5
IP Scanner
5-36
bizhub 350/250 (Phase 2.5)
ImageReceiver commands
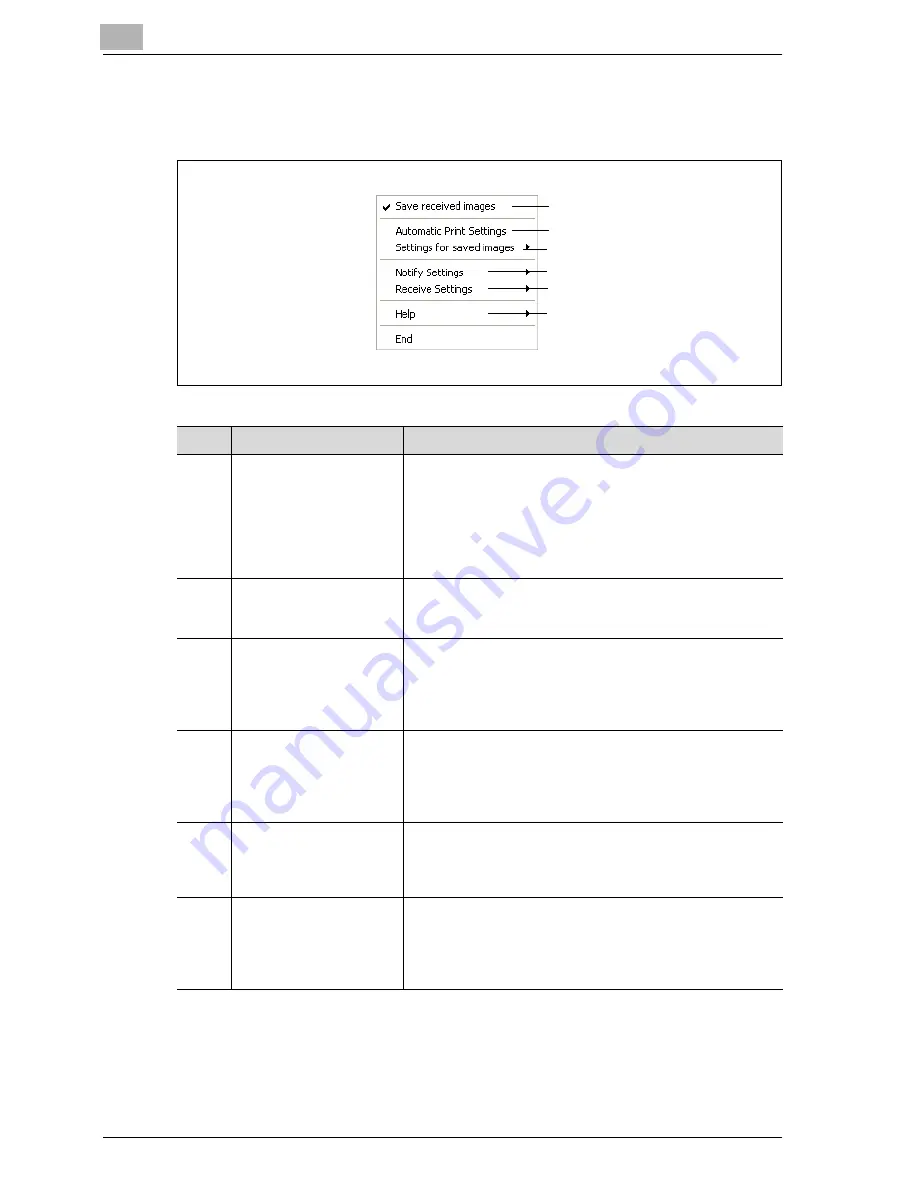
Right-click the icon in the taskbar to display a menu.
1
2
3, 4, 5
6, 7
8, 9
10
No.
Command
Description
1
Save received images
If there is a check mark beside this command, image data
is opened in ImageReceiver at the same time that it is re-
ceived, even if IP Scanner is not started.
When "Save received images" is clicked, a message ap-
pears, confirming whether or not the setting specified in IP
Scanner or ImageReceiver is to be taken over. To take over
the setting, click [Yes].
2
Automatic Print Settings
Click this command to display the Automatic Print Settings
dialog box. For details, refer to"Automatic Print Settings di-
alog box" on page 5-39.
3
"Settings for saved imag-
es"–"Image Folder Set-
ting"
Click this command to change the folder where the image
data is saved. This command is available only if there is a
check mark beside "Save received images".
A removable drive, CD-ROM drive or network drive cannot
be specified as the destination folder.
4
"Settings for saved imag-
es"–"Sort Settings"
Select this command to specify settings for sorting
scanned documents. This command is available only if
there is a check mark beside "Save received images". For
details, refer to "Sort Settings dialog box (Scanner tab)" on
page 5-24.
5
"Settings for saved imag-
es"–"Divided Settings"
Select this command to specify settings for dividing
scanned documents. This command is available only if
there is a check beside "Save received images". For de-
tails, refer to "Divided Settings dialog box" on page 5-28.
6
"Notify Settings"–"Re-
ceive Notify Settings"
Select this command to specify settings for computer noti-
fication for transmitting scanned documents. This com-
mand is available only if there is a check beside "Save
received images". For details, refer to "Receive Notify Set-
tings dialog box" on page 5-29.
Содержание SU-501
Страница 1: ......
Страница 2: ......
Страница 11: ...1 Introduction...
Страница 12: ......
Страница 25: ...2 Features...
Страница 26: ......
Страница 32: ...2 Features 2 8 bizhub 350 250 Phase 2 5...
Страница 33: ...3 IP address faxing...
Страница 34: ......
Страница 51: ...IP address faxing 3 bizhub 350 250 Phase 2 5 3 19 5 Touch Enter...
Страница 77: ...4 Scan to PC operations...
Страница 78: ......
Страница 114: ...4 Scan to PC operations 4 38 bizhub 350 250 Phase 2 5...
Страница 115: ...5 IP Scanner...
Страница 116: ......
Страница 126: ...5 IP Scanner 5 12 bizhub 350 250 Phase 2 5 5 Click Finish 6 Click Yes The certificate is installed...
Страница 172: ...5 IP Scanner 5 58 bizhub 350 250 Phase 2 5...
Страница 173: ...6 IP Relay operations...
Страница 174: ......
Страница 210: ...6 IP Relay operations 6 38 bizhub 350 250 Phase 2 5...
Страница 211: ...7 Specifying settings using PageScope Web Connection...
Страница 212: ......
Страница 245: ...8 Specifying management settings...
Страница 246: ......
Страница 278: ...8 Specifying management settings 8 34 bizhub 350 250 Phase 2 5...
Страница 279: ...9 Troubleshooting...
Страница 280: ......
Страница 294: ...9 Troubleshooting 9 16 bizhub 350 250 Phase 2 5...
Страница 295: ...10 Appendix...
Страница 296: ......
Страница 300: ...10 Appendix 10 6 bizhub 350 250 Phase 2 5 List of available characters Type Characters Alphanumeric characters symbols...


