background image

Disassembly/Inspection and Service

102

62 690 05 Rev. E

KohlerEngines.com

Remove Camshaft

Remove camshaft and shim (if used).

Inspection

Check lobes of camshaft for wear or damage. Inspect 

cam gear for badly worn, chipped, or missing teeth. 

Replacement of camshaft will be necessary if any of 

these conditions exist.

Remove Connecting Rods with Pistons and Rings

NOTE:  If a carbon ridge is present at top of either 

cylinder bore, use a ridge reamer tool to remove 

ridge before attempting to remove piston.

NOTE:  Cylinders are numbered on crankcase. Use 

numbers to mark each end cap, connecting rod 

and piston for reassembly. Do not mix end caps 

and connecting rods.

1.  Remove screws securing closest connecting rod end 

cap. Remove end cap.

2.  Carefully remove connecting rod and piston 

assembly from cylinder bore.

3.  Repeat above procedures for other connecting rod 

and piston assembly.

Connecting Rods

Off set, stepped-cap connecting rods are used in these 

engines.

Inspection and Service

Check bearing area (big end) for excessive wear, score 

marks, running and side clearances. Replace rod and 

cap if scored or excessively worn.
Service replacement connecting rods are available in 

STD crankpin size and 0.25 mm (0.010 in.) undersize. 

Always refer to appropriate parts information to ensure 

that correct replacements are used.

Piston and Rings
Inspection

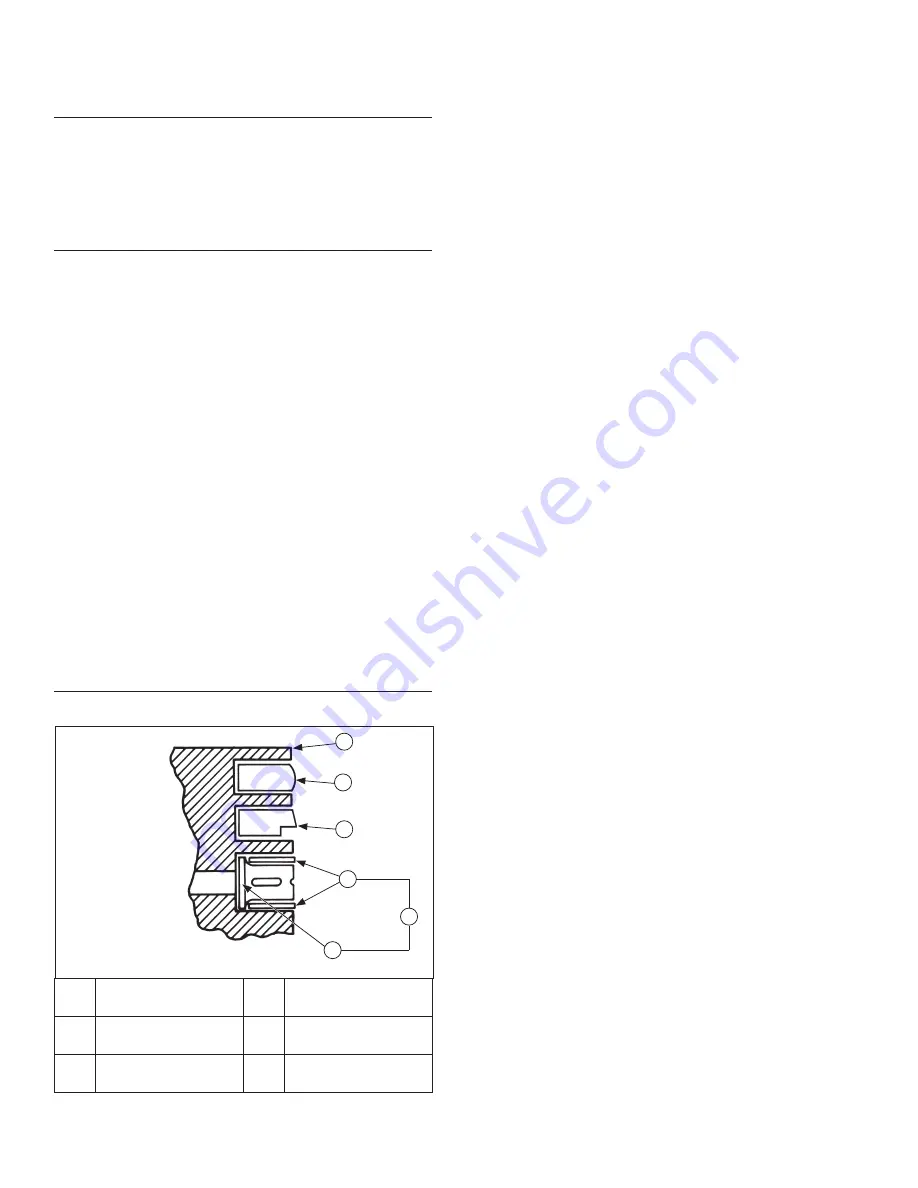
Piston and Rings Components and Details

A

Piston

B

Top Compression

Ring

C

Middle Compression 

Ring

D

Rails

E

Expander

F

Oil Control Ring

(3 Piece)

A

B

C

D

F

E

Scuffi  ng and scoring of pistons and cylinder walls occurs 

when internal engine temperatures approach welding 

point of piston. Temperatures high enough to do this are 

created by friction, which is usually attributed to improper 

lubrication and/or overheating of engine.
Normally, very little wear takes place in piston boss-

piston pin area. If original piston and connecting rod can 

be reused after new rings are installed, original pin can 

also be reused but new piston pin retainers are required. 

Piston pin is included as part of piston assembly – if pin 

boss in piston or pin are worn or damaged, a new piston 

assembly is required.
Ring failure is usually indicated by excessive oil 

consumption and blue exhaust smoke. When rings fail, 

oil is allowed to enter combustion chamber where it is 

burned along with fuel. High oil consumption can also 

occur when piston ring end gap is incorrect because 

ring cannot properly conform to cylinder wall under this 

condition. Oil control is also lost when ring gaps are not 

staggered during installation.
When cylinder temperatures get too high, lacquer and 

varnish collect on pistons causing rings to stick, which 

results in rapid wear. A worn ring usually takes on a 

shiny or bright appearance.
Scratches on rings and pistons are caused by abrasive 

material such as carbon, dirt, or pieces of hard metal.
Detonation damage occurs when a portion of fuel charge 

ignites spontaneously from heat and pressure shortly 

after ignition. This creates 2 fl ame fronts which meet and 

explode to create extreme hammering pressures on a 

specifi c area of piston. Detonation generally occurs from 

using low octane fuels.
Preignition or ignition of fuel charge before timed spark 

can cause damage similar to detonation. Preignition 

damage is often more severe than detonation damage. 

Preignition is caused by a hot spot in combustion 

chamber from sources such as glowing carbon deposits, 

blocked cooling fi ns, an improperly seated valve, or 

wrong spark plug(s).
Replacement pistons are available in STD bore size, and 

in 0.25 mm (0.010 in.), and 0.50 mm (0.020 in.) oversize. 

Replacement pistons include new piston ring sets and 

new piston pins.
Replacement ring sets are also available separately 

for STD, 0.25 mm (0.010 in.), and 0.50 mm (0.020 in.) 

oversize pistons. Always use new piston rings when 

installing pistons. Never reuse old rings.
Some important points to remember when servicing 

piston rings:
1.  Cylinder bore must be deglazed before service ring 

sets are used.

2.  If cylinder bore does not need reboring and if old 

piston is within wear limits and free of score or scuff  

marks, old piston may be reused.

3.  Remove old rings and clean up grooves. Never 

reuse old rings.

4.  Before installing new rings on piston, place top 2 

rings, each in turn, in its running area in cylinder 

bore and check end gap. Top and center 

compression ring end gap clearance is 0.30/0.55 

mm (0.011/0.021 in.) with maximum wear limit of 

0.94 mm (0.037 in.).

Содержание Command PRO EFI ECV940

Страница 1: ...this engine powers Ensure engine is stopped and level before performing any maintenance or service 62 690 05 Rev E 1 2 Safety 3 Maintenance 5 Speci cations 17 Tools and Aids 20 Troubleshooting 24 Air...

Страница 2: ...ct spark plug lead s 2 Disconnect negative battery cable from battery WARNING Hot Parts can cause severe burns Do not touch engine while operating or just after stopping Never operate engine with heat...

Страница 3: ...ded Lubrication System Remove cooling shrouds and clean cooling areas Air Cleaner Intake Every 150 Hours Check air cleaner element Air Cleaner Intake Replace unique Electronic Fuel Injection EFI fuel...

Страница 4: ...agent NOTE E15 E20 and E85 are NOT approved and should NOT be used e ects of old stale or contaminated fuel are not warrantable Fuel must meet these requirements Clean fresh unleaded gasoline Octane...

Страница 5: ...6 mm 3 92 in F 17 3 mm 0 68 in Spark Plug Lead G Cylinder 1 Shroud H 30 0 mm 1 18 in Cylinder 1 Shroud Removal I Oil Level Dipstick and Fill J Mounting Hole A K 89 8 mm 3 54 in Oil Filter L Centerline...

Страница 6: ...X 35 mm 1 38 in Mu er Gasket F 60 mm 2 36 in Exhaust Port 2 G M8 X 1 25 mm 4 Studs H 254 0 mm 10 0 in I M8 X 1 25 6H 25 mm 0 98 in Deep 7 Holes J Rotation Direction K 89 8 mm 3 54 in L Mounting Hole A...

Страница 7: ...1 38 in Mu er Gasket E 60 mm 2 36 in Exhaust Port 2 F M8 X 1 25 mm 4 Studs G 254 0 mm 10 0 in H 3 8 16 UNF 2B Inch 30 mm 1 18 in Deep 4 Holes I Rotation Direction J 89 8 mm 3 54 in K Mounting Hole A L...

Страница 8: ...Switch D Engine Mounting Surface E 80 2 mm 3 16 in F 6 4 mm 0 25 in Square Keyway G 7 16 20 UNF 2B Inch 38 1 mm 1 50 in Deep H 28 6 mm 1 13 in I Mounting Hole A J 156 2 mm 6 15 in Cylinder 1 Shroud Re...

Страница 9: ...to Oil Cooler D 156 2 mm 6 15 in Cylinder 2 Shroud Removal E Lifting Point F Fuel Filter Fits 6 4 mm 0 25 in Fuel Line G 70 5 mm 2 78 in Exhaust Port 2 H Mounting Hole A I 652 3 mm 25 68 in J Oil Dra...

Страница 10: ...re Sensors 7 3 N m 65 in lb Temperature Manifold Absolute Pressure TMAP Sensor Fastener Engines with Combined Sensor 7 3 N m 65 in lb GENERAL SPECIFICATIONS3 6 ECV940 ECV980 Bore 90 mm 3 54 in Stroke...

Страница 11: ...9 9 N m 88 in lb Front Drive Shaft Screw into ywheel 24 4 N m 216 in lb Flywheel Fan Fastener Screw Truss Head 10 4 N m 92 in lb Fan Fastener Screw Hex Head 9 9 N m 88 in lb Flywheel Retaining Screw...

Страница 12: ...20 in lb M6 Screw 9 9 N m 88 in lb M8 Screw 24 4 N m 216 in lb Oil Cooler Mounting Screw 2 3 N m 21 in lb Oil Filter Adapter Housing Mounting Screw 23 7 N m 210 in lb Oil Filter Nipple 17 8 N m 158 in...

Страница 13: ...sured from base circle to top of lobe Exhaust 35 mm 1 3779 in Intake 34 1 mm 1 3425 in 35 mm 1 3779 in Connecting Rod Crankpin End I D 70 F New Max Wear Limit 44 030 44 037 mm 1 7334 1 7337 in 0 070 m...

Страница 14: ...T I R PTO End Crank in Engine Entire Crank in V Blocks 0 279 mm 0 0110 in 0 10 mm 0 0039 in Flywheel End Main Bearing Journal O D New O D Max Wear Limit Max Taper Max Out of Round 44 978 45 00 mm 1 7...

Страница 15: ...5 0 0031 in Middle Compression Ring to Groove Side Clearance 0 04 0 08 mm 0 0015 0 0031 in Oil Control Ring to Groove Side Clearance 0 03 0 19 mm 0 0011 0 0074 in Top and Center Compression Ring End G...

Страница 16: ...English Fastener Torque Recommendations for Standard Applications Bolts Screws Nuts and Fasteners Assembled Into Cast Iron or Steel Grade 2 or 5 Fasteners Into Aluminum Size Grade 2 Grade 5 Grade 8 Ti...

Страница 17: ...Kohler required tools Components of 25 761 39 S Ignition System Tester Cylinder Leakdown Tester Oil Pressure Test Kit Recti er Regulator Tester 120 V AC 60Hz Kohler 25 761 39 S Kohler 25 455 01 S Koh...

Страница 18: ...ter 240 volt current For testing recti er regulators Components of 25 761 20 S and 25 761 41 S CS PRO Regulator Test Harness Special Regulator Test Harness with Diode Kohler 25 761 20 S Kohler 25 761...

Страница 19: ...ace is at 3 Find a 1 in long capscrew with correct thread size to match threads in connecting rod 4 Use a at washer with correct I D to slip on capscrew and approximately 1 in O D Assemble capscrew an...

Страница 20: ...en troubles occur be sure to check simple causes which at rst may seem too obvious to be considered For example a starting problem could be caused by an empty fuel tank Some general common causes of E...

Страница 21: ...r indications of improper t and seal Check air cleaner element Look for holes tears cracked or damaged sealing surfaces or other damage that could allow un ltered air into engine A dirty or clogged el...

Страница 22: ...losed 2 Start engine and run no load high speed 3 Open clamp and note water level in tube Level in engine side should be a minimum of 10 2 cm 4 in above level in open side If level in engine side is l...

Страница 23: ...aft Install a 3 8 in breaker bar into hole slot of holding tool so it is perpendicular to both holding tool and crankshaft PTO If ywheel end is more accessible use a breaker bar and socket on ywheel n...

Страница 24: ...l cause engine damage due to over heating Proper cooling is essential To prevent over heating clean screens cooling ns and other external surfaces of engine Avoid spraying water at wiring harness or a...

Страница 25: ...line into injectors which inject fuel into intake ports ECU controls amount of fuel by varying length of time that injectors are on This can range from 2 to over 12 milliseconds depending on fuel requ...

Страница 26: ...contacts enough to restore operation at least temporarily If a fault code indicates a problem with an electrical component disconnect ECU connector and test for continuity between component connector...

Страница 27: ...ated as O2 Sensor Safe Fuel injectors mount into intake manifold and high pressure fuel line attaches to them at top end Replaceable O rings on both ends of injector prevent external fuel leakage and...

Страница 28: ...g for fuel injectors throttle position sensor either a separate MAP sensor and an intake air temperature sensor or a TMAP sensor high pressure fuel line idle speed screw and air cleaner assembly Idle...

Страница 29: ...ors 11 MAP sensor or TMAP sensor input 12 Throttle Position Sensor TPS input 13 Crankshaft Position Sensor Ground 14 Oil Temperature Sensor input 15 Ignition Switch Switched 12V 16 Power for TPS senso...

Страница 30: ...ar all trouble codes all closed loop learned o sets all max values and all timers besides permanent hour meter This system will NOT reset when battery is disconnected ECU Reset Procedure 1 Turn key ig...

Страница 31: ...Fuse Q Battery R Fuel Pump S 6 Terminal Connector T Starter Motor U Oil Pressure Switch V MIL Optional W 10A Fuse X Black Connector Y Grey Connector Z Fuel Injector 1 AA Fuel Injector 2 AB Ignition C...

Страница 32: ...tch V MIL Optional W 10A Fuse X Black Connector Y Grey Connector Z Fuel Injector 1 AA Fuel Injector 2 AB Ignition Coil 1 AC Ignition Coil 2 AD Crankshaft Position Sensor AE Oxygen Sensor AF Throttle P...

Страница 33: ...Fuse X Black Connector Y Grey Connector Z Fuel Injector 1 AA Fuel Injector 2 AB Ignition Coil 1 AC Ignition Coil 2 AD Crankshaft Position Sensor AE Oxygen Sensor AF Throttle Position Sensor AG TMAP Se...

Страница 34: ...TPS Resistance Table Throttle Position Between Terminal Resistance Value Continuity Closed A C 1400 1800 Yes Full with Stop Pin A C 3200 4100 Yes Full without Stop Pin A C 4600 5200 Yes Any A B 3000...

Страница 35: ...e Measure voltage supply to sensor from ECU This voltage should be 5 00 0 20 volts This can be measured by gently probing terminals B C on harness side with TPS connector removed from TPS and key ON T...

Страница 36: ...to terminal 1 in sensor plug Continuity should be indicated Repeat test between Black pin 10 and terminal 2 in sensor plug Manifold Absolute Pressure Sensor MAP A sealed non serviceable assembly A fau...

Страница 37: ...ensor O2 Detail Pin D Pin C Pin B Pin A A B Pin A Purple Wire Heater Pin B White Wire Heater Pin C Black Wire Sensor Output Pin D Grey Wire Sensor Ground A 22 mm or 7 8 in Wrench Size B 18 mm x 1 5 Th...

Страница 38: ...ould lead to an incorrect signal because of repairs or contamination to sensor 1 With sensor connected and using diagnostic software start engine to observe O2 sensor activity Run engine at su cient s...

Страница 39: ...ire Wiring shorted to ground Replace sensor or replace and properly route wiring Upstream or downstream exhaust leaks observed Air leak at sensor Repair all exhaust leaks and torque sensor to 50 1 N m...

Страница 40: ...embly over an appropriate container to capture fuel and turn key switch ON to activate fuel pump and pressurize system Do not turn switch to START position NOTE Fuel pump module pins are coated with a...

Страница 41: ...17 Wiring and coil primary circuits are OK if readings are 0 5 0 8 2 If reading s are not within speci ed range check and clean connections and retest 3 If reading s are still not within speci ed rang...

Страница 42: ...assembly or purge port unless operating conditions indicate replacement is required All components are serviced individually Abrasion sleeves on hoses should be reused or replaced when servicing vent...

Страница 43: ...y engine temperature sensor Faulty injectors Engine Misses Hesitates or Stalls Under Load Fuel injector s fuel lter fuel line or fuel pick up dirty restricted Dirty air cleaner Insu cient fuel pressur...

Страница 44: ...Load Open Loop 0201 Injector 1 Circuit Malfunction 0202 Injector 2 Circuit Malfunction Function Test WARNING High Pressure Fluids can puncture skin and cause severe injury or death Do not work on fue...

Страница 45: ...to write down codes as they appear as they may not be in numerical sequence b Code 61 will always be last code displayed indicating end of code transmission If code 61 appears immediately no other fa...

Страница 46: ...oose damaged or corroded Pin circuit wiring or connectors at Black 10 11 and 16 Bad TPS Learn Code 0108 Component Manifold Absolute Pressure MAP or TMAP Sensor Fault MAP or TMAP Circuit High Voltage C...

Страница 47: ...Voltage or Open Condition Open connection broken wire or faulty sensor Conclusion TPS Related TPS bad or worn internally Engine Wiring Harness Related Broken or shorted wire in harness ECU Black pin...

Страница 48: ...nsed voltage and actual sensor voltage Short in wire harness Code 0171 Component Fuel System Fault Maximum adaptation limit exceeded Condition Fuel inlet screen lter plugged low pressure at high press...

Страница 49: ...rings valves Fuel in crankcase oil Fuel pump module is over lled Lift pump diaphragm is ruptured Code 0174 Component Fuel System Fault Lean fuel condition Condition Fuel inlet screen lter plugged low...

Страница 50: ...aft Position Sensor Wheel Related Damaged teeth Gap section not registering Engine Wiring Harness Related Pin circuit wiring or connectors ECU pin Black 4 and Black 13 ECU to harness connection proble...

Страница 51: ...oltage Fault System Voltage Low Condition Faulty voltage regulator bad fuse or shorted connection Conclusion Corroded Connections Bad Stator Bad Battery Low output charging system Poor magnet in ywhee...

Страница 52: ...FAULT CODE SUMMARY CLEAR CODES NO REFER TO DIAGNOSTIC AID 3 RUN ON OPERATE AT VARIOUS SPEED LOAD CONDITIONS ARE FAULT CODES PRESENT NO END OF TEST REFER TO DIAGNOSTIC AID 4 CRANKSHAFT POSITION SENSOR...

Страница 53: ...AFT POSITION SENSOR MIL does not turn o during cranking Condition Crankshaft position sensor Crankshaft position sensor circuit problem pin circuits Black 4 and Black 13 Crankshaft position sensor too...

Страница 54: ...movement See Adjustment Governor control unit GCU senses engine speed by pulse voltage inputs from EFI ECU module GCU regulates engine speed by variable input voltage from a customer supplied source N...

Страница 55: ...e a reasonable amount of pressure to do this If shaft will not move inward do not force it Remove clevis shaft and repeat previous step 6 Reinstall DLA into bracket torque screws to 7 3 N m 65 in lb a...

Страница 56: ...can be separated and tested for power and ground This design is easily identi ed by 2 screws that secure DLA actuator bracket See pages 58 64 for an engine with original design electronic governor Fie...

Страница 57: ...gn N New Sealed Bonded GCU Module Wiring Harness Assembly O 4 Pin GCU to Main Engine Harness P Speed Control Input New Updated Design features a sealed bonded GCU module wiring harness assembly that m...

Страница 58: ...nector Using a 12 volt meter test for voltage Turn key switch to ON position Voltage should be within 1 volt of battery voltage If voltage is within 1 volt of battery voltage harness is OK replace GCU...

Страница 59: ...GINAL DESIGN GCU Blink Codes for Software Stored Codes Activated when key is turned to ON position Failure Condition Possible Causes Response Response Time LED Diagnostics Yellow LED Green LED Speed E...

Страница 60: ...y ECU Faulty ECU wiring ON ON Missing Pulse RPM Too Low Faulty ECU Faulty ECU wiring OFF ON Sleep Mode Power at GCU with no ECU pulses left in run mode System shutdown 30 minutes OFF OFF Watchdog Inte...

Страница 61: ...r and replace as required No Start and or ungoverned speed below 1500 RPM Throttle fully closed No throttle movement While cranking GCU commands DLA to open to a predetermined position If no movement...

Страница 62: ...read 3 full turns or until you feel internal key touch Flat surface clevis should be in alignment with DLA mounting holes 7 Firmly push DLA to bottom 8 Connect clip 9 Connect wire Con rm that 1 Clevis...

Страница 63: ...ngine speed increases if it was at low speed Engine speed does not change Kohler electronic governor system tests OK Test control system of equipment Refer to Equipment Manufacturer s diagnostic proce...

Страница 64: ...2 Identify wire ends in connector Using a digital multi meter set to lowest scale 0 200 ohms place probes onto harness making sure of a good connection Resistance should be between 47 7 and 58 3 ohms...

Страница 65: ...nnection is a single wire red with yellow tracer FIELD INSTALLED UPDATED DESIGN GCU Harness Diagnostics and Troubleshooting This updated design was rst released as a eld installed kit with a sealed GC...

Страница 66: ...d Codes Activated when key is turned to ON position Failure Condition Possible Causes Response Response Time LED Diagnostics Yellow LED Green LED Speed Error BLINKS ON Watchdog Interrupt RFI interfere...

Страница 67: ...aulty ECU Faulty ECU wiring ON ON Missing Pulse RPM Too Low Faulty ECU Faulty ECU wiring OFF ON Sleep Mode Power at GCU with no ECU pulses left in run mode System shutdown 30 minutes OFF OFF Watchdog...

Страница 68: ...n Repair and replace as required No Start and or ungoverned speed below 1500 RPM Throttle fully closed No throttle movement While cranking GCU commands DLA to open to a predetermined position If no mo...

Страница 69: ...DLA 6 Thread 3 full turns or until you feel internal key touch Flat surface clevis should be in alignment with DLA mounting holes 7 Firmly push DLA to bottom 8 Connect clip 9 Connect wire Con rm that...

Страница 70: ...illustration on page 65 Attach open end of jumper wire to positive battery terminal See illustration on page 65 Engine speed increases if it was at low speed Engine speed does not change Kohler elect...

Страница 71: ...t DLA function can be tested and con rmed using a stepper motor controller tool Refer to Tools and Aids Testing instructions are included with tool Turn key switch to ON position Test supply voltage t...

Страница 72: ...N If no voltage is seen inspect 10 Amp system fuse 5 Relocate black negative DVOM lead to battery ground If no voltage is seen inspect and repair main engine wiring harness If battery voltage is seen...

Страница 73: ...vated when key is turned to ON position Failure Condition Possible Causes Response Response Time LED Diagnostics Yellow LED Green LED Speed Error BLINKS ON Watchdog Interrupt RFI interference Ground t...

Страница 74: ...ECU Faulty ECU wiring ON ON Missing Pulse RPM Too Low Faulty ECU Faulty ECU wiring OFF ON Sleep Mode Power at GCU with no ECU pulses left in run mode System shutdown 30 minutes OFF OFF Watchdog Interr...

Страница 75: ...Repair and replace as required No Start and or ungoverned speed below 1500 RPM Throttle fully closed No throttle movement While cranking GCU commands DLA to open to a predetermined position If no mov...

Страница 76: ...ace clevis should be in alignment with DLA mounting holes 7 Firmly push DLA to bottom 8 Connect clip 9 Connect wire Con rm that 1 Clevis shaft and boot in place 2 Clip attached 3 DLA wire attached Fai...

Страница 77: ...tion Input Voltage 0 1 Volts at Idle 9 Volts at High Speed Inspect wiring harness for broken wire or bad connections Repair Replace as required Test ground circuit to GCU Refer to page 72 Review GCU b...

Страница 78: ...2B Application Supplied Speed Control Input Operation Input Voltage 0 1 Volts at Idle 9 Volts at High Speed Device Ground Power Speed Signal ECU Speed Output speed signal DLA Driver Controls DLA ECU G...

Страница 79: ...is in FAST position tension of governor spring holds throttle plate open When engine is operating governor gear assembly is rotating Force applied by regulating pin against cross shaft tends to close...

Страница 80: ...Remove dipstick wipe oil o 2 Reinsert dipstick into tube rest cap on tube do not thread cap onto tube 3 Remove dipstick check oil level Level should be at top of indicator on dipstick 4 If oil is low...

Страница 81: ...try installation hole is sealed with a 1 8 27 N P T F pipe plug Installation 1 Apply pipe sealant with Te on Loctite PST 592 Thread Sealant or equivalent to threads of switch 2 Install switch into tap...

Страница 82: ...ement is necessary Recti er Regulator Recti er regulator is mounted on blower housing To replace disconnect plug s remove mounting screws and ground wire or metal grounding strap BATTERY A 12 volt bat...

Страница 83: ...erve volt reading on meter If voltage is 0 5 VDC or less continue with testing If voltage is higher than 0 5 VDC inspect and repair wiring connections as needed insu cient ground 3 Perform these outpu...

Страница 84: ...ixture problem or operating engine with too much choke Oil in combustion chamber is usually caused by a restricted air cleaner a breather problem worn piston rings or valve guides IGNITION SYSTEM Spar...

Страница 85: ...Safety System Active status in Data Display screen If yes is displayed equipment safety circuit is active seat switch PTO switch Safety interlocks etc This must be corrected prior to continuing testi...

Страница 86: ...ee EFI System Wiring Diagram If no continuity is found repair or replace electrical wiring harness If continuity is found refer to EFI System Ignition Coil Testing or exchange ignition coils side to s...

Страница 87: ...echarge or replace battery as necessary Wiring Clean corroded connections and tighten loose connections Replace wires in poor condition and with frayed or broken insulation Starter Switch or Solenoid...

Страница 88: ...to starter 3 Unhook plunger pin from drive lever Remove gasket from recess in housing 4 Remove thru larger bolts 5 Remove commutator end plate assembly containing brush holder brushes springs and loc...

Страница 89: ...own onto armature shaft with counter bore recess up b Install a new retainer in larger rear groove of armature shaft Squeeze with a pliers to compress it in groove c Slide stop collar up and lock it i...

Страница 90: ...ect all leads from solenoid including positive brush lead attached to lower stud terminal Remove mounting hardware and separate solenoid from starter for testing To test solenoid pull in coil plunger...

Страница 91: ...ground spark plug lead s before servicing External Engine Components M B S Q A B D P F D L J R C O N S I H G E F K T S S R A Dipstick B Oil Drain Plug C Oil Fill Tube D Valley Ba e E Spark Plug Lead F...

Страница 92: ...ove mounting screws from 1 barrel ba e Disconnect wiring harness from coil 1 starter side Let barrel ba e hang with coil installed 2 Carefully remove clip securing wires to 1 valley ba e Remove 3 scre...

Страница 93: ...J Recti er Regulator Connector K MAP or TMAP Sensor Connector L Ground Lead M Breather Hose N Oil SentryTM O Oil Temperature Sensor P Reducer Bushing Q Debris Screen Style B R Support Ring Style B S S...

Страница 94: ...ged 1 Use a ywheel strap wrench or holding tool to hold ywheel and loosen screw securing ywheel to crankshaft 2 Remove screw and washer 3 Use a puller to remove ywheel from crankshaft 4 Remove woodru...

Страница 95: ...O Ring NOTE Further disassembly of oil lter housing assembly is not required unless being serviced individually Follow substeps a b and c 1 Remove screw securing oil lter housing and individual O ring...

Страница 96: ...er Head D Pipe Plug E Guide Plate F Spacer G Washer H Spark Plug I Valve Stem Seal J Valve Spring K Valve Spring Retainer L Hydraulic Lifter M Valve Spring Keeper N Push Rod O Rocker Arm P Rocker Arm...

Страница 97: ...3 Remove screws securing each cylinder head Note locations of washers and spacer 4 Mark position of push rods as either intake or exhaust and cylinder 1 or 2 Push rods should always be reinstalled in...

Страница 98: ...and stems with a power wire brush Then carefully inspect each valve for defects such as a warped head excessive corrosion or a worn stem end Replace valves found to be in bad condition Valve Guides I...

Страница 99: ...half of full 89 angle will achieve desired 0 5 1 0 full cut interference angle where maximum pressure occurs on outside diameters of valve face and seat Lapping Valves Reground or new valves must be l...

Страница 100: ...lem with relief valve is encountered oil pump should be replaced Inspection Inspect oil pump housing gerotor gears and oil pan recess for nicks burrs wear or any visible damage Inspect inlet seal for...

Страница 101: ...H O M M L N K J I A G F H E C D B P A Camshaft B Locking Tab C Regulating Pin D Governor Gear E Cross Shaft F Lifter Feed Gasket Cover G Lifter Feed Cover H Governor Yoke I Crankshaft J Connecting Rod...

Страница 102: ...y is required Ring failure is usually indicated by excessive oil consumption and blue exhaust smoke When rings fail oil is allowed to enter combustion chamber where it is burned along with fuel High o...

Страница 103: ...nd visually check to ensure that llet blends smoothly with crankpin surface Carefully pull crankshaft from crankcase Note thrust washers and shims if used Inspection and Service Crankshaft Components...

Страница 104: ...r if any teeth are missing Inspect governor weights They should move freely in governor gear Remove Governor Yoke Cross Shaft and Seal Mechanical Governor Only 1 Remove mounting screws securing yoke t...

Страница 105: ...honing is very critical to a successful overhaul Machining grit left in cylinder bore can destroy an engine in less than 1 hour of operation after a rebuild Final cleaning operation should always be...

Страница 106: ...ttle body 4 Remove 3 screws securing GCU bracket 5 Disconnect link clip from outboard end of DLA remove spring and linkage 6 Carefully lift and move air cleaner brackets ECU GCU up on front section of...

Страница 107: ...arily to access and replace throttle body 11 On earlier engines with separate intake air temperature IAT and MAP sensors disconnect IAT sensor from throttle body 12 Disconnect breather tube from throt...

Страница 108: ...wn Bracket Remove Sealed Bonded GCU Module Wiring Harness Assembly FIELD INSTALLED UPDATED DESIGN Electronic Governor 1 Remove screws securing sealed bonded GCU module wiring harness assembly to GCU b...

Страница 109: ...ect IAT sensor from throttle body 11 Disconnect breather tube from throttle body 12 Disconnect throttle position sensor connector 13 Disconnect vent hose from bottom of throttle body 14 Slide throttle...

Страница 110: ...y 4 Unhook idle and governor springs from control bracket and governor lever Note location and position of each 5 Disconnect throttle linkage and linkage spring from governor lever Note location and p...

Страница 111: ...fuel injector cap There may be some fuel left in line Any spilled fuel must be cleaned up immediately 4 Reverse procedure to install Torque fuel injector cap screws to 7 3 N m 65 in lb Remove Manifol...

Страница 112: ...K J I A G F H E C D B P A Camshaft B Locking Tab C Regulating Pin D Governor Gear E Cross Shaft F Lifter Feed Gasket Cover G Lifter Feed Cover H Governor Yoke I Crankshaft J Connecting Rod End Cap K C...

Страница 113: ...ll amount of grease to locking tab thrust washer and install on top of governor gear so tang is facing up in 6 o clock position NOTE Make sure engine is assembled using all speci ed torque values torq...

Страница 114: ...s to 11 6 N m 103 in lb Align chamfer of connecting rod with chamfer of its mating end cap When installed at faces of connecting rods should face each other Faces with raised rib should be toward outs...

Страница 115: ...bly N Oil Seal O Crankshaft Non Thrust Bearing PTO P Check Ball Kit Q Breather Fastener Torque Sequence Install Oil Pan Seal and Crankshaft Bearing PTO If bearing was removed in servicing install a ne...

Страница 116: ...gasket onto crankcase 3 Make sure oil pump and oil pick up are installed in oil pan 4 Ensure end of locking tab washer on governor gear is positioned outward in 6 o clock position inside crankcase 5...

Страница 117: ...pe Plug E Guide Plate F Spacer G Washer H Spark Plug I Valve Stem Seal J Valve Spring K Valve Spring Retainer L Hydraulic Lifter M Valve Spring Keeper N Push Rod O Rocker Arm P Rocker Arm Pivots Q Roc...

Страница 118: ...s Prior to installation lubricate all components with engine oil paying particular attention to lip of valve stem seal valve stems and valve guides Install in order listed below using a valve spring c...

Страница 119: ...al compressions may be necessary Hold in this position for step 3b b Insert a 0 406 0 483 mm 0 016 0 019 in feeler gauge between end of one valve and rocker arm Turn adjuster until a slight drag is fe...

Страница 120: ...hole in cup until properly seated 2 Install larger spring into lter housing 3 Insert oil lter cup aligning cutout with corresponding section in housing 4 Install nipple in housing and torque to 17 8 N...

Страница 121: ...creen Style A C Sti ener Style A D Flywheel Screw E Washer F Flywheel Fan Hex Stud Assembly Style A G Backing Shroud Intake Manifold Air Cleaner H Crankshaft Position Sensor I Stator J Recti er Regula...

Страница 122: ...sened expanded several times to avoid leakage 1 Connect hoses between oil lter adapter and oil cooler Secure with new clamps 2 Align oil cooler with bosses in backing shroud assembly Secure with screw...

Страница 123: ...pply a small amount of Loctite 243 Threadlocker to external threaded section unless new parts with preapplied locking compound are being used Thread debris screen hex studs into mounting holes in ywhe...

Страница 124: ...rain Plug C Oil Fill Tube D Valley Ba e E Spark Plug Lead F Barrel Ba e G Starter Assembly H Ignition Coil I Fuel Pump Module Ba e J Fuel Filter K Fuel Pump Module L Fuel Pump M Electrical Connector N...

Страница 125: ...s 1 Align oil cooler with bosses in backing shroud assembly Torque screws to 2 3 N m 21 in lb Install Fuel Pump Module Fuel Pump Assembly NOTE Ensure all parts are clean undamaged and free of debris m...

Страница 126: ...to 7 1 N m 63 in lb 4 Connect governor spring with long looped end to inner hole on governor lever and control bracket Connect governed idle spring to outer governor lever hole and control bracket Ma...

Страница 127: ...brication System sections 4 Turn on fuel supply Testing Engine It is recommended engine be operated on a test stand or bench prior to installation in equipment 1 Set engine up on a test stand Install...

Страница 128: ...KohlerEngines com 62 690 05 Rev E 128 2018 by Kohler Co All rights reserved 8 85612 22194 0 1P62 690 05...

Отзывы: