27
www.klindex.com - Made in Italy
STARTING AND STOPPING
9 Starting and stopping
9.1 Before starting the appliance
l
WARNINGS
– Before using the appliance, carefully
read this manual and make sure that
you have understood every section.
– Always use appropriate PPE as de-
scribed in section "
on page28.
– Ensure that the work area is free of ob-
jects and/or people that could hinder
the normal appliance operating process
and would expose them to the risk of
serious injury.
– Never leave the appliance unattended
during use.
Before starting the appliance, carry out the checks de-
scribed below:
– check that the appliance is assembled correctly and
there is no sign of any damage or malfunctions, see
– move the appliance to the work area using one of
the methods described in the section "
the site/work area" on page 20
– only now can the caster wheel be removed as de-
scribed in the section "
– check that the wheels are secured to the drive
mechanism of the appliance as described in section
Wheel drive locking system" on page 27
– connect the appliance to the mains power network
as indicated in the section "
9.2 Starting the appliance using the
radio control
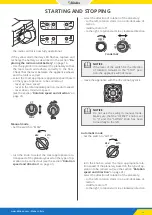
To start and control the appliance using the radio con-
trol, act as follows:
– check that the radio transmitter is connected to the
appliance control plug and that the battery in the
radio control is in place and fully charged
Error B
Stop B
Error A
Stop A
RF Busy
Power
Working
– release the radio control emergency button turning
it to the right
STOP
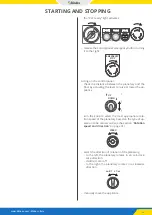
– select "Grinding" by setting the main dial on the
electric panel to position "2", the "Grinding power
OK" light activates. If the "Grinding power OK" light
does not activate, check the electrical power supply
and check the relative phases
– release the emergency button of the electric panel
by turning it to the right
– the "PLC ready" light activates
GRINDING
POWER OK
PLC
READY
OFF
2
1
TRANSPORT
MODE
OK
LOW
Acting on the radio control:
– press the reset button once. The green TX LED im-
mediately starts to flash. The yellow battery/alarm
LED flashes just once. After a few seconds the blue
RX LED starts to flash
– the white Busy RF LED on the radio control receiver
starts to flash
– press the reset button a second time after the blue
RX LED has started flashing. The green TX LED stops
flashing and stays fixed on. The yellow LED stays off.
The blue RX LED stops flashing and stays fixed on
– the white Busy RF LED on the radio control receiver
stops flashing and stays fixed on, the red Stop LEDs
turn green and the Working LED activates

