background image

25

www.klindex.com - Made in Italy

OPERATION

Summary of diamond principles

To obtain the necessary production levels, the dia-

mond segments must always have a certain degree 

of wear. Diamond segment wear can be affected by 

the following:

– pressure

– hardness of the bonding agent

– size of the diamond grain

– presence of any water

– number of segments below the appliance

– wear can be increased by adding an additional abra-

sive to the floor, for example, sand, silicone carbide.

Generally, speed of segment wear increases as pro-

duction speed increases. If these factors change, 

modifications can be made in order to influence the 

following:

– scratch pattern

– current consumption of the appliance

– evenness of the floor

– ease of operation.

l

NOTICE

– To obtain even and correct wear of

the diamonds, it is recommended that

every 50 m

2

 of worked surface, the tools

are removed and are rotated by 120°

changing the fastening position on the

planetary as shown in the figure.

– To keep the diamonds sharp, it is rec-

ommended that rotation of the plane-

tary is inverted frequently during grind-

ing operations.

120°

A

C

B

8.4  Types of tool holders

After having selected the appropriate tool for the 

floor,  the  type  of  tool  holder  can  be  selected  which 

will be fitted to the appliance.

The tool holders which can be fitted to the appliance 

are indicated below.

Code

Description

PL6904

Pad holder 240 QUICK 

ATTACK

PD1601

Pad holder for Pavelux 

and resinoids 240 QUICK 

ATTACK

UT43401

Pad holder 240 QUICK 

ATTACK for brushes 240 

and brush spikes 200

UT44201

Adapter for old crown 

wheel tools 240 QUICK 

ATTACK

PD05803

Velcro pad holder 240 

QUICK ATTACK

PL28001

Pad holder for trapezoids 

240 QUICK ATTACK

UT010301 Bush hammer 240 QUICK 

ATTACK

UT025402 READY COOL

Содержание EXPANDER 2000 RX

Страница 1: ...ALIST SINCE 1988 INSTRUCTIONS FOR INSTALLATION USE AND MAINTENANCE Before installing and using the appliance read this manual carefully and store it together with the product Remote control planetary...

Страница 2: ...d or materials a WARNING This indicates operations which if not performed correctly may cause general injury or may generate malfunctions or damage to the appliance and or materi als therefore they re...

Страница 3: ...plete and in tact If this is not the case contact the distributor that sold that the appliance l WARNINGS Run a functional check on the appliance and inform the product supplier of any faults or malfu...

Страница 4: ...legible and in good condition Where not easily legible or in poor con dition request a duplicate from the re tailer that sold you the appliance Using the appliance as a drive mecha nism Using the app...

Страница 5: ...ools taking care not to damage the ap pliance d NO Disposing of the packaging material irre sponsibly or leaving it within the reach of children as it is may be a potential haz ard It must be disposed...

Страница 6: ...ontrol or on the con trol panel 30 The appliance can now be moved either manually or using the radio control to move it manually release the 4 bolts on both wheels by pulling and twisting the pin 1 Pu...

Страница 7: ...hich the manufacturer is no longer in any way liable Products without an ID plate must be considered anonymous and potentially hazardous x x x x 2 4 Checking the supply When you receive the appliance...

Страница 8: ...k This patented planetary with gears in tempered steel and with working section which var ies based on the model The main characteristics are servo assisted mechanism to adjust the operating pressure...

Страница 9: ...ady green light 3 Grinding power OK white light 4 Battery level indicator Transport mode light 5 Lock 6 Hour meter 7 Emergency button 8 Inverter window 9 Radio control compartment 10 Display 11 Fan no...

Страница 10: ...clockwise stop 9 Emergency OFF button 10 Three position dial to set the appliance speed range 11 Manual automatic operating mode dial 12 Reset ON button 13 Battery LED panel ON TX RX W W 1 3 2 1 TX t...

Страница 11: ...wer Working 1 2 3 4 5 6 7 LED panel 1 Error B LED red 2 Stop B LED red green RED receiver off GREEN receiver on 1 Error A LED red 2 Stop A LED red green RED receiver off GREEN receiver on 3 RF Busy LE...

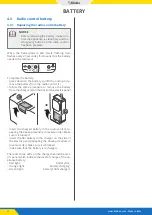
Страница 12: ...tion manoeuvres in the working area For all grinding work the product must be connected to an electrical pow er supply see section Connecting to the power socket on page 24 The battery lasts for a max...

Страница 13: ...move the battery from the radio control 1 follow the same procedure to remove the battery from the charger 2 on the back of the electric panel 2 1 insert the charged battery in the radio control re p...

Страница 14: ...needed for transporting the appliance and lightening the contact pressure of the appliance in some applications Assembly and dis mantling is easy simply loosen or tighten the lever 2 l NOTICE To disas...

Страница 15: ...1 to the appliance control plug 2 follow the instructions below make sure that the hooks 3 on the connector are open angle the plug on the electrical cable so that it lines up with the pins on the con...

Страница 16: ...s using the appliance battery energy supply The ap pliance has up to 1 5 hours of autonomy if moved using just the battery power supply see the section Appliance battery on page 15 with the appliance...

Страница 17: ...ng on the radio control release the radio control emergency button press the reset button once The green TX LED im mediately starts to flash The yellow battery alarm LED flashes just once After a few...

Страница 18: ...e appliance connected to the mains power supply make sure that once the direction of rotation has been selected the planetary begins to turn If the appliance is powered by the battery the planetary re...

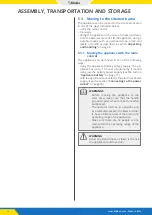
Страница 19: ...ed from possi ble knocks and sheltered from dust and dirt Make sure that the selected location is locked with a key and is out of the reach of children and unauthorised per sons If the appliance is to...

Страница 20: ...50 m 165 ft d NO Cutting or altering the plug and using adapters Only a qualified and authorised electrician can replace the plug if neces sary Only a qualified electrician can re place a burned cut o...

Страница 21: ...ency button The emergency stop button is used to stop appliance operation in the event of a hazard or malfunction without the operator having to switch the appliance off It is located on the electric...

Страница 22: ...activate OFF 2 1 a WARNING The appliance is in operation during the emergency button check Pay careful at tention Button on the electric panel Press the emergency button on the electric panel and che...

Страница 23: ...ntral position and then to the left or the right depending on the required direction of rotation 7 4 Main dial To check operation of the main dial act as follows check that none of the emergency butto...

Страница 24: ...inishes or residues for exam ple epoxy finish adhesives and glue for tiles etc When grinding a surface for the first time and there are any doubts regarding the hardness it is always recommended that...

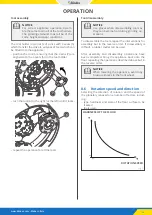
Страница 25: ...f the diamonds it is recommended that every 50 m2 of worked surface the tools are removed and are rotated by 120 changing the fastening position on the planetary as shown in the figure To keep the dia...

Страница 26: ...Tool disassembly l NOTICE Use gloves when disassembling tools as they can become hot during grinding op erations To disassemble the tools repeat the interventions for assembly but in the reverse order...

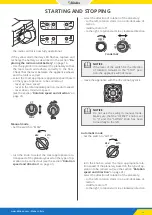
Страница 27: ...n page 24 9 2 Starting the appliance using the radio control To start and control the appliance using the radio con trol act as follows check that the radio transmitter is connected to the appliance c...

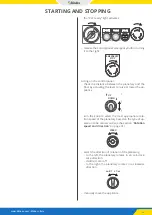
Страница 28: ...e type of op eration to be carried out see the section Rotation speed and direction on page 31 select the direction of rotation of the planetary to the left rotation starts in an anti clockwise di rec...

Страница 29: ...ion or increase the swing turn the SWING knob to the left to deactivate the function or decrease the swing SWING The swing radius increases as the appliance speed in creases SWING DX SWING SX If the r...

Страница 30: ...he floor by actuating the lever to raise or lower the ap pliance UP DOWN POWER ON turn the knob to select the most appropriate rota tion speed of the planetary based on the type of op eration to be ca...

Страница 31: ...ce act as described below set the dial for selecting the direction of rotation of the planetary to the neutral position middle RT LT to switch the appliance off act on the main dial on the electrical...

Страница 32: ...ck warning labels Weekly Check planetary fastening to the frame Weekly Check bolt tightening Weekly Check flexible joints Weekly Check splash guard Weekly Grease planetary arm After the first 50 opera...

Страница 33: ...imilar prod ucts to clean the planetary gear and its planets Use a sponge with water and detergent to clean the planetary and the planets 10 7 Greasing For greasing operations only use the lubricant i...

Страница 34: ...e operations listed and described in this chapter are carried out clean the outside of the appliance clean the electric panel filter clean the planetary and planets check the splash guard and replace...

Страница 35: ...4 LO RE light It activates when the local actuation control is active 5 LO RE key To switch actuation control between the oper ator LOCAL and the control circuit terminals REMOTE NOTE the LOCAL REMOT...

Страница 36: ...r U2 01 press the key followed by key to move to parameter U3 01 press the key followed by key to scroll through the parameters from U3 01 to U3 05 press the key to display the information re lating t...

Страница 37: ...just touch the ground Check operation of the cooling fans Driver overload Heatsink Overheat Undervoltage Appliance disconnected from the power network This message appears a few moments after the appl...

Страница 38: ...85 859 800 859 546 FAX 39 085 8599224 customercare klindex it Return the appliance to the Klindex support centre The transportation costs are borne by the purchaser and must be paid in advance cash on...

Страница 39: ...ols must be destroyed to pre vent them from being collected as waste and reused 14 2 Disposal at the end of product life The appliance is made up of different types of materials including metal and pl...

Страница 40: ...P2000 HG132302Antenna cavo tubo EXP 2000 1 22 1 23 1 24 HG135101Testata completa exp 750 rinforzata_mir RD0822 Testata completa exp 750 rinforzata HG135201Testata 750 per EXP2000 d 240 kW15 1 25 MOT18...

Страница 41: ...laio exp100 2 12 13 4 14 Vite TSEI M10x80 UNI 5933 4 Dado M10 DIN 985 autobloccante Ingrassatore TSD M6 UNI7663 A 2 15 HG1068101 AQacco cilindro C 298 1 16 11 17 Vite TE M10x50 UNI5739 zincata Dado M1...

Страница 42: ...1 2 3 1 4 5 RoseQa M12 UNI 6592 1 Vite TCEI M12x25 UNI5931 zincata Vite UNI 5931 M10x55 1 Dado M10 DIN 985 autobloccante 1 Sostegno ruote cpl sx Cod TE021302 N Codice Descrizione Pz 1 2 TE55602 Soste...

Страница 43: ...Vite TSEI M8x15 UNI5933 6 VITE TCEI M8x18 UNI59312 Telaio porta azionamento Cod TE014204 N Codice Titolo Pz 1 3 TE43403 TE56201 Roll bar1 Maniglione 1 Serbatoio olio Cod SE3901 N Codice Titolo Pz 1 2...

Страница 44: ...PARE PARTS Supporto quadro exp2000 Cod HG133501 N Descrizione Codice Pz 1 HG1066101 Supporto quadro EXP2000 1 2 MAN046 AnOvibrante D 40 H 30 M 8 8 3 RroseQa M8 UNI 6592 8 4 Dado autobloccante M8 DIN 9...

Страница 45: ...le 1 TE28301 Supporto molla 2 Perno d 28 x 41 6 14 15 19 25 HG1063302 HG1062502 4032 Distanziale3 Malla gomma 6 N Codice Descrizione Pz 26 TE55701 Sostegno ruote sso 1 27 TE55801 28 Piastra di ispezio...

Страница 46: ...D13820Molla interna 3 TE08301 Perno carrello 1 ANELLO UNI 7435 20 4 TE12202 Boccola 3 D13950Molla esterna 3 9 Grano M5x8 UNI 5927 Grano M5x8 UNI 5927 10 3 HG1072501 Blocco necorsa molle Exp2000 1 Peda...

Страница 47: ...85 4 10 TE20204 Albero trazione 1 11 TE20101 Albero cavo 1 13 TE20302 Anello Flangia 1 14 15 16 RoseQa M12 UNI 6592 4 Vite TE M12x25 UNI5739 4 ANELLO UNI 7435 50 1 Antenna cavo Exp 2000 Cod HG136302 N...

Страница 48: ...anetario exp 750 rinforzato 3 1 HG134501 Protezione centrale EXP 2000 1 5 HG126502 Portautensili 240 QA Ready Look EXP 3 Testata 750 per Exp 2000 d 240 15kW dx Cod HG135101 N 1 2 Codice Descrizione Pz...

Страница 49: ...15kW sx Cod RD0822 Carter EXP2000centrale Cod HG134501 N 1 Codice Descrizione HG1012801 Pz Protezione esterna destra 750 top 1 2 HG1068001 Protezion esterna sinistra centrale EXP2000 1 3 MAN192 Occhi...

Страница 50: ...2801 Pz Protezione esterna destra 750 top 1 2 HG1012902 Protezione eterna sinistra 750 top 1 3 MAN192 Occhiello M5 3 4 Dado esagonale UNI5588 M5 3 Fascia paraschizziexp 750 cpl Cod HG111501 Codice Des...

Страница 51: ...na Valeria km 209 200 65024 Manoppello PE Italy to which this declaration refers complies with the following directives Machinery Directive 2006 42 EC and subsequent modifications Low Voltage Directiv...

Страница 52: ...ance serial no Customer Address City County Postcode Tax ID no VAT no Telephone no Mobile no E mail Please place an order for the following materials Code Quantity Description NOTE Given that the code...

Страница 53: ...air replacement under warranty 8 Return for credit note Please return the goods with the relevant transport document to be credited addressed to Klindex s r l SS 5 Tiburtina Valeria km209 200 65024 Ma...

Страница 54: ...54 www klindex com Made in Italy TECHNICAL NOTES 19 Technical notes Date Operator Type of intervention...

Страница 55: ...55 www klindex com Made in Italy GENERAL NOTES 20 General notes Date Description...

Страница 56: ...ello PE Italy Tel 39 085 859 546 Fax 39 085 8599 224 www klindex com info klindex it Klindex S r l reserves the right to change its products at any time without pri or notice with the aim of improving...

Отзывы: