Kity TAB660 Скачать руководство пользователя страница 11

english 9

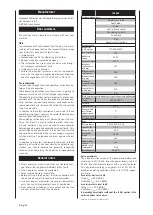
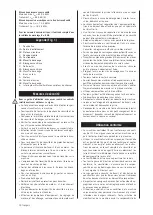
Controls and features (Fig. 1.1)

1.  Headstock
1A.  Driver
1B. Face plate
2.  Tailstock
2A.  Tailstock tip
2B. Clamping handle
2C.  Eccentric release handle
3.  Tool rest
3A.  Eccentric clamping
3B. Clamping handle
4.  Drilling bed
5.  Motor
5A.  Lever
5B. Clamping handle
6.  On/off switch

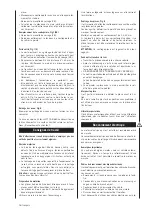
General Safety Notes

In  these  operating  instructions  we  have  marked  the  places 
that have to do with your safety with this sign.

•  Please pass on safety notes and instructions to all those 

who work on the machine.

•  Comply with all safety instructions and warnings on the 

machine.

•  Keep  all  safety  instructions  and  warnings  on  the  ma-

chine fully legible.

•  Check  all  power  supply  lines.  Do  not  use  defective 

lines.

•  Make  sure  that  the  machine  stands  stable  on  firm 

ground.

•  Caution  when  working:  There  is  a  danger  to  fingers, 

hands and eyes.

•  Keep  children  away  from  the  machine  when  it  is  con-

nected to the power supply.

•  When  working  on  the  machine,  all  safety  mechanisms 

and covers must be mounted.

•  Operating  personal  must  be  at  least  18  years  of  age. 

Trainees must be at least 16 years of age, but may only 
operate the machine under adult supervision.

•  Persons  working  on  the  machine  may  not  be  diverted 

from their work.

•  The working space on the machine must be free of chips 

and wood scrap.

•  Wear only close-fitting clothes. Remove rings, bracelets 

and other jewelry.

•  For the safety of long hair, wear a cap or hair net.
•  Do not wear gloves.
•  Wear goggles when working.
•  Note the motor rotational direction – see electrical con-

nection.

•  The safety mechanisms on the machine may not be re-

moved or rendered unusable.

•  Cleaning, changing, calibrating, and setting of the ma-

chine may only be carried out when the motor is switched 
off. Pull the power supply plug and wait for the rotating 
tool to completely stop.

•  Switch the machine off and pull power supply plug when 

rectifying any malfunctions.

•  Connection and repair work on the electrical installation 

may be carried out by a qualified electrician only.

•  All protection and safety devices must be replaced after 

completing repair and maintenance procedures.

•  Place the tool support as tightly as possible against the 

work piece.

•  The  peripheral  speed  of  wooden  workpieces  must  not 

exceed 30 m/s. Note spindle speed diagram!

•  Provide work pieces with center bores before clamping 

between pivots.

•  Work  large  and  imbalanced  work  pieces  at  a  reduced 

rotational speed; it may be necessary beforehand to cut 
accordingly with a band saw.

•  Before switching on the machine, check that the work-

piece is securely clamped.

•  Remove  the  chuck  key  or  spring  dowel  sleeve  before 

turning the machine on.

•  Always close the belt cover.
•  Work with three- or four-jaw chucks may only be carried 

out with mounted jaw chuck shield.

•  Never  stop  work  pieces  with  the  hand  during  run  out. 

Never take measurements on a rotating work piece.

•  Work only with well sharpened tools.
•  Always use both hands when using turning tool.
•  Nicked tools may not be used.
•  Note the correct rotational setting on the machine.
•  When leaving the work place, switch the motor off. Pull 

the power supply plug.

•  Unplug the machine before moving, even if only slightly. 

Correctly connect the machine to the electrical source 
before operating again.

Proper use

•  CE tested machines meet all valid EC machine guidelines 

as well as all relevent guidelines for each machine.

•  The machine must only be used in technically perfect 

condition in accordance with its designated use and the 
instructions set out in the operating manual, and only 
by safety-conscious persons who are fully aware of the 
risks  involved  in  oerating  the  machine.  Any  functional 
disorders,  especially  those  affecting  the  safety  of  the 
machine, sholud terefore be rectified immediately.

•  The „scheppach wood turner“ has been constructed ex-

clusively for use with wood.

•  Any other use exceeds authorization. The manufacturer 

is not responsible for any damages resulting from unau-
thorized use; risk is the sole responsibility of the opera-
tor.

•  The  safety,  work  and  maintenance  instructions  of  the 

manufacturer as well as the technical data given in the 
calibrations and dimensions must be adhered to.

•  Relevant accident prevention regulations and other, gen-

erally recognized safety-technical rules must also be ad-
hered to.

•  The machine may only be used, maintained, and operat-

ed by persons familiar with it and instructed in its opera-
tion and procedures. Arbitrary alterations to the machine 
release the manufacturer from all responsibility for any 
resulting damages.

•  The machine may only be used with original accessories 

and  tools made by the manufacturer.

Remaining hazards

The machine has been built using modern technology in ac-
cordance with recognized safety rules. Some remaining haz-
ards, however, may still exist.

•  Only  process  selected  woods  without  defects  such  as: 

Branch  knots,  edge  cracks,  surface  cracks.  Wood  with 
such defects is prone to splintering and can be hazard-
ous.

Содержание TAB660

Страница 1: ...TAB660 Drechselbank Übersetzung aus Originalanleitung Wood turn lathe Translation from original manual Tour à bois Notice originale 07 2009 10 0660 116 230V 50Hz ...

Страница 2: ...2 international ...

Страница 3: ...international 3 Fig 1 ...

Страница 4: ...4 international ...

Страница 5: ...Gefahren unterrichtet sind Das geforderte Mindestal ter ist einzuhalten Allgemeine Hinweise Überprüfen Sie nach dem Auspacken alle Teile auf even tuelle Transportschäden Bei Beanstandungen muss so fort der Zubringer verständigt werden Spätere Reklama tionen werden nicht anerkannt Überprüfen Sie die Sendung auf Vollständigkeit Machen Sie sich vor dem Einsatz anhand der Bedie nungsanweisung mit dem ...

Страница 6: ...0 m s betragen Spindeldrehzahlschaubild beachten Werkstücke vor dem Spannen zwischen Spitzen beidsei tig mit Zentrierbohrung versehen Groß und unwuchtige Werkstücke nur mit kleiner Dreh zahl bearbeiten und evtl vorher auf der Bandsäge ent sprechend beschneiden Rissige Werkstücke dürfen nicht verwendet werden Vor dem Einschalten der Maschine ist die sichere Ein spannung des Werkstückes zu überprüfe...

Страница 7: ...hleinstellung Niedrige Drehzahl für Werkstücke mit großem Durchmesser Harte Werkstücke mit großem Durchmesser Lange unwuchtige Werkstücke Verleimte Hölzer Drehzahleinstellung Fig 2 3 Deckel öffnen Den Klemmhebel 5B lösen Zum Weiterdrehen in Pfeil richtung ziehen Der Klemmhebel ist somit nach oben und unten frei beweglich Mittels Hebel 5A den Elektromotor anheben und den Riemen auf die gewünschte S...

Страница 8: ...stehen durch die Unwucht zu starke Vibrationen Ein Herausschleudern des Werkstückes kann die Folge sein HINWEIS Exakte Werkstückzentrierung ist sauberer Rundlauf Während der Drechselarbeit Das noch rohe Werkstück bei niedriger Drehzahl bear beiten Nach dem Vordrechseln das heißt wenn die Grundform des Werkstückes sowie ein gleichmäßiger Rundlauf erreicht ist kann die Drehzahl erhöht werden MOTOR V...

Страница 9: ...skantmutter unter der Klemmpratze nachziehen Antriebsriemen überprüfen und bei Bedarf erneuern Sonderzubehör Artikel Art Nr Einschlagfutter Ø30 mm 20 0661 030 Einschlagfutter Ø40 mm 20 0661 040 Einschlagfutter Ø60 mm 20 0661 060 Mitnehmer mit Holzschraube Ø80 mm 20 0661 080 Dreibackenfutter Ø100 mm 20 0661 012 Vierbakenfutter Ø125 mm 20 0661 013 Planscheibe Ø200 mm 20 0661 200 Set mit 5 Drehwerkze...

Страница 10: ...ountry s applicable reg ulations you should observe the generally recognized technical rules concerning the operation of woodworking machines General notes After unpacking check all parts for any transport dam age Inform the supplier immediately of any faults Later complaints cannot be considered Make sure the delivery is complete Before putting into operation familiarize yourself with the machine...

Страница 11: ...educed rotational speed it may be necessary beforehand to cut accordingly with a band saw Before switching on the machine check that the work piece is securely clamped Remove the chuck key or spring dowel sleeve before turning the machine on Always close the belt cover Work with three or four jaw chucks may only be carried out with mounted jaw chuck shield Never stop work pieces with the hand duri...

Страница 12: ...sired level The revolving speed from 650 to 3800 Rpm is distribu ted in 3 speed ranges Slow range from 650 to 1450 Rpm medium speed from 1250 to 2800 Rpm and high speed from 1600 to 3800 Rpm The selection of the speed range is made by moving the transmission belt The adjustment of the speed in each speed range is made by means of a frequency variator The belt must lie exactly in the grooves of the...

Страница 13: ...s been pre turned the pre turn ing operation is complete once the basic form of the workpiece as well as an even concentricity have been achieved can the speed be raised TURN OFF AND UNPLUG THE MOTOR FIRST The live center must be readjusted from time to time with the hand wheel This operation only should be per formed when the motor has been turned off The tailstock center should rest firmly in the...

Страница 14: ...Check the drive belt and replace when necessary Accessories Article Art No Cup chuck Ø30 mm 20 0661 030 Cup chuck Ø40 mm 20 0661 040 Cup chuck Ø60 mm 20 0661 060 Faceplate with woodscrew Ø80 mm 20 0661 080 Tree jaw chuck Ø100 mm 20 0661 012 Foure jaw chuck Ø125 mm 20 0661 013 Faceplate Ø200 mm 20 0661 200 Set with 5 turning tools 30 0660 005 Long tool rest 300 mm 20 0660 009 Extension bed 20 0660 ...

Страница 15: ...utorisé doit être respecté Outre les directives de sécurité contenues dans ce manuel et les prescriptions spécifiques à votre pays vous observe rez les règles techniques généralement reconnues pour la conduite des machines à travailler le bois Conseils généraux Vérifier dès la livraison qu aucune pièce n ait été détéri orée pendant le transport En cas de réclamation infor mer aussitôt le livreur Nou...

Страница 16: ...otection et de sécurité doivent être remontés immédiatement Amener le porte outil le plus près possible de la pièce Pour travailler le bois une vitesse de 30 m s à la circon férence de la pièce est approprièe Consultez le diagramme affiché sur le bloc moteur Faire un perçage de centrage aux deux extrémités avec un forêt à centrer avant de monter la pièce entre pointes Travailler les pièces de grand...

Страница 17: ...ois diamètre et longueur des pièces pièces polygonales ou dissymétriques pièces symétriques larges et pré tournées outil de tournage technique de tournage pièces en bois collés ATTENTION Un tournage réussi ne dépend pas d une vitesse rapide mais d une utilisation efficace des outils Indications pour le réglage du nombre de tours min Faible vitesse pour pièces de grand diamètre pièces dures de grand...

Страница 18: ...t être équarries à 4 faces planes avant d être travaillées sur le tour Les pièces en bois à contre fil doivent être également équarries grossièrement Utiliser une scie à ruban pour l équarrissage Une forme octogonale est avantageuse car elle restreint les vibrations Centrage des pièces Fig 6 Il est important d effectuer cette opération avant de mettre les pièces entre pointes Centrer signifie déterm...

Страница 19: ...er légèrement le filetage du porte outil après chaque changement d outil Démonter de temps en temps la douille de contre poin te la nettoyer et la saupoudrer de lubrifiant sec Graisser les tiges filetées Vérifier et ajuster le serrage à excentrique de la contre pointe et du porte outil Resserrer pour cela l écrou hexa gonal sous la cosse de serrage Vérifier le bon état des courroies et les renouveler s...

Страница 20: ...18 international 18 International ...

Страница 21: ...international 19 International 19 5B 5A 2A 1A 1B Fig 2 Fig 3 Fig 4 Fig 5 Fig 6 Fig 7 ...

Страница 22: ...20 international ...

Страница 23: ...0116 Artikelnummer 100660116 Article no 100660116 Directive CE en vigueur Einschlägige EG Richtlinien Relevant EC directives Directive CE sur les machines 98 37 EG 28 12 2009 Directive CE sur les machines 2006 42 EG 29 12 2009 Directive CE sur la sous tension 2006 95 EWG Directive CE EMV 2004 108 EWG EG Maschinenrichtlinie 98 37 EG bis 28 12 2009 EG Maschinenrichtlinie 2006 42 EG ab 29 12 2009 EG ...

Страница 24: ...22 international Scheppach Fabrikation von Holzbearbeitungsmaschinen GmbH Günzburger Str 69 D 89335 Ichenhausen Tel 00 49 0 8223 4002 0 Fax 00 49 0 8223 4002 20 www scheppach com ...

Отзывы: