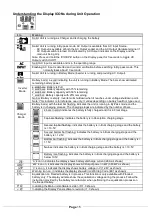
Kisae 120V 12V-2000W-80A Скачать руководство пользователя страница 12


Page 

12 


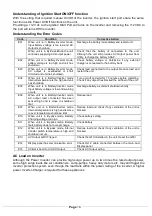
Quick Test on Unit after Installation: 

  Connect a small AC load like 40W light bulb to the AC Output of the unit. 

  Switch DC disconnect switch to ON to provide battery power to the unit, then press 

and hold ‘On/Off 

button on Main unit or 

‘Power’ button on Display panel for 1 second to turn unit or Inverter ON  

  The 

‘Status’  LED  on  display  will  turn  Amber  indicating  inverter  is  ON.  AC  Output  indicator  turns 

green indicating the AC is available at the AC Output terminal of the unit. 

  Verify the 40W light bulb is ON. 

  Switch ON the Main Circuit Breaker on the AC Input Panel. 

  Switch ON the AC Input Circuit Breaker that provides AC Input power to the unit. 

  If AC input source is available, the 

‘Status’ LED amber will flash for about 10 seconds indicating the 

AC  Input  source  is  available.  It  will  then  turn  to  solid green  or flashing  green  indicating  the  unit  is 
running from the AC input source.  

  Verify the 40W light bulb remains ON. 

  The unit is successfully installed and functioning properly. 


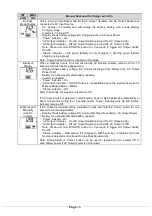
GFCI Monthly Testing on 120VAC 2000W/3000W model 

  For unit equipped with GFCI, the GFCI function is required to test monthly. 

  To test the GFCI, turn unit ON in either in By-pass mode or battery power mode. Plug a small AC 

load (e.g. 40W light bulb) to the AC Output GFCI Socket. 

  Check that the AC load is ON. 


Press ‘

TEST

’ button and observe a clicking sound. Check that the AC load is turned off. 


Press ‘

RESET

’ button and check that the AC load is back ON again.  

Содержание 120V 12V-2000W-80A

Страница 1: ...V 2000W 80A BIC1220080 12V 3000W 100A BIC1230100 24V 2000W 40A BIC2420040 24V 3000W 50A BIC2430050 230V Series 12V 2000W 80A BIC1220080i 12V 3000W 100A BIC1230100i 24V 2000W 40A BIC2420040i 24V 3000W...

Страница 2: ...1363 BIC1220080i AU Inverter Charger 12V 2000W 80A 230VAC Australia Socket NS NZS3112 BIC1230100i EU Inverter Charger 12V 3000W 100A 230VAC Schuko Socket CEE 7 4 BIC1230100i UK Inverter Charger 12V 30...

Страница 3: ...mable fumes or gases such as propane tanks or large engines AVOID covering the ventilation openings Always operate unit in an open area Prolonged exposure to high heat or freezing temperatures will de...

Страница 4: ...Page 4 Table of Contents 1 INTRODUCTION 5 2 PRODUCT DESCRIPTION 5 3 UNDERSTANDING THE UNIT 6 4 INSTALLING THE UNIT 10 5 UNIT OPERATION 13 6 TROUBLESHOOTING 24 7 SPECIFICATIONS 25 8 WARRANTY 27...

Страница 5: ...utility power is interrupted This manual will explain how to use this unit safely and effectively Please read and follow these instructions and precautions carefully 2 PRODUCT DESCRIPTION The Sinewave...

Страница 6: ...follow these instructions can damage the unit and could also result in personal injury or loss of life CAUTION Before beginning unit installation please consider the following The unit should be used...

Страница 7: ...y Actual run times may vary on battery type used b DC Fuse or Circuit Breaker DC rated fuse or DC rated circuit breaker connected along the DC positive line is required Fuse Circuit Breaker Rating 12V...

Страница 8: ...ent sizes refer to the applicable installation code for the DC grounding detail In marine applications the main AC DC ground bonding may require galvanic isolators to avoid galvanic corrosion Check yo...

Страница 9: ...t is used to connect to the Multi Function Display of the unit k Multi Function Display The display is used to provide unit information and for setting and programming the unit l BTS Port The port is...

Страница 10: ...Input terminals will damage the unit and it cannot be repaired Damage caused by reverse polarity connection is not covered by the warranty IMPORTANT Field wiring DC terminals tightening torque 12 13 N...

Страница 11: ...secure the AC Input wire For AC Output Hardwire Connections Insert the AC Input cable through the AC Output Strain relief h on the unit Connect the AC Sub Panel AC Ground wire to the AC Output Ground...

Страница 12: ...rovides AC Input power to the unit If AC input source is available the Status LED amber will flash for about 10 seconds indicating the AC Input source is available It will then turn to solid green or...

Страница 13: ...nput is available this Power button cannot be used to turn OFF the unit Menu SET e button can be used to view the unit setting ESCAPE h button Press and hold for 5 seconds to turn OFF or ON the AC Out...

Страница 14: ...Battery Default Bulk Charge Float Voltage is 14 2V 13 8V Default Flooded Battery Default Bulk Charge Float Voltage is 14 4V 13 5V AGM Battery Default Bulk Charge Float Voltage is 14 3V 13 4V Lithium...

Страница 15: ...the last bar flashing indicates the unit is running in By Pass mode and the battery is in charging process The charging stages are indicated by the number of bars 4 bars in solid indicates the battery...

Страница 16: ...arting Check if any object has blocked the air flow of the unit E05 When unit is in Battery Inverter mode Input battery voltage is low and warning occurs Recharge battery as unit will shutdown shortly...

Страница 17: ...y Note During blackout Power button can be used to temporarily turn inverter Off to save battery power if AC Output power is not required INT ABU Automatic Backup with Charger set to Off CHG OFF By Pa...

Страница 18: ...battery capacity Inverter is disabled Power indicator On AC Output indicator Off AC Output is not available due to the inverter being set to Manual Backup Mode MBU Status indicator Off After 10 secon...

Страница 19: ...acity Inverter is disabled Power indicator On AC Output indicator Off AC Output is not available due to the inverter being set to Manual Backup Mode MBU Status indicator Off After 10 seconds Display a...

Страница 20: ...ON Inverter Only Unit is running as inverter only no By Pass function CHG OFF ON This setting is specially designed so that the AC load connected to AC Output is always getting clean sinewave power f...

Страница 21: ...Switch On Off Status indicator solid green Note Power button function is disabled in this stage Blackout When a blackout occurs unit will not provide AC Backup Display remains On for 10 seconds with...

Страница 22: ...e total AC current draw from the shore power during the By Pass Charger mode to avoid tripping the shore power Branch Breaker Absorption to Float Stage Current Setting 12V 3000W 20A 15A 10A Default 5A...

Страница 23: ...d Battery Disconnect Functions Battery Under and Over Voltage Setting Battery Low Disconnect voltage has selectable range 10 5 12 0V 0 1V steps Default 10 5V The Battery Low Disconnect Voltage has to...

Страница 24: ...utput switch is turned Off Press and hold the ESCAPE button for 5 seconds to turn On the AC Output AC Input Source is available but is out of the acceptance range by the unit Check AC Input Source Uni...

Страница 25: ...rt RJ12 Inverter Mode Battery Voltage DC Current AC Output Power Charger Mode Charging Voltage Charging Current AC Input Power Running as Battery Charger Charging Voltage Range 13 8 14 8 VDC Float Vol...

Страница 26: ...Mode Battery Voltage DC Current AC Output Power Charger Mode Charging Voltage Charging Current AC Input Power Running as Battery Charger Charging Voltage Range 27 6 29 6 VDC Float Voltage Range 26 0 2...

Страница 27: ...e if products are deemed non working or malfunctioning the product may be returned to the purchasing store within 30 days of original purchase Any defective unit that is returned to manufacturer withi...

Отзывы: