background image

Congratulations

on your new CH78 handset

Your new handset will provide you with the greatest possible degree of flex-

ibility and mobility due to high battery capacity, practical weight, size and 

design.

 This handset is suppled by Multitone Electronics as an OEM partner of

Kirk Telecom. The handset may be used with Multitone messaging products 

Charge your 

handset 14 - 16 

hours prior to 

first use for best 

performance

STOP!

Содержание Multitone CH78

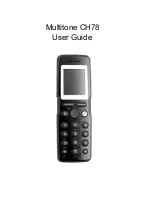
Страница 1: ...Multitone CH78 User Guide...

Страница 2: ...of flex ibility and mobility due to high battery capacity practical weight size and design This handset is suppled by Multitone Electronics as an OEM partner of Kirk Telecom The handset may be used wi...

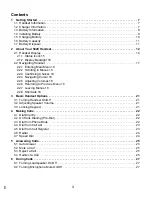
Страница 3: ...4 Navigating Cursor 18 2 2 5 Adjusting Volumes 18 2 2 6 Returning to Previous Menu 18 2 2 7 Leaving Menus 18 2 2 8 Shortcuts 18 3 Basic Handset Options 21 3 1 Turning Handset On Off 21 3 2 Adjusting S...

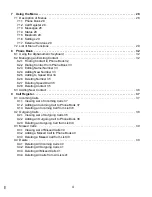
Страница 4: ...eleting Speed Dial 35 8 2 8 Deleting Contact 35 8 3 Adding New Contact 36 9 Call Register 37 9 1 Incoming Calls 37 9 1 1 Viewing List of Incoming Calls 37 9 1 2 Adding an Incoming Call to Phone Book 3...

Страница 5: ...essages from Inbox 48 10 13 Erase All Messages from Inbox 49 10 14 Erase All Messages from Outbox 49 10 15 Erase All Messages 49 11 Status 51 11 1 Silent 51 11 2 Headset 51 11 3 Auto Answer 51 11 4 Ba...

Страница 6: ...anced Settings 63 14 1 Phone User ID 63 14 2 Language 63 14 3 Any Key Answer 63 14 4 Headset 63 14 4 1 Turning Alert of Headset On Off 63 14 4 2 Adjusting Volume of Headset 64 14 5 Long Key 64 14 6 Lo...

Страница 7: ...nventilated areas devices which generate strong magnetic fields such as electrical appliances fluorescent lamps computers radios televisions or fax machines areas where the handset can be covered its...

Страница 8: ...es in potentially explosive environments such as rooms where flammable liquids or gases are present The battery will explode if disposed of in a fire Do not charge batteries unless you use the approve...

Страница 9: ...ything that would cause the battery to short circuit Do not let battery or charger come into contact with conductive metal objects Do not attempt to take battery apart Power handset off before removin...

Страница 10: ...ng Back light Off on page 60 Place handset in charger For correct charging be sure the room temperature is between 0 C and 40 C Do not place the handset in direct sunlight The battery has a built in h...

Страница 11: ...00 hours when backlight display is set at dimmed For information about how to check battery capacity refer to Battery on page 51 1 7 Battery Disposal Warning Lithium lon batteries must be disposed of...

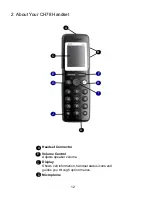
Страница 12: ...Your CH78 Handset Headset Connector Volume Control Adjusts speaker volume Display Shows call information handset status icons and guides you through option menus Microphone J J C A B D C D E G H I J...

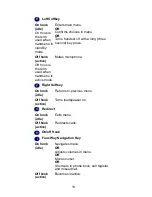
Страница 13: ...term used when handset is in active mode Mutes microphone Right Softkey On hook idle Returns to previous menu Off hook active Turns loadspeaker on Redirect On hook idle Exits menu Off hook active Redi...

Страница 14: ...hook idle display shows user ID personal settings and time off hook display shows user ID The types of information shown in Display center when on hook idle display shows standby logo or call informat...

Страница 15: ...t shown in display The handset also offers both personal and predefined shortcuts to selected functions in the menu In the end of this chapter you will find a section describing how to use these short...

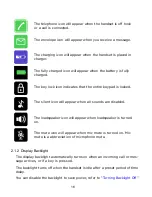
Страница 16: ...when the handset is off hook or a call is connected The envelope icon will appear when you receive a message The charging icon will appear when the handset is placed in charger The fully charged icon...

Страница 17: ...t shown in display The handset also offers both personal and predefined shortcuts to selected functions in the menu In the end of this chapter you will find a section describing how to use these short...

Страница 18: ...ntering editing numbers and want to delete a letter or digit To delete simply place cursor behind letter or digit and press right softkey to activate Delete 2 2 5 Adjusting Volumes When in the relevan...

Страница 19: ...Select to add the function to the list of personal shortcuts To use a shortcut 1 While on hook press Shortcut to enter the shortcut function 2 Scroll to the desired shortcut and press Select To remove...

Страница 20: ...e key lock icon followed by the text Keypad locked unlocked Missed calls While on hook press right side of navigation key to enter a list of missed call Redirect a call While on a call press R The fea...

Страница 21: ...e speaker volume until you make a new adjust ment During a telephone conversion you can adjust the speaker volume at any time in relation to the noise level of the surrounding environment Use key plac...

Страница 22: ...Dial number 2 Press to make a call 3 Press to terminate the call 4 3 Dial from Phone Book The handset s phone book is familiar to an ordinary phone book However the find name function makes it easy t...

Страница 23: ...system does not resend the information to the handset 4 5 Dial from Call Register The call register menu stores up to 40 of your incoming outgoing and missed calls The calls are classified in three gr...

Страница 24: ...sired name or number and press 4 7 Speed Dial If you have assigned a number to one of the speed dialing keys 0 9 do the following While on hook press digit equivalent to number of the contact in the s...

Страница 25: ...goes off hook when an incoming call arrives If subscribed to a solution the handset automatically goes on hook when calls are terminated 1 Press Menu to enter main menu 2 Scroll to Settings and press...

Страница 26: ...26 Note After redirecting the call display will continue to show caller information...

Страница 27: ...eople in the room to listen to and par ticipate in the conversation You may set the handset on a desk or table and leave your hands free To turn loadspeaker on off 1 While on a call press Loud on to t...

Страница 28: ...one Book You can store numbers and names in your phone book The phone book can store up to 250 names with up to four numbers each A maximum of 24 letters including spaces is allowed for each name Name...

Страница 29: ...ize the handset according to your needs The settings can be changed at any time For more information about customizing the handset refer to Settings on page 57 or Advanced Settings on page 63 7 1 7 Ex...

Страница 30: ...tes Status 1 Silent 2 Headset 3 Auto answer 4 Battery 5 Ring tone 6 Ringing Volume Bluetooth 1 Bluetooth On 2 Bluetooth Off 3 Search for units 4 Active Units 5 Paired Units 6 Phone Visibility Settings...

Страница 31: ...31 7 Backlight 8 Auto answer 9 Out of range Advanced Settings 1 Phone UserID 2 Language 3 Any key answer 4 Headset 5 Long Key 6 Login 7 Time Date External Services...

Страница 32: ...the 0 key Key changes between uppercase and lowercase letters which is indi cated on the top left hand corner of the display Pressing left or right side of navigation key will move the cursor To delet...

Страница 33: ...main menu 2 Scroll to Phone Book and press Select 3 Scroll to Find name and press Select 4 To find a name you can Scroll until you reach the desired name To scroll through the names quickly press the...

Страница 34: ...l You can assign a number to one of the speed dialing keys 0 9 This way you only need to press a single digit to find name and number of the contact you want to phone Note A maximum of 10 speed dial n...

Страница 35: ...g the first letter s max 5 letters of the desired name refer to Using the Alphanumeric Keyboard on page 32 5 Press Details 6 If more than one number scroll to the desired number and press Select 7 Scr...

Страница 36: ...ne number press Select 7 Scroll to Delete name number and press Select 8 Press OK to confirm 8 3 Adding New Contact Use the add name number function when you want to add a new contact to phone book No...

Страница 37: ...k the incoming call will be represented with the name of the contact If name and number do not exist in your phone book the handset cannot recognize the number and the incoming call will only be repre...

Страница 38: ...tgoing call already exits in your phone book the outgoing call will be represented with the name of the contact If name and number do not exist in your phone book the handset can not recognize the num...

Страница 39: ...to confirm 9 3 Missed Calls Missed calls is a list of all your missed calls sorted by date and time of the call starting with the latest call If the name and number of the missed call already exits i...

Страница 40: ...Menu to enter main menu 2 Scroll to Call Register and press Select 3 Scroll to Missed Calls and press Select 4 Scroll to the desired missed call and press Details 5 Press Options and scroll to Delete...

Страница 41: ...oing call see Deleting an Outgoing Call from List on page 39 9 4 3 Deleting All Missed Calls 1 Press Menu to enter main menu 2 Scroll to Call Register and press Select 3 Scroll to Delete and press Sel...

Страница 42: ...e Inbox and outbox can store up to 20 messages in total A maximum of 72 letters including spaces is allowed for each message If the memory of inbox and outbox is full the handset will automatically er...

Страница 43: ...Text Field Use the clear text function when your are writing a new message and want to start all over 1 Press Options 2 Scroll to Clear text and press Select 10 2 Saving a New Message in Outbox You ca...

Страница 44: ...n relation to the kind of message you often need to send To create a new template refer to Saving a New Mes sage as a Template on page 43 and Saving a Received Message as a Tem plate on page 44 When u...

Страница 45: ...ges and press Select 3 Scroll to Inbox and press Select 4 Scroll to the desired message and press Select Time and date of message is shown above the text message Note New messages appear in the beginn...

Страница 46: ...s Select 7 Scroll to Original text and press Select 8 Write a message in continuation of received message and press Options 9 Scroll to Send and press Select 10 Press Send 10 7 3 Reply Using a Templat...

Страница 47: ...To scroll through the names quickly press the navigation key continuously Use quick search by pressing the first letter s max 5 letters of the desired name refer to Using the Alphanumeric Keyboard on...

Страница 48: ...ess Select 3 Scroll to Templates and press Select 4 Scroll to the desired template and press Options 5 Scroll to Erase and press Select 6 Press Yes to erase the template 10 11 Erasing a Single Message...

Страница 49: ...efer to Erasing a Single Message on page 48 10 14 Erase All Messages from Outbox Use this function to erase all messages from your outbox 1 Press Menu to enter main menu 2 Scroll to Messages and press...

Страница 50: ...50 4 Scroll to All and press Select 5 Press Yes to erase all messages from all folders...

Страница 51: ...ngs for silent mode refer to Silent Mode on page 58 11 2 Headset Using headset allows you to keep up your activities and use the phone at the same time For more information about changing settings for...

Страница 52: ...tone of the ringer You can distinguish between an internal and external call by the ring tone The ring tone of an internal call is followed by three short beeps For more information about changing rin...

Страница 53: ...nnect units 12 3 Setting Up a Bluetooth Connection When setting up a Bluetooth connection you will need to search for com patible devices with Bluetooth connectivity To connect with a device you will...

Страница 54: ...ed unit and press Options 5 Scroll to Disconnect and press Ok 12 4 3 Reconnecting Active Units 1 Press Menu to enter main menu 2 Scroll to Bluetooth and press Select 3 Scroll to Active units and press...

Страница 55: ...ter use 1 Press Menu to enter main menu 2 Scroll to Bluetooth and press Select 3 Scroll to Paired units and press Select 4 Scroll to the desired unit and press Options 5 Scroll to Disconnect and press...

Страница 56: ...ss Select 6 Scroll to On or Off and press Ok 12 6 Changing Phone Visibility You can choose to visibility shows the handset to all other devices with bluetooth connectivity or Invisibility to show the...

Страница 57: ...press Select 3 Scroll to Ringing volume and press Select 4 Press left or right side of navigation key to adjust the volume of the ring tone 5 Press Set and then press Back 13 2 Ringing Tone The ring t...

Страница 58: ...f the ringer 5 Press Set and then press Back 13 4 Vibrator When vibrator is turned on the handset will vibrate when an incoming call or message arrives To turn vibrator on off 1 Press Menu to enter ma...

Страница 59: ...Short ring When turned on a short ring will appear when an incoming call arrives To change settings of silent mode 1 Press Menu to enter main menu 2 Scroll to Settings and press Select 3 Scroll to Sil...

Страница 60: ...Scroll to Settings and press Select 3 Scroll to Backlight and press Select 4 Scroll to Dimmed and press Set 13 7 2 Turning Backlight Off Turning display backlight off when handset is in standby mode w...

Страница 61: ...is inactive 13 8 1 Changing Settings of Auto Answer When auto answer is turned on you can select different situations where to use auto answer Settings of auto answer are Lift from charg When turned o...

Страница 62: ...Scroll to Out of range and press Select 4 Scroll to On or Off and press Change 13 9 1 Changing Settings of Out of Range The handset offers two types of out of range alerts Icon only Tone beep icon Wi...

Страница 63: ...ss Select 4 Scroll to Language and press Select 5 Scroll to the desired language and press Select 14 3 Any Key Answer When turned on you can answer a call by pressing any key 1 Press Menu to enter mai...

Страница 64: ...The long key function supports system features and defines a long key press to digits between 0 9 The long key press can be defined as speed dials or as MSF messages MSF messages are system dependent...

Страница 65: ...ss Select 3 Scroll to Advanced and press Select 4 Scroll to Login and press Select 5 Scroll to Remove login and press Select 6 Scroll to the desired login and press Select 7 Enter your password and pr...

Страница 66: ...subscription before creating a new subscription refer to Removing a Login on page 65 14 6 4 Selecting Login Automatically When auto login is turned on the handset automatically change to another syst...

Страница 67: ...e When you turn off the handset the settings of time are deleted if the subscribed system does not resend the information to the handset 14 7 2 Change Date 1 Press Menu to enter main menu 2 Scroll to...

Страница 68: ...68 15 External Services External services are features placed in the main system These may vary from system to system Please consult your system administrator for sup ported features...

Страница 69: ...m change the battery as it might be defective 16 2 Information 16 2 1 Error information Improper function of the handset might be related to the infrastructure to which the handset is connected to Bef...

Страница 70: ...id cleaners or aero sol cleaners Use damp cloth for cleaning 4 Do not install the telephone equipment in the bathroom or near a wash bowl kitchen sink or laundry tub in a wet basement or near a swim m...

Страница 71: ...one will not operate in the event of a blackout Please keep a backup phone for emergencies 16 2 4 1 Intrinsic safety Do not use the handset in conditions where there is a danger of electrically ignite...

Страница 72: ...your right to file a complaint with the FCC Your telephone company may make changes in its facilities equipment operations or procedures that could affect the proper functioning of your telephone syst...

Страница 73: ...operation of the device The Term IC before the certification registration number only signifies that the Industry Canada technical specifications were met Power Outage In the event of a power outage y...

Страница 74: ...74...

Страница 75: ...9262 8298...

Страница 76: ......

Отзывы: