background image


1011026 User Manual Issue 01 (26.10.2021) 


10 


Service  

8.4.1.


Service Due Date 

The Service Due Date can be viewed on main screen by pressing 

 until the date and time are shown. 

8.4.2.


Service Alarm  

If the service alarm is activated using PIN, service alarm is reported on the display every 360 days, by default. 
The beacon flashes 

and message “Contact Service Provider” pops every few seconds

.  

The beacon will stop flashing by pressing 

the ‘


 button. A service symbol appears on the screen until the next 

service is done & a contract renewed.   


Telemetry Relays Outputs 

There are three volt-free contacts available for alarm reporting to external systems. Follow Guide on Figure 4 
for wiring.  


Menu 

Menu allows timetable entries to be edited, event log to be viewed, date/time, settings, service, battery and 
setting factory defaults.  
This menu is intended for use by installation & Service engineers only.  
The menu is entered by simultaneously pressing then releasing the three buttons 

 & 

’. 


On entry to the menu all outputs and telemetry relays are switched off


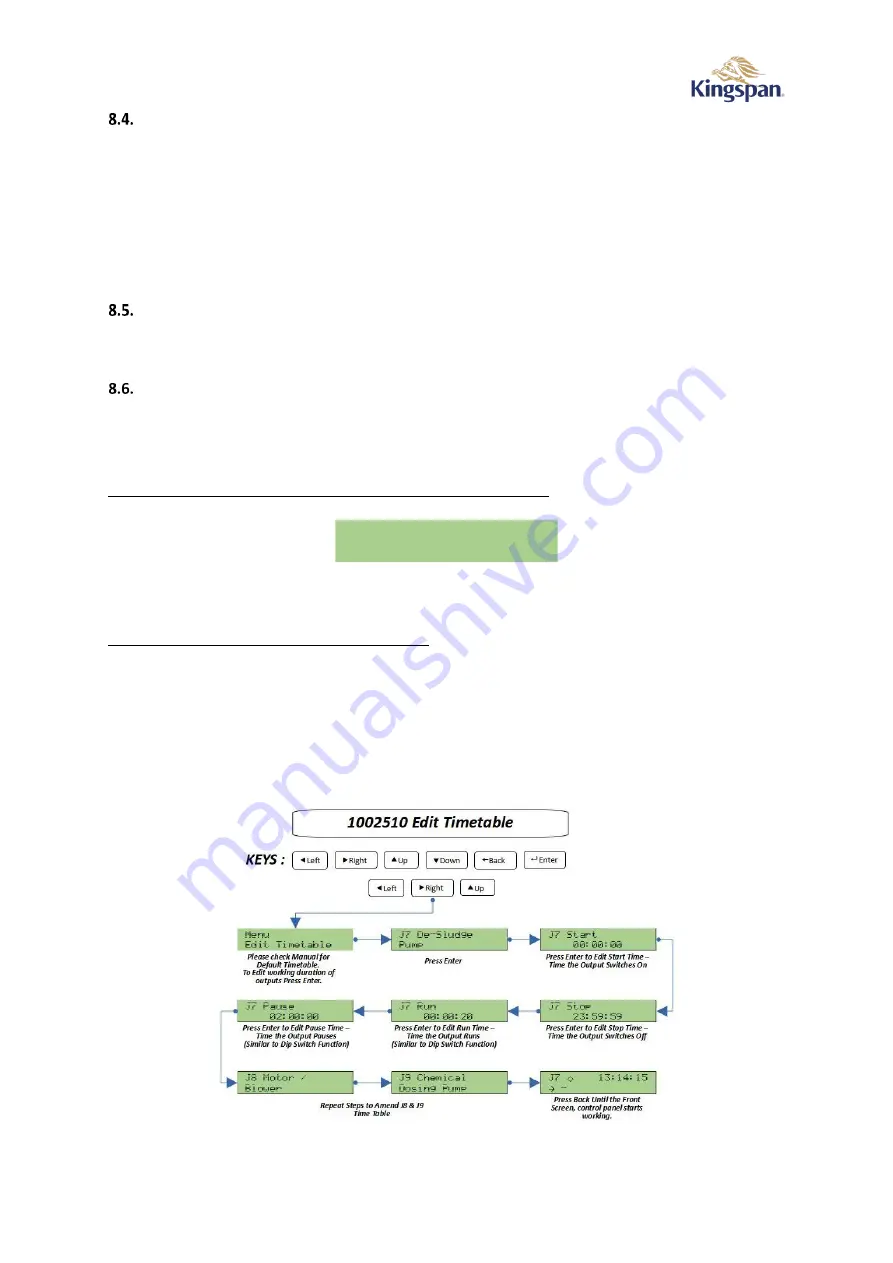
Figure 11 Menu - Edit Timetable 

The current option is shown on the bottom row and is selected 

by ‘

’ and ‘

’. Press the ‘


’ button to 

proceed with the current option. 

Pressing ‘

’ or ‘

’ will return to normal operation. 


8.6.1.


Edit Timetables 

Use ‘

’ and ‘

’ to select between 

Start

Stop

Run

, and 

Pause

 times for the current timetable entry. 

Use the ‘


’ button to edit the 

entry. A fla

shing cursor will appear over the first digit of the hour. Use ‘

’ and 

’ to increment and decrement the digit, respectively. Use ‘

’ and ‘

’ to move to the previ

ous or next digit 

in the time, respectively. Once the e

ntry has been edited, press the ‘


’ button to save changes and exit edit 

mode, or press the ‘

’ button to cancel changes and exit edit mode.


Use ‘

’ or ‘

’ to ret

urn to the menu. 


Figure 12 Editing Timetable 

  M e n u                          
  E d i t   T i m e t a b l e      

Содержание Klargester 1002510

Страница 1: ...Kingspan Klargester 1011026 Domestic Wastewater Control Panel USER MANUAL...

Страница 2: ...Installation of High Level Alarm HLA where applicable 6 Beacon units P No 1009254 where applicable 7 Installation of High Level Alarm HLA where applicable 7 For Biotec Bioficient or BioSafe Applicati...

Страница 3: ...of Practice Statutory Requirements and any specific instructions issued by the supplier of these details Earthing All equipment must be earth bonded in accordance with the latest IEE Wiring Regulation...

Страница 4: ...1011026 User Manual Issue 01 26 10 2021 4 7 Installation Figure 1 1002510 Lid Cover Figure 2 Enclosure Mounting Dimensions Figure 3 Control Panel Wiring 1...

Страница 5: ...1011026 User Manual Issue 01 26 10 2021 5 Figure 4 DTP Control Panel Wiring 2...

Страница 6: ...tape at a depth of 150mm For loads up to 0 75kW and runs of less than 100 metres 2 5mm 3 core SWA is adequate For loads up to 1 55kW and runs of less than 100 metres 4 0mm 3 core SWA should be used I...

Страница 7: ...Applications 7 7 1 Power Pressure Failure Detection System PPFDS where applicable The panel is designed to be used in conjunction with the Beacon unit to provide warning of either loss of power or ai...

Страница 8: ...te socket below the battery on the PCB marked J3 After finishing wiring replace the isolator cover and screw Turn the mains supply on at the source Turn on the panel using the isolation switch It shou...

Страница 9: ...vation time Alarms The conditions shown below cause an alarm message to appear on the display the beeper sounds the beacon flashes and the common alarm telemetry relay is de energised Some alarm condi...

Страница 10: ...factory defaults This menu is intended for use by installation Service engineers only The menu is entered by simultaneously pressing then releasing the three buttons On entry to the menu all outputs...

Страница 11: ...4 hour format The display will show Figure 13 Date Time Use and to move between date and time Pressing the button will freeze display of the clock and enter edit mode to allow the date or time to be s...

Страница 12: ...ickle Charge indicates that the unit is fully charged and maintaining the battery 8 6 7 Factory Defaults This option allows the control unit to be set back to the defaults as they were when the unit l...

Страница 13: ...lower J9 Chemical dosing pump Grundfos KP 350 Grundfos KP 250 Secoh JDK 250 Kingspan 404390 Fusing F1 De sludge pump terminals 3 4 T 5A H 250V F2 Internal power supply unit T 2A H 250V F3 Motor blower...

Страница 14: ...y 16 x 2 character LCD Green power LED Real Time Clock Event log timestamps and controlling the operation of the motors blowers according to a timetable LED Beacon 1009254 Only the LED beacon 1009254...

Страница 15: ...ay Motor Blower Start Time Time of Day where Unit is started 00 00 00 Stop Time Time of Day where Unit is stopped 23 59 59 Run Time Time for the components to Run 23 59 59 24 hours Pause Time Time for...

Страница 16: ...1011026 User Manual Issue 01 26 10 2021 16 This Page Intentionally Left Blank...

Отзывы: