background image

ENGLISH

WARNING

READ THE INSTRUCTIONS CAREFULLY BEFORE USE AND SAVE THEM FOR FUTURE REFERENCE! THE CHILD CAN BE HURT IF YOU DO NOT OBSERVE THESE 

INSTRUCTIONS!

•  The instruction can be kept in the reserved place of the car seat within the usage period.

•  Do not use this child seat in the home. It has not been designed for home use and should only be used in your car

•  Be sure that children are not left in their child restraint system unattended.

•  The child restraint system should be changed when it has been subject to violent stresses in an accident.

•  Any straps holding the restraint to the vehicle should be tight; Restraining the child should be adjusted according to the child's body, and should not 

be twisted.

•  Any lap strap should be worn low down, so that the pelvis is firmly engaged, shall be stressed.

•  Be sure any luggage or other objects liable to cause injuries in the event of a collision shall be properly secured.

•  The rigid items and plastic parts of a child restraint shall be so located and installed that they are not liable, during everyday use of the vehicle, to 

become trapped by a movable seat or in a door of the vehicle.

•  It is danger to make any alterations or additions to the device without the approval of the Type Approval Authority, and it is also danger not following 

closely the installation instructions.

•  It is extremely dangerous to use any load bearing contact points other than those described in the instructions and marked in the child restraint.

•  The child restraint shall not be used without the cover; The seat cover should not be replaced with any other than the one recommended by the 

manufacturer.

•  The child should be taken out from the car seat when it is being moved or

adjusted.(except adjusting the headrest)

•  The seat should be kept away from sunlight if the seat is not provided with a textile, otherwise it may be too hot for the child's skin.

•  Please do not buy the second hand safety car seat. Because you may not know the using history of the car seat. It may have been in an accident or lack 

some parts.

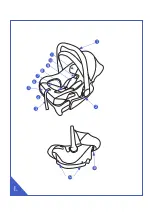
I. PARTS:

1. Handle; 2. Handle adjuster; 3. Adjustable straps; 4. Shoulder straps adjuster; 5. Cover; 6. Comfort pad; 7. Buckle pad; 8. Buckle; 9.  Shoulder pad; 10. 

Strap; 11. Headrest pad; 12. Fixed bar; 13. Lap belt hook; 

II. INSTALLATION LOCATION AND ADJUSTMENT OF CHILD SEAT

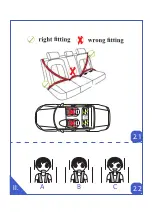
2.1. THE RIGHT FITTING POSITION IN THE CAR

Only suitable use in the listed vehicles fitted with 3 point  with retractor safety-belts, approved to ECE Regulation No.16 or other

equivalent standards.

2.2. ADJUST  THE HEIGHT OF HARNESS STRAPS

Always check that the shoulder are at the correct height for your child. The child`s shoulder should always be below the slot for the harness straps. The 

right fitting is showns on the picture.

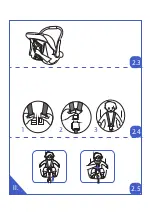
2.3. ADJUST THE HEIGHT OF SHOULDER RESTRAINT

Loosen the shoulder straps, open the buckle. Pull out the buckle tongues from the chest pad and the slots on the cover and the shell, then thread them 

into the corresponding belt slots. Ensure that both of the shoulder belt go through slots at the same height, and not twisted.

2.4. OPERATION OF BUCKLE

Loosen the harness, open the buckle, and place them down side ways. Seat your child in the child car seat. Place both shoulder straps over your child's 

shoulders. 

NOTE: Baby below 5kg,using comfort pad and headrest pad. Baby above 5 kg, only using headrest pad.

Put the two metal sections of the buckle connectors together. Slot the two buckle connectors into the slot in the top of the buckle until they "click" into 

place. Check the harness is correctly locked by pulling the shoulder straps upwards.

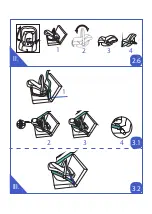
2.5.TIGHTEN AND LOOSEN  THE HARNESS RESTRAINT

Pull the adjustment straps until the harness straps are totally tight. The shoulder restraint shall be adjusted as tightly as possible without causing 

discomfort to your child. Check whether the straps are adjusted tightly enough and not twisted when the child is placed in the seat. Be sure the distance 

between the shoulder straps and shoulder is less than 1 cm. The lab strap shall be worn low down, so that the pelvis is firmly engaged. The loose straps 

are very dangerous for the child.

Find the right position of harness strap adjuster. Keep pressing down the harness straps adjuster by one hand, meanwhile grip two shoulder straps and 

pull them towards you by the other hand. With the operation mentioned above, you can loosen the harness restraint and adjust as you required.

Содержание ALVI/ VIVO

Страница 1: ...STRU ES DEUSO ISTRUZIONIPERL USO MODED EMPLOI GEBRAUCHSANWEISUNG INSTRUCTIUNI DE FOLOSIRE INSTRUKCJA U YCIA UPUTSTVO ZA UPOTREBU UPUTE ZA KORI TENJE N VOD K POU IT IN TRUKCIE NA POU VANIE HASZN LATI T...

Страница 2: ...1 2 3 4 5 6 7 8 9 10 11 12 13 I...

Страница 3: ...II 2 1 2 2 A B C...

Страница 4: ...1 II 2 3 2 4 2 5 1 2 3...

Страница 5: ...3 3 4 4 1 1 II III 3 1 3 2 2 6 2 2...

Страница 6: ...Shoulderstrapsadjuster 5 Cover 6 Comfortpad 7 Bucklepad 8 Buckle 9 Shoulderpad 10 Strap 11 Headrestpad 12 Fixedbar 13 Lapbelthook II INSTALLATIONLOCATIONANDADJUSTMENTOFCHILDSEAT 2 1 THERIGHTFITTINGPOS...

Страница 7: ...s Letthetongueplatesnapinthe beltlockwithaclearlyaudible click Pulltheshoulderbeltinnarrowdirectiontotightenthelapbelt Checktomakesurethetongueplateislockedby pullingonthebelt Figure1 2 Putthediagonal...

Страница 8: ...I 1 2 3 4 5 6 7 8 9 10 11 12 13 II 2 1 3 16 ECE 2 2 2 3 2 4 5 5 2 5 1cm...

Страница 9: ...2 6 4 1 2 3 4 III 3 1 1 3 1 2 2 3 3 3 4 4 3 2 Cr 150mm 5 1 2 3 4 5 1 2 3 Y 4...

Страница 10: ...onfort 7 Hebilladealmohadilla 8 Hebilla 9 hombrera 10 correa 11 Reposacabezas 12 barrafija 13 Ganchoparaelcintur nderegazo IIUBICACI NDELAINSTALACI NYAJUSTEDELASIENTOINFANTIL 2 1 LAPOSICI NCORRECTAENE...

Страница 11: ...enelcierredelcintur nconun clic claramenteaudible Tiredelcintur ndehombro endirecci nestrechaparaapretarelcintur nderegazo Verifiqueparaasegurarsedequelaplacadelaleng etaest bloqueadatirandodelcintur...

Страница 12: ...acidenteoufaltadealgumaspe as I PE AS 1 al a 2 Ajustadordeal a 3 Al asajust veis 4 Ajustadordeal as 5 capa 6 Almofadadeconforto 7 Almofadadefivela 8 fivela 9 almofadadeombro 10 cinta 11 Almofadadoenc...

Страница 13: ...sduas guiasdocintodeseguran a Deixealinguetaencaixarnatravadocintocomum clique claramenteaud vel Puxeocintodeombronadire o estreitaparaapert lo Verifiquesealinguetaest travadapuxandoocinto figura1 2 C...

Страница 14: ...aconfibbia 8 Fibbia 9 Spallina 10 Cinturino 11 Cuscinopoggiatesta 12 barrafissa 13 Ganciopercinturaaddominale II POSIZIONEDIINSTALLAZIONEEREGOLAZIONEDELSEDILEPERBAMBINI 2 1 LAPOSIZIONEDIMONTAGGIOGIUST...

Страница 15: ...adellacinturaconun clic chiaramenteudibile Tirarelatracollaindirezionestretta perstringerelacinturaaddominale Verificarechelalinguettadellalinguettasiabloccatatirandolacintura Figura1 2 Inserirelacint...

Страница 16: ...ben 3 VerstellbareTr ger 4 Schultergurteinsteller 5 Abdeckung 6 Komfortpolster 7 Schnallenpolster 8 Schnalle 9 Schulterpolster 10 Gurt 11 Kopfst tzenpolster 12 FesteStange 13 Beckengurthaken II INSTAL...

Страница 17: ...nSiedenSchultergurtinschmalerRichtung umden Beckengurtfestzuziehen StellenSiesicher dassdieZungenplattedurchZiehenamRiemenverriegeltist Abbildung1 2 F hrenSiedenDiagonalgurtdurchdenF hrungshakenhinter...

Страница 18: ...R glagedesbretelles 5 Couverture 6 Coussindeconfort 7 Boucledeboucle 8 Boucle 9 pauli re 10 Sangle 11 Coussind appui t te 12 Barrefixe 13 Crochetdeceinturesous abdominale II LIEUD INSTALLATIONETR GLA...

Страница 19: ...s enclencherdansleverroudeceintureavecun clic clairementaudible Tirezlaceinturediagonaledansune direction troitepourserrerlaceinturesous abdominale V rifiezquelalanguetteestverrouill eentirantsurlacei...

Страница 20: ...ner 3 bretelereglabile 4 Reglareabretelelordeum r 5 Acoperire 6 Gust confort 7 Catarama 8 Catarama 9 Padpentru umar 10 curea 11 Tetieratetiera 12 Barafixa 13 C rligpentrucurea II INSTALAREALOCA IA IAJ...

Страница 21: ...prind nblocareacenturiicuun clic sonorclar Trage icenturadeum r ndirec ierestr ns pentruastr ngecureaua n poal Verifica is v asigura ic placadelimb esteblocat tr g ndpecurea figura1 2 Introduce icentu...

Страница 22: ...dowego By mo emia wypadek lubbrakniekt rychcz ci I CZ CI 1 Uchwyt 2 Uchwytregulatora 3 Regulowanepaski 4 Regulatorpask wnaramiennych 5 Pokrywa 6 Komfortowapodk adka 7 Padklamry 8 klamra 9 Poduszkanara...

Страница 23: ...rzezobieprowadnice pasabiodrowego Pozw l abyp ytkazatrzaskowazatrzasn asi wzaczepiepaskazapomoc wyra nies yszalnego klikni cia Poci gnijpasekna rami ww skimkierunku abynapr y pasbiodrowy Sprawd czyp y...

Страница 24: ...SRPSKI I 1 2 3 4 5 6 7 8 9 10 11 12 13 II 2 1 16 2 2 2 3 2 4 5 5 2 5 1...

Страница 25: ...SRPSKI 2 6 4 1 2 3 4 3 1 1 1 2 2 3 3 3 4 4 3 2 150 5 1 2 3 4 5 1 2 3 4...

Страница 26: ...I 1 2 3 4 5 6 7 8 9 10 11 12 13 II 2 1 3 ECE 16 2 2 2 3 2 4 5 5 2 5 1 Ird...

Страница 27: ...2 6 NOT 4 1 2 3 4 III A UST 3 1 1 3 1 2 2 3 3 3 4 4 3 2 Cr 150mm Firura5 1 2 3 4 5 1 2 3 Y 4...

Страница 28: ...I 1 2 3 4 5 6 7 8 9 10 11 12 13 II 2 1 3 16 2 2 2 3 2 4 5 5 2 5 1...

Страница 29: ...2 6 4 1 2 3 4 III 3 1 1 1 2 2 3 3 3 4 4 3 2 Cr 150 Firura5 1 2 3 4 5 1 2 3 Y 4...

Страница 30: ...UA I 1 2 3 4 5 6 7 8 9 10 11 12 13 II 2 1 3 16 2 2 2 3 2 4 5 5 2 5 1...

Страница 31: ...UA 2 6 4 1 2 3 4 3 1 1 3 1 2 2 3 3 3 4 4 3 2 Cr 150 5 1 2 3 4 5 1 2 3 4...

Страница 32: ...akop u 8 Katarama 9 Jastu i izaramena 10 Pojas 11 Naslonzaglavu 12 U vrsnavrpca 13 remenzakai II SEDI TEIPOPRAVKASJEDALAUAUTOJU 2 1 PRAVILNAUGRADNJA Prikladnozaupotrebusamonanavedenimvozilimaopremljen...

Страница 33: ...u3to keokodvavodilicapojasa Nekasejezikomsna noklikneukop upojasa Povucitepojaszaramenauskojstranidagastegnete Provjeritejelikop azaklju anapovla enjemkai eva Slika1 2 Umetnitedijagonalnipojaskrozvode...

Страница 34: ...su 5 alounictv 6 Substr t 7 Podlo kanap ezku 8 Katarama 9 Ramenn chr ni e 10 P s 11 Op rkahlavy 12 Upev ovac p ska 13 h eknaopasek II SEDADLOASE ZEN SEDADLAAUTA 2 1 SPR VN INSTALACE Vhodn propou it po...

Страница 35: ...tekp su Nechtejazykzacvaknoutdospony opaskusjasn mcvaknut m P it hn teramenn p sna zk stran Zkontrolujte zdajep ezkazaji t nazata en mzap s Obr zek1 2 Vlo tediagon ln p sp esvodic h ekzasedadloautomob...

Страница 36: ...6 Substr t 7 podlo kanapracku 8 Katarama 9 chr ni eramien 10 P s 11 Opierkahlavy 12 upev ovaciap ska 13 h knaopasok II SEDADLOANASTAVENIESEDADLAAUTA 2 1 SPR VNAIN TAL CIA Vhodn napou itieibavovozidl c...

Страница 37: ...dvochvodi ovp sov Nechajtejaz ekzacvakn dopracky sjasn mkliknut m Potiahniteramenn p sna zkejstraneautiahniteho Potiahnut mzap sskontrolujte ijeprackazaisten postava1 2 Vlo tediagon lnyp scezvodiacih...

Страница 38: ...t 3 ll that hevederek 4 V llsz jakbe ll t ja 5 Fed l 6 K nyelmipad 7 csatcsat 8 Csat 9 V llp rna 10 Sz j 11 Fejt mlap rna 12 R gz tettr d 13 vhorog II AGYERMEK L STELEP T SIHELYE SBE LL T SA 2 1 AJOBB...

Страница 39: ...et n Hagyja hogyanyelvlap bepattanjonaz vz rbaegyj lhallhat kattan ssal H zzakeskenyir nybanav llsz jat hogymegh zzaaz vsz jat Asz jmegh z s valellen rizze hogyanyelvlemezr gz tvevan e 1 bra 2 Helyezz...

Страница 40: ...1 2 3 4 5 6 7 8 9 10 11 12 13 2 1 3 16 2 2 2 3 2 4 BUCKLE 5 5 2 5 1cm...

Страница 41: ...2 6 4 1 2 3 4 III 3 1 1 3 1 2 2 3 3 3 4 4 3 2 Cr 150mm 5 1 2 3 4 5 1 2 3 4...

Страница 42: ...c 5 Kapak 6 Konforpedi 7 Tokayast 8 Toka 9 Omuzpedi 10 Kay 11 Koltukba l 12 Sabit ubuk 13 Ku akkemerkancas II MONTAJYER VE OCUKKOLTU UNUNAYARLANMASI 2 1 ARA TADO RUMONTAJPOZ SYONU SadeceECEY netmelik...

Страница 43: ...kas n na k aduyulabilirbir klik sesiilekemerkilidineoturmas naizinverin Kucakkemerinis kmaki inomuzkemerinidary nde ekin Kay ekerekdilplakas n nkilitlendi indeneminolun ekil1 2 aprazkemeri ocukkoltu u...

Страница 44: ...AR...

Страница 45: ...AR...

Страница 46: ...O Bulgaria Vasil Levski 121 Plovdiv Bulgaria office kikkaboo com Kikkaboo Bulgaria kikkabooworld KIKKA BOO Spain Calle Sos Del Rey Catolico 16 7C Granada Spain office kikkaboo com Kikkaboo Spain kikka...

Отзывы: