In our presets, the
Vertical Slider
banks are all controlled using the nearest
Up/Down
Button
pair. The
Long Slider
banks are controlled using the
Up/Down Button
pair on
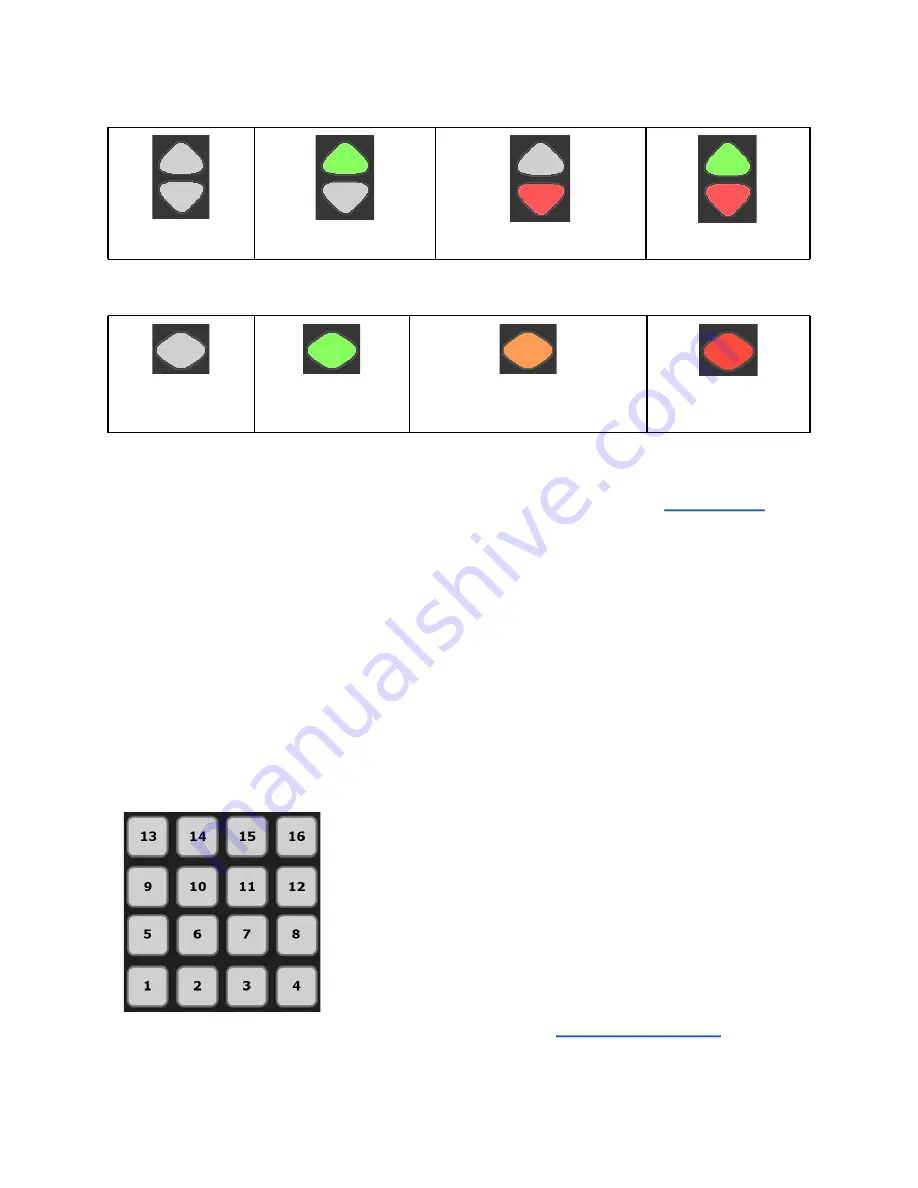
the right side of the Long Slider. The images below show how the Vertical and Long Slider
banks are indicated with the Up/Down Button LEDs:
Bank 1 - no LEDs
Bank 2 - top LED only
Bank 3 - bottom LED only
Bank 4 - both LEDs
In our presets, the
Rotary
banks are both controlled using the
Rhombus
Button. The
images below show how the Rotary banks are indicated with the Rhombus Button LEDs:
Bank 1 - no LEDs
Bank 2 - only the
green LED is on
Bank 3 - both red and green
are on to make orange
Bank 4 - only the
red LED is on
Using the QuNeo Editor, the bank controls for the Vertical Sliders, the Long Slider, and
the Rotaries can be chosen. Both Up/Down Button Pairs and the Rhombus Button can be
assigned to one of these sensors if editing presets in the Editor. See the
chapter for more information about editing presets.
The Mode Button
The Mode button is a small circular button that can be found in the upper left corner of the
QuNeo. When illuminated, the button is blue. The Mode button serves as the gateway to
selecting presets and entering CoMA mode (our Controller Mapping Assistant).
Selecting Presets
After plugging in the QuNeo, it will automatically load the last preset you used. The first
time, it will load Preset 1.
To enter preset mode, quickly tap the Mode button so that it begins to flash blue.
After entering Preset mode, the pad for the current preset
will be illuminated in red. Select a preset by pressing one
of the pads. The selected pad will briefly blink green and
QuNeo will exit Preset mode and go to the selected preset.
The image to the left shows how the pads are numbered
and which pad to select for which preset number.
Tapping the Mode button again will put QuNeo back into
Preset mode at any time.
For detailed information about the factory presets, see the
this manual.
9


