background image


Chapter 7. Calibrating and Verifying Sensors 

7.3  Selecting Sensors


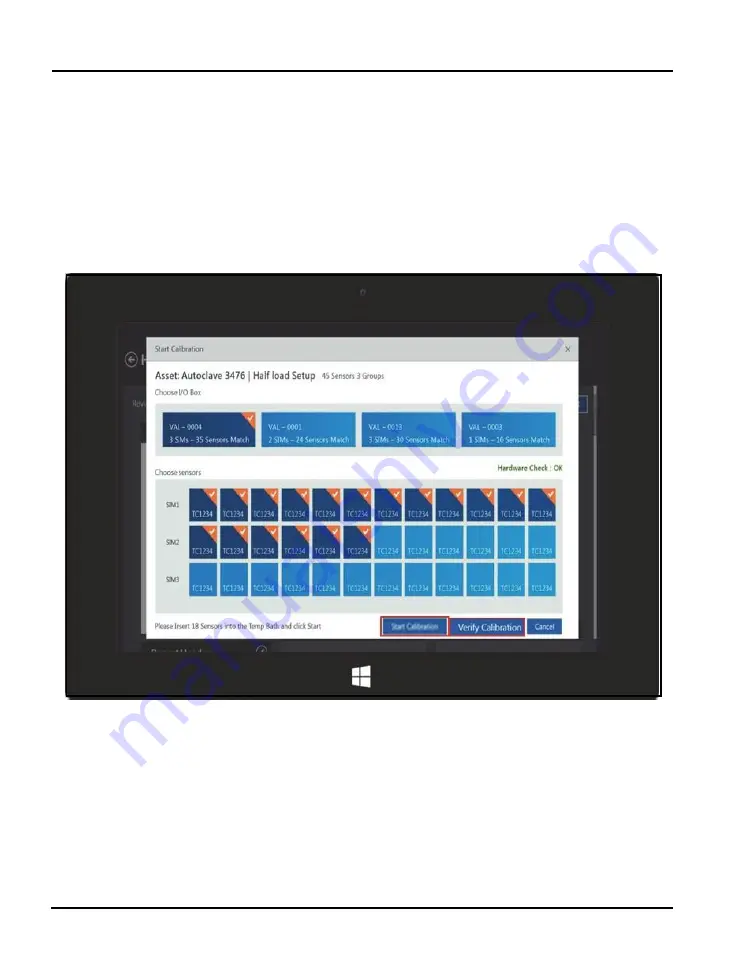
You select the sensors to be calibrated or verified on the Select Sensors screen. This screen 
(Figure below) lists all thermocouple sensors defined in the setup. Sensors that are not 
selected appear as plain blue, while selected sensors appear in their SIM row in deep blue 
with an orange triangle. For each SIM, you can select sensors individually or select all 
sensors in one step. 


Figure 39: Sensor Selection Screen


To select sensors individually, press the individual sensor location. The icon changes to 
deep blue and the check box is enabled. 


78 


Kaye Validator User’s Manual 


Содержание Validator AVS

Страница 1: ...Validation Kaye Validator AVS User s Manual Kaye Validator User s Manual...

Страница 2: ...Kaye Validator AVS Thermal Process Validation System User s Manual M5100 EN Rev A May 2015...

Страница 3: ...No content intended for this page Kaye Validator User s Manual...

Страница 4: ...5 4 The Study Setup 11 1 5 5 Sensor Calibration 12 1 5 6 The Qualification Study 13 1 6 Using the Validator System 14 Chapter 2 The Validator Hardware 2 1 Introduction 17 2 2 The Validator Instrument...

Страница 5: ...g Policies 48 3 6 Setting Policies cont 49 3 7 Online Help 50 Chapter 4 Defining Equipment 4 1 Adding New Equipment 52 4 2 Checking Details for Existing Equipment 53 Chapter 5 Defining Assets 5 1 The...

Страница 6: ...ted Sensors 85 7 4 5 Data Logging Complete at Setpoint 86 7 4 6 The Graph View 86 7 5 Current Calibration and Hardware Connections 87 7 5 1 Reasons for Calibration Failure 88 7 5 2 Completing Calibrat...

Страница 7: ...Report Template Screen 131 10 9 The Creating Cycles Screen 135 10 10 The Add Cycles Screen 140 10 14 The Report Screen 145 10 15 The Graph Report Screen 146 10 16 The Customize Calculations Screen 149...

Страница 8: ...al process validation in the pharmaceutical and biotechnology industries It features automated sensor calibration and qualification reporting A complete Kaye validation package which lets you perform...

Страница 9: ...rt files and audit trail files to a Portable Document Format PDF file optional Users can select and log in to any Console to communicate with any Validator monitoring current studies and calibrations...

Страница 10: ...data and upgrading firmware Plug in Sensor Input Modules minimize sensor handling and save calibration time More flexibility to set up your test assign sensors to groups to perform independent calcul...

Страница 11: ...The following is a brief description of each section of this user s guide Chapter 1 provides an overview of the Validator system Chapter 2 explains the Validator hardware and provides instructions for...

Страница 12: ...soles The Validator provides standalone functionality when calibrating sensors and running qualification studies Figure 2 The Validator Unit The Validator accepts up to 48 inputs in any combination of...

Страница 13: ...and store them for later use Figure 3 Sensor Input Module The Validator can be configured for up to 4 SIMs Each SIM has 12 sensor input connections A memory chip to store calibration offsets SIM seria...

Страница 14: ...of SIMs temperature standards temperature references a USB cable and a USB memory card on the left side of the instrument An icon indicating the type of device identifies each connector Figure 4 Vali...

Страница 15: ...alidator to match the way your company works The Validator software is designed user level has specific permissions that define system access Permissions can also be customized for each user 1 5 2 Use...

Страница 16: ...equirement Option to disable a user account if there are three consecutive login failures for the user ID Secure audit trail files provide a complete listing of events that affect the integrity of the...

Страница 17: ...e Specify how often to scan sensors Define the output relay After you have created and saved your setup you run the study by loading the setup into the Validator via connection from your Console to th...

Страница 18: ...rify that the sensor readings are still within the calibration criteria You can perform a one point two point or three point post qualification verification If a sensor fails post qualification verifi...

Страница 19: ...your production processes The Validator software includes a comprehensive reporting utility that allows you to access original study data to generate easy to read reports to document the specifics of...

Страница 20: ...nd confirm connections Once the hardware is connected use the Validator software to display a graphical representation of your validation equipment to verify hardware and communications connections 5...

Страница 21: ...Report Wizard a reporting utility that enables you to create setup calibration calibration verification and qualification reports and to export qualification data to a CSV file With Report Wizard you...

Страница 22: ...s describing The back of the Validator instrument has connection ports for all system devices and a USB flash drive interface on the left side Internal memory Backup battery Sensor Input Modules SIMs...

Страница 23: ...ses AC power 2 2 1 Connection Ports The back of the Validator shown in Figure 5 below has ports for electrical and communication connections Each connection port is labeled with an icon representing i...

Страница 24: ...a contact switch icon for signaling a PLC or other device Relay Rating 110 VAC amp resistive load 24 VDC 2 amps resistive load 110 VAC amp inductive load 24 VDC 1 amp inductive load USB Connector One...

Страница 25: ...ta and a button for data transfer as shown in Figure below The Validator is designed to write data to the USB flash drive interface To provide data security data is stored in secure data files that ca...

Страница 26: ...le For programming and control each Validator includes a Windows 8 1 based Console Figure below shows the procedure for docking a Console to a Validator via its docking station Figure 7 Docking and Re...

Страница 27: ...at is automatically determined based on the number of sensors being sampled as shown below For further information refer to the Validator Online Help topic Data Storage Rate The maximum file rate for...

Страница 28: ...ond in 2 SIMs 4 channel SIM 12 Channels per second in 2 SIMs 6 channel SIM 3 12 Channels per second in 3 SIMs 4 channel SIM 18 Channels per second in 3 SIMs 6 channel SIM 4 16 Channels per second in 4...

Страница 29: ...nd potentially lose any study data stored in internal memory To prevent this from occurring it is recommended that you connect the Validator to an Uninterruptible Power Supply UPS in areas likely to e...

Страница 30: ...ely discharged the fan will shut off when the battery is completely discharged 4 Turn the power switch off To recharge the battery 1 Connect the AC power cord 2 Turn the power switch on 3 Let the unit...

Страница 31: ...r errors measured in fractions of microvolts making these offsets specific to this instrument and SIM location it is recommended that you use the supplied erasable labels to record SIM serial number S...

Страница 32: ...ion information Use caution when connecting sensors It is recommended that you wear an anti static ground strap when connecting sensors and routing wires To connect sensors to SIM locations 1 Loosen t...

Страница 33: ...for remaining sensors 6 Once all sensors are connected route the wire harness around the connectors and out the drain hole Secure the harness with the tie wraps provided Follow Figure 9 below to main...

Страница 34: ...he negative lead to the negative connector The negative thermocouple lead is normally red in conformance with ANSI standards Moist Heat Environments When validating moist heat processes a sealed PTFE...

Страница 35: ...lue inner wire jackets at opposite ends of the outer insulation drip cut to allow condensate drainage from within the individual wires as shown in Figure 12 below Figure 12 Shaving from Inner Wire Jac...

Страница 36: ...udy You can also wire a dry contact to your vessel s PLC to detect status output and use it to automatically mark the start and end of the exposure cycle during the qualification study 1 2 3 4 5 6 Fig...

Страница 37: ...rrent Transmitter Connection 2 4 Kaye IRTD The Kaye IRTD temperature measurement standard is a self contained measurement system providing temperature data directly to the Validator software The measu...

Страница 38: ...steam autoclaves The LTR 25 140 accepts up to 18 thermocouples LTR 40 140 setpoint range 40 C to 140 C at 25 C ambient Recommended for calibration of sensors used in freezers cold rooms incubators an...

Страница 39: ...lator must be used at all times If it is not used specifications are not guaranteed Also at cold temperatures there will be significant ice buildup that will affect accuracy and uniformity Insert the...

Страница 40: ...the sensors will protrude approximately 0 5 inches beyond the end of the thermocouple wells For 22 gauge wire 12 PTFE thermocouples fit into each well Note The access cover which is 7 5 inches wide ca...

Страница 41: ...sert the thermocouple sensors into the temperature reference See the previous section Sensor and IRTD Installation for installation instructions 5 Connect your Console to the docking station Ethernet...

Страница 42: ...use 1 Turn the power off 2 Disconnect the power cord from the line filter 3 Using a small slotted screwdriver provided with the SIMs pry open the fuse holder from the bottom tab 4 Slide the fuse holde...

Страница 43: ...dator you ll need a safe and durable container A rugged foam fitted case equipped with wheels and a collapsible handle is available to transport your Validator Two compartments include a secure space...

Страница 44: ...System Administrator account that allows you first to set site options and then to log in to the Password Maintenance utility following initial program installation in order to create your own System...

Страница 45: ...indows Console The login screen appears as shown in Figure 16 below Figure 16 Login Screen 1 Enter Kaye in the User ID text box Kaye is the default System Administrator user ID The User ID text box is...

Страница 46: ...g in to the Validator you will need to enter your own System Administrator user ID and password The system is able to identify you by name using your unique user ID and password combination Note A goo...

Страница 47: ...dministrator Account cont Figure 18 The Preferences Tab 2 From the Admin Settings window press User Management Figure 19 User Management Tab 3 On the User Management screen press New User and enter yo...

Страница 48: ...he User ID text box Your user ID can be any combination of numbers and characters up to a maximum of 16 A user ID may not be used by more than one active account 5 Enter your new System Administrator...

Страница 49: ...ate a user account 1 From the Admin menu press User Management and then press New User The New User screen opens 2 Enter the new user name in the Name text box A user s name is associated with the use...

Страница 50: ...on verification Manually starts or stops a qualification study or exposure cycle Deletes or moves calibration or qualification data files Accesses report utilities Note A user account is not active un...

Страница 51: ...ts on the Preferences screen you ll be prompted to change to the new settings the next time you save that setup However only the label will be changed not the temperature value You need to make sure t...

Страница 52: ...B port from the Port list box to communicate with the Kaye Validator 8 Press Yes or No to indicate if you want to enable a user to change lethality 9 Enter the lower limit for IRTD stability 10 If nec...

Страница 53: ...or you can enable policies that Require minimum length passwords for all user accounts Set passwords to expire after a number of days The user will be prompted to change their password once their curr...

Страница 54: ...stem User IDs and passwords will not be required to use the software Allow Supervisors to change the D value in the lethality calculation When this option is enabled the D value field on the Lethality...

Страница 55: ...23 Equipment Hub Accessed from the Main Menu the Equipment hub displays Kaye equipment like Validator IRTD etc From the Equipment screen you can Add new equipment to the system Search study files wher...

Страница 56: ...r details separately for each new piece of equipment Use the text boxes and drop down menus to enter The Equipment Serial number Last Calibrated Date The model number The Equipment Type The Calibratio...

Страница 57: ...r Existing Equipment To review the details for a particular piece of equipment press the tile for that particular item on the Equipment Hub screen The Equipment Details screen opens Figure 25 The Equi...

Страница 58: ...sting Equipment cont Serial Number Date of last calibration Due date for calibration Model number Equipment Type Press the Edit button to change any of these parameters This screen shows equipment ass...

Страница 59: ...Main Menu The Assets Hub appears similar to Figure below Figure 26 The Assets Hub The Asset Hub screen lists the various assets validated by your Next Gen Validator system On the top text line you can...

Страница 60: ...er of assets exceeds the screen size a scroll bar enables you to view the other assets To search for a particular asset press on the Search magnifying glass icon and a text box enables you to enter se...

Страница 61: ...n the upper left the title will be the type and number of the asset If you have sorted the Assets screen in another way by manufacturer size or location these parameters will appear in the upper left...

Страница 62: ...sociated setups Press a downward arrow to launch the Setup Hub page On the Hub page users can apply predefined Filter options Status Activity Setup Name Date Comments and Actions to sort the files You...

Страница 63: ...1 The Asset Details Screen cont For documents the pane provide option to upload documents related to the Asset For notes the Notes screen provide option to upload text files related to the Asset 56 K...

Страница 64: ...he plus icon The New Asset screen opens Figure 28 New Asset Screen You enter details separately for each new asset Use the text boxes and drop down menus to enter The asset name The Equipment ID The t...

Страница 65: ...load up to three bmp or jpeg images of the unit to appear on the Asset Details screen as well as a wiring overlay image that provides users of sensor placement on the asset When you have finished pres...

Страница 66: ...creen through the Setup pane When you create a setup you Define the sensors you are going to use in the study Assign sensors to groups and specify group calculations Define group events to be monitore...

Страница 67: ...have permissions assigned by your System Administrator to create setups Figure 29 The Setup Hub Screen To create a setup file From the Asset Details screen for a particular asset press Setups In the S...

Страница 68: ...file From the Setup Hub screen for your asset select the setup file that you want to modify You must have user permissions to modify a setup 6 3 The Define Setup Screen After you have pressed the New...

Страница 69: ...iption any Comments you wish to add Note The Setup name Study type and Number of sensors fields are mandatory The Setup Name and Comment fields can accept alphanumeric characters and blanks while the...

Страница 70: ...espond to the numbers on the input connectors up to 12 mounted inside the SIM For an initial setup all the input connector tiles are blue to indicate that they have not been selected Press an individu...

Страница 71: ...selected the sensors you must configure them for the appropriate input type Figure 32 Configuring Sensors IMPORTANT If one sensor type is selected for a SIM then all sensors in that SIM should be of t...

Страница 72: ...ut Max 10 00 Shunt 250 00 Ohms The range of input current is from 4 up to 20 mA For pressure You can enter up to 4 decimal values in the voltage input and output fields The default values are Input Mi...

Страница 73: ...do not have to be in consecutive locations You can assign any sensor from any SIM to a group You can assign a sensor to more than one group to relate the sensor s output to different conditions For ex...

Страница 74: ...screen displays a scrollable listing of existing groups as well as the New Group button To assign sensors to groups 1 Press on individual sensors to select them for the group These sensors now appear...

Страница 75: ...permits moving sensors to another sensor group specified in drop down list Add Sensors allows users to add further sensors to a group Wiring overlay enables displaying the wiring overlay graphic Figu...

Страница 76: ...qualification study Calculations include statistical lethality interval saturation pressure of steam and saturation temperature of steam calculations You can also define criteria per group to monitor...

Страница 77: ...ensate for any errors inherent in sensor materials and stores these offsets in the associated SIMs You can specify a one point calibration a two point calibration or a two point calibration and a one...

Страница 78: ...mperature setpoints for calibration verification to verify that each sensor is still within your calibration criteria You must select at least one setpoint for calibration verification Sensor and IRTD...

Страница 79: ...ditions used to start and stop the qualification cycle manually or automatically Exposure start stop conditions used to start and stop the exposure cycle manually or automatically Data storage options...

Страница 80: ...screen provide following actions you can take Copy as New Setup allows copying the current setup as a new setup and saving it under a different name Create Setup Report creates an initial setup report...

Страница 81: ...hows the following sections each with an Edit icon to permit rapid changes Asset Details Sensor Details Calculation Groups Report Header Calibration Parameters Qualification Parameters Press OK to sav...

Страница 82: ...tpoint In this chapter you Load a setup into the Validator Select sensors to calibrate Run calibration The Kaye Validator uses the calibration parameters defined in your setup to perform sensor calibr...

Страница 83: ...ature variations and or exposure to external heat sources during calibration may cause temporary temperature measurement errors To provide maximum accuracy during the calibration process power up the...

Страница 84: ...just created a setup press Calibrate Sensors on the Review screen of the Setup Menu If you wish to use another setup from the Main Menu go to Calibration screen in Asset details and then select setup...

Страница 85: ...setup Sensors that are not selected appear as plain blue while selected sensors appear in their SIM row in deep blue with an orange triangle For each SIM you can select sensors individually or select...

Страница 86: ...Press the X in the upper right to exit the option Note Once you begin a new calibration any offsets from previous calibrations will be lost 7 4 Calibrating or Verifying Sensors The Kaye Validator auto...

Страница 87: ...gh the remaining data The Stop Calibration button enables you to stop calibration If the stability point for any particular sensor is reached that point is replaced with a green tick mark However if t...

Страница 88: ...eadings change to a green background If any sensors fail to reach stability the calibration process remains there To end terminate the calibration process press Cancel 7 4 3 Calculate Deviation of Unc...

Страница 89: ...etpoint the Kaye Validator automatically sets the Kaye temperature reference to the check setpoint The only difference between the low and high setpoint calibration and the check setpoint is that cali...

Страница 90: ...M are displayed along with the SIM number sensor label the temperature point of the sensor and the value of how much the sensor is off 7 5 Current Calibration and Hardware Connections Both List and Gr...

Страница 91: ...cation might fail for one of four reasons Failed calibrated deviation Failed uncalibrated deviation Failed calibration due to Unstable IRTD and loggers Failed calibration due to not enough data Data f...

Страница 92: ...you can monitor live data or calibration or qualification study progress on the Console 8 1 Select Validator From the Main Menu the hardware area in the center displays a tile Discover Press this til...

Страница 93: ...n the network The tile for the currently selected Validator has an orange triangle in the upper right corner Press the tile for the Validator you need to use and then press Connect to establish the co...

Страница 94: ...ys live data Pressing the Back button returns to the Main Menu which now shows the status of the connected Validator with its name at the upper right along with a Disconnect option Figure 45 Main Menu...

Страница 95: ...e Data cont If the Validator is in monitoring status you can switch between List or Graph view to see live data from the Validator on the screen Figure 47 Monitoring in List View Figure 48 Monitoring...

Страница 96: ...s in Qualification status the live screen displays groups as defined in the study In addition the Custom button permits users to customize group for display Figure 49 Qualification Study in Graph View...

Страница 97: ...program navigates to the Customize graph screen There users can customize the display of the SIMs within groups by changing the Max and Min values of the Y axis of the graph and also choose the senso...

Страница 98: ...Chapter 8 Viewing Live Data 8 2 Monitoring Live Data cont Figure 53 Calibration in Graph View Figure 54 Calibration in List View Kaye Validator User s Manual 91...

Страница 99: ...k Communications Connections On any of the live data monitoring screens you can check your communications connections by pressing the Hardware Connection button On the Hardware screen each hardware it...

Страница 100: ...a Device Not Found symbol 8 4 Select a Temperature Standard If you have two IRTDs connected to the Kaye Validator you have to specify which one to use as the temperature standard To select the temper...

Страница 101: ...culations and compiles data for your reports Qualification data is always written to the Kaye Validator internal memory In addition qualification data can be written to the USB flash drive The Kaye Va...

Страница 102: ...r study using the Kaye Validator report generator See Chapter 10 Before you begin your qualification study Place the Kaye Validator in a location with stable and even temperature not exposed to any lo...

Страница 103: ...ets are restored and the sensors are marked as calibrated When you load a setup with a different line frequency than the setup currently in memory you must wait for the Kaye Validator to stabilize app...

Страница 104: ...Chapter 9 The Qualification Study 9 2 1 Select a Setup File cont Kaye Validator User s Manual 97...

Страница 105: ...Console You can connect the Validator in either of three ways Through the docking station Through Ethernet the screen displays a list of Validator with same IP address or that are in range of the net...

Страница 106: ...hat apply to the whole study start stop qualification start stop exposure as well as all group specific events Graph option enables you to view the data graphically When viewing sensor readings and ca...

Страница 107: ...nsors or calculations than fit on the screen use the scroll bar to display the remaining data A button for to stop qualification is available at the bottom of the screen Data is refreshed at the rates...

Страница 108: ...tion data samples are displayed at the file selection rate To graph real time sensor readings and calculations 1 Press the Graph View option The Graphs screen displays All the available Groups in that...

Страница 109: ...he user to understand the type of calculation graph A block in the lower right displays the time taken to reach the set temperature ramp time 2 To create a custom graph press the Custom button Figure...

Страница 110: ...Chapter 9 The Qualification Study 9 4 Graph Real Time Sensor Readings and Calculations cont Figure 60 Graph View of Completed Study Kaye Validator User s Manual 103...

Страница 111: ...le by the software and you will not be able to generate reports Since reports are created each time from a secure data file you can specify which groups to include in your Qualification Report For qua...

Страница 112: ...sors the report lists scaling information such as min and max of input and output System preferences such as temperature units pressure units and line frequency also appear The report header lists the...

Страница 113: ...Report 10 2 3a Qualification Detailed Report The Qualification Detailed Report organizes information for each group by sensor data and type of calculation lethality interval statistical saturated stea...

Страница 114: ...puts section documents the raw data collected during the study If you are conducting penetration studies the Lethality Calculations section documents accumulated lethality for each sensor and the mini...

Страница 115: ...that were added during post qualification reporting For lethality calculations the Summary Report documents the lethality calculation parameters the lethality calculation condition the lethality calcu...

Страница 116: ...operator and any additional information required to understand the action taken A new audit trail file is automatically created each month and placed in the Kaye Validator application folder When runn...

Страница 117: ...Trail cont Audit trail data is available to authorized personnel through the Create Reports program The System Administrator can View and print the audit trail Backup the audit trail to a PC or netwo...

Страница 118: ...EventCond_MaxValue 100 EventCond_MinValue Audit Events EVENT_PROGRAM_START EVENT_PROGRAM_CLOSE EVENT_HMI_CONNECT EVENT_HMI_DISCONNECT EVENT_SIM_CONNECT EVENT_SIM_DISCONNECT EVENT_IRTD_CONNECT EVENT_IR...

Страница 119: ..._EXPOSURE_STARTED EVENT_MANUAL_EXPOSURE_STOPPED EVENT_AUTO_SENSOR_CAL_STARTED EVENT_AUTO_SENSOR_CAL_DONE EVENT_MANUAL_SENSOR_CAL_STARTED EVENT_MANUAL_SENSOR_CAL_DONE EVENT_MANUAL_SENSOR_CAL_TERMINATED...

Страница 120: ...FW_UPGRADE EVENT_DAQ_FW_UPGRADE EVENT_POWERBOARD_FW_UPGRADE EVENT_FILE_CREATION_FAILURE EVENT_HMI_SUBSCRIPTION_FAILURE EVENT_AUDIT_LOG_AT_THRESHOLD EVENT_AUDIT_LOG_FULL EVENT_AUDIT_LOG_CLEARED EVENT_A...

Страница 121: ...The Reports Hub enables users to access any report on the Console To access the Reports Hub press the Reports icon from the Main Hub To study the content of a particular report press the button for t...

Страница 122: ...s or Autoclaves or Heat Chambers ID the activity and the date on which the run was performed You can choose from three different types of analyses for a qualification study Summary summarizes the enti...

Страница 123: ...Details screen The header lists the particular asset for which you are looking up reports A row below includes information such as Equipment ID Water Spray VRX Fq1 Capacity and Manufacturer name You c...

Страница 124: ...avigate to Template Selection Screen If user Selects Performance Analysis Screen it will ask for Option to Select for unit Temperature Humidity Pressure Contact Voltage Current Note For the setup cali...

Страница 125: ...Chapter 10 Generating Reports Figure 63 Report Detail Screen When Summary Analysis is Selected 118 Kaye Validator User s Manual...

Страница 126: ...Chapter 10 Generating Reports Figure 64 Report Analysis Screen when Performance Analysis is Selected Kaye Validator User s Manual 119...

Страница 127: ...and orange on the left while the unselected files appear in light blue You can add up to three qualification study files A warning appears if you try to add a fourth study When you select two or three...

Страница 128: ...Chapter 10 Generating Reports 10 6 The Performance Analysis Screen cont Figure 66 The Performance Analysis Screen Kaye Validator User s Manual 121...

Страница 129: ...defined starting point and the conclusion of the study as the end point Save and Close Saves the selections and returns to the initial Performance Analysis screen Superimpose Superimposes one file on...

Страница 130: ...ress the Edit Cycles button to edit the existing cycle selections Press the Customize button to modify the generated graph page When you have finished press the forward right button in the upper right...

Страница 131: ...If user selects Summary Analysis Option in Report Analysis Screen then from there it will be Navigated to Report Detail Screen After Selecting Study file in the Report Detail Screen we will be moved...

Страница 132: ...en after selecting particular file Template Screen Appears If you have not yet created any report templates the drop down list on the Template Analysis screen is initially empty Once you have created...

Страница 133: ...Chapter 10 Generating Reports 126 Kaye Validator User s Manual...

Страница 134: ...orts 10 10 The Add Cycles Screen Figure 71 The Add Cycles Screen To define the data cycles press the Add Cycle button A window opens that lists various cycle names such as Exposure Ramp up etc Kaye Va...

Страница 135: ...er 10 Generating Reports 10 10 The Add Cycles Screen cont Figure 72 Window with Cycle Names Press a cycle name A window allows the user to type in a user defined cycle name 128 Kaye Validator User s M...

Страница 136: ...t the cycle on either Time or Condition by pressing the associated radio button If you select the Time option you enable the Start and End boxes to enter times in hh mm ss format If you select the Con...

Страница 137: ...ch cycle an Edit and Delete button appears next to the cycle name Press Edit to modify the cycle or Delete to delete the cycle Figure 74 Added Cycle Screen 5 When you have finished adding cycles press...

Страница 138: ...Chapter 10 Generating Reports Kaye Validator User s Manual 131...

Страница 139: ...ns Screen and pdf file of qualification can be generated 2 Customize Groups we can edit already defined groups and save it for generating graph report and qualification Report 3 Customize Calculations...

Страница 140: ...Graph Report Screen Figure 83 Graph Report Screen Depending on the sensor group and graph type selected you can apply the following calculations Max Value Min Value Avg and Std Dev Max Min Max Avg Av...

Страница 141: ...he left pane has the lethality graph for the entire study while the right pane enables you to change the D Z and Base temperature values The Saturation Pressure calculation is available only if the st...

Страница 142: ...Pressure Note For all types of graphs Open Under Range Over Range or NO SIM sensor values are not displayed for such failure values Users can zoom in and out of any graph or apply the print option to...

Страница 143: ...interval saturation pressure of steam and saturation temperature of steam calculations You can also define one event per Report to monitor during the study To specify a calculation If calculations ha...

Страница 144: ...rs to groups Press on individual sensors to select them for the group These sensors now appear as a deep blue with an orange checkbox Press the New Group button A Group Name text box appears above the...

Страница 145: ...tions Delete permits deletion of a sensor group Move Sensors permits moving sensors to another sensor group Add Sensors allows users to add further sensors to a group Wiring overlay icon enables displ...

Страница 146: ...row header First Page display information as entered during study creation At left side the Groups list two editable text boxes Performed By and Reviewed By allow you to enter the names of users who...

Страница 147: ...Chapter 10 Generating Reports 140 Kaye Validator User s Manual...

Страница 148: ...stem administrator Name of modified user Success or Failure Permission level Delete a user Date time of event Delete user Name of system administrator Name of deleted user Failed login Date time of ev...

Страница 149: ...time of event Site options modified Name of system administrator Modification Preferences Date time of event Preferences modified Name of user Modification Serial Numbers Validator Date time of event...

Страница 150: ...p name User who ran calibration Date calibration started Source directory Destination directory Delete calibration Date time of event Delete calibration file Name of user who deleted file Setup name U...

Страница 151: ...ory Copy calibration verify Date time of event Calibration verification file copied Name of user who copied file Setup name User who ran cal verification Date cal verification started Source directory...

Страница 152: ...ate created Delete Date time of event Setup deleted Name of user who deleted setup Setup name User who created Setup Date created Miscellaneous PC program started Date time of event Program launch Win...

Страница 153: ...Backup audit trail Date time of event backup Name of system administrator Directory Software upgraded Date time of event Software version change Name of user who upgraded software Old version to new v...

Страница 154: ...ontain hazardous substances that could impact health and the environment In order to avoid the dissemination of those substances in our environment and to diminish the pressure on the natural resource...

Страница 155: ...dmium Cd lead Pb or mercury Hg For proper recycling return the battery to your supplier or to a designated collection point B 2 1 What do the Markings Mean Batteries and accumulators must be marked ei...

Страница 156: ...g for mercury and Cd for cadmium Cadmium poisoning can result in cancer of the lungs and prostate gland Chronic effects include kidney damage pulmonary emphysema and bone diseases such as osteomalcia...

Страница 157: ...IRTD Temperature Standard 0 01 C k 1 IRTD Temperature Standard 0 051 C k 1 Total System Uncertainty 0 078 C k 1 Kaye Validator Specifications Analog Input Up to 48 Voltage Input Accuracy 30 days 0 00...

Страница 158: ...ld not be blocked The unit should be serviced by authorized service personnel only This unit must be opened by Amphenol authorized service technicians only tempering by unauthorized representatives co...

Страница 159: ...A Phone 814 834 9140 Fax 814 781 7969 Europe Amphenol Advanced Sensors Sinsheimerstr 6 75179 Pforzheim Germany Tel 49 0 7231 14335 0 Fax 49 0 7231 14335 29 China Amphenol Changzhou Connector Systems C...

Страница 160: ...Disposal 152 Battery Pack Replacement 25 Battery Recharge 25 C Calculations Graph Screen 95 Calibration 37 Calibration Failure Reasons 88 Calibration Parameters 74 Calibration Report 111 Calibration V...

Страница 161: ...40 Define Setup Screen 65 Deviation of Calibrated Sensors 85 Deviation of Uncalibrated Sensors 85 Display Screen 18 Disposal Batteries 152 Electronic Waste 151 E Equipment Adding New 52 Equipment Det...

Страница 162: ...ions 73 Groups 70 Groups Assigning Sensors to 71 H Hardware 87 Hardware Connection 97 Hardware Connections 7 87 HTR 400 33 I Validator 90 Internal Memory 22 IRTD 32 IRTD Address Changing 98 K Kaye IRT...

Страница 163: ...7 Memory 22 Setting Time and Date 37 Shipping 38 Software 8 User Access 8 L Live Data Viewing 89 Loading a Setup 80 101 Logging in First Time 40 LTR 25 140 33 LTR 40 140 33 LTR 90 34 36 M Maintenance...

Страница 164: ...Qualification Detailed Report 111 Qualification Study 13 Steps 14 Qualification Study Conditions 76 Qualification Study Setup 11 Qualification Summary Report 113 Qualifying Equipment Purpose 13 R Real...

Страница 165: ...the 77 Qualification Study 11 Reviewing the 77 Setup File Creating 64 Setup File Selecting 101 Setup Report 110 Setup Loading 101 Setups Defining 63 Shunt Resistors 32 SIM Wiring 27 Stability 85 Stop...

Страница 166: ...Date Setting 37 U User Access 8 User Access Levels 8 User Accounts 8 Creating 44 User Accounts Creating 44 User Identification User ID 9 V Validation Study Setups 8 Validator Hardware 5 Software 8 Va...

Страница 167: ...No content intended for this page...

Отзывы: