– 9
If there is still water in the fresh cleaning station,
empty it.
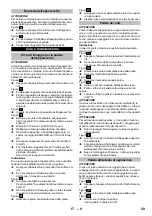
Illustration
Disconnect the main plug from the socket.
Illustration
Wind the mains cable around the cable clips.
Secure the mains cable with the cable clip.
ATTENTION
The fresh and waste water tanks must be emptied be-
fore the appliance is set down on the ground for roller
removal. This prevents any fluids from leaking out of the
tank when it is laid on the ground.
Note
In the case of heavy contamination, clean the cleaning
rollers separately.
Illustration
Switch off the appliance; press the on/off button to
do so.
If there is still water in the fresh water tank, remove
the fresh water tank and empty it.
Illustration
Disconnect the main plug from the socket.
Empty the fresh water reservoir.
Illustration
Empty the waste water tank.
Illustration
Twist out the cleaning rollers from the recessed
grip.
Clean the cleaning rollers under running water.
or
Wash the cleaning rollers in the washing machine
up to 60°C.
ATTENTION
Do not use any soft detergents when cleaning in the
washing machine. This avoids causing damage to the
microfibres. It also preserves the high performance lev-
els of the cleaning rollers.
The cleaning rollers are not suitable for the tumble dry-
er.
ATTENTION
To avoid damaging the washing machine, we recom-
mend placing the rollers in a laundry net and loading the
washing machine with additional laundry.
After cleaning, allow the rollers to air-dry.
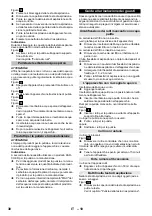
Illustration
Screw the cleaning rollers onto the threaded rod up
to the mechanical stop.
Pay attention to the colour-codes on the inside of
the roller and roller holder on the appliance (e.g.
blue should match up with blue).
After the installation, check to ensure that the
cleaning rollers sit snugly.
ATTENTION
In the case of heavy contamination or if parts such as
stones or splinters get into the suction head, it will need
to be cleaned. While the appliance is working, these
parts will cause a rattling noise or will block up the suc-
tion ducts, diminishing suction performance.
Illustration
Switch off the appliance; press the on/off button to
do so.
Illustration
Disconnect the main plug from the socket.
Illustration
Remove the cleaning rollers.
See "Cleaning the rollers".
Illustration
Press the suction head lock.
Take off the suction head lid.
Clean the suction head lid under running water.
If necessary, remove particle deposits from the
suction ducts and slits in the suction head lid.
Clean the suction head with a damp cloth.
Fix the suction head lid onto the suction head.
Note
When attached to the suction head the suction head lid
must lock in place audibly.
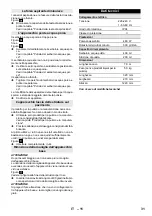
Illustration
Screw the cleaning rollers onto the threaded rod up
to the mechanical stop.
See "Cleaning the rollers".
ATTENTION
Regularly clean the waste water tank to prevent block-
age to the separator with dust and dirt or to prevent dirt
from building up in the tank.
Illustration
Switch off the appliance; press the on/off button to
do so.
Illustration
Place the appliance in the cleaning station.
Illustration
until
Illustration
Remove the waste water tank from the appliance.
See Chapter "Emptying the waste water tank".
Clean the lid/separator and waste water tank with
tap water.
The waste water tank can also be cleaned in the
dishwasher.
After cleaning, put the waste water tank with lid
back into the appliance.
ATTENTION
The use of unsuitable cleaning and disinfecting agents
can damage the appliance and will void the warranty.
Note
Add cleaning or disinfecting agent as required.
When dosing the detergent and care product, fol-
low the manufacturer's dosage instructions.
To prevent foaming, first fill the fresh water tank
with water then cleaning or disinfecting agent.
To avoid exceeding the "MAX" fill level on the fresh
water tank, leave room for the cleaning or disinfect-
ing agent when filling with water.
Often, failures have simple causes and you can do the
troubleshooting yourself using the following overview. If
you are in doubt or if the failure is not listed here please
contact the authorized customer service.
Filter inlay is not inserted.
(see graphic for description of the device)
Remove fresh water tank and insert filter inlay with
rubber pin facing upwards.
Filter inlay is inserted the wrong way round.
Cleaning the rollers
Cleaning the suction head
Clean the waste water tank
Detergents and care products
Troubleshooting
Lack of roller moistening with fresh water
16
EN
Содержание FC 5
Страница 2: ...2...
Страница 3: ...3...
Страница 4: ...4...
Страница 78: ...6 IEC 60364 FI 3x1 mm 78 EL...
Страница 80: ...8 60 50 ml 5 n Off n Off MAX MAX n Off n Off 80 EL...
Страница 81: ...9 n Off 200 ml K RCHER n Off 30 60 n Off n Off 60 C 81 EL...
Страница 82: ...10 n Off n Off K RCHER MAX 10 20 82 EL...
Страница 90: ...5 REACH www kaercher com REACH www kaercher com RU 5 RU 6 RU 7 RU 7 RU 7 RU 8 RU 9 RU 11 RU 12 MAX 1 2 90 RU...
Страница 91: ...6 IEC 60364 FI 3x1 91 RU...
Страница 93: ...8 K RCHER MAX 250 60 50 5 MAX MAX 93 RU...
Страница 94: ...9 200 K RCHER 30 60 94 RU...
Страница 95: ...10 60 C MAX 95 RU...
Страница 96: ...11 10 20 15 50 90 96 RU...
Страница 97: ...12 220 240 V 1 50 60 Hz IPX4 II 460 500 400 200 7 0 5 0 320 270 1220 97 RU...
Страница 152: ...5 PVC REACH www kaercher com REACH www kaercher com BG 5 BG 5 BG 7 BG 7 BG 7 BG 7 BG 9 BG 10 BG 11 MAX 1 2 152 BG...
Страница 153: ...6 IEC 60364 3x1 0 C 153 BG...
Страница 155: ...8 50 ml 5 MAX MAX 155 BG...
Страница 156: ...9 200 ml K RCHER 30 60 60 C 156 BG...
Страница 157: ...10 K RCHER MAX 10 20 157 BG...
Страница 158: ...11 15 50 ml 90 220 240 V 1 50 60 Hz IPX4 II 460 W 500 U min 400 200 7 0 5 0 320 270 1220 158 BG...
Страница 177: ...5 REACH www kaercher com REACH www kaercher com UK 5 UK 5 UK 7 UK 7 UK 7 UK 7 UK 9 UK 10 UK 11 MAX 1 2 177 UK...
Страница 178: ...6 IEC 60364 F 3x1 178 UK...
Страница 180: ...8 50 5 MAX MAX 180 UK...
Страница 181: ...9 200 K RCHER 30 60 60 C 181 UK...
Страница 182: ...10 MAX 10 20 15 50 182 UK...
Страница 183: ...11 90 220 240 V 1 50 60 Hz IPX4 II 460 500 400 200 7 0 5 0 320 270 1220 183 UK...
Страница 184: ...5 REACH www kaercher com REACH www kaercher com KK 5 KK 5 KK 7 KK 7 KK 7 KK 7 KK 9 KK 10 KK 11 MAX 1 2 184 KK...
Страница 185: ...6 IEC 60364 FI 3x1 185 KK...
Страница 187: ...8 60 50 5 MAX MAX 187 KK...
Страница 188: ...9 200 K RCHER 30 60 60 C 188 KK...
Страница 189: ...10 K RCHER MAX 10 20 189 KK...
Страница 190: ...11 15 50 90 220 240 V 1 50 60 Hz IPX4 II 460 500 400 200 7 0 5 0 320 270 1220 190 KK...
Страница 191: ...12 90 220 240 V 1 50 60 Hz IPX4 II 460 W 500 U min 400 ml 200 ml 7 0 m 5 0 kg 320 mm 270 mm 1220 mm 191 AR...
Страница 192: ...11 MAX 10 20 15 50 192 AR...
Страница 193: ...10 60 193 AR...
Страница 194: ...9 200 ON OFF 30 60 194 AR...
Страница 195: ...8 60 50 5 ON OFF MAX MAX 195 AR...
Страница 197: ...6 IEC 60364 FI 3x1 197 AR...
Страница 198: ...5 PVC REACH www kaercher com REACH www kaercher com AR 5 AR 5 AR 7 AR 7 AR 7 AR 7 AR 9 AR 11 AR 12 MAX 1 2 198 AR...
Страница 199: ......


