manualshive.com logo in svg
background image

13

NOTE:

 If the lid is not correctly 

secured to the jug, the soup 

maker will not operate. 

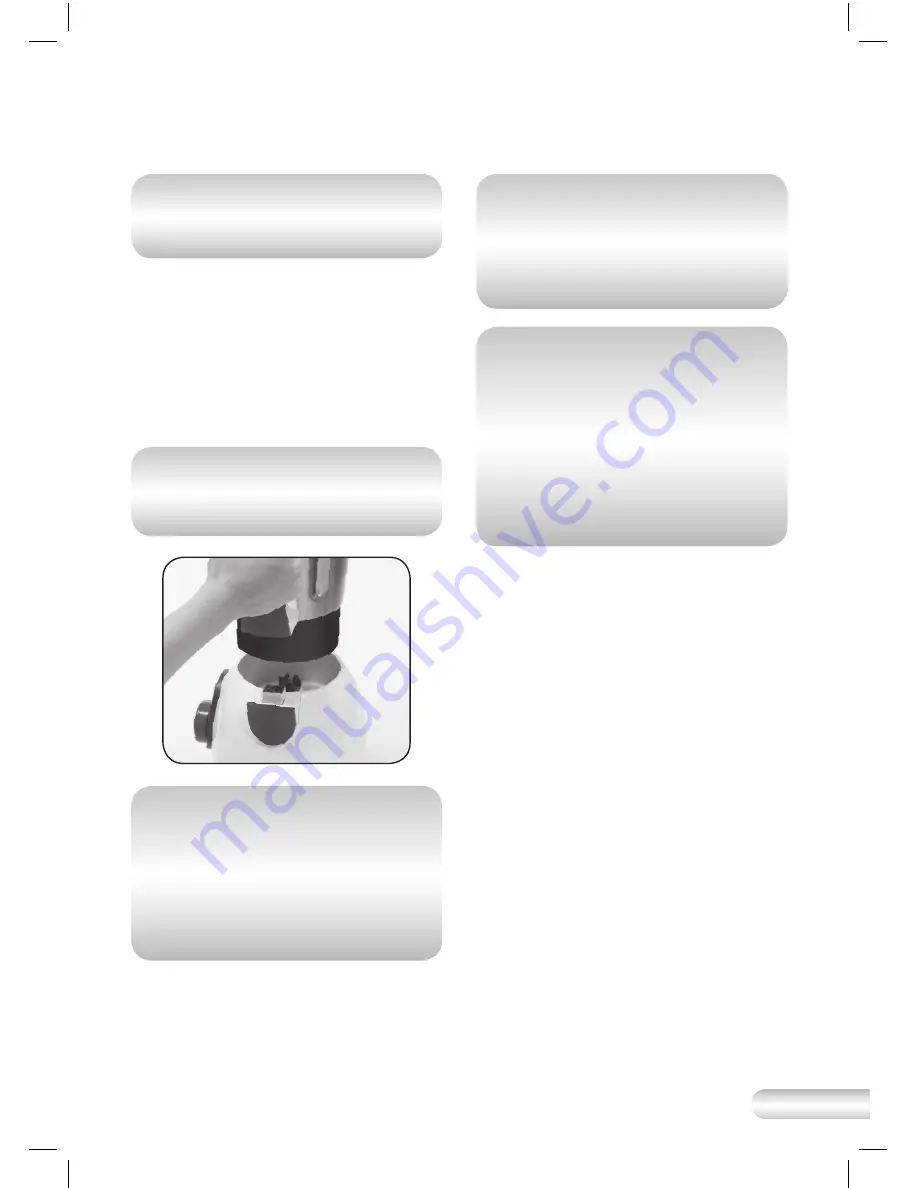
5.  Holding the soup maker jug by 

the handle, place the jug onto 

the motor base ensuring that the 

connector at the base of the 

handle aligns with the connector 

on the motor base. The jug should 

sit securely on the motor base 

(Fig.3).


NOTE:

 If the jug is not properly 

positioned on the motor base, 

the soup maker will not operate. 


Fig. 3


NOTE:

 Additional ingredients can 

be added during an operation 

by removing the inner cap from 

the lid and placing or pouring 

ingredients through the middle 

opening in the lid. Do not add 

ingredients while the soup maker 

is blending.


NOTE:

 Always ensure the inner 

cap is replaced and locked 

properly after adding additional 

ingredients to avoid spillage 

of soup during the cooking 

process.


NOTE:

 Unlocking and removing 

the lid during the cooking cycle 

will pause the program for 3 ½ 

minutes. Replace the lid onto 

the jug within this timeframe to 

recommence the current cycle. 

After this timeframe has lapsed, 

the program will have to be 

reselected and will commence 

from the beginning.


KBL620_IB_D17.indd   13

27/01/2017   10:52 am

Содержание KBL620 Series

Страница 1: ...INSTRUCTION BOOKLET Suits all KBL620 models u KBL620_IB_D17 indd 1 27 01 2017 10 52 am...

Страница 2: ...you need some assistance with your Kambrook appliance please contact our Customer Service Department on 1300 139 798 Australia or 0800 2738 45 New Zealand Alternatively visit us on our website at www...

Страница 3: ...Safety First Your Kambrook Soup 2 Simple Soup Maker p6 Soup Maker Quick Start Guide p7 Using Your Kambrook Soup Maker p12 Troubleshooting Guide p19 Care Cleaning and Storage p20 Recipes p22 KBL620_IB...

Страница 4: ...nished cooking before removing the jug from the motor base If the jug is removed from the motor base during to cooking program the soup maker will automatically switch off Do not place anything on top...

Страница 5: ...ing should be performed at an authorised Kambrook Service Centre Important Safeguards For All Electrical Appliances This appliance is for household use only Do not use this appliance for other than it...

Страница 6: ...al blending speed control dial 2 speeds plus pulse 9 ON OFF button for selecting 3 pre set functions Model KBL620 shown 10 BLEND button pre set blending cycle for smoothies and milkshakes 11 SMOOTH bu...

Страница 7: ...ture of the ingredients used NOTE Do not operate the LOW or HIGH blend setting for more than 2 minutes continuously Allow the motor to rest for 1 minute between each use Do not operate the PULSE setti...

Страница 8: ...mately 30 minutes see note The soup maker will beep three times when the cycle is complete 5 Switch the soup maker off at the power outlet Remove the soup maker jug from the motor base and remove the...

Страница 9: ...All buttons on the control panel will illuminate 4 Press the CHUNKY button once The CHUNKY button will illuminate red and the cooking process will begin taking approximately 30 minutes see note The so...

Страница 10: ...hts will illuminate 4 Press the BLEND button The button will illuminate blue and commence the blending cycle This cycle takes 30 seconds The soup maker will beep three times when the cycle is complete...

Страница 11: ...onto the jug and secure the jug onto the motor base 2 Plug power cord into a 230V or 240V power outlet and switch on 3 To blend using the LOW speed turn the speed control dial in a clockwise direction...

Страница 12: ...steam or condensation as it could cause serious burns Using Your Kambrook Soup Maker Assembling the Soup Maker 1 Place the soup maker motor base on a flat dry surface such as a bench top Ensure the sp...

Страница 13: ...operation by removing the inner cap from the lid and placing or pouring ingredients through the middle opening in the lid Do not add ingredients while the soup maker is blending NOTE Always ensure th...

Страница 14: ...is recommended that all ingredient are cut into a small dice 2 3cm to ensure they are thoroughly cooked NOTE The cooking cycle times for the SMOOTH and CHUNKY functions will vary depending on the quan...

Страница 15: ...to illuminate and flash to indicate a setting selection can be made 7 Press the SMOOTH or CHUNKY button and the selected function will illuminate to show the selection The ON OFF button will illuminat...

Страница 16: ...the BLEND button 7 During the BLEND cycle the soup maker will blend on and off for 30 seconds When the cycle is complete it will beep three times and the control panel will illuminate Switch the unit...

Страница 17: ...sition turn the soup maker off at the power outlet and remove the power plug from the power outlet WARNING Do not operate continuously on LOW or HIGH blending speeds for more than 2 minutes Allow the...

Страница 18: ...astic spatula to scrape down the sides of the jug Replace the lid before recommencing blending NOTE When cooking with starchy foods bubbling may occur in the soup maker jug If this occurs and results...

Страница 19: ...toes creamed corn coconut cream potatoes have stuck to the base of soup maker To remove residue stuck to the base follow the cleaning instructions on page 20 Soup maker is making noise and shaking dur...

Страница 20: ...power outlet and the plug is removed from the power outlet 2 Pour 0 8L of clean water into the jug with 4 5 drops of dishwashing liquid and secure the lid assembly 3 Place the soup maker jug onto the...

Страница 21: ...t into the motor base to avoid damage to the soup maker Soup Maker Base The soup maker motor base and outer jug surface can be cleaned with a soft damp cloth do not use abrasive agents or cloths which...

Страница 22: ...e jug Pour the soup into serving bowls and season with salt and pepper Simple Pumpkin Soup Serves 4 2 cloves garlic crushed 1 brown onion diced 550g pumpkin 2cm pieces 100g potatoes 2cm pieces 500ml v...

Страница 23: ...own onion diced 2cm piece ginger peeled and chopped 1 large coriander stalk with root chopped retain leaves for garnishing 4 carrots finely diced cup red lentils rinsed and drained 220ml coconut milk...

Страница 24: ...mpkin 2cm pieces 150g carrot 2cm pieces 450ml water 1 Place the pumpkin carrot and water into the soup maker jug 2 Attach the soup maker lid to the jug and place the jug on the motor base 3 Select the...

Страница 25: ...plete remove the jug from the base and the soup maker lid from the jug Pour the soup into serving bowls French Onion Soup Serves 4 1 tbsp olive oil 50g butter 5 onions thinly sliced 1 tbsp brown sugar...

Страница 26: ...arrot diced 1 tbsp tomato paste 200g tinned tomatoes chopped 80g curly dried fettuccine broken into pieces 500ml beef stock 150ml cold tap water tsp ground white pepper tsp sea salt tbsp basil chopped...

Страница 27: ...ce 4 Once the cooking cycle is complete remove the jug from the base and the soup maker lid from the jug Divide the green beans and bean shoots between the serving bowls and ladle hot laksa over the t...

Страница 28: ...e the jug on the motor base 3 Select the BLEND setting and the cycle will commence Once complete select the BLEND setting again 4 If further blending is required select the BLEND function again or alt...

Страница 29: ...ly use the blending speed control dial until the desired consistency is achieved 5 Pour into 4 large glasses Tropical Frappe Serves 4 250ml apple juice 350g mango flesh diced 150g paw paw diced 150g p...

Страница 30: ...ok Australia Ground Floor Suite 2 170 180 Bourke Rd Alexandria NSW 2015 Australia Locked Bag 2000 Botany NSW 1455 Customer Service Line 1300 139 798 Customer Service Fax 1800 621 337 www kambrook com...

Отзывы: