background image

E-38

BR-DV6000

PROFESSIONAL

MENU

RESET

A.DUB

EJECT

COUNTER

AUDIO

INPUT

SELECT

MONITOR OUTPUT

REMOTE

LOCAL

CTL

L

MIX

R

CH-1/2

MIX

CH-3/4

DV

LINE

Y/C

(CPN)

TC
UB

REW

STOP

FF

REC

OPERATE

PLAY

PAUSE

DISP

SET

BLANK

CUE UP

HOLD

PHONES

REC  LEVEL

CH-1/3

CH-2/4

MIC

SEARCH–

Mini

3 2 K C H – 1 / 2

0

m i n

S P

0 0

0 3 / 0 4 / 0 3

N O C A S S E T T E

1 1 : 2 0 : 0 0

T C R

0 2 : 0 0 : 0 0 : 0 0

REC

SAVE

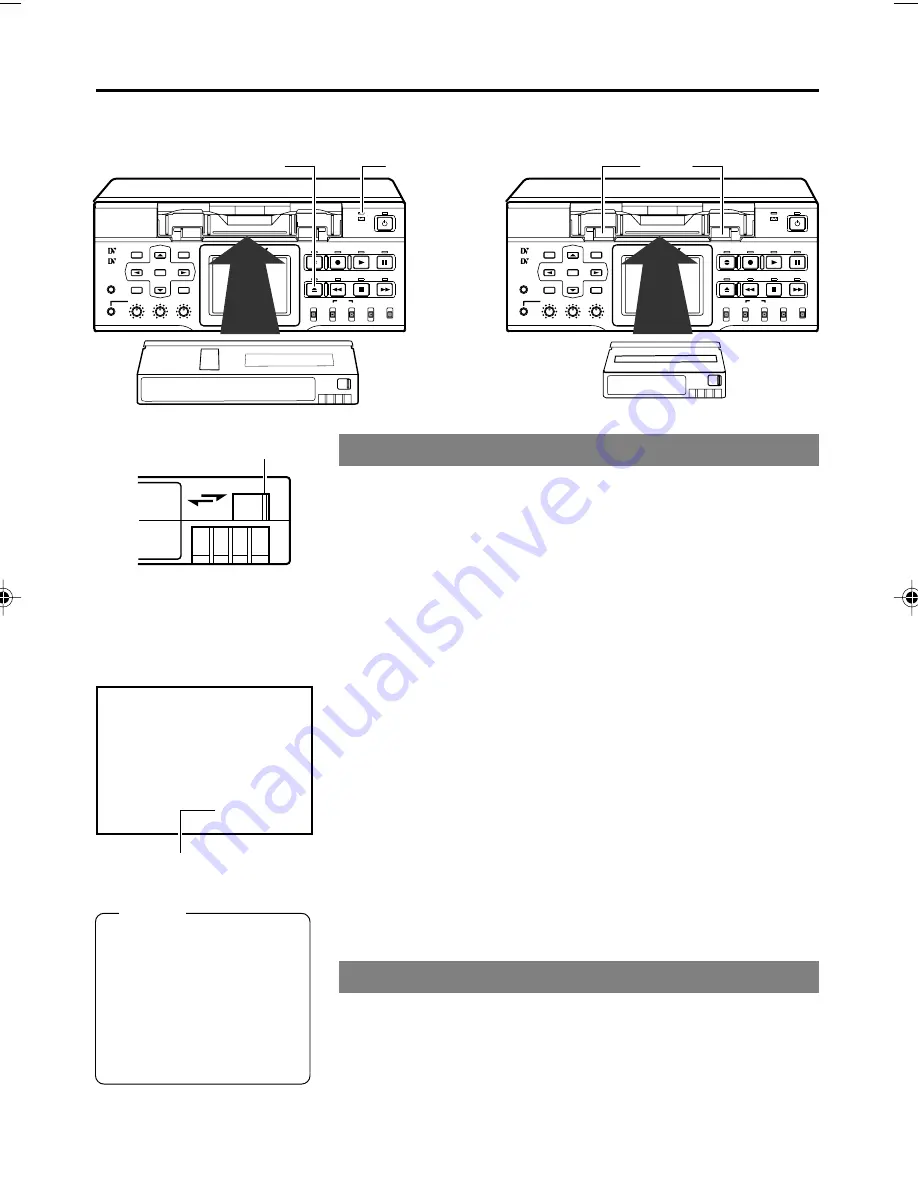
Loading the cassette tape

Use standard DV cassette tapes or mini DV cassette tapes.

VCR mode status display

1.

Check the cassette tape.

• Setting the rear switch.

Push it to “REC” for recording
To prevent its contents from being erased accidentally, push it to

“SAVE”.

• Ensure that the tape is not loosened.

2.

Ensure that no cassette tape is loaded.

With no cassette tape loaded, the cassette LED is off.
When no cassette tape is loaded, the status display for the VCR

operation mode shows “NO CASSETTE” on the monitor or the
LCD.

3.

Load the cassette tape.

• Insert a standard DV cassette tape into the tape-loading slot.
• For a mini DV cassette tape, load it in between the left and right

guides.

Set the tape window face up and push the cassette tape in slowly

until it is drawn in automatically.

When the cassette tape is loaded, the status display indicates

“STANDBY-ON”.

If the STANDBY-ON mode is left as is, it goes into the STANDBY-

OFF mode.

In the STANDBY-OFF mode, press the STOP button to return to

the STANDBY-ON mode.

Memo

The cassette tape can be
loaded/ejected even
when BR-DV6000 is in
the OPERATE OFF
mode.

The loading/ejecting ac-
tion of the cassette tape
takes about 6 seconds.

Ejecting the cassette tape

1.

Press the EJECT button of BR-DV6000.

While the cassette tape is being ejected, the status display flashes

“EJECT”.

2.

Remove the cassette tape.

Eject button

Guide

Standard DV tape

Mini DV tape

Switch

PREPARATION

– Loading/Ejecting cassette –

Cassette LED

DV6000E_28-051_Eng.p65e

06/03/03, 3:31 PM

38

Содержание BR-DV6000E

Страница 1: ...STRUZIONI PER L USO UAL DE INSTRUCCIONES RDER RDER TE DIGITAL VIDEO DEO DV AUDIO INPUT SELECT MONITOR OUTPUT REMOTE LOCAL L MIX R CH 1 2 MIX CH 3 4 DV LINE Y C CPN REW STOP FF REC OPERATE PLAY PAUSE English Italiano Español Français Deutsch LLT0034 002B H ...

Страница 2: ......

Страница 3: ...ating plate and the safety caution are on the rear of the unit The OPERATE button does not completely shut off mains power from the unit but switches operating current on and off WARNING It should be noted that it may be unlawful to re record pre recorded tapes records or discs without the consent of the owner of copyright in the sound or video recording broadcast or cableprogrammeandinanyliterary...

Страница 4: ...ording function With the combined use of other DV machines long time continuous recording is possible Using the SERIAL REMOTE OUT terminal or DV ter minal dubbing with other recorders is possible only with playback operation by BR DV6000 Replication function Equipped with a 2 5 inch color LCD Images status display and menu display can be viewed Multi cue up Up to 5 points of the tape position can ...

Страница 5: ...ackup recording function 45 Recording with serial remote terminals 46 External timer recording 47 PLAYBACK Setting 48 Basic playback procedure 49 Special playback functions 50 Search function 52 Repeat playback 53 Multi cue up 54 External timer playback 56 Dubbing with another machine using the SERIAL REMOTE OUT DV terminals 57 TIME CODE Displaying the time code 58 Presetting the time code 59 Reco...

Страница 6: ... out of reach of young children to prevent injury as fingers may get clamped while a cassette tape is being loaded Do not block the ventilation openings Avoid strong impact to the unit Do not drop the unit Remove the cassette tape from the cassette slot when transporting the unit Remove the AC adapter to save energy when the unit is not in use 䡵 Maintaining the unit Turn off the power before perfo...

Страница 7: ...ler 䡬 夡 夡 䢇 䢇 Reel disk tension bands 夡 䢇 䢇 Inspection 䡬 Cleaning inspection and adjustment 夡 Cleaning and inspection Replacement if necessary 䢇 Replacement Work and frequency of mainte nance depend on the environ ment and usage The above infor mation serves only as a guide Usage Time You can check the drum usage time with the hour meter display For details refer to page 100 Checking the hour mete...

Страница 8: ... M DV63PRO M DV60 M DV30 Standard DV cassettes LA DV276 LA DV186 LA DV124 Memo DVCAM cassette can be recorded in the DV format Tapes recorded in the DVCAM format can be played SP Mode M DV80 cassettes Mini DV 80min tape can not be used with this unit Remarks on the use of tape Do not load the videotape in the wrong direction Store the tape only after it has been fully rewound so as to avoid damagi...

Страница 9: ...emove the cassette tape Then place BR DV6000 in a plastic bag and seal it before transporting Take out BR DV6000 from the sealed plastic bag only after it has the same temperature as the surroundings CONDENSATION ON DRUM 䡵 For recording and storing videotapes in the best condition Observe the following instructions for the best recording and storage of videotapes Take care of the conditions of han...

Страница 10: ...Timer Switch is set to REC or PLAY and power is supplied to the DC IN terminal located on the rear panel BR DV6000 goes into the OPERATE ON state even if this button is not pressed Even after the power is turned off with this button BR DV6000 is live with a small amount of electricity Therefore if BR DV6000 is not to be used for a long period of time please remove the AC adapter to save energy 1Ca...

Страница 11: ...al speed During fast forwarding or fast forward play back the LED lights up in green 䡵 STOP button Press this button to stop operation When BR DV6000 is in the STANDBY OFF mode press this button to enter the STANDBY ON mode 䡵 REW button LED When BR DV6000 enters the STOP mode press this button to rewind the tape When BR DV6000 is in the PLAYBACK or STILL mode press this button for reverse playback...

Страница 12: ...analog sound is input 6 AUDIO OUTPUT switch Use this switch to select the audio channel from the headphone terminal and the AUDIO OUT terminal located on the rear panel This switch is valid in the following conditions During playback of tapes recorded in the 32k audio mode In the EE mode for DV input in the 32k audio mode During audio dubbing CH 1 2 For outputting the sound of the channels CH1 and...

Страница 13: ...e 20 Memo Use the DISP button to enable disable the LCD display and the display style LCD related settings e g brightness adjust ment of the LCD are performed in the DIS PLAY MENU screen Page 39 Setting the LCD display Page 82 DISPLAY MENU screen If the same image pattern is kept displayed on the LCD display for a prolonged period of time ghosting the permanent etching of a pattern on a display sc...

Страница 14: ... this button is pressed in the LCD enlarged display mode the time code preset screen will be displayed on the LCD When the time code preset screen is displayed press this button to return to the normal display Page 59 Presetting time code MENU button If this button is pressed when BR DV6000 is in the STOP STILL mode or when no cassette is loaded the menu is displayed on the LCD or the monitor conn...

Страница 15: ...eset and Multi Cue up 䡵 DISP 8 button During normal display this button is used to enable disable the LCD or select display style When this button is pressed the LCD dis play changes in the following manner Enlarged character display Image enlarged character display Image charac ter display Image display No display Enlarged character display When the setting screen is displayed this but ton is use...

Страница 16: ...erminal is for connecting to a monitor TV It outputs composite video signals It displays the Menu setting screen Date Time setting screen and warning information If DISPLAY in the DISPLAY Menu screen is set to ON or AUTO information will be dis played on screen e g the operation mode date time and counter Page 20 6 COMPONENT IN terminal BNC 3 This is the input terminal for component video signals ...

Страница 17: ...corded on CH2 For audio dubbing they are recorded on CH4 CH1 3 AUDIO OUT terminal RCA Use this terminal to output analog audio sig nals In the 48k audio mode it outputs the sound of CH1 When audio dubbing is paused it outputs the sound of CH3 In the 32k audio mode the sound is selected with the AUDIO OUTPUT switch located on the front panel Refer to the table below CH2 4 AUDIO OUT terminal RCA Use...

Страница 18: ...set to REC or PLAY recording or playback will be automatically started when power is supplied to the terminal Timer recording playback TIMER recording playback switch This switch is for setting BR DV6000 to start timer recording or timer playback when power is supplied to the DC power input terminal according to an external timer OFF No timer recording or timer playback REC When power is supplied ...

Страница 19: ...n be replaced by the RS 232C serial interface board SA K46U sold sepa rately Consult your JVC authorized service agent for such replacements REMOTE2 JVC Bus terminal 12 PIN This terminal is for connecting to the JVC bus interface compatible editing remote controller RM G800 With this terminal BR DV6000 can be used as a player or recorder of an editing system To operate BR DV6000 with this terminal...

Страница 20: ...rm displays are shown for about 3 sec onds AUTO It displays for about 4 sec onds during mode changes OFF No on screen display The alarm display is shown ac cording to errors which occurred Display on the LCD The on screen display changes whenever the DISPLAY button is pressed Page 26 It is displayed automatically when an error with the VCR occurred When BR DV6000 enters the STOP STILL mode or no c...

Страница 21: ...nit is in the RECORDING or STOP mode it displays the data of the built in clock During playback fast forwarding or rewinding the data re corded on the tape is displayed During DV signal recording the data from the DV terminal is displayed If the REC button is pressed in the STOP mode the input data from the DV terminal will be displayed The style for displaying the date and time can be selected wi...

Страница 22: ... on the tape are displayed The prefix indicates the time code mode TCG Time code generator data TCR Time code reader data DTCG Time code data received from the DV IN OUT terminal ETCG External time code generator data Depending on the framing mode the symbols for the sec onds and frames are different only for NTSC 00 00 00 00 Dot for the drop frame mode Colon forthenon dropframemode User s bit it ...

Страница 23: ...rt editing Audio both CH 1 and CH 2 INS VA Video Audio insert editing INS TC Time code insert editing Time code only Insert editing in the 32 k audio mode INS A12 CH1 CH2 audio INS A34 CH3 CH4 audio INS VA12 Video CH1 CH2 audio INS VA34 Video CH3 CH4 audio INS A CH1 to CH4 audio INS VA Video CH1 to CH4 audio The display can be turned on off with EDIT INFO in the DISPLAY Menu screen Memo If the cou...

Страница 24: ...he PLAYBACK mode and this message is displayed The temperature inside BR DV6000 has exceeded the stated value Disconnect the power and place it at a cool place If this message is displayed again BR DV6000 could be defective Consult your JVC authorized service agent INVALID TAPE LP TAPE NO DV SIGNAL COPY INHIBIT REC INHIBIT REC INHIBIT NTSC PAL Data tape for PCs or DVC PRO tape is used The cassette...

Страница 25: ...V signal input with the INPUT SELECT switch set to DV The user attempted audio dubbing when PB DV IN in the SYSTEM 2 2 Menu screen is set to NTSC The user attempted to perform audio dubbing on a DVCAM format tape The user attempted to edit a tape that cannot be recorded with the rear switch set to SAVE The user attempted to edit a tape recorded in the LP mode The user attempted to insert edit an u...

Страница 26: ...N or AUTO Memo With LCD AUTO OFF in the DISPLAY Menu screen the LCD display can be set to disappear if it continues to be on for a certain time When the display goes off automatically press any button to return to the original display mode The LCD display area is smaller compared with the one for the actual images 䡵 LCD display mode enlarged display 1 Audio output channel display It displays the s...

Страница 27: ... Recording pause Audio dubbing J Audio dubbing pause 0 Tape symbol display This symbol is displayed when a cassette tape is loaded It blinks during loading or ejecting of a cassette tape If the rear switch of the cassette tape is set to SAVE it is displayed in yellow Remaining tape time display Displays the remaining time minutes Blinks if the re maining time is less than 4 minutes Not displayed w...

Страница 28: ... IEEE1394 compliant digital video signals When a wide screen ID signal exists in the video signal the ID signal is output Connection with a monitor TV A monitor TV can be connected to the MONI TOR OUT terminal Besides the composite video signals it also displays the on screen dis play for status or menu screen Memo Whether or not to enable SET UP for analog I O signals of signals can be selected w...

Страница 29: ...minal EXT Selection of synchronization signals Synchronization signals should be selected de pending on whether external synchronization input SYNC IN or video input VIDEO IN ex ists or on the SYNC SELECT Menu settings Synchronization signals are selected as shown in the following table Playback Playback Record Record No Yes Yes No No Yes No Yes Memo During DV signal recording the status of synchr...

Страница 30: ...AUDIO terminal RCA 2 There are analog audio terminals for 2 chan nels For the DV format tracks are available for 4 channels in the 32kHz audio mode In the 32kHz mode from which one of the 4 channels sound is output can be selected with the AUDIO OUTPUT switch on the front panel Refer to the table on the right Headphone terminal Sound can be checked in stereo using a headphone The volume can be adj...

Страница 31: ...ime Sound from each termi nal is usually recorded to CH1 and CH2 To record to CH 3 and CH 4 set AUDIO MODE of the AUDIO Menu screen to 32 k and record it in the audio dubbing mode Page 44 Microphone input terminal This terminal is for connecting to a monaural microphone The same sound is recorded on the 2 channels Memo To record sound on the AUDIO IN terminal and MIC terminal set the INPUT SELECT ...

Страница 32: ... editing sytem BR DV6000 is equipped with 2 remote terminals for the JVC bus and RS 422A for editing pur poses When a JVC bus compatible editing remote controller is used For the editing remote controller use RM G800 Example BR DV6000 as player and recorder for cut editing of digital signals Note Before connecting the cables for remote ter minals ensure that the power to the VCR is turned off Remo...

Страница 33: ...C O N T R O L U N I T R M G 8 2 0 AUDIO MONITOR VIDEO MONITOR VIDEO MONITOR AUDIO MONITOR AUDIO IN VIDEO OUT SYNC IN SYNC IN RM G820 SYNC IN B B B B B B REMOTE 1 9 PIN REMOTE 1 9 PIN VIDEO IN AUDIO OUT When an RS 422A compatible remote controller is used For the editing remote controller use RM G820 Example use BR DV6000 as player and recorder for cut editing of analog signals To fasten the connec...

Страница 34: ...mmands of the SERIAL REMOTE IN termi nal is through output from the SERIAL REMOTE OUT terminal Only with OPERATE ON Multiple VCRs can be operated with RM G30 by series connection of the SERIAL REMOTE IN OUT terminals Start stop recording with an external switch e g a foot switch Connect an external switch e g a foot switch to the SERIAL REMOTE IN terminal The format of the input signals can be sel...

Страница 35: ... up in red OPERATE OFF mode If DC IN MODE of the SYSTEM 2 2 Menu screen is set to OPE ON the OPERATE in dicator will light up in green OPERATE ON mode Memo Even in the OPERATE OFF mode a small amount of electricity will still flow into the unit When the unit is in the OPERATE OFF mode no operation can be performed except that of the OPERATE buttons and cassette load ing ejecting Notes Supply power...

Страница 36: ...he OPERATE indicator lights up in green BR DV6000 is ready for operation OPERATE ON mode Turn off BR DV6000 1 Press the OPERATE button BR DV6000 enters the OPERATE OFF mode and the OPERATE indicator lights up in red 2 If BR DV6000 is not to be used for a long period of time unplug the AC adapter To unplug the AC adapter remove the power cord from the power outlet first Memo In the OPERATE OFF mode...

Страница 37: ...operate with the buttons of BR DV6000 set it to LOCAL To operate BR DV6000 with RS 422A or JVC bus editing re mote controller that is connected to the REMOTE 1 9 PIN or REMOTE 2 12 PIN terminal set it to REMOTE The setting position of the REMOTE switch for operating BR DV6000 with the SERIAL REMOTE terminal can be selected using REMOTE SEL SER in the REMOTE 1 2 Menu screen The setting position of ...

Страница 38: ...ed 2 Ensure that no cassette tape is loaded With no cassette tape loaded the cassette LED is off When no cassette tape is loaded the status display for the VCR operation mode shows NO CASSETTE on the monitor or the LCD 3 Load the cassette tape Insert a standard DV cassette tape into the tape loading slot For a mini DV cassette tape load it in between the left and right guides Set the tape window f...

Страница 39: ... Adjusting the LCD display Brightness With LCD BRIGHTNESS Color depth With LCD CHROMA Contrast With LCD CONTRAST Each of the above can be set up in 11 levels Setting the display time of the LCD display If the LCD display is not to be used for a long time LCD AUTO OFF can be selected to set the time for the LCD to go off automati cally OFF Does not turn off automatically 30MIN Turns off automatical...

Страница 40: ...on the power and set it to the STOP mode 1 Press the MENU button to display the TOP MENU screen 2 Displaying the CLOCK ADJUST Menu 1 Press the 8 or 9 button to bring the cursor to the desired TC UB CLOCK item Press SET or the button 2 Press the 8 or 9 button to bring the cursor to the NEXT PAGE item in the TC UB CLOCK 1 2 Menu screen Press SET or the button 3 Press the 8 or 9 button to bring the c...

Страница 41: ...h year TIME STYLE For selecting the time display style 24H 24 hour time mode 12H 12 hour time mode These setting items are also reflected in the date time record DATE REC function 4 Returning to the TOP MENU from TC UB CLOCK after com pleting all settings Press the button Or Press the 8 or 9 button to bring the cursor to PAGE BACK and press the SET button 5 Returning to the usual menu Press the ME...

Страница 42: ...s Set DATE REC in the TC UB CLOCK 2 2 Menu screen to ON Set DISPLAY in the DISPLAY 1 2 Menu screen to ON Set TIME DATE in the DISPLAY 2 2 Menu screen to any setting item except OFF The same data as on the date time on screen display are recorded on a tape INPUT SELECT switch Selecting input signal Select the signal with the INPUT SELECT switch located on the front panel DV For inputting DV signals...

Страница 43: ...at least an interval of 1 minute between recordings of in dex Index signals cannot be recorded with the REC button of the remote controller Use the record button of BR DV6000 If INDEX WRITE is set to ON in the SYSTEM 2 2 Menu screen an index signal is recorded at the recording starting position of the tape In the PLAYBACK mode the position where the index signal is recorded can be searched Index s...

Страница 44: ...recording After recording Notes For tapes recorded in the 48 kHz audio mode audio dubbing cannot be performed Audio dubbing cannot be performed for DV input signals Memo During audio dubbing if the tape comes to a part recorded in a mode in which audio dubbing cannot be performed such as LP mode or 48 kHz audio mode the VCR will enter the STOP mode When this happens loud noise from the DV output m...

Страница 45: ...75MIN 80 minute tape 115MIN 120 minute tape 175MIN 180 minute tape 265MIN 270 minute tape OFF No backup recording Operation 1 Recording begins on the source unit Ensure that recording starts from the begin ning of the recording tape 2 BR DV6000 begins recording when the tape of the source unit nears its end about 5 min utes before the end of the tape BR DV6000 begins recording when the re cording ...

Страница 46: ... to REMOTE operations can be performed via the SERIAL REMOTE IN terminal LOC REM With the REMOTE LOCAL switch is set either way operations can be performed via the SERIAL REMOTE IN terminal With this setting the buttons and switches of the unit can be used too Set FOOT SW in the REMOTE 2 2 Menu screen ac cording to how the serial remote terminal is used OFF Set to OFF when the serial remote contro...

Страница 47: ... selected 3 Adjust the recording level of sound During DV input the sound recording level cannot be adjusted 4 Load a cassette tape for recording 5 Set the TIMER switch on the rear panel to REC If the DISP button on the front panel is pressed to change the LCD display to the enlarged mode the timer symbol r lights up in red 6 Set the time etc of the external timer When the power is supplied to the...

Страница 48: ...t here to PAL for a tape recorded in PAL VIDEO Menu Page 79 SET UP for NTSC only For selecting whether to enable SET UP for analog video output signals composite Y C separate or component AUDIO Menu Page 78 A OUT AT SEARCH For selecting whether sound is output during variable speed playback AUDIO OUT LEVEL For selecting the reference level of the audio output level 20dB 12dB Set it to 12dB to play...

Страница 49: ...is automatic BR DV6000 can be used with PAL or NTSC standards Please select the desired format in the menu Set PB DV IN in the SYSTEM 2 2 Menu screen to NTSC for playing a tape recorded in NTSC Signal systems cannot be converted Playback of tapes recorded in the NTSC format 1 Load a recorded cassette tape The power for BR DV6000 is turned on 2 Start playback Press the PLAY button Playback starts I...

Страница 50: ... advance Frame advance playback SEARCH button SEARCH button PAUSE button REW button FF button SYSTEM 1 2 Menu screen Setting Set KEY FUNC in the SYSTEM 1 2 Menu screen to VAR Operation 1 Set BR DV6000 to the PLAYBACK or the STILL mode 2 Press the FF button to start fast forward playback Press the REW button to start reverse playback Press the SEARCH button to increase the search speed Every time y...

Страница 51: ...playback speed is increased by 7 3 When the buttons are released the operation changes as fol lows If the PLAY button is released first playback continues at the increased speed of 7 Latch mode To return to the normal playback speed press the PLAY button If the FF button is released first it returns to the nor mal playback speed Decreasing the playback speed by 10 1 Set BR DV6000 to the PLAYBACK S...

Страница 52: ... button is pressed Max 99 䡵 When the SEARCH or SEARCH button is pressed the unit fast forwards or rewinds to the specified in dexed position and start playing Blank search This function searches unrecorded parts of the tape Index search progressing displayed on the screen The number denotes the corresponding index position Monitor screen Memo If the interval between index signals is less than one ...

Страница 53: ...he tape to the position where recording of video signals ends TAPE END Repeat playback from the beginning to the end of the tape Operation 1 Press the REW button to rewind the tape to the beginning 2 Press the PLAY button to start playback When it reaches the position set at REPEAT MODE the tape starts rewinding and plays back again 䡵 To abort the repeat playback function press the STOP button Rep...

Страница 54: ...OUNTER switch to TC 2 Load a tape with time codes recorded 3 Press the CUE UP button The CUE UP screen appears on the monitor or the LCD 4 Perform playback or search At the position to be registered set it to the STILL or STOP mode 5 Press the 8 or 9 button to bring the cursor to the cue up point Press the SET button Register the time code data of the current position as a cue up point If no tape ...

Страница 55: ...the CUE UP button when the normal screen is displayed The Multi Cue up screen appears on the monitor or the LCD 3 Press the 8 or 9 button to bring the cursor to the cue up point to be searched 4 Press the CUE UP button The cue up operation for the selected point is performed While searching is being per formed the cue up point to be searched flashes on the moni tor or the LCD Memo For cue up opera...

Страница 56: ...avail able timer playback can start at a pre determined time DISP button LCD Display Timer symbol 䡵 Connect the supplied AC adapter To set the power supply power to be activated by a timer plug the power cord of the AC adapter to the power output terminal of the timer 1 Load the tape for playback 2 With REPEAT MODE in the SYSTEM 1 2 Menu screen whether to enable disable repeat playback and the typ...

Страница 57: ...RIAL RE MOTE OUT terminal Page 34 䡵 For recording digital video and audio signals use the DV terminal Setting 䡵 BR DV6000 For using the DV terminal set BACKUP REC TIME in the SYSTEM 1 2 menu screen to OFF Set the items in the SYSTEM 2 2 Menu screen Set REPLICATION to SERIAL or DV depending on the terminal To delay the output timing for the REC command in the PLAY BACK mode set REPLICATE DELAY OFF ...

Страница 58: ... on the monitor or the LCD Status display Monitor LCD TCG Time code generator data TCR Time code reader data DTCG Input time code data from the DV IN OUT terminal ETCG Input time code data from the TIME CODE IN terminal UBG User s bit generator data UBR User s bit reader data DUBG User s bit input data from the DV IN OUT terminal EUBG User s bit input data from the TIME CODE IN terminal Framing mo...

Страница 59: ...n to return to the normal screen To preset all digits to 0 press the RESET button when any of the digits is blinking When the hour digit is blink ing the frame digit starts blinking when the button is pressed If a user s bit is input with its all digits set as F BR DV6000 converts FFFFFFFF to FFFFFFFE before recording Operation This section describes the setting of the time code The setting of the...

Страница 60: ...rator in the TIME CODE Preset screen REC button COUNTER switch Setting Set the TC UB CLOCK 1 2 Menu as follows TCG SOURCE INTERNAL TCG SELECT PRESET TCG MODE REC RUN or FREE RUN Operation 1 Check the preset time code 1 Set the COUNTER switch to TC or UB 2 In the STOP mode hold down the REC button The preset time code or the user s bit is displayed on the monitor or the LCD The counter mode is disp...

Страница 61: ...he same run ning mode as the tape Operation 1 Insert a tape with time codes recorded 2 Set BR DV6000 to the RECORDING PAUSE mode at the posi tion where time codes are to be recorded again 3 Press the PLAY button to go to the RECORDING mode Time codes will be recorded on the tape starting from where it stopped at last recording The counter mode display shows either TCR or UBR Recording time code in...

Страница 62: ...de generator and the phase of the video are not synchronized the EXT display blinks If a user s bit is input to the TIME CODE IN terminal with its all digits set as F BR DV6000 converts FFFFFFFF to FFFFFFFE before recording Connection 䡵 Input reference video signals to the external time code generator and the SYNC IN terminal of BR DV6000 䡵 Connect theTIME CODE IN terminal of BR DV6000 with the LT...

Страница 63: ...pped with a time code reader During playback the time code or user s bit data recorded on the tape is displayed on the monitor or the LCD COUNTER switch TIME CODE OUT terminal Time code or user s bit 1 Select the time code data to display Set the COUNTER switch to TC or UB 2 Press the PLAY button to go to the PLAYBACK mode It displays the time code and the user s bit on the monitor or the LCD The ...

Страница 64: ...message will appear But preview edit will be performed without any warning message 2 In case of CH1 CH2 CH3 CH4 simultaneous insert or assemble edit mode of 32 kHz audio input signal to audio input connector CH1 CH3 is recorded onto CH1 and CH3 tracks simulta neously and input signal to audio input con nector CH2 CH4 is recorded onto CH2 and CH4 tracks simultaneously ASSEM ASSEM INS V INS VA INS A...

Страница 65: ...32 kHz au dio in DV interface ASSEM ASSEM INS V INS VA INS A INS A1 INS A2 INS TC INS VA1 INS VA2 VIDEO VIDEO AUD 1 AUD 2 AUD 1 AUD 2 VIDEO AUD 1 VIDEO AUD 2 AUD 1 AUD 2 TC Edit mode DV editing Mode select OSD 48 kHz 44 1 kHz mode Yes Yes Yes Yes No No No No No ASSEM ASSEM INS V INS VA INS A INS A12 INS A34 INS TC INS VA12 INS VA34 VIDEO VIDEO AUD 1 AUD 2 AUD 1 AUD 2 VIDEO AUD 1 VIDEO AUD 2 AUD 1 ...

Страница 66: ...t the editing timing If the start points of edit are not concurrent adjust the playback startup timing 0F No correction 1F 15F Delays the timing for the duration of the set frames If BR DV6000 is connected to an editing remote controller with no bump function use this setting to adjust the edit precision Memo No bump function is available for RM G800 SYNCHRONIZATION only for RS 422A Whether to use...

Страница 67: ...the audio mode corre sponding with the source tape It is necessary to record continuous time code information on a prerecorded tape Please refer to Presetting the time code section Page 59 Note When the BR DV6000 is used as an editing recorder we recommend using tapes that were recorded in this machine Confirmation by preview editing Before performing editing it is possible to check the edit in an...

Страница 68: ... screen REMOTE FF REW MODE Use this item to select the operation to be per formed if the FF or REW command is received during playback FF REW or Search If the search operation is not performed prop erly set it to SEARCH CONTROLLER TYPE in the REMOTE 2 2 Menu screen Set this item to TYPE1 Setting 䡵 REMOTE 1 2 Menu screen Set REMOTE SEL DV to ON or LOC REM Set this item to ON if it is to become enab...

Страница 69: ...R O M A 0 L C D C O N T R A S T 0 L C D A U T O O F F 3 0 M I N D I S P L A Y O N C O U N T E R P O S I L OW E R R N E X T P A G E P A G E B A C K D I S P L A Y 2 2 T I M E C O D E O N V T R M O D E O N T A P E R E M A I N O N T I M E D A T E D A T E T M A U D I O I N F O O N E D I T I N F O O N D A T E S T Y L E D D MM Y Y T I M E S T Y L E 2 4 H O U R P A G E B A C K R E M O T E 2 2 R E M F F R ...

Страница 70: ...ry of BR DV6000 and retained even after power off 1 4 MENU button 2 1 3 1 3 8 button 2 2 3 2 4 SET button button 2 1 3 1 3 9 button 2 2 3 2 button Cursor Menu items Cursor Item Setting value Perform the menu settings while viewing the display on the moni tor connected to the VIDEO MONITOR OUT terminal or the LCD 䡵 Set BR DV6000 to the STOP or STILL mode 1 Displaying the TOP MENU screen Press the M...

Страница 71: ... F F R E P L I C A T E D E L A Y O F F K C A B E G A P 0 0 0 0 0 0 R E T E M R U O H M U R D L E C N A C G N I T T E S Y R O T C A L A P N I V D B P F SYSTEM 2 2 Menu screen 䡵 To display the Menu screen at the next level bring the cursor to NEXT PAGE and press the SET or t button 䡵 To return to the previous Menu screen do one of the following actions Press the 8 button Or Select PAGE BACK and pres...

Страница 72: ...DV6000 sold separately is installed For details refer to the user s guide for SA DV6000 Return to the normal screen SYSTEM Menu screens The SYSTEM Menu consists of the following two screens 1 2 and 2 2 SYSTEM 1 2 menu Item Setting Description SYNC SELECT STL F ADV MODE AUTO EXTERNAL FIELD 1ST 2ND FRAME Use this item to select the synchronization signal if there is no input of synchronization signa...

Страница 73: ...N mode if the unit has stayed at still stop or recording pause for a prolonged period of time The TAPE PROTECTION mode in at STILL can be selected from LONG PAUSE MODE 30SEC 30 seconds 1MIN 1 minute 3MIN 3 minutes 2MIN 2 minutes 5MIN 5 minutes Memo To prevent the video head from clogged or the tape from being damaged set as short a time as possible For selecting the action when BR DV6000 stays at ...

Страница 74: ...KUP REC TIME in the SYSTEM 1 2 Menu screen is set to other than OFF With this item set to DV BACKUP REC TIME is fixed to OFF For setting the output timing of the REC command from the SERIAL RE MOTE OUT terminal or the DV terminal when BR DV6000 is set to the PLAY BACK mode OFF Outputs when the unit is set to the PLAYBACK mode 1SEC 5SEC Delays output timing by the set time seconds For enabling disa...

Страница 75: ...F Control disabled regardless of the settings of the REMOTE LOCAL switch ON Control enabled only when the REMOTE LOCALswitch is set to REMOTE LOC REM Control enabled regardless of the settings of the REMOTE LOCAL switch For enabling disabling the REMOTE 2 12 PIN terminal when the REMOTE LOCAL switch on the front panel is set to REMOTE OFF Control through the JVC bus disabled ON Control through the...

Страница 76: ... 5SEC 5 seconds 7SEC 7 seconds 10SEC 10 seconds Memo To enhance editing precision please set it to at least 7 seconds For displaying the REMOTE 2 2 Menu screen For returning to the TOP MENU screen Item Setting Description REM FF REW MODE REM STOP SEL FF REW SEARCH EE PB For setting the action to be performed when the 9 PIN REMOTE terminal 12 PIN REMOTE terminal RS 232C terminal or DV terminal rece...

Страница 77: ... pre roll time to at least 7 seconds For setting the type of controller to be connected when remote control is enabled with the RS 422A interface TYPE1 RM G820 TYPE2 RM G860 set the preroll time to at least 10 seconds TYPE3 AG A850 TYPE4 RM 450 PVE 500 TYPE5 TYPE7 Not in use For setting when an external switch e g a footswitch is con nected to the SERIAL REMOTE terminal Before operating an externa...

Страница 78: ...udio output from this AUDIO OUT termi nal during searches OFF Output off ON Output on Use this setting when the XLRIN board SA X61U sold separately is installed For selecting the audio input terminal XLR Audio input terminal of SA X61U RCA AUDIO INPUT terminal of the unit For selecting the level for playback audio output 12 dB Select here to reduce the analog sound output level It will be reduced ...

Страница 79: ...signals composite Y C and component During recording and playback OFF Does not apply setups ON Applies setups Memo The application of setups on playback or recorded video signals must match the setting of SET UP Otherwise if dubbing is re peatedly performed the hue and brightness of the video may not appear normal For enabling disabling output of black burst signals of the built in signal generato...

Страница 80: ...ime code to be recorded with DV signal input OFF Records time code of the built in time code gen erator of BR DV6000 AUTO Records the time code input to the DV IN termi nal The framing mode of the time code will be set automatically to the framing of the time code in put NON DROP Records the time code input to the DV IN termi nal The framing mode of the time code is fixed to non drop framing NTSC ...

Страница 81: ... on the tape OFF No recording ON Recording date time on screen display descrip tion For this to be enabled the following settings are required Set DISPLAY in the DISPLAY 1 2 Menu screen to ON Set TIME DATE in the DISPLAY 2 2 Menu screen to other than OFF Memo With DV signal input date time data are not recorded For displaying the date time setting screen For setting refer to page 40 Setting date t...

Страница 82: ... to turn off the LCD display automatically when it is not to be used for a long time OFF No auto OFF 30MIN Auto OFF after 30 minutes 1HOUR Auto OFF after 1 hour 2HOUR Auto OFF after 2 hours Memo During recording or playback the LCD display stays on regard less of this setting For turning on off on screen status display on the monitor con nected to the VIDEO MONITOR OUT terminal or the LCD OFF No o...

Страница 83: ...e on the monitor or the LCD OFF No display ON Display For enabling disabling the time date display on the monitor or the LCD and selecting the display format OFF No display TIME Time display only DATE Date display only DATE TM Date Time display For enabling disabling the display of audio channel or sampling frequency on the monitor or the LCD OFF No display ON Display For selecting whether to disp...

Страница 84: ...Preset Reset Preset Preset Preset Tm Preset Select Sw Preset F JVC Tbl 1 Basic Rec Dub Vtr Ind Select Tbl Select Request High Low 0 1 2 3 4 5 6 7 8 9 A B C D E F 0 Complete Error Cassette Not ACK NAK Out Target 1 2 3 Play Stop 4 Enter Clear In Shift In Shift Out Shift Out Shift Still Error 5 In Entry Out Entry In Flag Out Flag In Flag Out Flag Clear Go to Go to Memory Memory Reset Reset Recall Rec...

Страница 85: ...ck None Start bit 1 Stop bit 1 Data rate 9600bps Bit configuration 0 1 2 3 4 5 6 7 8 9 A B C D E F 0 SP 0 P p 1 1 A Q a q 2 2 B R b r 3 3 C S c s 4 4 D T d t 5 5 E U e u 6 6 F V f v 7 7 G W g w 8 8 H X h x 9 9 I Y i y A J Z j z B K k C L l D M m E N n F O o RS 232C INTERFACE RS 232C specifications Memo PC means a controller such as a per sonal computer Starting bit ASCII code table Use this table ...

Страница 86: ...lay R STILL Pause REV x 9 10 9 10 x reverse play STILL Pause IN ENTRY Registers the current time as the IN point OUT ENTRY Registers the current time as the OUT point IN FLAG RESET Cancels the registered IN point OUT FLAG RESET Cancels the registered OUT point IN FLAG RECALL Validates the cancelled IN point OUT FLAG RECALL Validates the cancelled OUT point GO TO IN Cues up the point specified with...

Страница 87: ... a cue point transmit the time data hour minute second frame a total of 8 bytes with 2 bytes for each following this command By transmit ting ENTER 40H with the time data transmission of lower data becomes unnecessary In such a case 0 is transmitted If the specified point can not be found NOT TARGET 05H is returned J1 B B B5 B6 CO C1 F SHUTTLE Shuttle play The search speed is specified by sending ...

Страница 88: ... 0A COMPLETION The VCR outputs this command when the operation specified with Cue Up with Data Preroll Auto Edit etc is complete CASSETTE OUT The VCR outputs this command when RS 232C ejected the tape NOT TARGET The VCR outputs this command when the operation specified with Cue Up with Data Preroll failed to be completed ACK This command is returned when a defined command is received Error command...

Страница 89: ...4h V 56h 6 36h K 4Bh TAPE REMAIN SENSE For checking the tape remaining time 3 byte data is returned showing the hour one s place and minutes ten s place and one s place PREROLL SENSE For checking the preroll time 2 byte data is returned showing the seconds ten s place and one s place STATUS SENSE For checking the status Refer to STA TUS SENSE Page 90 B B B D8 D9 DA DB DC DD FB CURRENT TC SENSE For...

Страница 90: ...the tape end Second byte 7 TIMER PLAY TIMER switch set to PLAY 6 TIMER REC TIMER switch set to REC 5 Unused Always 0 4 REPEAT REPEAT PLAYBACK mode ON 3 Unused Always 0 2 REPEAT MODE Repeat playback in operation 1 SEARCH MODE VCR being cueing up prerolling 0 Unused Always 0 Third byte 7 PLAY MODE VCR playing 6 FF MODE VCR fast forwarding 5 REW MODE VCR rewinding 4 STOP MODE VCR stopped 3 STAND BY M...

Страница 91: ... corresponding to the settings can be transmitted B B B B E0 E1 E3 E4 E5 E6 TC DATA PRESET For presetting the time code data To set transmit the time data following this command Specify the time in or der of hour minute second and frame using two digits for each When EN TER 40h is transmitted before all dig its have been transmitted the time code data are specified by entering digits from the uppe...

Страница 92: ... This command is for changing the VCR s menu switches Following this command transmit the data 3 bytes corresponding to the menu switch to be changed Example Set SYNC SELECT to EXTERNAL In the diagram below the data corresponding to the setting of EXTERNAL show that DATA 0 D2 No 1 bit and D2 No 0 bit are respectively 01 0 and 1 Set the command by transmitting data in a way that the corresponding b...

Страница 93: ... FRAME 95 D2 1ST 2ND BACK UP REC TIME 95 D1 OFF 25MIN 55MIN 75MIN 115MIN 175MIN 265MIN LONG PAUSE TIME 10 D1 30SEC 1MIN 2MIN 3MIN 5MIN LONG PAUSE MODE 10 D1 STBY OFF F ADV REPEAT MODE 01 D2 OFF TAPE END INDEX V END DC IN MODE 95 D1 OPE OFF OPE ON INDEX WRITE 88 D2 OFF ON REPLICATION 95 D1 OFF SERIAL DV REPLICATE DELAY 95 D2 OFF 1SEC 2SEC 3SEC 4SEC 5SEC OPERATION LOCK 01 D1 OFF ON PB DV IN 08 D2 NT...

Страница 94: ...EMOTE SEL JVC 93 D2 OFF ON REMOTE SEL NET 93 D2 OFF ON LOC REM 96 D1 OFF ON LOC REM LOCAL FUNCTION 20 D1 EJECT STP EJT ALL KEY NO KEY PREROLL 20 D2 3 SEC 5 SEC 7 SEC 10 SEC REMOTE 93 D1 FF REW FF REW MODE SEARCH REM STOP SEL 93 D1 EE PB PB START DELAY 96 D2 OF 1F 15F SYNCHRONIZATION 40 D1 OFF ON CONTROLLER SEL 90 D2 TYPE1 TYPE2 TYPE3 TYPE4 FOOT SW 88 D2 OFF L EDGE H EDGE L LEVEL 7 6 5 4 3 2 1 0 RE...

Страница 95: ...2 OFF ON BLACK BURST 0D D2 OFF ON 0 1 0 1 0 1 0 1 0 1 0 0 0 1 1 0 0 0 0 0 0 1 0 1 0 0 1 1 1 0 0 0 1 0 1 TCG SOURCE 81 D2 INTERNAL EXTERNAL TCG SELECT 81 D2 PRESET REGEN TCG MODE 81 D2 FREE RUN REC RUN NDF DF NTSC 81 D2 DROP NON DROP DF BIT PAL 78 D2 OFF ON TC DUPLICATE 78 D1 OFF AUTO NON DROP TC OFFSET 78 D2 OFF 1F 2F 2F 1F U BIT PAL 78 D2 OFF ON DATE REC 78 D2 OFF ON AUDIO Menus VIDEO Menus TC UB...

Страница 96: ...ST F1 D2 MAX 5 0 MIN 5 LCD AUTO OFF F1 D2 OFF 30MIN 1HOUR 2HOUR DISPLAY 01 D1 OFF ON 72 D1 OFF ON AUTO COUNTER POSI 82 D1 LOWER R LOWER L UPPER R UPPER L CENTER TIME CODE 72 D1 OFF ON VTR MODE 72 D1 OFF ON TAPE REMAIN 82 D2 OFF ON TIME DATE 83 D2 OFF TIME DATE DATE TM AUDIO INFO 72 D1 OFF ON EDIT INFO 72 D1 OFF ON DATE STYLE 83 D2 YY MM DD MM DD YY DD MM YY TIME STYLE 83 D2 12H 24H 7 6 5 4 3 2 1 0...

Страница 97: ...e head cleaning tape is loaded The internal temperature of BR DV6000 has ex ceeded the stated value This is a system error that occurs when the power is turned on The OPERATE indicator on BR DV6000 blinks in green The unit will not accept any operation commands Check the power voltage Clean it with a JVC head clean ing tape Page 8 If the message persists despite cleaning it could be due to bad rec...

Страница 98: ...or rotation error Leave the power on and wait for the display to disappear This error can be resolved by turning off and then on the power However doing so may damage the tape in some cases Consult your JVC authorized dealer Press the EJECT button to remove and replace the tape This error can be resolved by turning off and then off the power However doing so may damage the tape in some cases Consu...

Страница 99: ...he operation buttons are to be used For REMOTE select the buttons that can be operated with the LOCAL FUNCTION Menu To control with RS 422A set REMOTE SEL 9 PIN in the RE MOTE 1 2 Menu screen to ON To control with the JVC bus set REMOTE SEL JVC to ON The tape is damaged Replace the tape The head is dirty Clean it with the specified head cleaning tape Page 8 Is TC DUPLICATE in the TC UB CLOCK 1 2 M...

Страница 100: ...A E P E R X E D N I C N U F Y E K V D A F E D O M E S U A P G N O L N I M 5 E M I T E S U A P G N O L F F O E M I T C E R P U K C A B D N 2 E D O M V D A F L T S O T U A T C E L E S C N Y S 2 1 M E T S Y S S Y S T E M 2 2 D C I N M O D E O P E O F F I N D E X WR I T E O N R E P L I C A T I O N O F F R E P L I C A T E D E L A Y O F F O P E R A T I O N L O C K O F F K C A B E G A P 0 0 2 0 0 0 R E T...

Страница 101: ...ace board for controlling BR DV6000 with the RS 232C interface Connect it to BR DV6000 with the RS 232C cable Use a reverse type cable Replace it with the RS 422A REMOTE 9 PIN terminal of A Page 102 To control BR DV6000 with RS 232C set REMOTE SEL 232 in the REMOTE 1 2 Menu screen to ON Details of the command Page 84 Network board SA DV6000 This network board can be used to record streaming data o...

Страница 102: ...he RS 422A REMOTE board Remove the cable carefully not to damage it 2 Remove the plate of RS 422A REMOTE 1 terminal For removing the plate remove the two hexagonal screws first with a tool such as a socket wrench 3 Remove the SA K46U plate in the same procedure above 4 Fix the plate of RS 422A REMOTE 1 terminal removed in 2 above to SA K46U Hexagonal screws The screw holes for the hexagonal screws...

Страница 103: ...ed 100 Color Bar without Setup Video output Line composite 1 0 V p p 75 Ø unbalanced Y C Y 1 0 V p p 75 Ø unbalanced C 0 286 V p p NTSC 0 3 V p p PAL 75 Ø unbalance Component Y 1 0 V p p 75 Ø unbalanced 100 Color Bar R Y 0 7 V p p 75 Ø unbalanced 100 Color Bar without Setup B Y 0 7 V p p 75 Ø unbalanced 100 Color Bar without Setup Monitor composite 1 0 V p p 75 Ø unbalanced On screen display Horiz...

Страница 104: ...or notice 212 327 88 BR DV6000 PROFESSIONAL MENU RESET A DUB EJECT COUNTER AUDIO INPUT SELECT MONITOR OUTPUT REMOTE LOCAL CTL L MIX R CH 1 2 MIX CH 3 4 DV LINE Y C CPN TC UB REW STOP FF REC OPERATE PLAY PAUSE DISP SET SEARCH BLANK CUE UP HOLD PHONES REC LEVEL CH 1 3 CH 2 4 MIC SEARCH Mini OTHERS Specifications continued ...

Страница 105: ......

Страница 106: ......

Отзывы: