


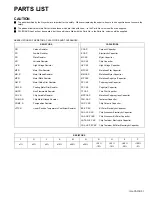

(No.YA318)1-43
4.6.3.4
CONVERGENCE ADJUSTMENT
Item
Measuring
instrument
Test point
Adjustment part
Description
CONVERGENCE
PHASE
check
Signal
generator
Remote
control unit
[6.CONVER A]
CPA04 : TPOV OFST
CPA05 : FINEP
CPA06 : STARTLIN A
CPA07 : STARTLIN B
CPA08 : CAU H2
CPA09 : COARS OFST
CPA10 : V1OFSTA
CPA11 : V1OFSTB
NOTE:
Be sure to make it the value of Table1. Supposing data
differs, correct to the value of Table1.
When data is corrected (when the [MUTING] key is
pushed), it is necessary to perform an AUTO
CONVERGENCE PRESET, after a convergence
adjusts exactly.
(1) Receive NTSC crosshatch signal.
(2) Select 6.CONVER A from SERVICE MENU.
(3) Select < CPA > item with [INPUT] key.
(4) Check and set data that < CPA04 > to < CPA11> are
same value as table1.
(5) Press [MUTING] key to memorize the set values.
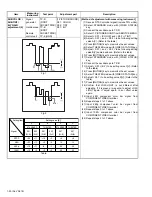
Table1
OVERALL
CONVERGENCE
(LINE)
check
Signal
generator
Remote
control unit
[ 6.CONVER A ]
CPA01 : FINE OFF
CCA01 : H CENT
CCA02 : H SIZE
CCA03 : H LIN
CCA04 : H SKEW
CCA05 : EW PIN
CCA06 : H BOW
CCA07 : V CENT
CCA08 : V SKEW
CCA09 : V SIZE
CCA10 : V LIN
CCA11 : V KEY
CCA12 :TB PIN
NOTE:
Be sure to make it the value of Table2. Supposing data
differs, correct to the value of Table2.
When data is corrected (when the [MUTING] key is
pressed), it is necessary to perform an AUTO
CONVERGENCE PRESET, after a convergence
adjusts exactly.
(1) Receive NTSC crosshatch signal.
(2) Select 6.CONVER A from SERVICE MENU.
(3) Select < CPA01 > (FINE OFF).
(4) Change the data 0 to1. (Clear the fine adjustment
data)
(5) Select < CCA > item with [INPUT] key. Then a green
crosshatch pattern for adjustment will be displayed
on the screen.
(6) Check and set data < CCA01 > to < CCA12 > are
same value as table2.
(7) Press [SLEEP TIMER] key to change the adjusting
color to red and blue.
NOTE:
Press [OK] key to change the display colors.
Whenever [OK] key is pressed, the menu will
sequence in this order: "2 colors (adjusting
color+green)"
→
"3 colors (RGB)"
(8) Press [MUTING] key to memorize the set values.
(9) Select < CPA01 >.
(10) Change the < CPA01 > 1 to 0.
(11) Press [MUTING] key to memorize the set values.
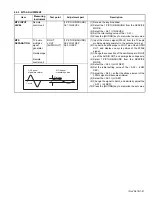
Fig.Table2
CPA04
TPOV OFST
0
Item name
Item No.
Initial setting
value
CPA05
FINEP
1245
CPA06
STARTLIN A
56
CPA07
STARTLIN B
-1
CPA08
CAU H2
0
CPA09
COARS OFST
-50
CPA10
V1OFSTA
7
CPA11
V1OFSTB
0
Item name
Item No.
Initial setting value
CCA01
CCA02
CCA03
CCA04
CCA05
CCA06
CCA07
CCA08
CCA09
CCA10
CCA11
CCA12
H CENT
H SIZE
H LIN
H SKEW
EW PIN
H BOW
V CENT
V SKEW
V SIZE
V. LIN
V. KEY
TB PIN
GREEN
0
-27
-96
0
-91
0
-19
0
-108
15
0
280
RED
-246
-54
240
0
-26
-30
8
0
-77
12
114
153
BLUE
395
16
-348
-10
-17
21
12
4
-105
8
-77
230
Содержание AV-48P776/H
Страница 1: ......
Страница 92: ... No YA318 2 4 ...
Страница 135: ...2 47 No YA318 PATTERN DIAGRAMS MAIN PWB PATTERN SOLDER SIDE ...
Страница 136: ... No YA318 2 48 FRONT ...
Страница 137: ...2 49 No YA318 MAIN PWB PATTERN PARTS SIDE ...
Страница 138: ... No YA318 2 50 FRONT ...