


P5417009-rev.6
51
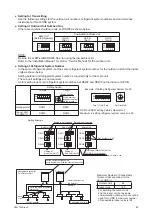
6.6 Multi-Kit Connection
Use the branch piping kit to ensure proper piping.
Do not use a T-Joint. Secure the branch pipes horizontally to a pillar, a wall, or ceiling.
When installing the piping by securing plates, wrap the branch pipe with an insulation or slip a cushioning
between the pipe and the plate. Then secure it to the wall.
Installation Position of Branch Piping
Keep Horizonta
l
Keep Horizontal
Branch
Connection
To Indoor Unit
To Indoor Unit
To Outdoor Unit
Keep
Vertical
Securing the Branch Pipe to
Ceiling Surface or Beam
Secure the Branch Pipe
to the surface of Pillar or Wall.
Keep Horizontal
Main Pipe
Branch
Connection
Branch Pipe
Main Pipe
Branch
Connection
Branch Pipe
Branch Pipe
Straight
Length
Min. 1.6 ft
(0.5m)
Main
Pipe
Branch
Connection
Branch Pipe
Branch Pipe
Main Pipe
Branch
Connection
Branch
Pipe
Branch
Pipe
Bending
Radius
Min.
1.6 ft
(0.5m)
CORRECT
CORRECT
CORRECT
INCORRECT
Upper Side
Upper Side
Upper Side
Upper Side
Outdoor Unit
Outdoor Unit
Multi-Kit
Example: Recommended
From each Indoor Unit to Multi-Kit, use hard copper pipes that bend to prevent kinking.
Bending Pipe
Connection Pipe
Example: Not Recommended
Indoor Unit
Straight piping does not allow for movement of the pipe
when it expands or contracts.
Hard copper pipe will expand and contract
due to temperature changes in piping.
Hard copper pipe will expand and contract
due to temperature changes in piping.
Piping Form from Multi-Kit to Indoor Unit
When on-site piping is installed using soft or hard copper, make sure that the piping is installed to allow
for movement of the piping. Temperature changes cause contraction and expansion of the pipe.
Содержание YVAHR072B32S
Страница 2: ......
Страница 88: ...P5417009 rev 6 Code No LIT 12012492 Revised February 2019 2017 Johnson Controls Inc ...


