DINAMAP*
Compact
Vital Signs Monitor
38
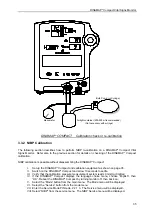
XI. Apply 157 mmHg (210mBar) pressure using the bulb pump or syringe, and hold the
pressure.
XII. Approximately 12 seconds after the “Pop Off” option was selected, the monitor will bleep
3 times and then start calibration. Retaining the pressure at this point is crucial.
Calibration may take up to a minute.
XIII. When calibration is complete, the monitor will enter its Failsafe alarm mode.
XIV. Turn off the DINAMAP*
Compact
, and remove LK1.
XV. Check calibration by repeating test 3.3.3.
XVI. Carryout Manual Release Test Procedure as per Section 4 prior to release of unit
for clinical use.
Note:
If overpressure occurs when applying pressure in point (XII) above, turn off the DINAMAP*
Compact
and re-start the sequence.
3.3.5 Predictive Temperature Calibration Check
The predictive temperature calibration of the DINAMAP*
Compact
monitor should be checked every 12
months or when there is doubt about the validity of the temperature readings. The temperature
calibration plug (part number 320-635) may be used to check the calibration of the temperature
detection circuits within the monitor.
-- CAUTION --
DO NOT
twist the calibration plug when inserting
or removing it since this may damage the precision
resistors contained within the plug.
To check the temperature calibration:
I. Insert the plug into the temperature probe connector on the front of the monitor and
switch the monitor on.
II. Switch on the DINAMAP*
Compact
and wait for the main menu to be displayed on the
LCD.
III. IF UUT
°
C LED is lit, select MODE followed by SERVICE from the sub menu. Enter
service code 2 2 1 3.
IV. Select TEMP followed by ‘C OR F’ from the sub menu.
V. When LCD displays message ‘Trend data will be lost’, select YES and confirm
°
F LED is
lit.
VI. Switch unit off then on.
VII. Select the TEMP button from the main menu.
VIII. After determination (approximately 60 seconds), the Temperature display should show
98.6
±
0.1
°
F.
IX. If the display is off by more than
±
0.1 degree, the monitor is out of calibration and should
be calibrated.
Note:
The calibration plug contains an internal resistor that must be verified every time the monitor is
calibrated. Using a calibrated multimeter, the resistance between pins 1 and 2 of the calibration
plug should be 6090
±
7
Ω
. If the plug is not within this range, replace it.

