PAGE 96 of 142
3.
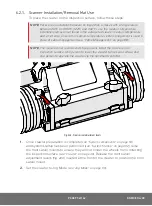
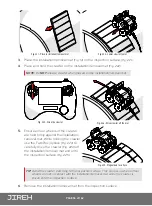
Place the installation/removal mat
(Fig. 14)
on the inspection surface
(Fig. 221)
.
4.
Place and hold the crawler on the installation/removal mat
(Fig. 222)
.
NOTE:
Do
NOT
release crawler when placed on the installation/removal mat.
5.
Ensure all four wheels of the crawler
are held firmly against the installation/
removal mat. While holding the crawler,
use the Fwd/Rev joystick
(Fig. 223)
to
carefully drive the crawler
(Fig. 224)
off
the installation/removal mat and onto
the inspection surface
(Fig. 225)
.
TIP:
Avoid the crawler slamming to the inspection surface. This can occur when all four
wheels are not in contact with the installation/removal mat while the crawler is
driven onto the inspection surface.
6.
Remove the installation/removal mat from the inspection surface.
Fig. 221 - Place installation/removal mat
Fig. 222 - Lower crawler to mat
Fig. 223 - Drive the crawler
Fig. 224 - Drive crawler off the mat
Fig. 225 - Magnetized to surface


