background image

CD6111

1

INTRODUCTION

Congratulations on your purchase of the Jensen CD6111 Mobile AM/FM/CD Receiver. It’s a 
good idea to read all of the instructions before beginning the installation. We recommend 
having your Jensen CD6111 installed by a reputable installation shop.

Features

CD

CD-R/RW compatible

Last position memory

Random/repeat/intro

High-speed audible track search

1-Bit D/A converter 

Anti-shock mechanism

AM/FM TUNER

24 station presets (12 FM, 6 AM)

JENSEN Plus Tuner II

Auto station store/preset scan

One-touch memory

Manual stereo/mono, local/distance, and up/down tuning

Auto seek tuning up/down and 5-second scan tuning

Chassis

Electronic detachable face with hard case

Import ISO/DIN mountable

20-pin power harness

General

High contrast Liquid Crystal Display (LCD)

Infrared remote control (included)

iEQ3 - instant EQ with 3 selectable EQ curves - Classic, Pop and Rock

1 pair each rear RCA auxiliary inputs and pre-amp outputs

Rotary encoder audio control with electronic volume, bass, treble, balance, fader

Multi-button power on

Keyless CD eject

4V Peak / 2V RMS RCA pre-amp output voltages

Rear RCA pre-amp outputs

200-ohm low impedance preamp output

Flex-Fader

True Blue LED preset illumination

Loudness

Clock

Mute

Theft deterrent LED

Optional Accessories

jPORT (Sold Separately)

Controls your iPod and CD Changer

jLink Apple approved iPod cable (included)

jLink Adapter (included)

iAux (Sold Separately)

Converts 3.5mm Input to RCA outputs for auxiliary devices

Under-dash adapter allows for quick installation of portable media devices
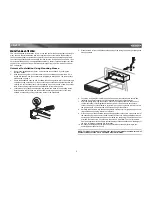
PREPARATION

Tools and Supplies

The following tools and supplies are needed to install the radio.

Torx type, flathead and Philips screwdrivers

Wire cutters and strippers

Tools to remove existing radio (screwdriver, socket wrench set or other tools)

Electrical tape

Crimping tool

Volt meter/test light

Crimp connections

18 gauge wire for power connections

16-18 gauge speaker wire

SPEAKER REQUIREMENTS: Only connect speakers rated in the load impedance of 4 
ohms. Speakers with a load impedance less than 4 ohms could damage the unit.
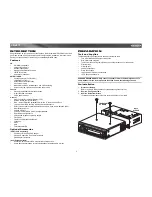
Pre-installation

1.

Disconnect Battery

Before you begin, always disconnect the battery negative terminal.
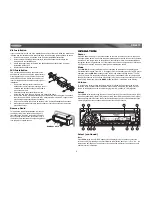
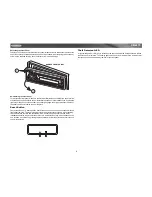
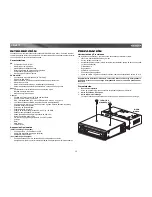
2.

Remove Transport Screws


3.

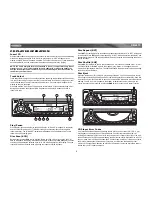
Remove Radio from Sleeve

Lift latches on both sides of sleeve to remove half-sleeve from radio.

TRANSPORT 
  SCREWS

HALF 

SLEEVE

Содержание CD6111

Страница 1: ...TUNE 160 WATTS CD6111 READY READY AUDIO INPUT CD6111 Instruction Manual Manual de Instrucciones Guide d instructions...

Страница 2: ......

Страница 3: ...peraci n 16 Operaci n del Radio 19 Operaci n del Equipo de CD 20 Operaci n del Cambiador de CD 21 Operaci n del JPORT 21 Control Remoto 22 Cuidado y Mantenimiento 22 Correcci n de Problemas 23 Especif...

Страница 4: ...ii CD6111...

Страница 5: ...RMS RCA pre amp output voltages Rear RCA pre amp outputs 200 ohm low impedance preamp output Flex Fader True Blue LED preset illumination Loudness Clock Mute Theft deterrent LED Optional Accessories...

Страница 6: ...bles Connect line in for auxiliary input devices CD player etc 8 Outputs to Amplifier gray RCA cables Connect line out for optional external amplifiers The red connector is for the right and the white...

Страница 7: ...d opening bend as many of the tabs outward as necessary to firmly secure the sleeve to the dashboard 5 Place the radio in front of the dashboard opening so the wiring can be brought through the mounti...

Страница 8: ...they will not lock properly to release the unit OPERATION Power Press the power button 1 or any other button on the face of the receiver to turn the unit on when the ignition switch is on Press the po...

Страница 9: ...gain adjusting the volume control or by pressing any other button on the unit Liquid Crystal Display LCD The liquid crystal display LCD panel 8 displays the frequency time and activated functions of t...

Страница 10: ...l the mechanism locks it into place Reset Button The reset button 11 is located on the front of the chassis and can only be accessed with the front panel removed The reset circuitry protects the micro...

Страница 11: ...resets on the current band and for all presets on the other three bands Automatically Store Preset Scan AS PS Automatically Store Select six strong stations and store them in the current band using th...

Страница 12: ...k S SCN will disappear from the display The scan function will also be canceled when activating the repeat or shuffle functions Disc Repeat RPT Press RPT 25 during disc play to continuously repeat the...

Страница 13: ...Repeat Shuffle Track Select and Fast Forward Fast Reverse features for CD changer play are accessed in the same methods as for regular disc play Refer to the CD Player Operation section of this manua...

Страница 14: ...ing burning the session must be closed Please refer to your software s recommended procedures for closing a disc session Review your recording software to familiarize yourself with the correct recordi...

Страница 15: ...eneral Power supply 11 16 VDC negative ground Fuses 15 amp fast blow ATO DIN chassis dimensions 2 H x 7 W x 7 D 51mm x 178mm x 178mm Specifications subject to change without notice Problem Cause Corre...

Страница 16: ...O THE REPAIR OR REPLACEMENT PROVIDED ABOVE AND IN NO EVENT SHALL THE COMPANY S LIABILITY EXCEED THE PURCHASE PRICE PAID BY PURCHASER FOR THE PRODUCT This Warranty is in lieu of all other express warra...

Страница 17: ...CA 4V Pico 2V RMS Salidas preamplificadas RCA traseras Salida preamplificada de baja impedancia de 200 ohm Balance delantero trasero Flex Iluminaci n configurada previamente de LED True Blue Volumen R...

Страница 18: ...RCA para utilizar con dispositivos de entrada auxiliares Pasador de CD etc 8 Salidas de RCA al Amplificador Enchufe hembra de salida RCA para utilizar con amplificadores externos opcionales 9 Altavoz...

Страница 19: ...o 5 Ubique el radio en frente de la apertura del tablero de manera tal que los cables puedan pasar por la manga de montaje 6 Siga el diagrama de cableado detalladamente y aseg rese que todas las conex...

Страница 20: ...rte la s herramienta s Hale el radio hacia afuera Desconecte el arn s del cableado y quite el radio OPERACI N Encendido Presione el bot n de encendido 1 o cualquier otro bot n en el frente del radio p...

Страница 21: ...do humano Cuando esta funci n se active LOUD ON aparecer en la pantalla por cinco segundos Presione BAND por dos segundos nuevamente para desactivar esta funci n y LOUD OFF aparecer por cinco segundo...

Страница 22: ...correctamente enganchado luego presione suavemente la parte izquierda del panel hasta que el mecanismo se trabe en su lugar Bot n de Reconfigurar Reset El bot n para reconfigurar reset 11 est ubicado...

Страница 23: ...bot n asociado a ella Repita este procedimiento para los cinco botones restantes en esa misma banda y para todos los botones en las otras tres bandas Grabado Autom tico Recorrido de Sinton a Preselecc...

Страница 24: ...recorrido y ejecutar la pista seleccionada S SCN desaparecer de la pantalla La funci n de recorrido tambi n ser cancelada activando las funciones de repetici n o de entremezclar Repetici n RPT Presion...

Страница 25: ...uffle Selecci n de Pista Track Select y Avance y Retroceso R pidos Fast Forward Fast Reverse durante la ejecuci n del cambiador de CD se pueden utilizar en la misma forma que para la ejecuci n de un C...

Страница 26: ...Refiera por favor a sus procedimientos recomendados software s para cerrar un disco Repase su software de la grabaci n para familiarizarse con los procedimientos correctos de la grabaci n Recomendamos...

Страница 27: ...s a cambio sin aviso previo Problema Causa Correccion El equipo no func tiona el visualizador no se enciende No hay corrriente en el cable amarilo No hay cor riente en el cable rojo Revise la conexi n...

Страница 28: ...A SUSTITUCION QUE SE MENCIONAN ANTES Y BAJO NINGUNA CIRCUNSTANCIA LA RESPONSABILIDAD DE LA COMPA IA HABRA DE EXCEDER EL PRECIO DE COMPRA QUE EL COMPRADOR PAGO POR EL PRODUCTO Esta Garant a reemplaza a...

Страница 29: ...amplification 4V Peak 2V RMS RCA Sorties pr amplification RCA l arri re Sortie pr amplification basse imp dance 200 ohm Flex quilibreur Illumination pr r gl e True Blue DEL Intensit Horloge Muet DEL...

Страница 30: ...s par ment 7 C bles d entr e auxiliaire Prise femelle d entr e en ligne utiliser avec des appareils d entr e auxiliaires changeur de CD etc 8 Sorties de RCA l amplificateur Prise femelle sortie de li...

Страница 31: ...n fix la planche de bord 5 Placez la radio devant l ouverture dans la planche bord afin que le c blage puisse tre fait travers le manchon du montage 6 Consultez soigneusement le sch ma du c blage et r...

Страница 32: ...rez l autoradio D branchez le faisceau de c bles et enlevez l autoradio OPERATION Puissance Appuyez sur le bouton puissance ou sur n importe quel bouton sur la radio pour mettre l appareil en marche l...

Страница 33: ...marche sera affich e pendant cinq secondes Appuyez de nouveau sur BAND pendant deux secondes pour d sactiver cette fonction Les mots Intensit arr t e sera affich e pendant cinq secondes Mise en sourdi...

Страница 34: ...onner la partie droite du panneau en place pour qu elle soit bien engag e et puis appuyez l g rement sur la partie gauche jusqu ce que le m canisme soit bien verrouill et en place Le bouton de r glage...

Страница 35: ...ant sur le bouton pr r glage correspondant R p tez pour les cinq pr r glages sur la bande et proc der de m me pour les autres bandes Mise en m moire automatique Balayage du pr r glage AS PS Mise en m...

Страница 36: ...a piste choisie Le mot S SCN va dispara tre de l affichage La fonction balayage peut tre annul e en utilisant les fonctions R p tition ou M lange R p tition RPT Appuyez sur RPT 25 pendant que le disqu...

Страница 37: ...onctions Pause Balayage R p tition M lange S lection de piste pendant l op ration du changeur de CD peuvent tre acc d es de la m me mani re que pour une op ration CD platine Voyez la section sur l op...

Страница 38: ...ur la fermeture un disque Passez en revue votre logiciel d enregistrement pour se familiariser avec les proc dures correctes d enregistrement Nous recommandons d employer les derni res versions logici...

Страница 39: ...cifications sujettes modifications sans pr avis Probl me Cause Mesure Prendre L appareil ne fonc tionne pas l affichage ne s allume pas Aucune alimentation au fil jaune Aucune alimenta tion au fil ro...

Страница 40: ...MPLACEMENT TEL LE QU IL ELLE EST STIPULE E CI DESSUS ET EN AUCUN CAS LA RESPONSABILITE DE LA SOCIETE NE POURRA EXCEDER LE PRIX D ACHAT PAYE PAR L ACHETEUR DU PRODUIT Cette Garantie remplace toute autr...

Отзывы: