background image

ENGLISH

OPERATION MANUAL

JB SYSTEMS

®

9/50

PLANO SPOT

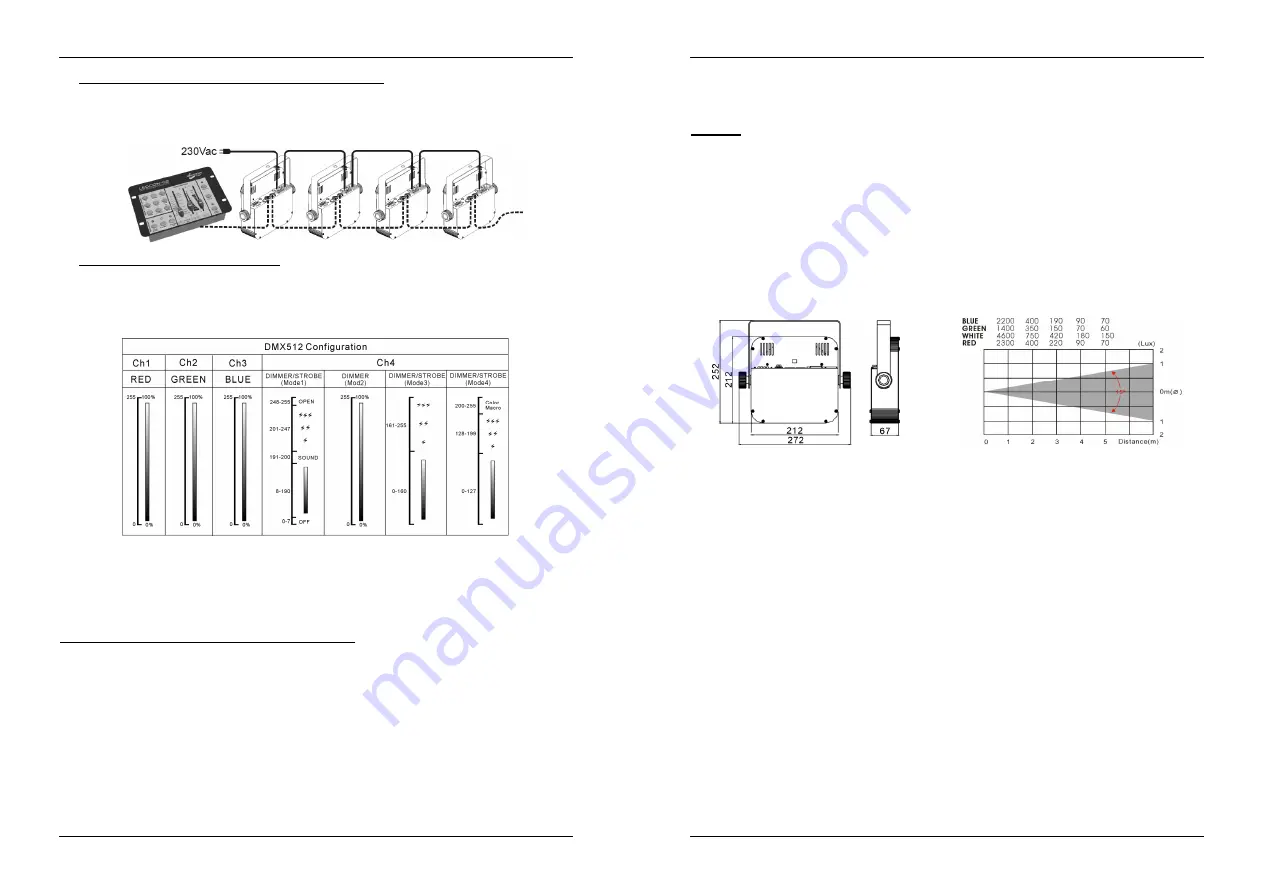
D. Connect an optional LEDCON-02 controller for more control:

The LEDCON-02 controller can only be used in standalone or master/slave mode. Connect the controller
to the DMX-input of the first unit (master). Make sure that the PLANO SPOT projectors are all set to
channel mode1 (Md 1). Now you can control all the connected units in 4 or 8channel mode. Refer to the
user manual of the LEDCON-02 controller for more information and automatic addressing.

E. Controlled by universal DMX-controller:

Connect all units together. Refer to the chapter “Electrical installation for two or more units in DMX-
mode” to learn how to do this (don’t forget to address all units properly!)

Connect all units to the mains and turn on the DMX controller.

Since each unit has its own DMX-address, you can control them individually. Remember that each unit
uses 4 DMX-channels as shown in the DMX chart below:

Channel4 can have 4 different behaviors, depending on the channel mode (1,2,3 or 4) you selected. (see
chapter HOW TO SETUP)

MAINTENANCE

Make sure the area below the installation place is free from unwanted persons during servicing.

Switch off the unit, unplug the mains cable and wait until the unit has been cooled down.

During inspection the following points should be checked:

All screws used for installing the device and any of its parts should be tightly fastened and may not be
corroded.

Housings, fixations and installations spots (ceiling, truss, suspensions) should be totally free from any
deformation.

When an optical lens is visibly damaged due to cracks or deep scratches, it must be replaced.

The mains cables must be in impeccable condition and should be replaced immediately when even a
small problem is detected.

In order to protect the device from overheat the cooling fans (if any) and ventilation openings should be
cleaned monthly.

The interior of the device should be cleaned annually using a vacuum cleaner or air-jet.

The cleaning of internal and external optical lenses and/or mirrors must be carried out periodically to
optimize light output. Cleaning frequency depends on the environment in which the fixture operates: damp,
smoky or particularly dirty surroundings can cause greater accumulation of dirt on the unit’s optics.

ENGLISH

OPERATION MANUAL

JB SYSTEMS

®

10/50

PLANO SPOT

Clean with a soft cloth using normal glass cleaning products.

Always dry the parts carefully.

Clean the external optics at least once every 30 days.

Clean the internal optics at least every 90 days.

Attention: We strongly recommend internal cleaning to be carried out by qualified personnel!

SPECIFICATIONS

Mains Input:

230V 50Hz

Power consumption:

28Watt

Fuse:

250V 6,3A slow blow (20mm glass)

IEC input/output daisy chaining:

50pcs

Sound Control:

Internal microphone

DMX connections:

XLR 3pin

LEDs:

212 high power LEDs (R70 + G71 + B71)

Beam angle:

15°

Luminous intensity:

see chart below

Size:

see drawing below

Weight:

1,6kg

Every information is subject to change without prior notice

You can download the latest version of this user manual on our website: www.beglec.com

Содержание Plano Spot

Страница 1: ...ofveld 2 B1702 Groot Bijgaarden Belgium Reproduction or publication of the content in any manner without express permission of the publisher is prohibited Operation Manual Mode d emploi Gebruiksaanwij...

Страница 2: ...t toestel en de gebruikte batterijen op een milieuvriendelijke manier conform de in uw land geldende voorschriften DU ENTSORGUNG DES GER TS Entsorgen Sie das Ger t und die Batterien auf umweltfreundli...

Страница 3: ...om after transport Condense sometimes prevents the unit from working at full performance or may even cause damages This unit is for indoor use only Don t place metal objects or spill liquid inside the...

Страница 4: ...ote controller ENGLISH OPERATION MANUAL JB SYSTEMS 4 50 PLANO SPOT Electrical installation for two or more units in DMX mode The DMX protocol is a widely used high speed signal to control intelligent...

Страница 5: ...th channel Refer to the DMX chart to see the differences Press the MENU button until is shown on the display Press the ENTER button to select Use DOWN and UP button to select one of the available chan...

Страница 6: ...play off display is off when not used Press the MENU button until the display shows Press the ENTER button Use DOWN and UP buttons to select display always on or display off when not used Once the mod...

Страница 7: ...nd installations spots ceiling truss suspensions should be totally free from any deformation When an optical lens is visibly damaged due to cracks or deep scratches it must be replaced The mains cable...

Страница 8: ...on future Si vous vendez l appareil FRAN AIS MODE D EMPLOI JB SYSTEMS 12 50 PLANO SPOT assurez vous d y joindre ce manuel galement Afin de prot ger l environnement merci de recycler les emballages aut...

Страница 9: ...pour diminuer les valeurs affich es par l cran 14 Touche UP utilis e pour avancer dans le menu et pour augmenter les valeurs affich es par l cran FRAN AIS MODE D EMPLOI JB SYSTEMS 14 50 PLANO SPOT 15...

Страница 10: ...e programm e sur le premier appareil Appuyez sur la touche MENU du premier appareil pendant 2 secondes pour revenir en mode de fonctionnement Exemple supposons que le premier appareil ait t programm l...

Страница 11: ...lectionn appuyez sur le bouton ENTER pour confirmer Appuyez sur la touche MENU pendant 2 secondes pour revenir en mode de fonctionnement FRAN AIS MODE D EMPLOI JB SYSTEMS 18 50 PLANO SPOT Led Display...

Страница 12: ...concern es lors de la maintenance Mettez l appareil hors tension d branchez le cordon d alimentation et attendez que l appareil ait refroidi Pendant l inspection les points suivants doivent tre v rifi...

Страница 13: ...m het milieu probeer zoveel mogelijk het verpakkingsmateriaal te recycleren Een nieuw lichteffect kan soms ongewenste rook en of reuk veroorzaken Dit is normaal en verdwijnt na een paar minuten Stel d...

Страница 14: ...tsels en of schade aan eigendommen tot gevolg hebben Het ophangen vergt veel ervaring U behoort de grenzen te respecteren aan de werklast erkende installeringmaterialen moeten worden gebruikt de veili...

Страница 15: ...volgende adressen toegewezen 104 108 112 116 Channel Mode Het toestel beschikt over 4 verschillende kanaalmodi elk met verschillende functies voor het 4 de kanaal Zie de DMX table voor de verschillen...

Страница 16: ...ay inversion display is leesbaar wanneer het toestel ondersteboven hangt Druk op de MENU toets tot op de display verschijnt Druk op de ENTER toets NEDERLANDS HANDLEIDING JB SYSTEMS 28 50 PLANO SPOT Ge...

Страница 17: ...lein probleem ontdekt werd Om het toestel tegen oververhitting te beschermen behoren de ventilatoren als die er zijn en de ventilatieopeningen elke maand gereinigd te worden De binnenkant van het toes...

Страница 18: ...gen Minuten Zur Vermeidung von Stromschlag oder Feuer Ger t bitte nicht Regen oder Feuchtigkeit aussetzen Zur Vermeidung von Kondensation im Inneren des Ger ts bitte nach dem Transport in eine warme U...

Страница 19: ...enn Sie zus tzliche Steuerungsfunktionen haben m chten Sie k nnen auch den LEDCON 02 Controller anschlie en Elektrische Installation von zwei oder mehreren Ger ten im DMX Modus Das DMX Protokoll ist d...

Страница 20: ...denen Funktionen sind auf der DMX Karte angegeben MENU Taste dr cken bis im Display angezeigt wird EINGABE ENTER dr cken Benutzen Sie den DOWN und UP Knopf um einen der m glichen Kanal Moden zu w hlen...

Страница 21: ...dr ckt um in den Betriebsmodus zur ckzukehren Led Display Display an Display ist st ndig eingeschaltet Display aus Display ist ausgeschaltet wenn nicht in Benutzung MENU Taste dr cken bis im Display a...

Страница 22: ...rstellen dass sich keine unbefugten Personen unterhalb des Ger ts befinden w hrend es gewartet wird Ger t ausschalten Netzstecker ziehen und warten bis es sich abgek hlt hat W hrend der Wartung sind f...

Страница 23: ...efecto luminoso provoca a veces humo y u olor no deseados Esto es normal y desaparece despu s de algunos minutos Para evitar incendios o riesgos de descarga no exponga la unidad a la lluvia o a la hu...

Страница 24: ...i n el ctrica de una o m s unidades en modo maestro eslavo Conecte 2 a 16 m ximo unidades mediante cables de micr fono equilibrados de buena calidad La unidad que no tenga ning n cable conectado a su...

Страница 25: ...recciones siguientes 104 108 112 116 Modo de canal La unidad tiene 4 modos de canal diferentes cada uno con distintas funciones para el 4 canal Consulte la tabla DMX para ver las diferencias Pulse el...

Страница 26: ...iento Una vez que haya seleccionado el modo pulse el bot n ENTER para confirmar su selecci n Pulse el bot n MENU durante aproximadamente 2 segundos para volver al modo de ejecuci n ESPA OL MANUAL DE F...

Страница 27: ...e el mantenimiento Apague la unidad desenchufe el cable de red y espere hasta que la unidad se haya enfriado Durante la inspecci n deber comprobar los siguientes puntos Todos los tornillos utilizados...

Отзывы: