background image

Description and Operation

Operation in RTK Mode

Type of Survey

57

www.javad.com     


5. Operation in RTK Mode 

5.1. Type of Survey

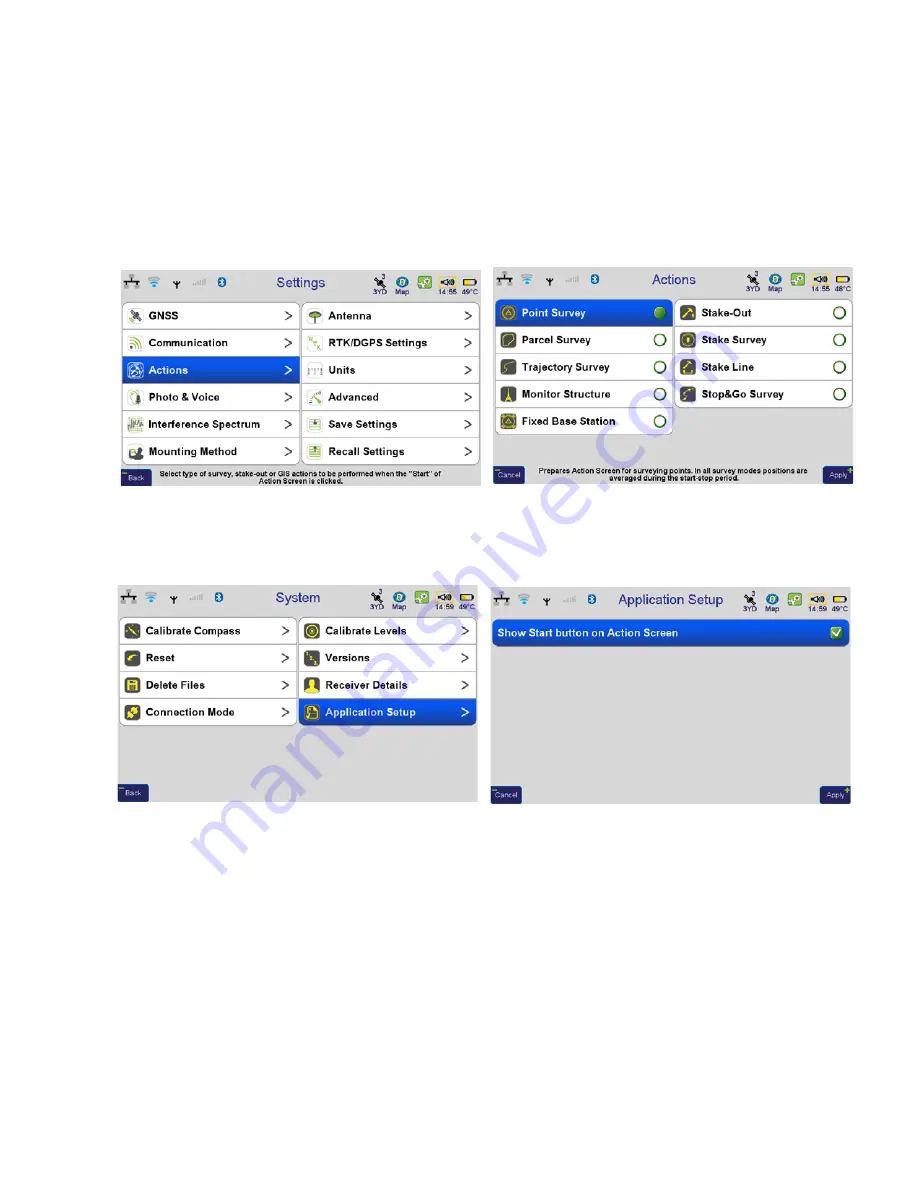
To setup the survey type, tap 

Settings 

Actions

 or press F2 button on the top of the receiver. 

Figure 101. Actions

All operations is performed using 

Action

 screen and 

Command

 screen, if the survey buttons are disabled

on the 

Action

 screen. To enable these buttons tap 

System

Application Setup

:

Figure 102. Application Setup

Enable 

Show Start button on Action Screen

. Without survey buttons it is necessary to switch to Lite view

and tap there Start and Stop to start and finish survey.

Содержание TRIUMPH-VS

Страница 1: ...ed The information contained herein may not be used accessed copied stored displayed sold modified published or distributed or otherwise reproduced without express written consent from JAVAD GNSS TRIUMPH VS GNSS Receiver Operator s Manual Version 1 1 Last Revised July 29 2014 ...

Страница 2: ...www javad com ...

Страница 3: ... Card Slots 13 2 5 Data and Power Ports 14 2 6 Two Cameras 14 2 7 Mounting 15 2 8 Cables 15 2 9 Accessories 16 3 Operation 17 3 1 Software installation 17 3 2 Installing Optional SIM Cards 17 3 3 Charging the Batteries 18 3 4 Turning On Off the Receiver 20 3 5 Mounting Method 21 3 6 Connecting to Internet 23 3 7 Checking OAF and Software Version 25 3 8 TRIUMPH VS Configuration 27 4 Base and Rover ...

Страница 4: ...68 6 Stop and Go Survey for Post processing 74 7 Monitor Structure 76 Chapter 2 Troubleshooting 77 2 1 Check This First 77 Appendix A Specifications 81 Appendix B UHF Radio Usage 89 Appendix C Safety Warnings 91 General Warnings 91 Battery Pack Warnings 92 Power Supply 92 Usage Warnings 93 Appendix D Warranty Terms 95 ...

Страница 5: ... of considerable work time and money and are the result of original selection coordination and arrangement by JAVAD GNSS TRADEMARKS TRIUMPH VS JAVAD GNSS are trademarks or registered trademarks of JAVAD GNSS Windows is a registered trademark of Microsoft Corporation Bluetooth word mark is owned by the Bluetooth SIG Inc Product and company names mentioned herein may be trademarks of their respectiv...

Страница 6: ...in this paragraph shall restrict you from disclosing Confidential Information to your employees as may be necessary or appropriate to operate or care for TRIUMPH VS Such employees must also keep the Confidentiality Information confidential In the event you become legally compelled to disclose any of the Confidential Information you shall give JAVAD GNSS immediate notice so that it may seek a prote...

Страница 7: ...e receiver Plug the equipment into an outlet on a circuit different from that to which the receiver is powered Consult the dealer or an experienced radio television technician for additional suggestions Note Any changes or modifications to the equipment not expressly approved by the party responsible for compliance could void your authority to operate such equipment Canadian Emissions Labeling Req...

Страница 8: ...y different from the sample screen due to the receiver you have connected operating system used and settings you have specified This is normal and not a cause for concern Technical Assistance If you have a problem and cannot find the information you need in the product documentation contact your local dealer Alternatively request technical support using the JAVAD GNSS World Wide Web site at www ja...

Страница 9: ...oc GLONASS C A L2C P1 P2 L3 I Q QZSS C A L1C I Q L2C L M L5 I Q SAIF BeiDou B1 B2 SBAS L1 L5 improving the accuracy and reliability of your survey points and positions especially under difficult jobsite conditions The GNSS component of TRIUMPH VS receivers means you can access the GPS Global Positioning System satellites of the United States the Galileo an upcoming global positioning system mainta...

Страница 10: ...rd is a wide variety of communication options GSM GPRS UHF transmit and receive Bluetooth Ethernet even WiFi Figure 1 TRIUMPH VS Receiver Firmware updates for receivers are fairly common and for most of us it means getting all the receivers together and hitching them up to a PC one at a time for updating With the TRIUMPH VS receiver there is a better way Firmware and software updates are performed...

Страница 11: ... rechargeable battery pack two SIM card slots SD card slot a Bluetooth wireless technology module a multi system receiver board and a radio modem 2 1 GNSS Antenna The Triumph VS GNSS antenna is a stacked microstrip multipatch model that supports GPS GLONASS and Galileo L1 GPS GLONASS Galileo L2 GPS GLONASS L3 GLONASS L5 GPS E5 Galileo Unless you plan on using the TRIUMPH VS as a CORS station you s...

Страница 12: ...uick access to Action screen Cancel Zoom Decline the action or scale down for example map Enter OK Accept the changes in parameter s configuration Home Quick return to the Home screen Accept Zoom Accept the action or enlarge for example map or image Figure 4 User programmable buttons and On Off button The On Off power button turns the receiver on and off Five user programmable buttons are used for...

Страница 13: ...nd SIM Card Slots The SIM card slot allows a standard SIM cards to be installed in the receiver Once installed the SIM cards provide a unique identification for the receiver s GSM module and enable the receiver s GSM functionality based on the subscribed services the receiver board accesses the GSM module which accesses the SIM card The SIM cards usually remains inside the receiver A SIM card can ...

Страница 14: ...e receiver and an external device by synchronizing with Justin Link USB INT USB port for connecting NetView software to the GNSS board Ant used for external GNSS antenna connection UHF used for external UHF antenna connection Ext Frq 1PPS Event used for external devices connection for input output special signals Figure 7 TRIUMPH VS Ports 2 6 Two Cameras Two integrated 3 megapixel cameras on the f...

Страница 15: ...achines Figure 8 TRIUMPH VS Mounting 2 8 Cables The TRIUMPH VS receiver package includes standard communication and power cables for configuring the receiver and providing a power source to the receiver Power cable 14 578101 01 Power supply with SAE connector 22 570101 01 Power cable 14 508053 01 USB cable 14 578104 01 Ethernet cable 14 578105 01 Mounting ...

Страница 16: ...1 TRIUMPH VS soft carrying case 20 590204 01 Triumph VS Support Legs 21 590299 11 TRIUMPH VS Shoulder Strap 30 590209 01 TRIUMPH VS 3 Mount Survey Tripod Adaptor 02 590290 01 TRIUMPH VS 1 4 20 to 5 8 11 adapter 10 590293 01 Mouse pad 21 590282 01 Tweezers Straight Spade Tip Smooth 4 1 2inch SS 34 000004 01 Stereo Headset 30 590213 01 TRIUMPH VS Victor VS Headset Bung 21 590301 01 TRIUMPH VS Sun Vi...

Страница 17: ...ware for connecting the receiver to the PC as mobile device 3 2 Installing Optional SIM Cards TRIUMPH VS is equipped with two SIM card slots to allow using two SIM cards and switching between two different cell providers The SIM card can be purchased at your local cellular phone supply store The SIM card must have GPRS support to provide an Internet connectivity in the field where WiFi is not avai...

Страница 18: ...work fully charge the batteries for maximum operating time An approximately 6 hour charge cycle will fully charge the batteries the batteries will charge simultaneously The batteries can not be overcharged Note The batteries are shipped from the factory with 40 of power Fully charge the batteries before surveying The Li Ion batteries used in the battery packs should run at no less than 80 capacity...

Страница 19: ... the supply make sure that the supply meets local and national safety ordinances and matches the equipment s voltage and current requirements CAUTION Never attempt any maintenance or cleaning of the supply while plugged in Always remove supply from AC power before attempting service or cleaning Warning If the voltage supplied is below the minimum specification the receiver will suspend operation I...

Страница 20: ...leave overnight Figure 11 Charger 3 4 Turning On Off the Receiver To turn ON the receiver press and hold the power button on the top of TRIUMPH VS To turn OFF the receiver press and hold the power button for more than one seconds until the special Power Off screen appears This delay about 1 second will prevent the receiver from being turned off by mistake Select the desired action Figure 12 Power ...

Страница 21: ...ree offset attachment points If you use an offset attachment point you simply set the options in the TRIUMPH VS so that it will adjust the position to eccentric using the compass and clinometers You also have the option of using the bottom camera to center the TRIUMPH VS over a point visually and of course snap an image at the same time as you collect the point This use of a graduated monopod is a...

Страница 22: ...hod 2 Select the desired mounting method Figure 16 on page 22 Note The mounting method is effective only when the internal antenna is used Figure 16 Mounting Method To use inclinometers and compass corrections select the appropriate check marks To center the receiver when Hold on Hand mounting method is selected double tap on the screen center to activate the bottom camera ...

Страница 23: ... javad com 3 6 Connecting to Internet Establishing WiFi Connection 1 On the main screen tap the Settings icon Figure 17 Home screen 2 Tap Communication WiFi Figure 18 Communication Wi Fi 3 Select the desired available WiFi access point and tap Connect Figure 19 WiFi ...

Страница 24: ...shing LAN Connection 1 On the main screen tap the Settings icon Figure 20 Home screen 2 Tap Communication LAN Figure 21 Communication LAN 3 Enter the network parameters such as IP Net Mask Gateway DNS then tap Apply Figure 22 LAN parameters Note Contact you system administrator to obtain the required LAN parameters 4 The connection will be established and the LAN status icon will be active in the ...

Страница 25: ...period of time When the receiver is purchased a new OAF activates desired purchased options permanently Receiver options remain intact when clearing the NVRAM or resetting the receiver For a complete list of available options and details visit the JAVAD GNSS website http www javad com or consult your dealer 1 To check OAF and or update options tap Support on the Main screen Figure 23 Support Note ...

Страница 26: ...hecking version and software updating 1 To update software version tap Support on the Main screen the Update Software Figure 25 Support Update Software 2 The list of current software versions will be displayed and in red will be shown available updates Tap Update Figure 26 Update software ...

Страница 27: ...ngs One by one configuring receiver s parameters save them at once tapping Save Settings Here can be saved a lot of different configuration types for different jobs all of them can be recalled at any time with Recall Settings item Figure 28 Save settings and Recall Settings items All parameters and receiver configuration for different applications will be described below ...

Страница 28: ...plies correction information from the Base station to its current location to accurately calculate one or more points Rovers are mobile GNSS receivers on a survey pole or bipod that compares the information from the Base station to the data it logs from satellites and applies correction algorithms to accurately calculate a new point In applications intended for post processing the receivers typica...

Страница 29: ...p Base Station Configuration 29 www javad com 2 Then Communication UHF Figure 30 Communications UHF 3 Set the UHF modem parameters Frequency Protocol and its parameters Output power Specify the antenna external or internal Figure 31 UHF parameters ...

Страница 30: ... Add or Edit and insert edit the frequency Figure 32 UHF Frequency 5 The protocol parameters can be reviewed changed by tapping on the Protocol button Use JAVAD protocol type if base and rover are the JAVAD GNSS receivers Figure 33 Protocol parameters 6 Modem is configured now Return to Main screen and tap Settings GNSS Figure 34 GNSS 7 Tap Receive Data Rover and ensure the reception from all chan...

Страница 31: ...Transmit data parameters 9 Click on the UHF icon check the Sent parameter Ensure this parameter value is on the increase Figure 36 Status of the radio 10 Specify antenna parameters and antenna height Tap Settings Antenna Figure 37 Antenna parameters Select antenna type internal external and enter the antenna height If the internal antenna is selected specify the vertical height offset for Triumph ...

Страница 32: ...sable Correct by Compass Correct by Level and Lift Tilt Figure 38 Mounting Method 12 Ensure the receipt of the satellite signals is turned on tap Settings GNSS Figure 39 GNSS 13 If the data recording for base station is needed activate the data recording in Record Data specify what data will be recorded to internal memory and or SD card Figure 40 Record data ...

Страница 33: ...pecify the time Disable Delay and Auto repeat Figure 41 Duration parameters 15 Tap Settings Actions and select Fixed Base Station Figure 42 Actions Fixed Base Station 16 Press Action button on the front of TRIUMPH VS to switch to Action screen Tap on the Fixed Base Station name and set the base parameters Figure 43 Base station parameters ...

Страница 34: ... Coordinates Enter Position Figure 44 Base station position 18 Tap Apply on all screens then return to Action screen by pressing Action button Figure 45 Action screen 19 To disable Base station after finishing the work tap Settings GNSS Transmit Data Base and set UHF modem format to None Otherwise the base station operation will continue ...

Страница 35: ...Communication GSM CSD GPRS 2 Tap Settings and specify what SIM card will be used for data transfer enter PIN code and additional settings Figure 47 SIM card settings 3 The modem is configured The receiver should be configured now for transmit corrections to rover s 4 Repeat the steps described on page 32 apply all settings to GSM modem not UHF Enter antenna parameters mounting method duration base...

Страница 36: ...None Otherwise the base station operation will continue Base via GPRS EDGE modem THe corrections can be transmitted from the base station via GPRS EDGE modem However SIM card should have static IP address Otherwise after each connect to the network IP address of the base receiver will be a new one Also the access to this address should be enabled Check with your mobile operator that such opportuni...

Страница 37: ...and additional settings Figure 50 SIM card settings 3 Now the password to access to the base should be specified Tap Communication Network Services TCP server Figure 51 Network Services TCP server 4 Set server parameters port and password tap Apply Figure 52 TCP server parameters 5 The modem is configured The receiver should be configured now for transmit corrections to rover s ...

Страница 38: ... the screen s top wait until SIM card will be registered in network It should be SIM card READY Network REGISTERD 8 Tap again Communication Network Services TCP server and check IP address Write it down to use on in the rover side Figure 53 IP address 9 Tap Apply on all screens then return to Action screen by pressing Action button Figure 54 Action screen 10 To disable Base station after finishing...

Страница 39: ...nches thread Attached to the TRIUMPH 1 receiver this antenna gets a part of survey pole making handling with receiver easy and simple Figure 55 TRIUMPH 1 External UHF GSM Antenna TRIUMPH 1 Placement Recommendations TRIUMPH 1 should be placed on a stable surface and antenna should be positioned horizontally Ensure TRIUMPH 1 is placed on a place with maximum satellites visibility open sky and minimu...

Страница 40: ... connection window will appear Figure 57 Bluetooth connection window Note Red color of the satellites icon means TRIUMPH 1 is not connected yet and cannot track satellites 5 Tap Discovery and after the Bluetooth devises are discovered select your TRIUMPH 1 from the list and tap Connect When the connection will be established the Bluetooth icon will become green and satellites icon will show the nu...

Страница 41: ...d com 6 To set up the Base station tap Settings on the Main screen Figure 59 Settings 7 Then Communication UHF Figure 60 Communications UHF 8 Set the UHF modem parameters Frequency Protocol and its parameters Output power Specify the antenna external or internal Figure 61 UHF parameters ...

Страница 42: ...dd or Edit and insert edit the frequency Figure 62 UHF Frequency 10 The protocol parameters can be reviewed changed by tapping on the Protocol button Use JAVAD protocol type if base and rover are the JAVAD GNSS receivers Figure 63 Protocol parameters 11 Modem is configured now Return to Main screen and tap Settings GNSS Figure 64 GNSS 12 Tap Receive Data Rover and ensure the reception from all cha...

Страница 43: ...JPS full and period 1 Hz Figure 65 Transmit data parameters 14 Specify antenna parameters and antenna height Tap Settings Antenna Figure 66 Antenna parameters Select antenna type internal external and enter the antenna height 15 Specify the mounting method Settings Mounting Method on tripod Disable Correct by Compass Correct by Level and Lift Tilt Figure 67 Mounting Method ...

Страница 44: ...d on tap Settings GNSS Figure 68 GNSS 17 If the data recording for base station is needed activate the data recording in Record Data specify what data will be recorded to internal memory and or SD card Figure 69 Record data 18 Set up the duration stop record manually or specify the time Disable Delay and Auto repeat Figure 70 Duration parameters ...

Страница 45: ...se Station 20 Press Action button on the front of TRIUMPH VS to switch to Action screen Tap on the Fixed Base Station name and set the base parameters Figure 72 Base station parameters 21 Enter Base station coordinates Base Station Coordinates Enter Position Figure 73 Base station position 22 Tap Apply on all screens then return to Action screen by pressing Action button ...

Страница 46: ...p Stop Figure 74 Command screen 24 Now base station is configured Please do not move it 25 In the Action screen ensure the base station is transmitting corrections Figure 75 Base station is transmitting corrections 26 To disable Base station after finishing the work tap Settings GNSS Transmit Data Base and set UHF modem format to None Otherwise the base station operation will continue ...

Страница 47: ...me white and the satellites icon red this mens TRIUMPH VS is disconnected Figure 77 TRIUMPH VS is disconnected from TRIUMPH 1 4 2 Rover Configuration To obtain precise position a radio communication link is maintained between the base receiver and the rover and the base receiver supplies the corrections to the rover which computes its position and display the coordinates Corrections from the base ...

Страница 48: ...in screen press the Home button on the front panel of TRIUMPH VS Note Always tap Apply or press the Apply button to save the settings and parameters into receiver s memory 1 To set up the rover tap Settings on the Main screen Figure 78 Settings 2 Then Communication UHF Figure 79 Communications UHF 3 Set the UHF modem parameters Frequency Protocol and its parameters ...

Страница 49: ...hould be identical with the same base parameters 4 To setup the frequency select the value from the list by tapping on the Frequency If there is no needed frequency value tap Add or Edit and insert edit the frequency Figure 81 UHF Frequency 5 The protocol parameters can be reviewed changed by tapping on the Protocol button Use JAVAD protocol type if base and rover are the JAVAD GNSS receivers Figu...

Страница 50: ...g All Transmit Data Base formats should be set to None 8 Tap Receive Data Rover UHF and select the same corrections type which was selected on the base Figure 83 Receive Data 9 To ensure the rover receives the corrections via UHF tap on the UHF status icon and check the LQ and Received parameter Ensure LQ is 100 and Received value is on the increase Figure 84 Status of the radio ...

Страница 51: ...m the base Figure 85 Rover is receiving corrections Rover via GSM modem 1 Tap Settings Communication GSM CSD GPRS Figure 86 Communication GSM CSD GPRS 2 Tap Settings and specify what SIM card will be used for data transfer enter PIN code and enter the dial number of the base which GSM modem will dial for call Figure 87 SIM card settings ...

Страница 52: ...p Receive Data Rover GSM CSD and select the same corrections type which was selected on the base Figure 88 Receive Data 5 To ensure the rover receives the corrections via GSM tap on the GSM status icon and check the LQ and Received parameter Ensure LQ is 100 and Received value is on the increase Rover via GPRS connection RCV or NTRIP 1 Tap Settings Communication GSM CSD GPRS Figure 89 Communicatio...

Страница 53: ...number of the base which GSM modem will dial for call Figure 90 GPRS settings 3 Tap Settings Real Time Networks RTNs add the connection description by tapping Add Select NTRIP or RCV To connect to NTRIP caster enter server s IP address TCP port username and password Figure 91 RTN NTRIP Client parameters To connect to RCV TCP enter appropriate parameters Figure 92 RTN TCP client parameters ...

Страница 54: ...ghts 1 Tap Settings Mounting Method and select On Tripod 2 If TRIUMPH VS is used as rover select Correct by Compass as well 3 Activate Lift Tilt mode if needed 4 Return to Home screen tap Settings Antenna Set the antenna type internal or external and height of the tripod Measured Height If there are offsets mounting for TRIUMPH VS or UFH GSM antenna for TRIUMPH 1 tap Internal and add these offsets...

Страница 55: ...rence rejection Set what data should be recorded and specify the destination Internal memory or SD card Figure 95 GNSS Parameters Tap Duration to set the survey duration Keep Auto repeat disabled Figure 96 Duration Tap Accept Position Results of and specify what type of solution will be accepted usually it is RTK Fixed Figure 97 Solution type ...

Страница 56: ... video parameters Tap Settings Interference Spectrum and setup the parameters of spectrum recording if needed Figure 99 Spectrum settings Tap Save Settings to save made configurations then it can be recalled with Recall Settings item Figure 100 Save settings and Recall Settings Now the receiver is ready for surveying We recommend to go to the opened place receive the fixed solution and then go to ...

Страница 57: ... of the receiver Figure 101 Actions All operations is performed using Action screen and Command screen if the survey buttons are disabled on the Action screen To enable these buttons tap System Application Setup Figure 102 Application Setup Enable Show Start button on Action Screen Without survey buttons it is necessary to switch to Lite view and tap there Start and Stop to start and finish survey...

Страница 58: ...front of the receiver Double pressing switches to Command screen and back 5 2 Action Screen This screen shows current settings and surveying progress It is divided on some panels which show the information depending on survey type Figure 103 Action screen All fields are active and tapping on each appropriate parameters can be changed 1 2 3 4 5 6 7 8 9 10 ...

Страница 59: ...ww javad com 1 This panel shows coordinates and received epochs By tapping 9 buttons appear Camera enables the picture from bottom camera double tapping enables front camera RTK Settings opens RTK settings window Mounting Method quick access to Mounting Method window ...

Страница 60: ...Operation Operation in RTK Mode Action Screen 60 www javad com Spectrum opens Spectrum Analysis window Accuracy quick access to Accept Positions window Elevation Mask allows the quick access to Elevation mask settings ...

Страница 61: ...ngs CLR Screen Clear screen Back Return to Action screen 2 This panel displays the name of the current point tapping on this panel appears the window with the parameters of the object name attribute layer etc for survey either select a point for the stake out or setup coordinates of the base station ...

Страница 62: ...n screen with list of actions 4 The survey time panel By tapping opens the screen with the duration settings 5 The achieved accuracy It also displays the current type of solution and PDOP After surveying the values are not lost To check current epoch accuracy tap Clear By tapping displays RTK V6 screen 6 Tracking satellites By tapping opens the GNSS screen with the main GNSS settings ...

Страница 63: ...t shows the transmitted corrections and for the rover received By tapping opens Communication screen 8 The panel displays the status of recording raw measurements By tapping it opens the screen Record Data 9 Displays for the TRIUMPH VS the status of inclinometer By tapping it opens the screen Calibrating Levels ...

Страница 64: ...window which helps during the stake out o by displaying the epochs during surveying 5 3 Command screen While all the information is displayed on the Action screen the surveying management can be performed on the Command screen To switch to it press the FN button once again Figure 104 Command screen This screen is divided into 9 parts with text On the right there are three buttons associated with t...

Страница 65: ...Description and Operation Operation in RTK Mode Command screen 65 www javad com By the different modes the screen content will be different Below are examples of screen commands in different modes ...

Страница 66: ... to change the point name return to the Action screen and change the name there During the point survey it is possible to enable the cameras to take pictures or record a voice note Using the Justin Link software these voice notes can be converted into codes for objects or other values such as the height of the antenna comments etc The results of the survey are the files with raw measurements saved...

Страница 67: ...e Justin Link with their attributes Figure 106 Justin Link If the localization was performed in the field it will be transferred to Justin Link as coordinate system and its localization parameters will be transferred as well 5 5 Parcel Survey If you want to combine several points to the object parcel select the parcel survey mode Set the name of the polygon and point name Figure 107 Parcel survey ...

Страница 68: ...l Figure 108 End parcel confirmation 5 6 Trajectory survey In this mode kinematic survey is performed the epochs are not averaged and are saved as points of polyline Set the trajectory name and minimal distance between points in the DeltaDistance Figure 109 Trajectory survey Stat the survey with the Action screen buttons Tap Start and Stop buttons to start and finish trajectory survey 5 7 Stake ou...

Страница 69: ...nd import the points for stake out using Import for text files DXF files KML files or use Add Layer for MapInfo TAB file and ESRI SHP files 2 Now you need to convert a new layer to the Justin Link layer Select all the objects on the layer on the map and click Create new layer 3 Select the objects for stake out with the right button open the menu and select Export Export To TVS Figure 110 Export of...

Страница 70: ...ou can send backgrounds to the device For details refer to the Justin Link Software Manual Point stake out In this mode the points are staking out one by one Select the points from the list to open the list tap on the point name at the top of Action screen Figure 112 Stake out points Use Action or Command screen to perform the stake out On the Action screen a yellow circle in the center is display...

Страница 71: ... top you have to go forward when it is on the left turn left on the right turn right when it is on the bottom you need to turn around to go to the point You can also focus on the difference of distances that are displayed on the right Figure 113 Point stake out In the Command screen you can also focus on the difference of distances Tapping the Start button starts the averaging of the coordinates S...

Страница 72: ...compare the difference between the true values of the coordinates and the coordinates obtained in the field Stake Line While stake line the data is displayed relative to a line specified by two points This is useful if you want to divide the line into several parts to draw a parallel line and similar works Such tasks can be performed with coordinate geometry CoGo and y Stake line also 1 Select two...

Страница 73: ...distance along line Figure 117 Action and Command screens during stake line 3 You can now move along this line Audio Guidance In addition to the distance orientation there is audio guidance provided To activate it tap on the volume icon on the top of the screen Display Audio screen appear Here this option can be disabled as well Figure 118 Audio guidance is activated ...

Страница 74: ...ory Place the receiver on monopod and set it at an unknown point and collect data for 2 to 10 minutes For Stop And Go survey use pole Set the record data interval Settings GNSS Record Data it can be e g 1 sec for Stop and Go mode and 5 sec for static Figure 119 Record data and the duration of the point survey Settings GNSS Duration up to 1 2 minutes for the Stop and Go 8 30 minutes for fast static...

Страница 75: ... reference points their original coordinates are entered and then network vectors are calculated In this survey mode Action and Command screens are as follows Figure 122 Action and Command screens during Stop and Go survey mode In the Command screen tap Start to start writing the file by tapping on Stop the file will be closed The and respectively switch between the mode Stop and the mode Go All p...

Страница 76: ...e out 76 www javad com 7 Monitor Structure In this mode the receiver averages its position and records the result as a position in the trajectory Later the result can be used for analysis Figure 123 Action and Command screens during monitor structure ...

Страница 77: ...and that the most current firmware is loaded into the receiver Check the JAVAD GNSS website for the latest updates Then try the following Clear the NVRAM If the problem persists see the following sections for other solutions The receiver does not power up The batteries may be discharged The receiver may have a defective charger If after connecting an external power source the receiver still does n...

Страница 78: ...the differential standards used at the Base and Rover receivers Ensure the Base and Rover receivers use the same corrections input output format The transmitting and or receiving antenna may be improperly connected Check that the radio modem s antenna is securely and properly connected to the antenna connector Check that the radio modem s antenna is undamaged If damaged contact your JAVAD GNSS dea...

Страница 79: ... Check This First 79 www javad com The receiver does not start data logging The memory option is disabled or expired Check that the memory option is enabled The receiver s memory has no free space Use the AFRM feature ...

Страница 80: ...Troubleshooting Check This First 80 www javad com ...

Страница 81: ...ccuracy 2m Static Fast Static Accuracy Horizontal 0 3 cm 0 5 ppm base_line_length Vertical 0 5 cm 0 5 ppm base_line_length Kinematic Accuracy Horizontal 1 cm 1 ppm base_line_length Vertical 1 5 cm 1 5 ppm base_line_length RTK OTF Horizontal 1 cm 1 ppm base_line_length Vertical 1 5 cm 1 5 ppm base_line_length DGPS 0 25m post processing 0 5m real time Cold Start 35 sec Warm Start 5 sec Reacquisition...

Страница 82: ...ange 406 470 EU 406 1 470 MHz USA 406 430 450 470 Canada Channel Spacing 25 12 5 6 25 kHz USA Canada 25 20 12 5 kHz ETSI EN 300 113 20 12 5 kHz ETSI EN 300 220 Carrier Frequency Stability 1 ppm Modulation GMSK DBPSK DQPSK D8PSK D16QAM Communication Mode Half duplex simplex Radio Transmitter Transmitter Output Power 15 30 dBm in 1 dB step 50 Carrier Frequency Stability 1 dB 2 dB Radio Receiver Mode...

Страница 83: ...SK GMSK 15000 bps DQPSK 4FSK 22500 bps D8PSK 30000 bps D16QAM Data Rate of Radio Interface 12 5 kHz Channel Spacing 4800 bps DBPSK GMSK 9600 bps DQPSK 14400 bps D8PSK 19200 bps D16QAM Data Rate of Radio Interface 6 25 kHz Channel Spacing 2400 bps DBPSK 4800 bps DQPSK 7200 bps D8PSK 9600 bps D16QAM Forward Error Correction FEC Reed Solomon Error Correction Data scrambling Yes Compliance FCC FCC Par...

Страница 84: ...QS9000 manufacturing RoHS WEEE Communication Ports Wi Fi IEEE 802 11b g Bluetooth V2 0 EDR Class 2 supporting SPP Slave and Master Profiles Full duplex 10BASE T 100BASE TX Ethernet port High Speed USB 2 0 On The Go port High Speed USB 2 0 Device port Other I O 1 PPS synchronized Event Marker External GNSS antenna Range up to 10 m indoor up to 50 m outdoor Type Class 2 Service classes Miscellaneous...

Страница 85: ...e user programmable buttons On Off button Enunciators Three LEDs battery charging status battery status sleep mode Voice recording integrated Audio Output integrated Photo camera Two 3 Megapixels IMU integrated Compass integrated Battery Intelligent rechargeable lightweight Li Ion battery pack 63 0 Wh nom Battery easily changed in field without tools Operation Time Operates no less than 9 hours on...

Страница 86: ...t connector Figure A 3 is a sealed receptacle ODU p n G80F2C P07QC00 0000 Figure A 3 Ethernet Connector Number Signal Name Dir Details 1 Power_INP P 10 to 30 volts DC input 2 Power_INP P 10 to 30 volts DC input 3 Power_GND P Ground power return 4 Power_GND P Ground power return 5 Not used 1 2 3 4 5 Number Signal Name Dir Details 1 USB ID I USB ID 2 USB_PWR P Bus power 3 GND Ground 4 USB D I O Data...

Страница 87: ... EVENT and 1PPS optional EVENT and 1PPS connectors are standard SMA connectors Number Signal Name Dir Details 1 Not used 2 Power_GND Signal ground 3 TXD O Transmit data plus 4 TXD O Transmit data minus 5 RXD I Receive data plus 6 RXD I Receive data minus 7 LAN LED External LAN LED anode Number Signal Name Dir Details SMA ANT_IN I RF input from LNA 100 mA at 5 0 volts DC output ...

Страница 88: ...Specifications 88 www javad com ...

Страница 89: ...between base and rover modems Know the strengths and weaknesses of this technology to get the best use out of your modem The quality and strength of the UHF signals translates into range for UHF communications The system s range will greatly depend on the local conditions Topography local communications and even meteorological conditions play a major role in the possible range of RTK communication...

Страница 90: ...UHF Radio Usage 90 www javad com ...

Страница 91: ...rt apparatus combination to avoid injury from tip over Unplug this apparatus during lightning storms or when unused for long periods of time Refer all servicing to qualified service personnel Servicing is required when the apparatus has been damaged in any way such as power supply cord or plug is damaged liquid has been spilled or objects have fallen into the apparatus or has been dropped Apparatu...

Страница 92: ...y pack Warning Do not disassemble the battery pack Warning Do not charge in conditions different than specified Warning Do not use other than the specified battery charger Warning Do not short circuit the battery pack Warning Do not crush or modify the battery pack Power Supply Connect the supplied adapter to the side of the unit in the slot marked PWR Plug the two prong end of the power cord to a...

Страница 93: ...g body rather than the output cord when disconnecting the equipment Do not operate the supply if it has received a sharp blow been dropped or otherwise damaged Do not disassemble the supply Warning Before connecting the external power source and the receiver make sure that the power source matches the receiver s voltage and current requirements Usage Warnings If this product has been dropped alter...

Страница 94: ...Safety Warnings Usage Warnings 94 www javad com ...

Страница 95: ...mage to the product resulting from an accident disaster misuses abuse or modification of the product Warranty service may be obtained from an authorized JAVAD GNSS warranty service dealer If this product is delivered by mail purchaser agrees to insure the product or assume the risk of loss or damage in transit to prepay shipping charges to the warranty service location and to use the original ship...

Страница 96: ...900 Rock Avenue San Jose CA 95131 USA Phone 1 408 770 1770 Fax 1 408 770 1799 www javad com Copyright JAVAD GNSS Inc 2014 All rights reserved No unauthorized duplication ...

Отзывы: