33
MANUAL DE INSTRUCCIONES • INSTRUCTIONS MANUAL • MANUAL DE INSTRUÇÕES
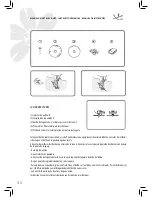
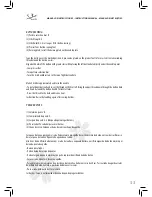
BUTTON SEWING
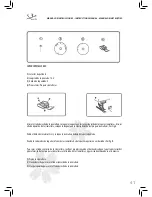
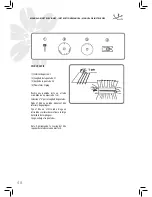
(1) Pattern selection dial: B
(2) Stitch length: 0
(3) Stitch width: 3-5 (as long as fit for button sewing)
(4) Presser foot: Button sewing foot
(5) Darning plate: Install the darning plate on the needle plate
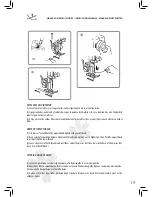
Tape the button over the marked position. A pin can be placed on the presser foot to form a stem to make winding
thread around the button easier.
Align both holes of the button with groove slots while placing the left button hole directly under the needle point.
• Low presser foot.
• Turn pattern selection dial
• Turn the stitch width just up to the top of right button hole
Make 5 stitches approximately and raise the needle.
• To get a thicker button handle, cut the thread with 20cm left. Bring the upper thread down through the button hole
and wind it around the button handle for several turns.
• Draw the thread to the back and make a knot.
Instruction: Raise the feed dog again after sewing buttons.
PREGAR BOTÕES
(1) Seletor do ponto: B
(2) Comprimento do ponto: O
(3) Largura do ponto: 3-5 (Adequado para pregar botões)
(4) Pé calcador: Pé calcador para coser botões
(5) Chapa de cerzir: Coloque a chapa de cerzir na chapa da agulha
Coloque o botão na posição marcada. Pode colocar uma agulha de cerzir em cima do botão, entre os dois orifícios, se
desejar que o botão não fique muito agarrado ao tecido.
Alinhe os dois orifícios do botão com o sulco da ranhura enquanto desloca o orifício esquerdo do botão mesmo por
baixo da ponta da agulha.
• Baixe o pé calcador
• Rode o botão de seleção de pontos
• Rode a largura do ponto mesmo até à parte superior do orifício direito do botão
• Faça cerca de 5 pontos e levante a agulha.
• Para obter um espaço maior entre o tecido e o botão corte a linha com cerca de 20 cm. Passe a linha da agulha através
do orifício do botão e enrole-a por baixo do botão várias vezes.
• Puxe a linha pela parte de trás e remate.
Instruções: Levante o alimentador de novo depois de pregar os botões.

