background image

96

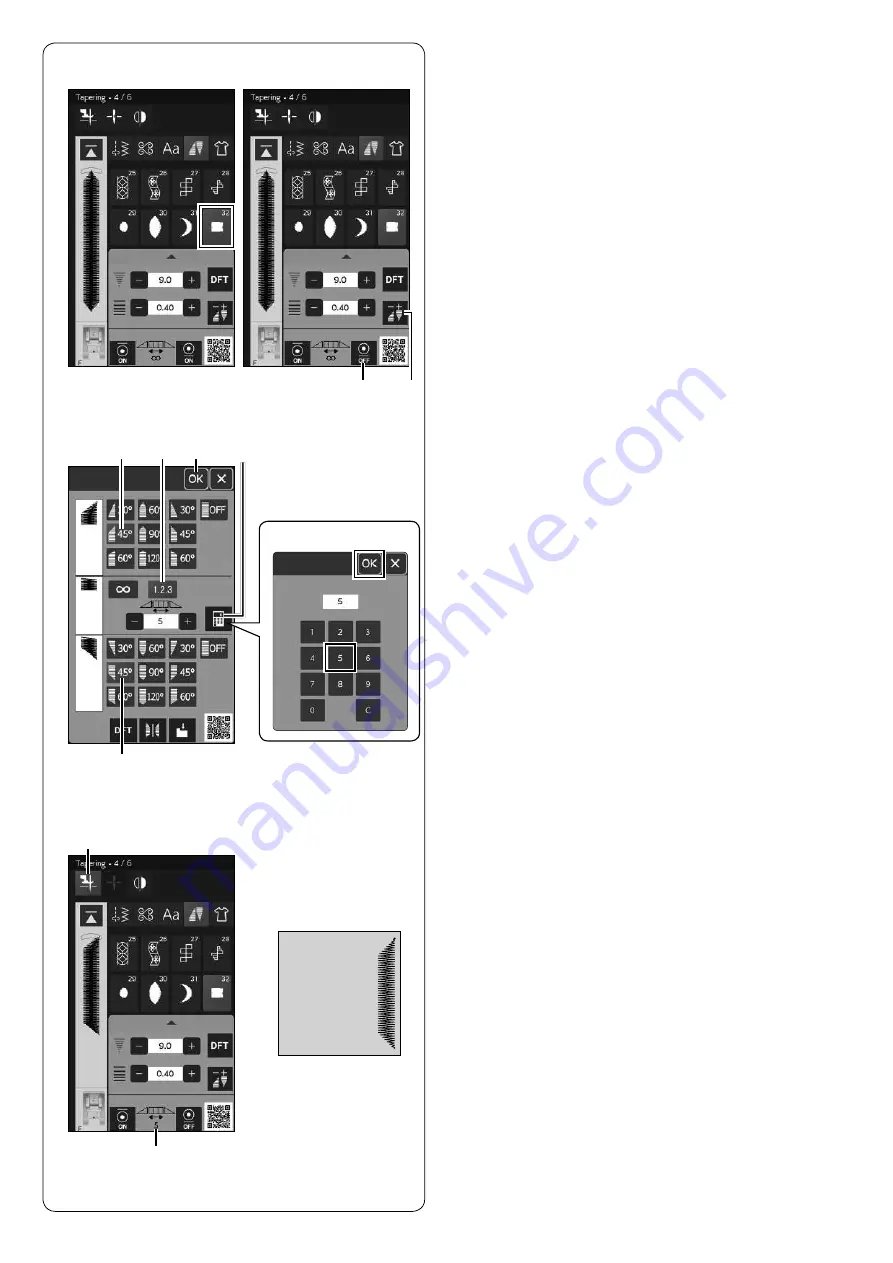
Tapered Stitch Sample 2
Example:

 To create a corner frame with tapered stitch 

pattern #32

1. 

Select stitch pattern #32.

2. 

Press the end lock stitch key to turn off the end lock 

stitch.

(1)  End lock stitch key

3. 

Press the tapering adjustment key.

(2) 

Tapering adjustment key

4. 

Press the tapering shape key (for start tapering 

pattern).
Press the tapering shape key (for end tapering 

pattern).
Press the pattern length key.
Press the “+” key 4 times or press the numeric pad 

key and enter “5” (refer to page 94).
Press the OK key.

(3)  Tapering shape key (for start tapering pattern)

(4)  Tapering shape key (for end tapering pattern)

(5)  Pattern length key

(6)  Numeric pad key

(7)  OK key

5. 

Press the foot-up key.
You can check the number of body patterns on the 

screen.

(8)  Foot-up key

(9)  Number of the body pattern

6. 

Lower the needle into the fabric at the point where 

you want to start sewing.

Start sewing. Sew until the machine stops.

The machine stops and the presser foot rises 

automatically.

(1)

(4)

(3)

(5)

1.

2. 3.

4.

(8)

5.

6.

(2)

(6)

(7)

(9)

Содержание HORIZON Memory Craft 9480 QC PROFESSIONAL

Страница 1: ...Instruction Book HORIZON Memory Craft 9480 QC PROFESSIONAL...

Страница 2: ......

Страница 3: ...asp the plug not the cord 10 Keep fingers away from all moving parts Special care is required around the sewing machine needle and or cutting blade 11 Always use the proper needle plate The wrong plat...

Страница 4: ...Direction 42 Turning a Square Corner 42 Securing Seams 43 Cutting Threads 43 Needle Plate Guides 43 Sewing with the Dual Feed Device 44 Dual Feed Professional Grade Foot HP2 45 Sewing with Professiona...

Страница 5: ...r 117 Gathering 119 Easestitching 119 Basting 120 Buttonhole 120 Button 121 Tacking 122 Eyelet 123 Smocking 124 Fagoting 125 Quilt Application 126 Patchwork Piecing 126 Free Motion 127 Accurate Stitch...

Страница 6: ...ter socket 20 Visual touch screen 21 Speed control slider 22 Start stop button 23 Reverse button 24 Auto lock button 25 Needle up down button 26 Presser foot lifter button 27 Thread cutter button 28 S...

Страница 7: ...859810007 3 Satin stitch foot F 859806011 4 Blind hemming foot G 859807001 5 Zipper foot E 859805009 6 1 4 seam foot O 859814012 7 1 4 seam foot O without guide 202313104 8 Automatic buttonhole foot R...

Страница 8: ...5 1 set on the machine 102261103 2 Needle set 859856005 3 Lint brush 802424004 4 Seam ripper Buttonhole opener 647808009 5 Quilting guide bar 755802001 6 Screwdriver 820832005 7 Spool holder large x...

Страница 9: ...ist list PLQy563Wz2act S1sbbNAMa0RS1WP1z5Xvd This application is for PC only StitchComposer You can design and create your own stitch patterns https www7 janome co jp global product softwareapps stitc...

Страница 10: ...Dual feed foot AD twin 8 Dual feed professional grade foot HP2 9 Extra spool pin Other accessories can be also stored in the compartment in the extension table 9 4 5 7 8 Accessory Case To store the ot...

Страница 11: ...w 5 Table top 4 Remove the extension table tighten loosen 5 Place the assembled table on the machine 6 Adjust the height of the table top by turning the adjusting screw To remove To remove the legs fr...

Страница 12: ...ach the foot control and thread cutter switch with the setscrews and the washers Tighten the setscrews A and B Be sure that the cable is not caught between the foot control and the base plate 1 Setscr...

Страница 13: ...l position of the thread cutter switch 1 Remove the setscrews and washers 2 Move the switch forward or backward attach the switch at the desired position and fix it with the setscrews and washers 1 Se...

Страница 14: ...eedle Always turn off the power switch and unplug the machine from the power supply when leaving the machine unattended when attaching or removing parts when cleaning the machine Do not place anything...

Страница 15: ...cable into the machine socket 3 Draw out the cord from the foot control and insert the pin connector into the foot control jack on the machine 4 Insert the power supply plug into the wall outlet and...

Страница 16: ...upply plug into the wall outlet and turn the power switch on 1 Power switch 2 Cable tie 3 Pin connector 4 Thread cutter switch jack 5 Machine plug 6 Machine socket 7 Power supply plug 8 Wall outlet 6...

Страница 17: ...NOTE The machine runs at the maximum speed set by the speed control slider when the foot control is fully depressed You can select the desired start up speed from slow medium or high refer to page 14...

Страница 18: ...e The machine starts running slowly for the first few stitches then runs at the speed set by the speed control slider The machine runs slowly as long as this button is pressed The button will turn red...

Страница 19: ...ories etc To reduce the risk of injury all the buttons except the lockout key and presser foot lifter button are deactivated To unlock the machine press this key again 6 Touch bar Press on the bar and...

Страница 20: ...pplication can be downloaded from App store or market Scan the QR code on the right with your mobile device to download App Standard data charges from your internet provider may apply iOS is the name...

Страница 21: ...tion This may cause damage to the presser foot The presser foot lifter button the presser foot lifter or the knee lifter raises and lowers the presser foot You can raise the presser foot about 6 mm 1...

Страница 22: ...in the stitch reference charts 1 Stitch reference key 2 Page number 2 NOTE Stitch reference charts will not be displayed if the monogram key or sewing application key is selected When selecting some s...

Страница 23: ...range of 3 8 to 7 16 9 5 mm to 10 5 mm and the spool length has a range of 2 3 4 to 3 70 mm to 75 mm 3 Spool holder special 4 Hole diameter 3 8 to 7 16 5 Spool length 2 3 4 to 3 Firmly insert the spo...

Страница 24: ...to the right around and under the guide plate 1 Guide slot 2 Thread guide 3 Guide plate 2 Firmly pull the thread to the right while holding it with both hands 4 7 9 8 10 3 4 5 6 7 8 1 2 1 2 5 6 2 1 B...

Страница 25: ...marked 1 Make sure that the thread comes out from the side notch of the bobbin holder 7 Guide path 1 8 Side notch 4 Continue to draw the thread along the guide path marked 2 and pull the thread to the...

Страница 26: ...own under the notch and into the space below the guide slot as shown 3 Notch 1 2 5 3 4 6 7 8 1 2 3 CAUTION Always make sure to press the lockout key to lockout the machine before threading the machine...

Страница 27: ...nd through the lower thread guide 9 Lower thread guide 7 Slide the thread from the right of the needle bar thread guide to the left 10 Needle bar thread guide 8 Thread the needle with the needle threa...

Страница 28: ...shown 4 Slit NOTE The needle threader can be used with a 11 to 16 needle Thread size 50 to 90 is recommended Do not use thread size 30 or thicker The needle threader cannot be used with the twin need...

Страница 29: ...d rethread the bobbin holder according to the instructions on page 23 but leave a 10 cm 4 tail of bobbin thread as shown 1 Bobbin thread 2 Raise the presser foot Hold the needle thread lightly with yo...

Страница 30: ...malfunction Fabric Thread Needle Fine Lawn Georgette Tricot Organza Crepe Cotton 80 100 Synthetic 80 100 Blue tip needle Universal needle 9 65 11 75 Medium Sheeting Jersey Broadcloth Fleece Cotton 50...

Страница 31: ...p off 4 Lever 4 Place the presser foot so that the pin on the foot lies just under the groove of the foot holder Lower the presser bar to lock the foot in place 5 Pin 6 Groove Each foot is marked with...

Страница 32: ...out key to lockout the machine before replacing the foot holder Removing the foot holder 1 Raise the needle by pressing the needle up down button Press the lockout key and raise the presser foot with...

Страница 33: ...he screwdriver Attaching Ruler Work Foot QR Attach Ruler work foot QR to the presser bar from behind Tighten the thumbscrew firmly with the screwdriver 1 2 Attaching Darning Foot PD H Attach darning f...

Страница 34: ...e on the arm of the retractable sewing light as this may cause damage when it is extended 2 1 3 2 Attaching Dual Feed Foot AD or Dual Feed Professional Grade Foot HP2 1 Attach the dual feed holder to...

Страница 35: ...key 3 Presser foot lifter button 2 Slide the extension table to the left to remove it Push down the needle plate release lever and the needle plate will snap off 4 Needle plate release lever 5 Needle...

Страница 36: ...appear on the visual touch screen 1 Using the Straight Stitch Needle Plate The straight stitch needle plate has three holes where the needle enters The straight stitch needle plate is helpful to hold...

Страница 37: ...ric while your knee controls the presser foot Attaching the knee lifter Match the ribs on the knee lifter with the notches in the knee lifter socket and insert the knee lifter 1 Knee lifter 2 Rib 3 Kn...

Страница 38: ...TE In this manual the pattern number refers to the initial letter for each group or category For example pattern 15 in the buttonholes and specialty stitches is referred to as pattern B15 1 Utility st...

Страница 39: ...loom H Quilt Q Quilt Style QS Satin S Bridge BR Decorative D Botanical BO Long L Animals AN Life Style LS Kids K Seasons SE Words W Mirage M Created Stitch CS 2 A C S QS BR BO AN D L LS W K CS SE M 3...

Страница 40: ...38 4 Tapering You can taper the beginning and end of the decorative stitch patterns to create tapered corners and points refer to pages 91 97 4...

Страница 41: ...the appropriate stitch for a specific sewing project and fabric type from the designated application in this category refer to pages 104 138 Press one of the key to select the category 6 Sewing key 7...

Страница 42: ...before you start sewing Press this key once to startover from the beginning of the current pattern or press this key twice to startover from the beginning of the first pattern of the combination refer...

Страница 43: ...key to view the stitch image of the entire pattern combination 15 Function switch key Press this key to switch the function keys 16 Save file key Press this key to save the pattern combination as a fi...

Страница 44: ...ewing at the extreme edge of thick fabrics or for sewing across a hem Lower the needle into the fabric at the point where you wish to start sewing Lower the foot while pushing in the black button The...

Страница 45: ...ed on the front of the needle plate 1 Seam guides on the front of the needle plate The numbers on the needle plate indicate the distance from the center needle position in millimeters and inches 2 Cen...

Страница 46: ...adjust the dual feed balance depending on the type of fabric Check the feed balance by test sewing on an extra piece of the fabric you intend to use A If the lower layer puckers turn the dual feed bal...

Страница 47: ...efer to page 33 for how to attach the professional grade needle plate HP 1 Professional grade needle plate HP Refer to page 32 for how to attach dual feed professional grade foot HP2 and to engage the...

Страница 48: ...the professional grade needle plate HP 1 Professional grade needle plate HP Refer to page 31 for how to attach the professional grade foot HP Attach the professional grade needle plate HP and profess...

Страница 49: ...se the presser foot height Press to decrease the presser foot height NOTE When using the floating mode always adjust the presser foot height and conduct a test sew on an extra piece of the fabric befo...

Страница 50: ...forward When you press the reverse button at the end of the seam the machine will sew several locking stitches in place then stop sewing automatically U4 Straight stitch in left needle position Use t...

Страница 51: ...titches U9 U10 Zigzag stitches Zigzag stitches are used for various sewing needs including overcasting These stitches can be used on most woven fabrics A dense zigzag stitch can also be used for appli...

Страница 52: ...etic knits and stretch velour as it provides the greatest amount of elasticity and strength Place the fabric edge next to the guide of the foot and sew For better results use zigzag foot A and sew lea...

Страница 53: ...Setting bar 2 Manual setting window 3 Default key Altering stitch width Turn the stitch width adjusting dial clockwise to increase the stitch width Turn the stitch width adjusting dial counterclockwi...

Страница 54: ...o decrease the stitch length 1 2 Adjusting Thread Tension This machine is equipped with automatic thread tension control which optimizes the tension balance for the selected stitch pattern Balanced th...

Страница 55: ...this option on or off 1 Foot up key NOTE Height of the foot can be adjust in the sewing setting mode refer to page 144 1 2 Number of Locking Stitches The machine sews 5 lock stitches at the beginning...

Страница 56: ...the needle drop position from 4 5 to 5 0 Turn the Favorite Stitch Adjustment option ON refer to page 146 Select stitch pattern U1 Press the setting bar The manual setting window expands to show more...

Страница 57: ...e the fabric with the right side up Sew along the fold at the desired depth Trim the excess on the wrong side U18 U22 Shell Tuck Refer to page 113 for sewing instruction Other Utility Stitches U16 U17...

Страница 58: ...Box Stitching Use this stitch to join heavy weight fabrics Overlap two raw edges together and use this stitch to join them Use also for fagoting U20 Attaching elastic Mark the elastic into quarters Ma...

Страница 59: ...le buttonhole is widely used on medium to heavy weight fabrics It is also suitable for larger and thicker buttons B6 Rounded keyhole buttonhole This buttonhole is used for thicker buttons on medium we...

Страница 60: ...holder You may lift the presser foot lifter to the extra lifted position when placing the automatic buttonhole foot under the foot holder Press the lockout key to unlock the machine 4 Groove 5 Pin NOT...

Страница 61: ...NOTE Make sure there is no gap between the slider and front stopper otherwise the buttonhole will be out of position or there will be a sewing gap 5 Start sewing while pulling the needle thread light...

Страница 62: ...le is finished the machine will stop automatically with the needle in the up position Press the thread cutter button and remove the fabric Double Layer Buttonhole To make a sturdy buttonhole sew anoth...

Страница 63: ...der Press the key to make the buttonhole opening narrower 3 Altering buttonhole width Turn the stitch width adjusting dial clockwise to increase the buttonhole width Turn the stitch width adjusting di...

Страница 64: ...lizer Plate The stabilizer plate holds and supports the fabric so it is helpful when sewing buttonholes over the hem of thick fabrics 1 Insert the tab of the stabilizer plate into the slot of the butt...

Страница 65: ...hole length and stop the machine Then press the reverse button 1 Reverse button 2 Start sewing again and the machine sews back with a straight stitch Stop the machine when you reach the starting point...

Страница 66: ...g stitches then stops automatically with the needle in the up position When the buttonhole is finished a message will appear To make the next buttonhole position the fabric and start sewing again The...

Страница 67: ...ensor buttonhole refer to pages 58 60 NOTE The opening width is adjustable from 0 2 to 2 0 The buttonhole width is adjustable from 2 6 to 9 0 The stitch density is adjustable from 0 20 to 1 00 NOTE A...

Страница 68: ...lted buttonhole on both fabrics together Cut the buttonhole opening as illustrated then pull the patch out through the slit to the other side 1 Wrong side of patch 2 Right side of garment fabric 3 Rig...

Страница 69: ...cm 3 8 5 8 away from the hole The corners should be cut rounded off as shown 3 Right side of patch 4 Wrong side of garment fabric 10 Place the facing on the wrong side of the garment fabric Mark the...

Страница 70: ...2 Metal plate Set the stabilizer plate as necessary and attach the buttonhole foot 2 Lower the needle into the fabric where the buttonhole will start Lower the foot and buttonhole lever Pull the need...

Страница 71: ...rect it If the right corner is lower than the left side turn the stitch width adjusting dial clockwise or press the key to correct it NOTE The machine will sew the darning at maximum 2 cm 3 4 length a...

Страница 72: ...ng stitch for use on a zipper fly bottom and on the side pockets of pants Attach the satin stitch foot F To sew Place the garment under the foot and lower the needle at the starting point Sew the stit...

Страница 73: ...ecorative stitch selection window will open 1 Decorative and quilting stitches key 3 Applique A 2 pages Stitches in this group are for applique refer to pages 133 134 4 Cross stitch C 2 pages This gro...

Страница 74: ...72 6 Quilt Q 9 pages Stitches in this group are for patchwork and quilting refer to pages 79 80 126 136 5 Heirloom H 3 pages This group provides heirloom stitches for craft sewing and home d cor 5 6...

Страница 75: ...73 6 7 7 Quilt Style QS 2 pages There are stitch patterns created from quilt blocks in this group...

Страница 76: ...ng straight stitches after a stitch pattern The number beside the stitch image on the straight stitch key indicates the stitch count of a programmable unit Patterns BR5 BR6 and BR8 will inherit the ne...

Страница 77: ...75 11 Botanical BO 3 pages There are patterns of trees grass and flowers in this group 10 11...

Страница 78: ...in this group are ideal for decorating garments and for adding border trims 12 13 Animals AN 1 page There are patterns of animals in this group 13 14 14 Life Style LS 3 pages There are patterns relat...

Страница 79: ...77 18 17 15 16 19 15 Kids K 3 pages There are patterns for kids in this group 15 16 16 Seasons SE 2 pages There are patterns related to seasons in this group...

Страница 80: ...ns created with StitchComposer Refer to page 82 for how to transfer created stitch patterns from a PC to the machine 17 Words W 1 page There are word patterns in this group 17 18 Mirage M 1 page This...

Страница 81: ...Broken line 1 1 1 1 2 2 Q1 Q3 Patchwork Piecing Patterns Q1 to Q3 are special stitches for seaming patchwork pieces Patterns Q2 and Q3 are for patchwork piecing with 1 4 and 7 mm seam allowances resp...

Страница 82: ...X3 X4 X5 1 Satin Stitches Elongation Ratio Patterns S1 to S24 are decorative satin stitches for which the pattern length can be elongated without changing the stitch density Press the setting bar to...

Страница 83: ...decorative stitch part and connecting straight stitch part separately Press the setting bar to expand the manual setting window 4 Setting bar Adjust decorative stitch length adjusting key or connectin...

Страница 84: ...folder list will appear Select the desired folder to open and the file list will appear Select the desired file to save the original stitch pattern Saved stitch pattern will appear as the pattern sel...

Страница 85: ...the ones included in the standard accessories otherwise the needle may hit the needle plate foot or hook and break 2 Lockout key 1 NOTE When you sew patterns with the twin needle test the stitches fir...

Страница 86: ...spool pin into the hole under the top cover Place a spool of thread on the extra spool pin and the spool stand refer to page 21 3 Extra spool pin Draw both threads from the spools and pass them throug...

Страница 87: ...3 Horizontal mirror image key NOTE Horizontal mirror image is available only for specific patterns For pattern identification these patterns are colored in blue on the reference chart inside the top c...

Страница 88: ...tch key indicates the stitch count of a programmable unit If you want more space between French knots D5 for example insert pattern BR5 after pattern D5 Two counts of straight stitches are added to pa...

Страница 89: ...shown in blue is deleted by pressing the delete key 1 Cursor 2 Delete key To delete a pattern in the middle of a combination press the cursor keys to select the pattern you wish to delete The stitch...

Страница 90: ...rtover key is activated Current pattern startover If you wish to start sewing from the beginning of the current pattern press the startover key once and start the machine The key will change and show...

Страница 91: ...depending on sewing conditions For example select pattern SE5 three times and sew a pattern combination If the actual length differs considerably from the readout measure the actual length and enter t...

Страница 92: ...ns LS4 LS6 and SE5 The theoretical value is 54 mm However the read out is calculated according to the measured actual length In this case the adjusted value is 45 mm Press the default key to clear the...

Страница 93: ...xample To sew tapered stitch pattern 9 Select stitch pattern 9 Start the machine The machine sews the start tapering pattern and pattern body Sew to the required length then press the auto lock button...

Страница 94: ...pressing the corresponding auto lock keys on the visual touch screen 1 Initial lock stitch key 2 End lock stitch key 3 Initial lock stitch 4 End lock stitch 5 Lock stitch key ON 6 Lock stitch key OFF...

Страница 95: ...2 Tapering shape keys for start tapering pattern 3 Tapering shape keys for end tapering pattern 4 Start tapering pattern 5 End tapering pattern The numbers in the tapering shape keys indicate the deg...

Страница 96: ...ength key 4 Pattern length key 5 Number of the body patterns Press the pattern length key Press the or key to set the number to repeat the pattern body 4 Pattern length key 6 key 7 key You can also se...

Страница 97: ...mage key Saving tapered stitches The customized tapered pattens can be saved as a file in the machine s internal memory or a USB flash drive Press the save file key after customizing a tapered stitch...

Страница 98: ...attern length key Press the key 4 times or press the numeric pad key and enter 5 refer to page 94 Press the OK key 3 Tapering shape key for start tapering pattern 4 Tapering shape key for end tapering...

Страница 99: ...and end lock stitch keys Be sure that the initial lock stitch key is turned off and the end lock stitch key is turned on Start sewing in the new direction 10 Presser foot lifter button 11 Initial loc...

Страница 100: ...ss this key to switch the horizontal or vertical orientation MONOGRAMMING You can program letters and symbol designs for monogramming Press the Monogram key and the font selection window will open 1 M...

Страница 101: ...her you do not need to select the letters Press the unified thread tension key 5 Unified thread tension key Press or key to adjust the thread tension The adjusted thread tension is applied to all ente...

Страница 102: ...lock font Press the monogram key and select Block font Enter Q 1 Monogram key Example 2 Caf in Script font Press the monogram key and select Script font Enter C 1 Monogram key Press the letter case ke...

Страница 103: ...he OK key to save the file under the assigned name 3 File name If you wish to assign a unique name to the file press the rename key and the keyboard window will open 4 Rename key 1 3 4 NOTE The files...

Страница 104: ...ct the file or folder to delete A confirmation message appears Press the OK key to delete the file or folder 12 Delete key Changing a Folder Name or File Name Press the rename key and select the folde...

Страница 105: ...Ordf folder will appear 2 Next or previous page key 2 NOTE If you created any folders before those folders will also appear If you cannot find the desired folder or the file in the page press the nex...

Страница 106: ...elected by pressing the optional foot key Please refer to optional feet instructions for usage details 4 Optional foot key 2 4 6 1 3 5 8 10 12 7 9 11 1 2 Sewing Press the sewing key and the sewing app...

Страница 107: ...ategory 10 types of useful stitches for quilting are available Press the quilt key and the quilt sewing application menu will open The 10 quilt sewing applications are as follows 1 Patchwork Piecing 2...

Страница 108: ...ations are as follows 1 Beading 2 Ribbon Sequin 3 Piping 4 Cording 5 Pintucking 6 Free Motion Couching 2 4 6 1 3 5 8 7 9 7 Applique 8 Ruffler 9 Ultraglide 10 CONCEAL Zipper Refer to the instructions o...

Страница 109: ...rve Short straight stitches for seaming curved lines Topstitching Long straight stitches for topstitching with thick threads Seaming Stretch Knit Narrow stretch stitches for seaming stretch or knit fa...

Страница 110: ...m edge with the guide of the foot Turn the handwheel to lower the needle to the starting point Lower the foot and sew several stitches slowly while pulling on the threads to assist feeding the fabric...

Страница 111: ...ven fabrics Overedge Stretch Knit Knit stitch for finishing raw edges of stretch or knit fabrics For better results use zigzag foot A and sew leaving an adequate seam allowance After sewing trim the s...

Страница 112: ...110 Overedge Heavy Double overedge stitch for preventing raw edges of linens and gabardines from raveling...

Страница 113: ...r foot The needle should just pierce the folded edge when it comes over to the left side Adjust the position of the needle drop if necessary Sew guiding the fold along the guide 5 Fold 6 Guide 7 Wrong...

Страница 114: ...p position 4 with the or key in 1 Adjusting the needle drop position Press the setting bar to expand the manual setting window 1 Setting bar Press the key to move the needle drop positions to the left...

Страница 115: ...h shell tuck stitch 3 Large Regular shell tuck stitch To sew Use a light weight fabric Tricot for example Fold the fabric in bias as shown and stitch on the fold 4 Bias direction Allow the needle to b...

Страница 116: ...nd the zipper sewing window will open Press the sewing step key and the machine setting will automatically adjust to suit each sewing step 4 1 2 3 Lock a Matic Basting 5 Fabric preparation Add 1 cm 3...

Страница 117: ...pper so that the needle pierces the fabric next to the fold and the zipper tape Sew along the zipper guiding the zipper teeth along the bottom edge of the foot Sew through all layers next to the fold...

Страница 118: ...eeth along the bottom edge on the foot Stop about 5 cm 2 from the top of the zipper Lower the needle into the fabric raise the foot and remove the basting stitches refer to page 114 11 Basting stitche...

Страница 119: ...ong side of the zipper tape Sew back left side Fold back the right seam allowance Place the right sides of the other fabric and zipper tape together aligning both left edges Open the zipper and seam a...

Страница 120: ...zipper foot E reaches the slider on the zipper tape Close the zipper and stitch the remainder of the seam 1 Right side of the fabric A 4 Right side of the fabric B Topstitch front right side Open the...

Страница 121: ...page 27 2 Sew two rows of straight stitches 0 6 cm 1 4 apart Knot the threads at the beginning 3 Pull the bobbin threads at the end to gather the fabric 4 Knot the threads at the end and distribute t...

Страница 122: ...t control The machine will sew one stitch and stop automatically Slide the fabric to the rear for the next stitch Buttonhole Please refer to pages 57 70 for BUTTONHOLES AND SPECIALTY STITCHES Medium H...

Страница 123: ...aligning the direction of the button 3 Button shank plate NOTE The button shank plate cannot be used if the button is too thick 1 2 3 5 6 NOTE The shank plate is double sided The shank plate has two t...

Страница 124: ...h is needed There are 3 auto tacking sizes and manual tacking available Attach satin stitch foot F Auto tacking Lower the needle at the starting point and start sewing The machine will sew the tack of...

Страница 125: ...ine stops automatically 1 Starting point Open the eyelet with an awl punch or pointed scissors NOTE The shape can be adjusted within S1 to S3 default setting is S2 To correct the shape of an eyelet If...

Страница 126: ...bric NOTE Pull up the bobbin thread and draw a 10 cm 4 thread tail to the back before starting to sew Use the thread cutter on the face plate Smocking stitch Select a smocking stitch Sew the smocking...

Страница 127: ...arance and add design interest Fold under each fabric edge 1 5 cm 5 8 and press Pin the two edges to paper or tear away backing 0 3 cm 1 8 apart 1 0 3 cm 1 8 2 Paper Sew slowly guiding the fabric so t...

Страница 128: ...s of fabric with the right sides together Place the patchwork pieces under the foot so that the edge of the fabric matches the guide on the presser foot 3 Edges of fabric 4 Guide on 1 4 seam foot O Yo...

Страница 129: ...ou can trim the thread tails with scissors The machine will stitch continuously when you resume sewing If you wish to start sewing without one stitch off press the one stitch off key to cancel this fu...

Страница 130: ...en the thumbscrew with your fingers 2 Thumbscrew 2 Tighten the thumbscrew securely with the screwdriver 4 Press Free Motion 5 Free Motion Drop the feed dogs refer to page 34 5 Press Straight Stitch 3...

Страница 131: ...gth become too short when the fabric guiding with your hands The machine sews at low speed when you are not guiding fabric Accurate Stitch Regulator sensor cannot detect fabric movement in the area 2...

Страница 132: ...able zigzag settings 8 9 10 1 2 3 10 3 To attach the foot set both ends to the A S R foot holder and push the foot up to fit in place 10 Both ends 4 8 9 CAUTION Always make sure to press the lockout k...

Страница 133: ...not lower the needle while the foot is raised otherwise the needle clamp may hit the foot and cause injury or breakage NOTE A ruler quilting template for ruler work sewing is required Use the ruler qu...

Страница 134: ...fabric is fed by the feed dogs and the stitch width can be varied with the knee lifter Attach a stabilizer to the wrong side of the fabric if needed Sew at slow to medium speed while guiding the fabri...

Страница 135: ...the setting bar to expand the manual setting window 2 Setting bar The baseline can be adjusted without changing the stitch width by pressing the or key 3 Needle drop position Pivoting at applique corn...

Страница 136: ...e bar 2 Hole Press the dual feed key 3 Dual feed key Sew rows of stitching while tracing the previous row of stitches with the quilting guide bar 3 1 2 Starting over from the corner Press the startove...

Страница 137: ...Use satin stitch foot F The machine sews one unit of the pattern and automatically stops with the needle in the up position when completed Decorative Quilt Stitch You can decorate the seam on the qui...

Страница 138: ...thread for the needle and ordinary sewing thread for the bobbin The bobbin thread is pulled up on the right side of the fabric and the stitches will look as if sewn by hand Sashiko These stitches are...

Страница 139: ...reverse button to lock the seams 2 End of opening 3 2 cm 3 4 4 Zipper size 5 Opening size Basting Baste the opening 0 3 cm 1 8 inside of the seam line 6 0 3 cm 1 8 Fold up the left seam allowance to t...

Страница 140: ...Left side of tape Raise the foot and close the zipper Replace the foot with zipper foot E Turn and fold the bodice to the right Seam along the edge of the left zipper tape and reverse the stitches 2...

Страница 141: ...s the sewing setting mode key to enter the sewing setting mode In this mode you can customize the machine settings and options for ordinary sewing refer to pages 143 146 for the operation 4 Language s...

Страница 142: ...to turn off the timer press and hold the key until OFF shows in the timer window To turn on the machine again turn the power switch on 1 2 3 Machine Setting Mode 1 Buzzer Sound The signal sound can b...

Страница 143: ...141 6 6 Sewing Light The sewing lights can be turned on or off individually Press the corresponding light keys to turn the sewing lights on or off Press the next page key to show the next menu...

Страница 144: ...open the calibration window Press the sign with the touch panel stylus as the sign appears When you press the last sign the screen shows END and the calibration window will close 8 Background Color Y...

Страница 145: ...the next menu NOTE The machine stops with the needle in the down position if Foot up key option is turned on even if the needle stop position is set to up position 9 Format If the internal memory of...

Страница 146: ...n the up position can be adjusted by pressing the key or key in accordance with thickness of the fabrics Press the next page key to show the next menu 6 Adjustable Start Up Speed The machine will star...

Страница 147: ...he next page key to show the next menu 9 11 12 10 Variable ZZ Sensitivity You can adjust the amount of needle swing with the knee lifter movement for variable zigzag in sewing applications Press the k...

Страница 148: ...tch is deleted with the delete key The internal memory is formatted 13 14 13 Favorite Stitch Adjustment If you wish to save the changes to manual stitch settings turn on this option by pressing the ON...

Страница 149: ...ith the feed balancing dial 1 Feed balancing dial 2 Neutral position Stretch stitch pattern Q24 If the pattern is compressed turn the feed balancing dial in the direction of If the pattern is drawn ou...

Страница 150: ...Feed dogs 5 Auto thread cutter device 4 Clean the hook race with a soft cloth 6 Soft cloth CARE AND MAINTENANCE 1 1 2 6 4 2 8 7 1 1 2 3 5 CAUTION Do not store the machine in a high humidity area near...

Страница 151: ...thread guide plate by pulling it up 1 Thread guide plate 2 Clean the area around and under the pre tension leaf with the lint brush 2 Pre tension leaf 3 Lint brush 3 Set the thread guide plate on the...

Страница 152: ...e sign is indicated on the visual touch screen Replace the twin needle with a single needle and press the OK key refer to page 28 The stitch that requires lowering the feed dogs is selected Lower the...

Страница 153: ...8 Pages 24 25 Change the needle Page 28 Seam puckering 1 The needle thread tension is too tight 2 The needle thread is not threaded properly 3 The needle is too heavy for the fabric being sewn 4 The s...

Страница 154: ...ch screen is not clear 1 The screen brightness is not adjusted properly Page 140 The needle thread appears on the wrong side of the fabric when the stitch width value is larger than 7 0 1 Thread tensi...

Страница 155: ...ve Click format 1 Format NOTE Do not check the quick Format 4 Click the start key 5 Start key 1 3 5 3 From allocation unit size select a size of 64 kilobytes or less 3 Allocation unit size NOTE If FAT...

Страница 156: ...After the start key is clicked the confirmation message will be displayed NOTE If there is any important data remaining on the USB flash drive click the cancel key After saving the data elsewhere beg...

Страница 157: ...155 Stitch Chart Stitch patterns marked with grey can be flipped vertically Horizontal mirror image Utility U Buttonhole B Applique A Quilt Q Satin S Bridge BR Cross stitch C Heirloom H Quilt style QS...

Страница 158: ...Quilt Q Utility U Stitches for the professional grade needle plate Quilt Q Utility U Stitch patterns marked with grey can be flipped vertically Horizontal mirror image Botanical BO Long L Animals AN...

Страница 159: ...157 Stitch Chart Monogram Block Script...

Страница 160: ...158 Block 9 mm Stitch Chart Monogram Broadway Cyrillic...

Страница 161: ...159 Symbol Mincho 9 mm Marumoji 9 mm Stitch Chart Monogram...

Страница 162: ...Version 1 01 12 05 2023 This page is left intentionally blank...

Страница 163: ......

Страница 164: ...869 800 005 EN...

Отзывы: