background image


Maintenance Manual for J2 Sedan

Mechanical Part of Engine

58

X.  Camshaft and balance shaft assembly


1. Parts


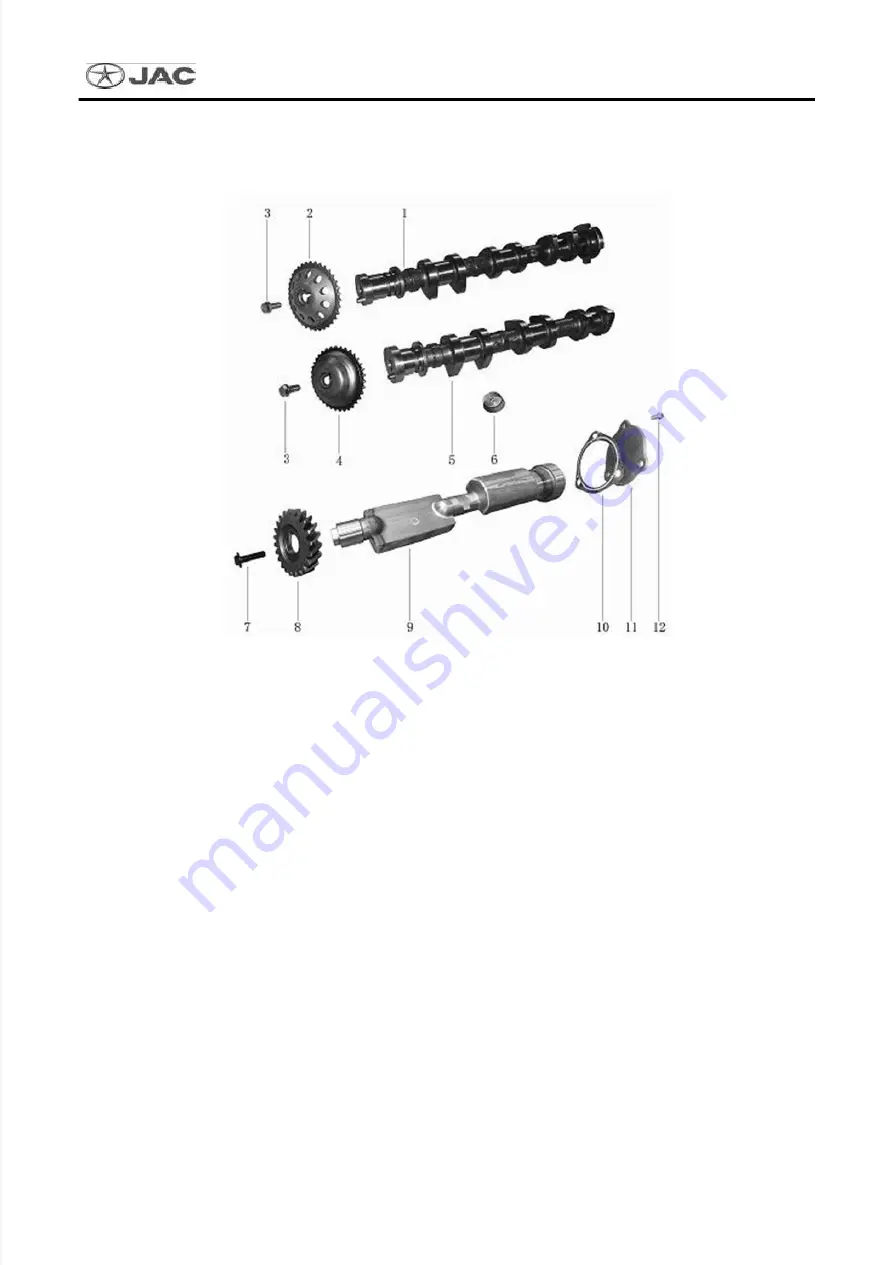
Breakdown diagram for camshaft and balance shaft

1 – Intake camshaft subassembly  2 – Intake camshaft chain wheel  3 – Chain wheel bolts
4 – Exhaust camshaft chain wheel  5 – Exhaust camshaft subassembly  6 – Mechanical tappet
7 – Balance shaft retaining bolt  8 – Balance shaft gear  9 – Balance shaft
10 – Balance shaft rear end cap gasket  11 – Balance shaft rear end cap
12 – Balance shaft rear end cap bolts

2.  Disassembly and installation

1


Disassembly of camshaft


Remove cylinder cover. See "Intake Manifold."


Remove high-voltage ignition coil. See "Ignition  Coil."


Disconnect PCV hose and air hose of respirator.


Remove the cylinder head cover from the cylinder head.


Remove camshaft timing sprocket. Seethe "timing sprocket body."


Remove camshaft position sensor from rear end of the cylinder head.

Tightening torque: 9 - 11 N • m

Содержание J2

Страница 1: ...affected due to product improvement JAC Passenger Car Sales Company will provide technical bulletins or supplementary volumes Therefore you should use this manual and pay close attention to obtaining...

Страница 2: ...n 2 II Nameplate 2 III Vehicle Identification Number VIN 3 IV Engine Number 4 Section III Lifting Protection and Towing of Vehicle 6 I Lifting of Vehicle 6 II Protection of Vehicle 6 III Towing of Veh...

Страница 3: ...this Manual No description is given for the necessary basic skills of maintenance technicians in this Manual II How to use This Manual comprises four parts i e engine volume chassis volume electrical...

Страница 4: ...ehicle 2 ID number of vehicle II Nameplate 1 Position of nameplate at the firewall of engine compartment 2 Instructions of nameplate Example of Nameplate Made by China Anhui Jianghuai Automobile Co Lt...

Страница 5: ...e below Table Worldwide Manufacturer Identification ID Manufacturer Applicable Models LJ1 JAC Co Ltd ANHUI Freight truck incomplete vehicle bus passenger car tractor special vehicle Part 2 vehicle des...

Страница 6: ...ype and rated power 2 gasoline 70 90Kw 3 gasoline 90 110Kw Part 3 indication of vehicle 8 digitals 4 General Assembling Workshop of Passenger Car Manufacture Company Factory assembled 7 General Assemb...

Страница 7: ...ance Manual for J2 Sedan Overview 5 2 Meaning of Engine Number 3GB4 C Engine model 1 0 3 cylinder gasoline engine A3408769 A the year of 2010 3 engine type petrol local parts 408769 Production SN Fig...

Страница 8: ...l injury or even death II Protection of Vehicle 1 Appearance Protection Be sure to use the four protection appliances including seat cover steering wheel cover gearshift lever cover and foot mat befor...

Страница 9: ...ing If no towing vehicle is available under emergency a rope may be fixed to the emergency towing hole under the vehicle for temporary traction 1 Front towing hole It is under the front bumper A drive...

Страница 10: ...tems to be Frequently Inspected for the Exterior of Vehicle Item Inspection Tyre Use an air gauge to inspect the pressure of tyres including spare tyre in the service station regularly adjust pressure...

Страница 11: ...al would not be seized or loaded unevenly Keep floor pad away from the pedal Brake pedal and booster Check if the pedal can be operated smoothly make sure the pedal still keeps an appropriate distance...

Страница 12: ...I I I I I I I 10 Exhaust fittings leakage I I I I I I I I I I 11 Throttle body C C C C C 12 Injector C C C C C C C C C C 13 Valve clearance I I I I I I Notes C For cleaning operation of fuel injector...

Страница 13: ...eat Wall AC refrigerant 600 25g R134a Wiper cleaning liquid 3 Water AC compressor lubricating oil 0 12 PAG56 V Service of Engine 1 Inspection of Driving Belt Warnings Be sure to operate only with engi...

Страница 14: ...pen the water drain plug at the bottom of radiator and then open the cap of radiator If necessary please dismount coolant reservoir drain the engine coolant and reinstall it after cleaned Check if the...

Страница 15: ...emoved above Attention The drain screw plug must be cleaned a new O ring must be installed Dismount air filter upper cover and the intake hose Refer to Air Filter Assembly Disconnect outlet tube of he...

Страница 16: ...imit 59 KPa Connect the radiator cap to radiator leak detector paste engine coolant onto the sealing face of cap If any failure is found in above mentioned three inspection items replace radiator cap...

Страница 17: ...h engine hot otherwise the high temperature and high pressure liquid overflowing from the radiator may cause severe scald Attention A pressure exceeds the specified test pressure may cause damage to t...

Страница 18: ...ssible 1 Warm up the engine and check for any oil leakage in the engine compartment Refer to Leakage of engine oil 2 Stop engine and wait for ten minutes 3 Loosen engine oil filler cap and then remove...

Страница 19: ...be prepared to wipe up the leaked or splashed oil Please keep the driving belt free from engine oil Clean any oil splashed on engine and vehicle 2 Installation Clear any foreign substance on mounting...

Страница 20: ...case ignition knock frequently occurs with standard ignition plug the cold ignition plug should be used Long time traveling on the expressway Engine is frequently running with high speed Attention Be...

Страница 21: ...nition switch to ON with engine stopped and then check for leakage at the joints of fuel pipeline Start engine and run with increased speed check again for fuel leakage at the joints of fuel pipeline...

Страница 22: ...information refer to Change Manual Transmission Oil 2 Inspect oil level For detailed information refer to Inspection of Manual Transmission Oil Level 6 Wheel Balance 1 Dismantlement Dismount the wheel...

Страница 23: ...uld be replaced every time At most three balance blocks are allowed to be installed The original balance blocks should be used any time c In case the calculated weight of balance block is more than 50...

Страница 24: ...se check brake system for leakage 9 Inspection of Brake System Pipeline and Cable Check for correct positions of brake pipeline and parking brake cable and any leakage worn scratching or ageing etc 10...

Страница 25: ...d then step on the brake pedal to close the release valve Repeat there procedures for all wheels 5 Bleed air See also Air Bleeding of Brake Pipeline 11 Inspection of Brake 1 Brake disc Check for worn...

Страница 26: ...Cylinder bore of brake slave cylinder 17 46 mm Clearance adjustment Automatically Brake drum Circular runout 0 05 mm 3 Brake caliper Check for any oil leakage 4 Rear brake slave cylinder Check for any...

Страница 27: ...ion with the steering column is loose 2 Steering pull rod Check ball joint dust boot and other components for loosening worn damage and grease leakage 13 Check the pipeline Stop engine check fluid lev...

Страница 28: ...orber for oil leak or other damages Check the suspension ball joint for grease leakage check ball joint dust boot for crack or other damages 15 Inspection of Drive Shaft Check dust boot and drive shaf...

Страница 29: ...nt of seat belt assembly has problems please do not repair it but replace the seat belt assembly In case the seat belt is broken worn or damaged don t repair but replace the seat belt assembly Be sure...

Страница 30: ...torques listed above are not applicable for following conditions a When the component is to be tightened with spring or tooth washer b Tightening of the plastic parts c Self tapping screw or self loc...

Страница 31: ...balance shaft assembly 58 XI Cylinder head 64 XII Valves 68 XIII Cylinder Body Assembly 72 XIV Diagnosis of Common Troubles 86 XV Parameters for Maintenance 88 Section II Engine Lubrication System 92...

Страница 32: ...ubles 137 III Parameters for Maintenance 137 Section II Starting and Charging System 138 I Principle Diagram of Starting and Charging System 138 II Battery 138 III Starting System 141 IV Charging Syst...

Страница 33: ...n Sensor 183 IV Crankshaft Position Sensor 185 V Camshaft phase sensor 188 VI Oxygen sensor 191 VII Fuel Injector INJ 194 VIII Knock sensor 195 IX Air conditioning switch and relay 197 X Canister sole...

Страница 34: ...al ones second and so on Conduct the operation in compliance with the loosening sequence if specified 4 Precautions on Check Repair and Replacement Thoroughly check the parts before repair or replacem...

Страница 35: ...ge the matching faces Insert the scraper and then knock its side to slide it as shown in the figure For the positions where it is difficult to use scraper lightly knock the parts to dismount them with...

Страница 36: ...ally put outside the bolt hole Install the matching part in a certain period of time after applying sealant Eliminate any dirt from the sealant Do not re tighten the bolts or nuts after installation i...

Страница 37: ...camshaft timing sprocket 2 Pin JAC T1D001 Used together with the end forked clamp 3 Locating tool for piston pin Used to install and dismantle the piston pin 4 Guide sleeve JAC T1F005 Used together w...

Страница 38: ...staller for valve oil seal JAC T3F001 Used to install the valve oil seal 11 Guide for front oil seal of crankshaft JAC T3F003 Functioning as a guide during the installation of front oil seal of cranks...

Страница 39: ...valent 3 Sealant Oil pressure switch draining screw plug and flywheel bolt LT243 or equivalent 4 Sealant Coolant temperature sensor and water temperature alarm switch LT648 or equivalent 5 Petrol 93 u...

Страница 40: ...ifters according conditions 2 Preparation for Dismounting Engine and Transmission Assembly 1 General Dismount the engine and transmission assembly from the vehicle and then detach the engine from tran...

Страница 41: ...ee Air Compressor Remove the brake fluid reservoir Remove the accelerator cable Disconnect the wire harness connectors and buckles of the following parts and then take them away Oxygen sensor Engine c...

Страница 42: ...due to changes of vehicle gravity use the jack to support the rear lifting point 6 Detachment Remove A C compressor assembly from the engine and transmission assembly Dismount starter See Starter Lif...

Страница 43: ...e check for any abnormal noise and or vibration With engine warmed up verify that there are no leakage of fuel exhaust gas or other oil and liquid including engine coolant and oil Bleed air and replen...

Страница 44: ...oning force for new belt 1 2 1 5 Adjust if tension is out of range Attention When checking belt tension after installation firstly to adjust tension to specified value Then revolve the crankshaft for...

Страница 45: ...4 Dismantlement of Drive Belt 1 Completely loosen the alternator belt as per the instructions in Tension Adjustment 2 Remove the alternator belt 5 Installation of Drive Belt 1 Mount the belt onto the...

Страница 46: ...d Air Duct 1 Parts Diagram of Positions 2 Intake Pipe 1 Dismantlement Remove the fastening bolts and clamps of front intake pipe and remove the front intake pipe assembly Tightening torque 17 19 N m L...

Страница 47: ...the base Tightening torque 8 12 N m 2 Check after Dismantlement Check whether there is any crack or wearing on the air duct assembly If any replace 3 Installation Install with steps contrary to disman...

Страница 48: ...al Maintenance Blow the filter element from its back side with compressed air till nothing is blown off 3 Installation Install with steps contrary to dismantlement VII Intake Manifold and Exhaust Mani...

Страница 49: ...ottle position sensor Carbon canister control solenoid Accelerator cable Disconnect the following hose joints Water hose joint insert a plug to prevent the engine coolant leakage PCV hose Vacuum hose...

Страница 50: ...nstall with steps contrary to the dismantlement Attention Do not reuse the non reusable parts Before starting the engine check the level of engine coolant If the level is lower refill engine coolant a...

Страница 51: ...ge the oxygen sensor It is forbidden to use any oxygen sensor which has dropped to the hard ground from a height above 0 5m Such an oxygen sensor should be replaced Unscrew the fixing bolt for heat sh...

Страница 52: ...nverter 6 Bellow 7 Rear oxygen sensor 2 Inspection of Exhaust System Check whether the exhaust pipe the three way catalytic converter the muffler and the fixing devices are properly installed and whet...

Страница 53: ...t Such joints should be firmly connected to avoid gas leakage Pre tighten the fixing nuts and bolts on exhaust manifold side and those on vehicle side Check whether there is any intervention between p...

Страница 54: ...cover plate 8 Balance shaft chain wheel fastening bolt 9 Balance shaft chain wheel 10 Secondary chain 11 Balance shaft idler gear 12 Secondary tensioner 13 Secondary tensioner torsion spring 14 Fixed...

Страница 55: ...place drive belt c Dismantle oil gauge assembly Tightening torque 7 8 2 N m d Dismantle damping wheel Tightening torque 160 170 N m e Remove the alternator bracket f Dismantle oil pan and cylinder hea...

Страница 56: ...heck the timing point shown in the diagram for compliance Fig 1 1 028 Timing mark of primary chain Timing mark of secondary chain Timing mark of secondary chain Timing mark for crankshaft chain wheel...

Страница 57: ...track 10 12 N m Dynamic track 19 28 N m j Dismantle exhaust camshaft sprocket bolt Tightening torque 88 10 N m k Remove t he bolts of intake cam chain wheel Tightening torque 88 10 N m l Remove the r...

Страница 58: ...ve the secondary chain tensioner Tightening torque 10 2 N m n Remove the bolts of balance shaft chain wheel and remove the balance shaft chain wheel Tightening torque 45 5 N m 2 Installation Reverse t...

Страница 59: ...t 8 Balance shaft gear 9 Balance shaft 10 Balance shaft rear end cap gasket 11 Balance shaft rear end cap 12 Balance shaft rear end cap bolts 2 Disassembly and installation 1 Disassembly of camshaft R...

Страница 60: ...remove the balance shaft front end cap Tightening torque for balance shaft front end cap 7 6 0 5N m Remove the balance shaft idler gear remove the bolts of balance shaft front gear and remove the bal...

Страница 61: ...shaft assembly should be assembled according to grouped drawings The mechanical tappet at the intake side will be grouped and assembled as per the following table to ensure the intake valve clearance...

Страница 62: ...0 25 3 25 L1 3 27 3 04 304 0 19 0 25 3 27 L1 3 29 3 06 306 0 19 0 25 3 29 L1 3 31 3 08 308 0 19 0 25 3 31 L1 3 33 3 10 310 0 19 0 25 3 33 L1 3 35 3 12 312 0 19 0 25 3 35 L1 3 37 3 14 314 0 19 0 25 3...

Страница 63: ...9 2 88 288 0 27 0 33 3 19 L2 3 21 2 90 290 0 27 0 33 3 21 L2 3 23 2 92 292 0 27 0 33 3 23 L2 3 25 2 94 294 0 27 0 33 3 25 L2 3 27 2 96 296 0 27 0 33 3 27 L2 3 29 2 98 298 0 27 0 33 3 29 L2 3 31 3 00 3...

Страница 64: ...timing chain wheel of balance shaft During installation notice to align the timing mark of balance shaft Backlash of balance shaft gear 0 06 0 12mm Backlash of balance shaft idler gear 0 08 0 14mm Be...

Страница 65: ...tention It is required to obtain the specified engine speed always by the battery which is fully charged Inspect valve clearance and other relevant parts such as valve valve seat piston piston ring cy...

Страница 66: ...ed down Do not splash engine coolant or oil onto the drive belt Dismount the following elements and the relevant parts Engine trimming cover See Intake Manifold Drive belt See Drive Belt Cylinder head...

Страница 67: ...ant and the carbon deposit Attention Be careful to prevent impurities from falling into coolant gallery and oil passage of cylinder head b Measure the planeness in six directions at several positions...

Страница 68: ...on should be performed in sequence a b e f g and h Then perform the installation steps which are just contrary to dismantlement 4 Check after Dismantlement The steps for checking oil leakage lubricant...

Страница 69: ...r 10 exhaust valve spring upper seat 11 exhaust valve spring 12 exhaust valve 13 intake valve oil seal 14 intake valve spring lower seat 15 exhaust valve seal 16 exhaust valve spring lower seat 17 int...

Страница 70: ...e the valve seat if required See Valve Guide to replace the valve guide if required 2 Assembly Install valve guide if it has been dismounted See Valve Guide Install valve seat if it has been dismounte...

Страница 71: ...at if the contact is uneven or incomplete Inspect thickness of valve edge Replace the valve if the measurement is less than the specified value For intake valve 1 35 1 65mm For exhaust valve 1 85 0 15...

Страница 72: ...iameter of 10 655 10 665mm extend the size of valve guide by 0 05mm For the hole with diameter of 10 855 10 865mm extend the size of valve guide by 0 25mm For the hole with diameter of 11 105 11 115mm...

Страница 73: ...ve seat Replacement of Valve Seat a Cut away the replaced valve seat from its inner side in order to decrease the wall thickness Then remove the valve seat b Rebore the valve seat hole on cylinder hea...

Страница 74: ...engine assembly from the vehicle and then detach the transmission from engine See Engine Assembly for detailed dismantlement steps Fix whole engine Discharge engine oil See Change Engine Oil Dismount...

Страница 75: ...r oil seal housing to dismantle Attention Once dismounted the rear oil seal must not be reused It should be replaced by a new one Dismount the piston and connecting rod assembly Before dismounting the...

Страница 76: ...rod with method below a Insert the push rod special tool from the front side with a arrow mark and then install the guide sleeve D b With the front mark of piston face upwards install piston and conn...

Страница 77: ...after Disassembly Axial clearance of Crankshaft Detection methods are as shown in the figure Standard value 0 09 0 27mm If measurement is not within the standard range replace the thrust washer and re...

Страница 78: ...iston and the piston ring with new engine oil then insert the piston ring till the piston reaches the middle part of cylinder measure end gap of piston ring by the feeler gauge Standard values For 1st...

Страница 79: ...r to check whether the piston skirt is distorted Standard values 74 973mm Clearance between Piston and Cylinder Bore Calculate per the actual measurement of piston skirt and cylinder bore Gap inner di...

Страница 80: ...rules of selection to replace Diameter of Main Journal of Connecting Rod Measure the diameter of main journal of connecting rod by using outside micrometer Standard values 43 0mm Replace the connecti...

Страница 81: ...f Crankshaft a Wipe off oil from the crankshaft journal and the inner surface of bearing shell b Mount the bearing shell c Set the plastic divicer till its width equals to the width of bearing shell T...

Страница 82: ...bearing shell to match the crankshaft Crankshaft group marking Main bearing Hole group marking 1 2 3 4 5 0 up down Black Black Black Yellow Black Red Black White Black Purple 1 up down Yellow Black Ye...

Страница 83: ...bolts of main bearing cap verify that the crankshaft can be rotated smoothly by hand Check the axial clearance of crankshaft See Axial clearance of Crankshaft Install piston onto the connecting rod wi...

Страница 84: ...expansion a Install oil ring a Install oil ring lining ring into the piston ring groove Then install the upper and lower blades Attention Lining ring and blade can be installed in two directions There...

Страница 85: ...kshaft journal Align air ring opening with oil ring opening See Fig 1 1 097 Install piston rod assembly in corresponding cylinder according to marks on connecting rod Make sure that the front mark on...

Страница 86: ...ould be followed After piston connecting rod assembly is installed verify that clearance for the connecting rod big end is 0 10 0 30mm Attention Connecting rod bolts can only be used once Before insta...

Страница 87: ...ng bolt loosened Tighten The transmission mounting support loosened Tighten The engine support loosened Tighten The heat shield for engine is damaged Replace The engine support heat shield is damaged...

Страница 88: ...The sensor or the wire harness is at fault Repair or replace The sensor or the starter is at fault Repair or replace Ineffective fan The fan relay or the wire harness is damaged Repair or replace The...

Страница 89: ...ve stem and valve guide mm Exhaust valve 0 030 0 045 0 15 Conical angle of valve 45 45 5 Intake valve 89 61 89 51 Total length of valve mm Exhaust valve 90 91 90 41 Free height of valve spring mm 43 1...

Страница 90: ...20 0 50 1 0 Outer diameter of piston pin mm 18 0 Pressing load on piston pin under room temperature N 4900 14700 Oil gap of crankshaft pin clearance of connecting rod journal mm 0 02 0 04 0 1 Side cle...

Страница 91: ...oil seal bolt M6 10 E8 6 7 6 0 6 Rear lug blot M8 20 E10 2 18 4 1 4 Intake manifold bolt M8 40 E10 4 18 1 0 Oil pan bolt M6 12 E8 14 7 6 0 6 Sprocket cover bolt I M10 90 E14 2 39 5 3 0 Sprocket cover...

Страница 92: ...ud nut M6 1 3 10 1 Q2580614 crank signal wheel bolt M6 3 12 5 2 5 Water temperature sensor 1 20 4 Hall sensor bolt Inner hex M6 1 16 2 8 4 0 6 Knock sensor bolt Inner hex M8 1 25 30 1 20 4 Exhaust man...

Страница 93: ...es on sealant application surface 2 Wipe sealant surface and matching surface clean with special cleaner remove water drops grease and foreign substances 3 Set the sealant with specified type complete...

Страница 94: ...ine 93 II Preparation 1 Repair Tools List of repair tools No Tool Outline Drawing Explanation 1 Oil pressure gauge Measure oil pressure 2 Hose Connect oil pressure gauge to cylinder body 3 Oil pressur...

Страница 95: ...of engine oil Check the engine oil for any white turbidity and or severe pollution If the oil is turbid or polluted it may be caused by engine coolant Please repair or replace the damaged parts 3 Leak...

Страница 96: ...e with the following steps after inspection a Remove any used sealant attached on pressure switch and engine b Apply sealant as specified and tighten the pressure switch Please use the specified seala...

Страница 97: ...the above data are only for reference Always use oil gauge to check oil filling volume Warm up engine and check the oil drain bolt and oil filter for oil leakage Stop engine and wait for 10min Check t...

Страница 98: ...surface tighten the oil filter by more 0 75 lap or get the tightening torque to 11 1N m Attention The oil filter must be tightened with filter spanner If the filter is tightened by hand oil leakage m...

Страница 99: ...4 O ring 5 Engine oil collector filter gasket 6 Engine oil collector filter 7 Oil drainage bolt washer 8 Oil drainage bolt 9 Engine oil filter 10 Oil sump assembly 2 Dismantlement Caution Do not disch...

Страница 100: ...cylinder body and then dismount the oil pan Attention Do not damage the matching surface 4 Dismount oil pump housing assembly 5 Dismount oil pickup Attention Tightening torque 8 4 0 65 N m 3 Check af...

Страница 101: ...he oil filter by 0 75 lap or get the tightening torque to 11 1N m Attention The oil filter must be tightened with filter spanner If the filter is tightened by hand oil leakage may occur due to inadequ...

Страница 102: ...Install the oil drainage bolt washer of oil pan shown in the figure Attention After the installation of oil pan wait at least 30min before filling engine oil 5 Check after Installation 1 Check the oi...

Страница 103: ...a n g e r A i r t h r o t t l e b o d y F i x i n g b o l t s o f c o o l a n t p u m p p u l l e y C o o l a n t p u m p p u l l e r B o l t s f o r w a t e r p u m p W a t e r p u m p a s s e m b l...

Страница 104: ...when engine is very hot otherwise the high pressure engine coolant overflowing from radiator will cause severe burns Attention Test pressure over specified value may cause radiator damaged When it is...

Страница 105: ...refer to Air Filter Assembly Disconect the outlet pipe of warm water pipe Please lift the hose as high as possible Fill coolant into radiator and reservior until specified level is achieved The coolan...

Страница 106: ...refer to Air Filter Assembly Run engine to warm it up to normal working temperature Increase engine speed for several times with no load applied to the engine Stop engine and wait for it to cool Disc...

Страница 107: ...coolant leakage 2 Inspect Radiator Cap 1 Pull out the negative pressure valve and open it Check if it can be fully closed after pressure release Make sure there is no dirt on or damage to negative pr...

Страница 108: ...above 30cm 5 Blow each surface of radiator core with compressed air every 1min until no water is blown out IV Radiator Cooling Fan 1 Dismantlement and Installation 1 Dismantlement Dismount the air in...

Страница 109: ...diator Please refer to Replace Engine Coolant Loosen the fixed bolt for belt pulley of water pump Dismount the drive belt Please refer to Drive Belt Dismount the fixed bolt for water pump Attention Ti...

Страница 110: ...leakage VI Thermostat Sub assembly 1 Dismantlement and Installation 1 Dismantlement Discharge the engine coolant through water drain plug of radiator See Replace Engine Coolant Attention Operate after...

Страница 111: ...lation Be aware of following precautions to install with steps contrary to dismantlement Be careful not to splash engine coolant onto the engine and wipe and dry the engine coolant with cleaning cloth...

Страница 112: ...r and lower water hoses of radiator Dismount the warm water hose and minor cycle water piping Unscrew water inlet pipe bolt before disassembling the water inlet pipe from back of water pump Attention...

Страница 113: ...f engine coolant Viscous engine coolant Loose clamp Coolant hose Broken hose Water pump Improper sealing Looseness Poor sealing Broken radiator coolant reservoir Radiator cap Broken radiator core F a...

Страница 114: ...J2 Sedan Mechanical Part of Engine 113 IX Parameters for Maintenance Technical specification for cooling system Temperature of thermostat opening 82 Initiall y open 95 Fully open Maximum lift of ther...

Страница 115: ...ve pole of battery Replace with new clips all the time Do not distort the fuel pipe during installation Please operate on level ground Connect the fuel pipe joint and make sure the joint has been fixe...

Страница 116: ...Do not operate electrical system during inspection Prepare a container under the fuel pipe to be disconnect to avoid fuel splash 1 Fully release fuel pressure Please refer to Release Fuel Pressure 2 D...

Страница 117: ...s control circuit IV Fuel Injector and Guide Rail 1 Dismantlement Caution Do read the General Precautions before dealing with fuel system Please refer to General Precautions 1 Disconnect the PCV hose...

Страница 118: ...e fixing bolt for fuel guide rail 5 Take off the fuel guide rail with injector from intake manifold Attention Avoid interference with fuel injector during removal Absorb the fuel leaked from fuel pipe...

Страница 119: ...e the O ring with petrol Do not wash O ring with solvent Verify that there is no foreign substance on O ring and its matching part Make sure the O ring will not be scraped by tool or fingernail and it...

Страница 120: ...lation Check for fuel leakage with following steps 1 Set the ignition switch at ON position when the engine stops and then check the connection of fuel pipe for leakage 2 Start the engine increase its...

Страница 121: ...t Attention The joint can not be disconnected when the raised position is fully pressed down Do not excessively distort the joint Do not disconnect the joint with any tool Prevent the resin pipe from...

Страница 122: ...il click is heard Check whether the connector is connected properly with following methods after connection Visually inspect that 2 raised positions have been connected to the connectors Stretch the r...

Страница 123: ...cates full or to be full discharge the fuel from tank until the meter indicates that the fuel level is lower than position E Attention If fuel level exceeds mounting surface of fuel level sensor the f...

Страница 124: ...e joint can not be disconnected until the raised position is fully pressed down Do not excessively distort the joint Do not disconnect the joint with any tool Prevent the resin pipe from being heated...

Страница 125: ...ace or wash it Inspect Fuel Pump Operation Actuate the fuel pump with 12V regulated power supply directly and check if the operation is normal Attention Do not make the fuel pump operation for a long...

Страница 126: ...n substance and damage Make the connector align with the resin pipe and insert the connector straightly until click is heard Check whether the connector is properly connected with following methods af...

Страница 127: ...s before dealing with fuel system See General Precautions Discharge fuel tank if necessary Please refer to Fuel Pump Please operate on level ground Carry out the dismantlement steps 1 6 of fuel pump P...

Страница 128: ...its backing plate Check the surface of reinforced plate for scratch and deformation Check the backing plate for crack material loss deformation and breakage 3 Installation Be aware of following precau...

Страница 129: ...fuel evaporation from sealed fuel tank will be introduced into EVAP carbon canister with active carbon and stored there During operation of engine the fuel evaporation in EVAP carbon canister will be...

Страница 130: ...uel filter Note Do not use soap water or any other detergent when installing vacuum pipe or cleaning pipeline 3 Inspection of parts 1 EVAP carbon canister Check EVAP carbon canister with following met...

Страница 131: ...ng so as to optimize engine control The optimum value memorized in ECM lies on the state of engine When the engine operates flow rate of fuel evaporation from EVAP carbon canister is adjusted along wi...

Страница 132: ...e 3 Filler cap Vacuum relief valve is mounted at the filler cap When the pressure in fuel tank is high more fuel evaporation the vacuum relief will be closed so as to avoid emission of fuel evaporatio...

Страница 133: ...conditions the ventilation volume of PCV valve is sufficient to suck all blow by gas of crankcase and a little air The vent air is brought into crankshaft through air intake pipe Ventilation hose inha...

Страница 134: ...of engine Out of work Operating state of engine Idling or deceleration PCV valve Out of work PCV valve Fully open Variation of vacuum Limited Variation of vacuum Slight Valve chamber cover side Valve...

Страница 135: ...er Dismantlement PCV valve Hissing may be produced during normal working of valve with air flows through When finger touches the valve at the entrance you can immediately feel a strong vacuum pressure...

Страница 136: ...I Ignition coil 1 Parts Ignition coil 2 Dismantlement Installation 1 Dismantlement Attention Be sure that the ignition switch is in the OFF position Dismount the trimming cover of engine Refer to Inta...

Страница 137: ...istance of secondary coil Secondary coil resistance 7 75 10 23 K Attention The ignition coil harness connector must be disconnected for secondary coil resistance measurement Spark plug Check the spark...

Страница 138: ...lement II Diagnosis of Common Troubles Diagnosis Common Troubles Symptom Possible causes Solution Trouble of ignition coil or ignition switch Check or replace the ignition coil or the ignition switch...

Страница 139: ...o the terminals of battery and have good contact 2 Methods to prevent excessive discharging of battery The following precautions should be particularly emphasized to prevent excessive discharging of b...

Страница 140: ...reference only If U 13 2V inspect the electrical system If 12 5V U 12 9V the system is normal If 11V U 12 4V inspect charging system If U 11V the battery is damaged or the charging system has trouble...

Страница 141: ...rosion If there is clean with warm clean water Battery harness Check for erosion and damage Replace if there is any 3 Installation Install with steps contrary to dismantlement Attention During connect...

Страница 142: ...starter is connected with engine body for grounding After the power supply and grounding are provided the starter can turn the crankshaft and thus engine is started 2 Dismantlement and installation C...

Страница 143: ...art of Engine 142 Disconnect the harness connector of starter Dismount the fixing bolts of starter then take off the starter 2 Installation Install with steps contrary to dismantlement Attention Be su...

Страница 144: ...1 Disassembly Exploded View of Starter 1 Screw 2 Front support3 Stop ring 4 Snap ring 5 Pinion 6 Gear ring 7 Solenoid switch 8 Plantery gear 9 Planetary gear 10 Ball 11 Gasket12 Stator 13 Rotor 14 Ele...

Страница 145: ...ed Pinion a Visual inspection of the meshing gear teeth If the teeth are worn or damaged replace meshing gear check teeth of fly wheel in this step b Check the teeth of pinion If the teeth are worn or...

Страница 146: ...ngs negative with an ohmmeter If broken replace electric brush retainer b Check for electric brush smoothly moving If electric brush bracket is bent replace If the sliding surface is dirty clean Inspe...

Страница 147: ...ductivity between each copper plate and shaft of commutator with ohmmeter If open replace c Check surface of commutator If it is rough use 500 sandpaper to lightly sand with method shown in figure d C...

Страница 148: ...by adding high temperature grease And then conduct the following operations Gear clearance adjustment Push the pinion out with the magnetic switch energized meanwhile check the clearance between the p...

Страница 149: ...s the gear shaft run Check pinion clutch Yes Repair the starter Normal No Check the reduction gear armature and the gear shaft No Check the fuse and the fusible wire Normal Inspect following items of...

Страница 150: ...nt voltage the grounding circuit will be opened while the charging alarm light will be turned off If the charging alarm light is still on with engine running it has troubles 2 Charging alarm light If...

Страница 151: ...Drive Belt section Take off the generator from the vehicle 2 Installation Install with reversed order of dismantlement Before installing the generator please inspect tension of generator belt Please...

Страница 152: ...Disassembly and Assembly Exploded View of Engine 1 Lock nut 2 Belt pulley 3 Spacer 4 Front end cover 5 Front bearing6 Bearing cap 7 Bolt 8 rotor 9 Rear bearing 10 Stator 11 gasket 12 commutator 13 Ele...

Страница 153: ...Resistance test Resistance Approximately 2 0 2 5 If it is beyond the standard range replace b Insulator test If electrically continued replace c Inspect wearing condition of slip ring If it is beyond...

Страница 154: ...ntion The rear bearing can not be reused after being taken off Please with new one Lubrication of rear bearing out race is not permitted Installation of rear cover a Mount the carbon brushes assembly...

Страница 155: ...itch is on The alarm light is off The alarm light is off The alarm light is on The engine starts with a rev of 1500 rpm The alarm light is on The alarm light is off The alarm light is on Perform follo...

Страница 156: ...d be used to test any circuit of airbag system The air bag circuit harness can be identified by the yellow or orange harness or harness connectors II General Precautions 1 Only digital electric meter...

Страница 157: ...ot be reversed 5 During inspection of ignition system the sparking should be detected only when it is necessary and the time should be as short as possible The air throttle must not be opened during i...

Страница 158: ...diagnose Description of tool diagnose tool of electronic controlled injection system Function reading clearing DTC of electronic injection system view data flow test actions of parts etc Description...

Страница 159: ...158 Description of tool digital universal meter Function measure characteristic parameters such as voltage current and resistance of electronic injection system Description of tool vacuum gauge Funct...

Страница 160: ...ne 159 Description of tool cylinder pressure gauge Function inspect pressure in each cylinder Description of tool fuel pressure gauge Function inspect pressure of fuel system determine working states...

Страница 161: ...he MIL lit After the operation be sure to connect the rubber pipe properly The failed connection of the rubber pipe may cause lighting of MIL because of failure of the EVAP system and fuel injection s...

Страница 162: ...he parts and harness of the electronic control system dry Inspect ECM with port and reference value to assure the normal function of ECM before replacing Even the very little leakage in the intake sys...

Страница 163: ...em of Engine 162 Tighten clamp of fuel hose to specified torque Don t step on accelerator pedal when starting the vehicle Don t increase the speed of engine immediately after starting the vehicle Don...

Страница 164: ...system of ECU monitors various components and control functions in the system Once a malfunction is detected and confirmed the system will save the malfunction code and activate the Limp home function...

Страница 165: ...xygen concentration in exhaust Throttle opening sensor Throttle opening Knock sensor Knock of engine Air conditioner switch Air conditioner pressure Wheel speed sensor Vehicle speed Coolant temperatur...

Страница 166: ...sed to make vehicles slow down In back tow or towing operation condition fuel injection is cut off in order to reduce the fuel consumption and the emission more importantly the three way catalyst can...

Страница 167: ...ing to limit of evaporative emission regulation it is not permitted to exhaust the vapor containing large quantity of HC composition directly into the atmosphere The fuel vapor in the system is collec...

Страница 168: ...identifying storing and showing the trouble information through the self diagnosis malfunction indicator lamp MIL 2 Trouble Information Record Electronic control module constantly monitors the sensor...

Страница 169: ...f 2Hz 2 When a malfunction is present The malfunction indicator lamp will be always on after the ignition switch is turned on ON After the engine is started the malfunction indicator lamp will go out...

Страница 170: ...ed information and confirm the clearing of the trouble 2 Connection of Diagnosis apparatus The K line protocol and ISO9141 2 standard diagnosis joint are adopted for the system as shown in the figure...

Страница 171: ...ge of engine coolant temperature sensor circuit P0118 High voltage of engine coolant temperature sensor circuit P0122 Out of lower limit of throttle position sensor circuit voltage P0123 Out of upper...

Страница 172: ...80 Open circuit of cooling fan relay control circuit low speed P0481 Open circuit of cooling fan relay control circuit high speed P0501 Inappropriate vehicle speed sensor signal P0506 Lower idling con...

Страница 173: ...VS lamp drive circuit P2177 Out of upper limit of air fuel ratio closed loop control self learning Medium load zone P2178 Out of lower limit of air fuel ratio closed loop control self learning Medium...

Страница 174: ...emblies of the electronic control system with trouble diagnose apparatus Attention Before dismantling or installing any component read the DTC at first and then disconnect battery negative poles Befor...

Страница 175: ...e the symptom described by the user User described the symptom and apparatus did not show DTC 6 Implement the basic check 10 Check the troubled component through the diagnosis steps 9 Use the trouble...

Страница 176: ...rt normally 7 Unstable idle fluctuant idle speed and hunting 8 High idle speed abnormal idle speed 9 Idle Stability abnormal idle speed Low idle speed abnormal idle speed 10 The engine stops at the id...

Страница 177: ...the current vehicle speed or the temporary decline of vehicle speed rotation speed of engine during acceleration Poor acceleration Poor acceleration refers to that the vehicle is unable to acquire ac...

Страница 178: ...for 2min at the idle speed 5 Read idling speed 750 50r min 7 Fuel Pressure Test Attention Before disconnecting the fuel pipeline it is necessary to release the fuel pressure inside the fuel pipeline...

Страница 179: ...d of fuel return pipe Repair or replace fuel pipe 8 Turn off engine and check the changes of fuel pressure gauge reading for 5min If the reading drops observe the reduction rate Referring to following...

Страница 180: ...ring starting under certain conditions it allows the ECM to be adjusted automatically at different altitudes ECM provides 5V voltage to MAP sensor and receives voltage signal by the signal line The se...

Страница 181: ...ircuit open circuit grounding problem exists in sensor wiring harness Whether sensor is highly impacted resulting in sensor failure Operating pressure range 12 5kPa 115kPa Operating temperature range...

Страница 182: ...res the engine coolant temperature and sends the signal to the ECM for control of ignition timing and fuel injection pulse width during start idling and normal running It adopts one negative temperatu...

Страница 183: ...Solution It mainly checks the connections between wires of sensor and ECU and between wires of sensor and instruments for presence of short circuit and open circuit Short circuit open circuit groundi...

Страница 184: ...arness connector With engine idling visually inspect coolant leakage III Throttle Position Sensor 1 Instruction of Parts This sensor is one angle sensor with linear output characteristic and is compos...

Страница 185: ...4 Diagnosis Poor acceleration etc 5 Solutions Mainly inspect sensor and ECU wiring harness for short circuit open circuit grounding problems Shift the multimeter to Ohm measurement scale and connect t...

Страница 186: ...n of throttle position sensor 1 Dismantlement Disconnect the wire harness connector of air throttle position sensor Note Be sure that the ignition switch is at the Off position Remove the screws of th...

Страница 187: ...he crankshaft When the tip of tooth passes through the tip of crankshaft position sensor the signal wheel made of ferromagnetic material cuts the magnetic force line of permanent magnet in the speed s...

Страница 188: ...it to ground Sensor unit short circuit to system reference voltage signal wire 5 Trouble Solution Check sensor circuit for normal function and incorrect connection of grounding Connect the sensor and...

Страница 189: ...ndard 0 5 1 5mm Tightening torque 7 8 9 N m V Camshaft phase sensor 1 Component Description This sensor provides crankshaft phase information to the ECU namely differentiating the compression top dead...

Страница 190: ...is in proportion to the magnetic field induction B perpendicular to the current IS and the current IS The Hall voltage is subject to the varying magnetic field induction strength B Performance Operat...

Страница 191: ...short circuit to system reference voltage signal wire 5 Trouble Solution Check sensor circuit for normal function and incorrect connection of grounding Connect the sensor and harness to check whether...

Страница 192: ...nd purified in the three way catalytic converter The sensing component is a kind of porous ceramic tube the wall is surrounded by the engine exhaust while the inside is put through to the atmosphere T...

Страница 193: ...oxygen sensor heating control 1 To main relay power Pin 39 Upstream oxygen sensor grounding Pin 45 Upstream oxygen sensor signal Pin 2 Upstream oxygen sensor heating control 1 To main relay power 4 D...

Страница 194: ...ay attention to the fuel quality meanwhile excessive fuel consumption may also lead to sensor failure Changes of the oxygen sensors should be not less than a certain times in certain period of time 6...

Страница 195: ...VII Fuel Injector INJ 1 Instruction of Parts Fuel coming from the fuel pump is stored and distributed via the fuel rail components and provides the fuel system with a more stable pressure environment...

Страница 196: ...1 4 12 6 2 Inspect operating time of the fuel injector with trouble diagnosis apparatus Standard operation time 2 0 3 0ms at the idle speed and more during the acceleration 3 Check the operating sound...

Страница 197: ...y reduce it until the knock disappeared and then gradually restore to the knock threshold the cycle is done repeatedly 2 Installation position Installed aside of cylinder 3 Inspection 1 Wiring diagram...

Страница 198: ...sconnect knock sensor harness connector Unscrew knock sensor locking nut remove the knock sensor Attention Do not drop or damage the sensor 2 Installation Install with reversed steps of disassembly Ti...

Страница 199: ...anister has certain limits if evaporation of gasoline attached to the canister is not consumed it may emit into ambient air resulting in pollution and increased insecurity Internal of canister valve i...

Страница 200: ...Temperature 40 120 Coil resistance 19 22 Working voltage 8 16V 6 Removal and installation 1 Removal Disconnect hose at canister solenoid valve side Disconnect the canister solenoid valve wiring harne...

Страница 201: ...utilize the high voltage generated in the secondary stage of the coil to puncture the gap of spark plug generate strong spark and ignite the gas mixture Due to high air ionization degree and low resi...

Страница 202: ...ponding cylinder will be turned off Control cable short circuit with ground Control cable short circuit with power line Control circuit open 4 Diagnosis Internal short circuit open circuit of coil Coi...

Страница 203: ...Check the fuel pressure Refer to Fuel System 5 Dismantlement and Installation Refer to Fuel Pump Assembly Attention In order to prevent accidental damage of fuel pump please do not run the fuel pump w...

Страница 204: ...ive circuits execute different actions by driving corresponding actuators and control the engine to run as per preset control strategy At the same time the malfunction diagnosis system of ECU monitors...

Страница 205: ...minal B of engine speed sensor 15 Diagnosis K line 47 Terminal A of engine speed sensor 16 Sustained power supply 48 Power grounding 1 17 Ignition switch 49 Fuel injector 2 3 rd cylinder 18 5V power s...

Страница 206: ...signal normal connection of its circuit 4 Check whether the actuator is normal and whether its line is intact 5 Finally replace the ECM to carry out the test 5 Dismantlement and Installation 1 Disman...

Страница 207: ...rcuit with ground or open circuit if the DTC points to high voltage of a specific circuit it indicates that the circuit is likely to have short circuit with power circuit if the DTC points to a circui...

Страница 208: ...cantly fast depress the accelerator pedal and almost open the throttle completely and at this moment the displayed value can reach above 90kpa instantly No Replace the sensor Fault code P0108 the inta...

Страница 209: ...on the diagnosis meter and at this moment the displayed value increases along with the rising of engine intake temperature No Replace the sensor Fault code P0113 the signal voltage of intake temperatu...

Страница 210: ...ure value on the diagnosis meter and at this moment the displayed value shall increase with the rising of engine coolant No Replace the sensor Fault code P0118 the circuit voltage of engine coolant te...

Страница 211: ...Maintenance Manual for J2 Sedan Electronic Control System of Engine 210...

Страница 212: ...Replace the sensor 6 Check if the voltage between Pins 1 and 2 of this connector is about 5V by the multimeter No Diagnosis help Fault code P0123 the circuit voltage of throttle position sensor is at...

Страница 213: ...tep 1 Connect the diagnosis device and adapter and turn the ignition switch to ON position Next step Yes Diagnosis help 2 Start the engine and run the engine idly till the coolant temperature reaches...

Страница 214: ...n Next step Yes Next step 2 Start the engine and run the engine idly till the coolant temperature reaches to the normal value Under all the work conditions observe the change of the value of Oxygen se...

Страница 215: ...s 5 A Check if the fuel injector drips fuel B Check if the exhaust pipe has leakage C Check if the ignition timing is incorrect Etc No Diagnosis help Fault code P0201 the control circuit of fuel injec...

Страница 216: ...tween Pin 2 of the fuel injector connector of Cylinder 2 and Pin 63 of ECU is open or short to power source or ground No Diagnosis help Fault code P0203 the control circuit of fuel injector of Cylinde...

Страница 217: ...and turn the ignition switch to OFF position Next step Yes Next step 2 Unplug the knocking sensor connector on the harness and check if the resistance between Pins 1 and 2 of knocking sensor is higher...

Страница 218: ...rcuit connecting Pin 3 of phase sensor to Pin 87 of main relay is open or short to ground Check if Pin 1 of phase sensor is grounded improperly No Next step Yes To Step 6 4 Check if the voltage betwee...

Страница 219: ...o Pin 87 of main relay is open or short to ground Check if Pin 1 of phase sensor is grounded improperly No Next step Yes To Step 6 4 Check if the voltage between Pin 2 of phase sensor and the negative...

Страница 220: ...he canister control valve at 20 is between 22 and 30 by the multimeter No Replace the control valve Yes Diagnosis help 5 Check if the voltage between Pin 1 of the canister control valve connector and...

Страница 221: ...tive pole of power source is about 3 7V by the multimeter No Next step Yes Repair or replace the harness 5 Check if the circuit connecting to Pin 86 of relay control side to Pin 62 of ECU is open or s...

Страница 222: ...ault code P0506 the idle speed is the lower than the target idle speed S N Step Check result Subsequent step 1 Connect the diagnosis device and adapter and turn the ignition switch to OFF position Nex...

Страница 223: ...rive pin of stepping motor is short to power source S N Step Check result Subsequent step 1 Connect the diagnosis device and adapter and turn the ignition switch to ON position Next step Yes Next step...

Страница 224: ...attery is too low S N Step Check result Subsequent step 1 Connect the diagnosis device and adapter and turn the ignition switch to OFF position Next step Yes Next step 2 Check if the battery voltage i...

Страница 225: ...the relay power supply side namely Pins 87 and 85 of relay and the negative pole of power source is about 12V No Next step Yes Repair or replace the harness 3 Check if the circuit of relay power supp...

Страница 226: ...the voltage between the relay power supply side namely Pins 87 and 85 of relay and the negative pole of power source is about 12V No Next step Yes Repair or replace the harness 3 Check if the circuit...

Страница 227: ...itions about the occurrence of the trouble And then check the appearance 1 Check fuel pipes for leakage 2 Check vacuum pipes for breakage or kink and proper connection 3 Check intake pipes for blockag...

Страница 228: ...ine No Replace battery Yes Next step 2 With ignition switch at the starting position check voltage of starter negative terminal to verify that it is above 8V No Repair or replace wire harness Yes Repa...

Страница 229: ...tor and observe whether fuel pressure is about 300kPa No Repair the fuel supply system Yes Next step 2 Connect the electric control system diagnosis apparatus to the engine to observe the data of rota...

Страница 230: ...e of the cylinders and connect the spark plug to make the spark plug electrodes about 5mm away from the engine body and start the engine to check whether there is the blue and white high voltage spark...

Страница 231: ...the blue and white high voltage spark No Repair the ignition system Yes Repair circuit or replace the sensor 3 Pull out the connector of coolant temperature sensor and start the engine to observe whe...

Страница 232: ...body then start the engine to check whether there is the blue and white high voltage spark No Repair the ignition system Yes Next step 4 Check the spark plug of each cylinder to observe whether model...

Страница 233: ...with the specification No Adjust or replace Yes Wash 4 Check air throttle body and idle bypass air passage for carbon deposit No Next step Yes Failure of Replacement 5 Dismantle the fuel injector and...

Страница 234: ...ck whether there is carbon deposit in the air throttle body idle adjustor or idle bypass air passage No Next step Yes Repair circuit or replace sensor 4 Pull out the connector of coolant temperature s...

Страница 235: ...whether there is carbon deposit in the air throttle body idle adjustor and idle bypass air passage No Next step Yes Repair circuit or replace sensor s 4 Pull out the connector of coolant temperature s...

Страница 236: ...em diagnosis apparatus to observe the changes of ignition advance angle fuel injector pulse width and intake volume No Next step Yes Next step 3 Connect the adapter of electric control system and disc...

Страница 237: ...ystem and vacuum pipeline or leakage No Next step Yes Wash related components 3 Dismantle the idle adjustor to check whether there is carbon deposit in the air throttle body idle adjustor and idle byp...

Страница 238: ...ck spark plug of each cylinder to observe whether its model and gap are in compliance with the specification No Adjust or replace Yes Wash related components 4 Dismantle the idle adjustor to check whe...

Страница 239: ...rk plug of each cylinder to observe whether its model and gap are in compliance with the specification No Adjust or replace Yes Wash related components 4 Dismantle the idle adjustor to check whether t...

Страница 240: ...one of the cylinders and connect the spark plug to keep the spark plug electrodes about 5mm away from the engine body and start the engine to check whether the strength of high voltage spark No Repair...

Страница 241: ...rottle position sensor circuit voltage P0123 Out of upper limit of throttle position sensor circuit voltage P0130 Inappropriate upstream oxygen sensor signal P0131 Low upstream oxygen sensor signal ci...

Страница 242: ...6 Lower idling control speed against target speed P0507 Higher idling control speed against target speed P0508 Short circuit of stepping motor drive pin to ground P0509 Short circuit of stepping motor...

Страница 243: ...Codes UAES P2178 Out of lower limit of air fuel ratio closed loop control self learning Medium load zone P2195 Aged upstream oxygen sensor P2196 Aged upstream oxygen sensor P2270 Aged downstream oxyge...

Отзывы: