J. A. Roby Elda Скачать руководство пользователя страница 3


July 13, 2017 


INTRODUCTION 

This  manual  describes  the  operation  and  installation  of  J.A. 

Roby cook stove model: 

Cuistot

. This appliance meets the 2020 

U.S. Environmental Protection Agency's emission standard with 

Douglas-fir  crib  wood.  The  capacity  of  this  appliance  is  from 
9806 to 21782 BTU/h. 
Read  all  instructions  carefully  before  installing  your  new  J.A. 

Roby 

Cuistot

 cook stove. A good installation is very important 

for a safe and effective use of this appliance. If you have doubts 
about how to install your appliance correctly, we suggest to call 

a professional installer. A wrong installation may result in a fire, 
burns or even death. 
When this stove is not properly installed, it may result in fire. To 

reduce the risk of fire, follow the installation instructions. Contact 

local  building  or  fire  departments  about  restrictions  and 
requirement about installation in your area. 
Keep these instructions for future reference. 
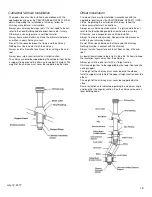
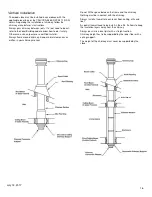
This appliance must be connected to: 

  A HT type factory-built chimney approved UL103 or ULC 

629 with 6 inches diameter (15.24 cm);  

  A code-approved masonry chimney with a flue liner with a 

6 inches diameter (15.24cm).  The masonry chimney liner 

must be made of stainless steel and meet the standards 
for masonry chimney with inner sleeve 


LISTING AND CODE APPROVALS 

Appliance certification 

The Cuistot cook stove meets the 2020 U.S. Environmental 

Protection Agency's emission standard with Douglas-fir crib 
wood.  
This appliance also meets:  

  UL 1482-2011 Standard for Solid-Fuel Type Room Stoves; 

  ULC S627-00 Standard for Space Heaters for use with 

Solid Fuels; 

  (UM) 84-HUD, Mobile Home approved. 

THIS  WOOD  STOVE  HAS  A  FACTORY  MINIMUM  AND 

MAXIMUM  BURN  RATE  SETTING  THAT  MUST  NOT  BE 
ALTERED.  
IN  THE  UNITED  STATE  IT  IS  AGAINST  FEDERAL 

REGULATIONS TO ALTER THIS SETTING OR OTHERWISE 

OPERATE  THIS  WOOD  STOVE  IN  A  MANNER 
INCONSISTENT WITH INSTRUCTIONS IN THIS MANUAL. 

This wood stove needs regular inspection and repair for proper 

operation (see pages 19-20, 26-28). It is against U.S, federal 
regulations to operate this wood stove in an inconsistent 
manner with the operating instructions in this manual. 

Mobile home approved 

This appliance is approved for mobile home installation. The 

structural integrity of the mobile home floor, ceiling, and walls 
must be maintained and respect construction code.  
When installed in mobile home, the appliance must be properly 

grounded to the frame of the house and use only a listed 
double-wall steel pipe.  
The appliance must be fixed on the floor by the bottom notch of 
legs or by the opening at the bottom of base. 

DO NOT INSTALL IN A SLEEPING ROOM. 

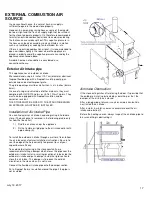
Fresh air intake is mandatory for mobile home use. 

BTU & Efficiency Specifications 

  Average efficiency 64.47% 

  Particle emission 1.9g/h 

  Minimum Heat Output* : 9806 BTU/h 

  Maximum Heat Output* : 21782 BTU/h 

  Cord Wood Load : 70 000 BTU 

  Vent size 6"  

  Firebox size 1.69 ft

3


  Recommended wood length: 20 inches 

  Fuel Orientation: front to back 

  Fuel: Seasoned cord wood. 

* BTU outputs are based on the EPA official test in reference to 

particle emission using Douglas-fir crib wood with controlled 
dimension, humidity and volume. 


WARNING 

If this appliance is in an area where children can reach it, it 
is  recommended  to  place  a  fire  guard  in  front  of  the 
appliance.  
THE APPLIANCE GETS HOT WHILE IN OPERATION. KEEP 
CHILDREN,  CLOTHINGS  AND  FURNITURES  AWAY, 
CONTACT MAY CAUSE BURNS. 
N.B: BE WARNED THAT THE LOCAL CODES AND RULES 

CAN  HAVE  MORE  SPECIFIC  REQUIREMENTS  THAN  THIS 

MANUAL.  YOU  CAN  CONSULT  A  PROFESSIONAL 

INSTALLER, FIRE DEPARTMENTS OR LOCAL AUTHORITY 

ABOUT  INSTALLING  SOLID  FUEL  APPLIANCE  IN  YOUR 
AREA. 
YOU MIGHT NEED TO OBTAIN A PERMIT FOR INSTALLING 
THE CHIMNEY AND  THE STOVE. 
DO NOT CONNECT THIS APPLIANCE TO A CHIMNEY FLUE 
ALREADY SERVING ANOTHER APPLIANCE.


DO  NOT  CONNECT  TO  OR  USE  IN  CONJUNCTION  WITH 

ANY  AIR  DISTRIBUTION  DUCTWORK  WHICH  ARE  NOT 
APPROVED FOR SUCH INSTALLATIONS. 
THIS  APPLIANCE  IS  BUILT  FOR  BURNING  SEASONED 

CORDWOOD  ONLY.  USE  OF  ANY  OTHER  TYPE  OF  FUEL 

SUCH  AS  COAL,  CONSTRUCTION  WOOD,  TREATED 
WOOD, FLAMABLE LIQUID, TRASH CAN OVERHEAT AND 
DAMAGE THE STOVE. 
DO NOT OBSTRUCT THE SPACE BENEATH THE STOVE. 

Содержание Elda

Страница 1: ...5 Fax 418 849 0077 www jaroby com Certified and tested according to Canadian Safety ULC S627 00 United States Safety UL 1482 2011 Emission EPA Method 28R ASTM2510 Efficiency CSA B415 1 10 Elda Cuistot...

Страница 2: ...17 STAINLESS STEEL TUBES REPLACEMENT 18 Stainless steel tubes Installation 18 How to install the tubes 18 OPERATING INSTRUCTIONS 19 Burning regime control 19 Lightning fire 19 First fire 19 Keeping a...

Страница 3: ...ation see pages 19 20 26 28 It is against U S federal regulations to operate this wood stove in an inconsistent manner with the operating instructions in this manual Mobile home approved This applianc...

Страница 4: ...cm 12 ft 366 cm Exterior height 37 in 95 25 cm 58 in 148 6 cm 58 in 148 6 cm Exterior width 41 in 105 7 cm 41 in 105 7 cm 51 in 131 4 cm Exterior depth 26 in 66 7 cm 26 in 66 7 cm 26 in 66 7 cm Door...

Страница 5: ...The heat radiation from the stove which might cause an auto ignition to the floor or to the floor covering Possible flow of creosote when there is a fire chimney The coating used for the protection mu...

Страница 6: ...decor by his originality and warmth Here is the minimum clearance for different certified flue pipes Double wall flue pipe distance Single wall flue pipe with shield Single wall flue pipe To know how...

Страница 7: ...warmer 1 as well as the decorative faceplate 2 1 Open the installation opening at the bottom right of the warmer by removing the screws 5 and the plate 4 2 Place and align the warmer with the correspo...

Страница 8: ...f the gas from wood which wouldn t be burnt in any other manner The rockwool above the brick prevents leakage between the bricks and keeps a maximum heat inside combustion chamber It must cover up all...

Страница 9: ...two half round steel plates over the rockwool near the rear deflector already in place Be sure to put them under the rear deflector to maximise the clearance between the rockwool and the rear deflect...

Страница 10: ...ave to be connected to 6 inches 15 24 cm factory build chimney HT UL 103 or CAN ULC S629 compliant or a 6 inches 15 24 cm masonry chimney with a homologated sleeve inside The masonry chimney liner mus...

Страница 11: ...indication s for approved double wall chimney pipe ALL PIPE SECTIONS MUST BE CLEAN AND IN GOOD CONDITION AND THEY MUST BE APPROVED FOR CORDWOOD FUEL How to set the pipe sections Make an installation...

Страница 12: ...mney is exposed outside from a wall and placed lower than 7 feet 213 cm above the ground level where the mobile home is situated a guard must be installed around the chimney at the height of 7 feet 21...

Страница 13: ...ry for your chimney 2 Cut the holes in all the floors and in the roof 3 If you need to cut a joist be sure to strengthen the adjacent joists and frame the hole respecting the minimum dimensions betwee...

Страница 14: ...ity to find the latest information in terms of construction standards To install a stove with a chimney serving a masonry fireplace you must have a certified stainless steel sleeve inside covering up...

Страница 15: ...accordance with the applicable local laws or the CAN CSA B365 NFPA211 USA norms Regarding the installation of chimney follow the chimney manufacturer s instructions Always pass chimney between joists...

Страница 16: ...tified Installer Always frame around chimney Keep minimal clearances as written in your chimney manual Do not fill the space between the frame and the chimney Nothing must be in contact with the chimn...

Страница 17: ...T BE FIXED TO THE STRUCTURE WHEN AN EXTERIOR AIR INTAKE IS INSTALLED Installation of Air Intake Pipe You can find external air intake head and grating in hardware store The back panel is removed in th...

Страница 18: ...stall The three tubes in the back 1 are perforated from a single side and the second tube in the front 2 is also perforated from a single side but with bigger holes than the other tubes The first tube...

Страница 19: ...owing the instructions of the manufacturer you are ready to light it up 1 Pull the handle under the front table of the stove forward to let the air admission enter in the combustion chamber 2 Put pape...

Страница 20: ...ommon method used for cordwood Season wood outdoor in summer for at least 6 months before use Properly seasoned wood is darker has cracks at the ends and sounds hollow when one piece is smacked agains...

Страница 21: ...ulf in the opening and it will cool down the chimney and diminish the draft inside the stove Moreover smoke might come out from the openings if the draft in the chimney diminishes too much Lids above...

Страница 22: ...the chimney when it gets hot enough It is therefore important to respect the minimum chimney length according to the standard to get the optimal performance You can refer to the section of the chimne...

Страница 23: ...are 4 access points 1 The 2 round lids on the hob which allow the cleaning of the oven top 2 The little rectangular hatch located on the top right corner of the hob which allows access to the right si...

Страница 24: ...ncompletely burned it produces tar and other organic vapors which condensate as creosote The creosote vapor condenses on the relatively cold flue walls As a result creosote residue accumulates on the...

Страница 25: ...ith a spanner partially or completely so that you can liberate the upper part of the door 3 Remove the tilted door from the lower hinge by lifting it To reassemble the door 1 Put the door on the botto...

Страница 26: ...round the groove without giving any tension and measure the length of the rope 5 Add inch to the length measured in step 4 and repeat the step 2 3 for the new rope end Fiberglass rope installation 1 P...

Страница 27: ...July 13 2017 27 APPENDIX 1 Exploded diagram of doors Oven door Glass dimension Order Code CB VPF...

Страница 28: ...July 13 2017 28 Square Stove door Glass Dimension Order Code CB VPC...

Страница 29: ...July 13 2017 29 Arc Stove door Glass dimension Order Code CB VPA...

Страница 30: ...July 13 2017 30 Reservoir Door Glass dimension Order Code CB VPR...

Страница 31: ...enir la temp rature de l eau sur une p riode prolong e Attention Pour remplir le r servoir d eau chaude J A Roby pr conise l utilisation d une bouilloire conventionnelle en m tal plac e directement su...

Страница 32: ...s 4 espaces du r chaud pr vus cet effet 3 Appuyer le r servoir a eau sur les 4 vis puis serrer les vis compl tement X 4 INSTALLATION DU R SERVOIR 1 Screw partially the 4 screws A provided with the wat...

Страница 33: ...et de l eau 4 Replacer le r servoir en le pla ant plut t vers l arri re afin que la porte n heurte pas la t te du robinet en la refermant FILLING OF THE WATER TANK 1 Open the lid and remove the second...

Страница 34: ...NDIX 3 Replaceable parts Bricks Door glass Spring Handle Stove Door with handle Flat fiber glass rope around glass Round fiberglass rope Ash Plug Slotted Brick Washer Call your stove seller representa...

Страница 35: ...ranty repair are not covered The manufacturer may at its discretion decide to repair or replace any part or unit after inspection and investigation of the defect The manufacturer may at its discretion...

Отзывы: