


July 13, 2017
26
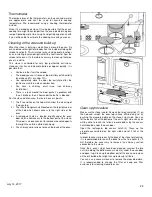
Fiberglass rope replacement
When it is impossible to adjust the door because of the
flattened fiberglass rope, it is the time to change it. When the
rope is damaged, you also have to replace it.
Use a ½ inch (12.7mm) braided round fiberglass rope
(available in some hardware store).
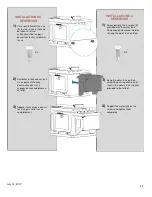
To install the new fiberglass rope, we recommend detaching
the door from the stove. Please see the section « Disassembly
and reassembly of door » in this manual.
Fiberglass rope preparation
1) Remove the worn fiberglass rope and take care
cleaning the groove of any leftover pieces of fiber or
latex.
2) Take the frayed end of the fiberglass rope and push
the loose fiber inside the end of the rope to put it
together
3) Add a small amount of high temperature latex or
silicone at the end of the fiberglass rope to make a
clean end.
4) Starting from the lower corner near the hinge, put the
fiberglass rope around the groove without giving any
tension and measure the length of the rope.
5) Add ½ inch to the length measured in step 4 and
repeat the step 2 & 3 for the new rope end.
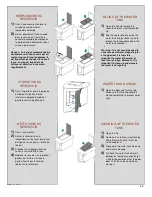
Fiberglass rope installation
1) Put high temperature latex inside the clean groove in
order to glue the fiberglass rope.
2) Starting from the lower corner near the hinge, put the
fiberglass rope into the groove without giving any
tension.
3) Align the two fiberglass rope ends perpendicularly and
put some high temperature latex in between.
4) Let dry the high temperature latex for at least 48
hours. Put the door back on the hinges and readjust
the tightness.
IN CASE OF CHIMNEY FIRE
CONTACT YOUR LOCAL AUTHORITY TO KNOW WHAT TO
DO IN CASE OF CHIMNEY FIRE AND BE SURE TO KNOW
PROCEDURE IN CASE OF CHIMNEY FIRE.
1. Close all door, the air intakes and the damper.
2. Water the combustible materials around the stove.
3. Trigger an alarm and leave the house, if necessary, call
the fire department.
4. Don’t interact with the pipes before the fire is completely
extinguished.
Do not use the chimney before inspection or necessary repairs.
.
Содержание Elda
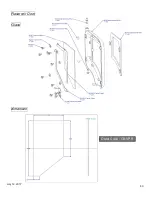
Страница 27: ...July 13 2017 27 APPENDIX 1 Exploded diagram of doors Oven door Glass dimension Order Code CB VPF...
Страница 28: ...July 13 2017 28 Square Stove door Glass Dimension Order Code CB VPC...
Страница 29: ...July 13 2017 29 Arc Stove door Glass dimension Order Code CB VPA...
Страница 30: ...July 13 2017 30 Reservoir Door Glass dimension Order Code CB VPR...


