background image

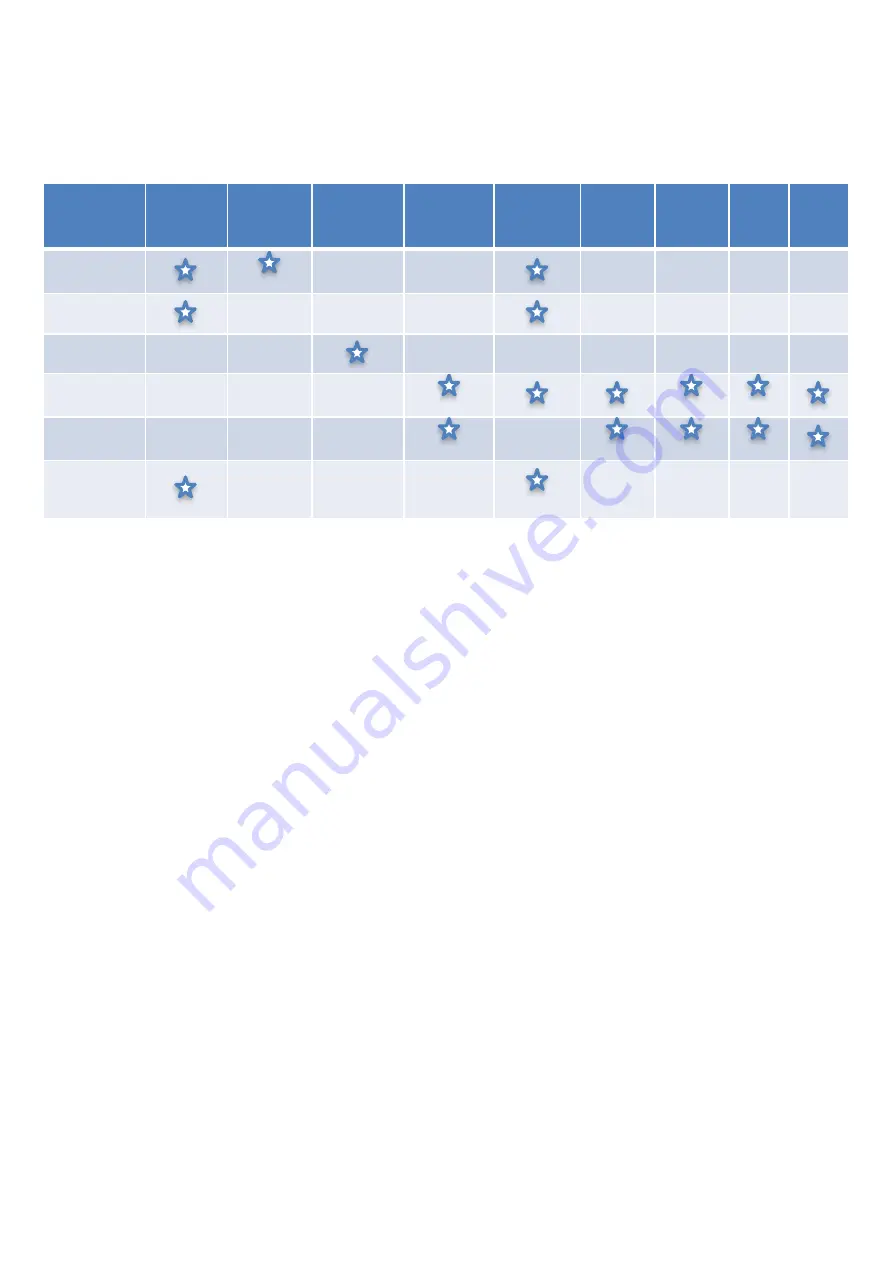
2. Which IQaudIO board is best for me?

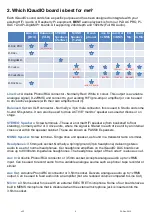
Each IQaudIO sound cards has a specific purpose and has been designed to integrate with your 
existing HiFi / audio or Raspberry Pi equipment. 

BEST

 audio playback is from our Pi-DAC PRO, Pi-

DAC+ and Pi- boards. All supporting 24bit depth and 192kHz (Full HD Audio). 

Line Out

: A double Phono/RCA connector - Normally Red / White in colour. This output is a variable 

analogue signal (0..2vRMS) and connect to your existing HiFi (pre-amp or amplifier) or can be used 
to drive Active speakers (with their own amplifier built in). 

Balanced Out

: An XLR connector - Normally a 3 pin male connector, this is used in Studio and some 

hi-end hifi systems. It can also be used to drive ACTIVE “monitor” speakers as used at discos or on 
stage. 

STEREO Speakers

: Screw terminals - These are normal HiFi speakers (from bookshelf to floor 

standing), normally with 2 or 3 drive units, where the signal is filtered to each drive unit by an internal 
cross over within the speaker cabinet. These are known as PASSIVE speakers. 

MONO Speaker

: Screw terminal - Single drive unit speaker, as found in a transistor radio or similar.  

Headphones

: 3.5mm jack socket. Normally a tip/ring/ground (3pin headphone) delivering stereo 

audio to a set of normal headphones. Our headphone amplifiers on the IQaudIO DAC boards can 
drive up to 80/90ohm impedance headphones. The headphone output of the Codec+ is also aux out. 

Aux In

: A double Phono/RCA connector or 3.5mm socket. Accepts analogue audio up to 1vRMS 

input. Can be used to record audio from a variable analogue source such as phone / tape recorder or 
similar. 

Aux Out

: A double Phono/RCA connector or 3.5mm socket. Delivers analogue audio up to 1vRMS 

output. Can be used to feed audio into an amplifier (but at a reduced volume compared to Line Out) 

Mic In

: a 3.5mm socket for use with an external ELECTRET microphone. Some of our boards have a 

built in MEMS microphone that is disabled when the external microphone jack is inserted into the 
3.5mm socket.

Line Out 

(RCA)

Balanced 

(XLR) 

STEREO 

Speakers 

(2x35w)

MONO 

Speaker 

(

1.2w

)

Head- 

phones

Aux In 

1vRMS

Aux Out 

1vRMS

Ext 

Mic

Built 

in Mic

Pi-DAC PRO

Pi-DAC+

Pi-

Pi-Codec+

Pi-CodecZero

Pi-DACZero


(Electret)


(MONO)


(No Fit)


(with HP board)


(Electret)


(MONO)


(XLR board)


(No Fit)


(3.5mm)

v32 


24-Nov-2019 

4

Содержание Pi-Codec+

Страница 1: ...udio accessories with the Raspberry Pi If you would like to see additional information within this document please email us at info iqaudio com v32 IQaudIO Limited Company No 09461908 For those who si...

Страница 2: ...DACZERO HEADPHONE 13 12 COSMICCONTROLLER 14 13 IQAUDIO KITS 15 14 ADDING THE IQAUDIO SOUND CARD TO YOUR RASPBERRY PI 16 15 BUILDING THE IQAUDIO ACRYLIC CASE 18 16 CONFIGURING LINUX TO SUPPORT IQAUDIO...

Страница 3: ...actor We also have accessory boards that either act as accessories to our sound cards or can be used standalone such as the CosmicController High Definition Audio Playback Pi DAC PRO Pi DAC Pi DigiAMP...

Страница 4: ...aker Screw terminal Single drive unit speaker as found in a transistor radio or similar Headphones 3 5mm jack socket Normally a tip ring ground 3pin headphone delivering stereo audio to a set of norma...

Страница 5: ...needed for the IQaudIO boards and also the quickest image that can be downloaded from our website The following will help you check your sound card is working and it s configured correctly Disabling t...

Страница 6: ...e RoonLabs images that turns the Pi into a Roon Certified end point The Pi is then controlled form the RoonLabs PC Mac application which connects to and plays music through the IQaudIO sound card on y...

Страница 7: ...his will just store the img file on the SD card The Pi needs the SD card to be formatted in a particular way to allow it to boot start up and run Don t worry there are several ways to do this and some...

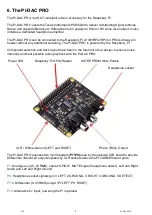
Страница 8: ...e been in the forefront of our design to ensure noise immunity and best possible audio playback with the Pi DAC PRO Power LED Raspberry Pi GPIO Header HAT EEPROM Write Enable Headphone socket XLR Diff...

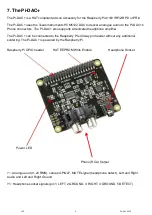
Страница 9: ...one amplifier The Pi DAC can be connected to the Raspberry Pi s 40way pin header without any additional soldering The Pi DAC is powered by the Raspberry Pi Raspberry Pi GPIO header HAT EEPROM Write En...

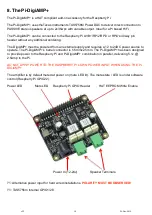
Страница 10: ...to 24DC power source to operate The Pi DigiAMP s barrel connector is 5 5mmx2 5mm The Pi DigiAMP has been designed to provide power to the Raspberry Pi and Pi DigiAMP combination in parallel delivering...

Страница 11: ...s bi directional digital audio signals I2S between the Raspberry Pi and onboard Dialog Semiconductor DA7212 codec Supporting a range of input and output devices from built in MEMS microphone AUX IN du...

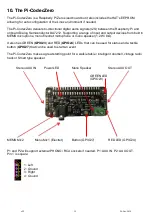
Страница 12: ...ono Electret microphone or mono speaker 1 2W 8 It also has GREEN GPIO23 and RED GPIO24 LEDs that can be used for status and a tactile button GPIO27 that can be used to start an event The Pi CodecZero...

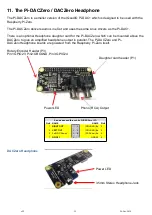
Страница 13: ...be mounted above the DACZero to give an amplified headphone output in parallel The Pi DACZero and Pi DACZeroHeadphone boards are powered from the Raspberry Pi Zero itself Rotary Encoder Header P3 Pin1...

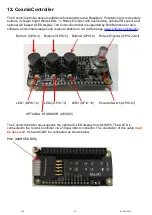
Страница 14: ...nd sample usage code is also available on out GitHub page www github com iqaudio Button1 GPIO 4 Button2 GPIO 5 Button3 GPIO 6 Rotary Encoder GPIO 23 24 LED1 GPIO 14 LED2 GPIO 15 LED3 GPIO 16 Encoder S...

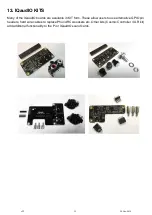
Страница 15: ...e available in KIT form These allow users to use alternative GPIO pin headers hard wire cables to replace Phono RCA sockets etc Other kits Cosmic Controller XLR kit add additional functionality to the...

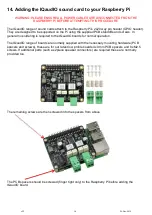
Страница 16: ...eral no soldering is required to the IQaudIO boards for normal operation The IQaudIO range of boards are normally supplied with the necessary mounting hardware PCB spacers and screws these are for our...

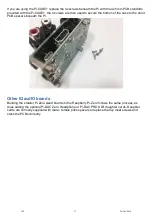
Страница 17: ...to the short PCB spacers beneath the Pi Other IQaudIO boards Building the smaller Pi Zero sized boards to the Raspberry Pi Zero follows the same process as does adding the optional Pi DAC Zero Headpho...

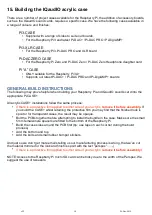
Страница 18: ...tions follow the same process If there is a protective film applied to either side of your acrylic remove it before assembly If you build the CASE whilst retaining the protective film you may find tha...

Страница 19: ...Several sides There are normally 3 sides which are used for all IQaudIO boards and a set of sides specific to the IQaudIO board being used A Lay out the CASE sides corresponding to the Raspberry Pi th...

Страница 20: ...text outwards and screw the case to the Raspberry Pi D Pi CASE top in place Now add the 4 nuts and bolts Do not over tighten finger tight is OK E Completed Pi CASE with Raspberry Pi and Pi DAC inside...

Страница 21: ...F Now apply the small transparent bumper stickers to the base of each Bolt G Now to complete screw the remaining 4 screws from the bottom of the case into the 5mm spacers inside v32 24 Nov 2019 21...

Страница 22: ...ypi sudo apt get update pi raspberrypi sudo apt get dist upgrade To ensure that the IQAUDIO Device drivers are loaded make sure boot config txt file has the valid entry below a For Pi DAC Pi DACZero P...

Страница 23: ...pberrypi aplay l If the IQaudIO board and drivers have been installed correctly you should see something similar to pi iqaudio aplay l List of PLAYBACK Hardware Devices card 0 IQaudIODAC IQaudIODAC de...

Страница 24: ...IODAC device 0 IQaudIO DAC HiFi pcm512x hifi 0 Subdevices 0 1 Subdevice 0 subdevice 0 Texas Instruments based IQaudIO boards For our Texas Instruments based boards Pi DAC Pi DAC PRO Pi DigiAMP Pi DAC...

Страница 25: ...the ALSA speaker test utility and listen for Front Left Front Right Make sure your volume level Digital mixer above is not at 100 before doing this pi raspberrypi speaker test c 2 t wav Alternatively...

Страница 26: ...used to check that audio playback is working as expected CONFIGURE THE CODEC BOARD TO PLAYBACK AUDIO THROUGH THE AUX OUT AND MONO SPEAKER From the Raspberry Pi s command line run alsamixer If you have...

Страница 27: ...atively listen to an internet based radio station Notice the hw parameter which points to device 0 subdevice 0 in the example below Change these values depending on the specific output of the aplay l...

Страница 28: ...es High performance 24 bit audio codec Supports common audio sample rates between 8 96kHz Built in MEMS microphone Mic2 Mono Electret microphone Mic2 left Automatic MEMS disabling on Mic2 insert detec...

Страница 29: ...the device within the 5 second close window will cancel mute If you do not want to control Mute state through device tree then you can also script your own solution The information below may be usefu...

Страница 30: ...available as pre configured SD card images from our web site s download page www iqaudio com downloads Please see the dedicated RoonLabs setup section 21 at the end of this document Max2Play IQaudIO S...

Страница 31: ...nd lines of the audio player you would like to use For more guidance and to follow along the settings you can also check out the YouTube video on the IQaudIO Plugin by Max2Play Volumio https volumio o...

Страница 32: ...ixer Control Name is set to Digital Press SAVE MoodeAudio http www moodeaudio org From a fresh distribution you will find that IQaudIO support is built in connect from web browser to moode local selec...

Страница 33: ...ternet radio s around the Raspberry Pi He includes many details on IQaudIO board support and also includes support for the IQaudIO CosmicController buttons volume control and mini OLED display PiCoreP...

Страница 34: ...s osmc tv IQaudIO Pi DAC support is configurable Pre configured versions are available at www iqaudio com downloads Others If you know of others please let us know by emailing us at info iqaudio com v...

Страница 35: ...cted keyboard Roon WiFi setup As the RoonLabs end point is headless WiFi on Raspberry Pi needs to be configured through a text file on the micro sd card itself There are various walk though examples f...

Страница 36: ...should be installed and running on your host PC or Apple Mac To configure the music application to use the IQaudIO board please see below Start the Roon application and login Once Roon has found your...

Страница 37: ...find any new IQaudIO Roon device listed under Networked You should then Enable this device and give it a descriptive Zone Name You can select the settings cog to adjust the IQaudIO board s internal De...

Страница 38: ...an have a different volume as needed Useful if the IQaudIO board is feeding directly into a Power amplifier or you are using a Pi DigiAMP Fixed Volume DO NOT USE THIS WITH THE Pi DigiAMP This setting...

Страница 39: ...evice First select the Zone you want to control such as Lounge From then on you can select music to play and adjust the Zone s volume from the line art at the bottom of the screen You can also group o...

Страница 40: ...CodecZero GPIO 25 for the IR Sensor GPIO 27 for the Rotary Encoder push switch Pi CodeZero switch Pi DAC PRO Pi DAC Pi DigiAMP Pi DACZero Pi Codec Pi CodecZero SIGNALS Pin NAME NAME Pin 1 3 3v DC Pow...

Страница 41: ...y Please note that some signals are for exclusive use I2S and EEPROM for some of our boards others such as I2C can be shared across multiple boards The old Legacy Pi DigiAMP had a 2x5 pin header which...

Страница 42: ...l volume control Sample software is available on our GitHub page www github com iqaudio tools that converts physical rotation to ALSA audio volume commands With the rotary encoder shaft facing you and...

Страница 43: ...up when accessory boards are in use then you may also want to add the following line to your boot config txt file max_usb_current 1 Please ensure your Pi power supply is able to deliver 2 5amp if you...

Страница 44: ...r the official Raspberry Pi 7 display are 5mm male female o The rotary encoders we have used and tested are the ALPHA 3 pin Rotary Encoder RE160F 40E3 20A 24P the ALPS EC12E2430804 RS 729 5848 the Bou...

Отзывы: