background image

61

For details on other operations, click

in the upper right corner for more operations.

5.3.3 Eshare Pro

Application note

The main function of this application is to wirelessly transmit the content of mobile phones, tablets
or computers to the display, and truly achieve the wireless screen transmission function of the

Содержание IQTouch HC900Pro

Страница 1: ...IQTouch HC900Pro User Manual ...

Страница 2: ...RS232 20 4 Turning on off 24 4 1 Power On 24 4 2 Power Off 25 5 IQ OS 26 5 1 Android Home Page 26 5 1 1 Status Bar 27 5 1 2 Sidebar 28 5 1 3 Floating Bar 40 5 1 4 Bottom Bar 40 5 2 Android Settings 41 5 2 1 Network 42 5 2 2 Application Notification 44 5 2 3 Display 45 5 2 4 Volume 45 5 2 5 Power on off Schedule 16 5 2 6 Personal Settings 47 5 2 7 System Space 49 5 2 8 System Settings 49 5 2 9 Rest...

Страница 3: ...ble into the machine If any liquid or metal is dropped into the machine power off the machine and disconnect power supply then contact professional staff for solutions Pay attention to children when they are close to the machine Put the machine on a stable surface An unstable surface includes and does not limited to an inclined plane a shaky stand desk or platform which might cause turnover and da...

Страница 4: ...vapor The preceding environments may cause faults in the machine or electric shock under extreme conditions Do not put an exposed fire source such as a lit candle on the machine Pull out the power supply during thunderstorms Do not touch the machine during a lighting storm you may experience an electric shock Install or place components that supply high enough voltage to cause personal injury out ...

Страница 5: ...lowing solutions Adjust the direction of the radio antenna to avoid the interference from the machine Keep the radio away from the machine Do not damage the power cable Do not damage change twist bend or forcibly drag the power cable Do not put weights such as the machine itself on the power cable Do not forcibly drag the cable when you pull out the power plug If the power cable is damaged please ...

Страница 6: ...ion If you must use amplifier equipment the input power should not exceed the maximum of speaker power Otherwise the speaker can become overpowered and damaged special remarks The machine can only achieve zero energy consumption when no external input power supply is connected Therefore it is recommended to shutdown state when not using to reduce energy consumption On the premise of ensuring the v...

Страница 7: ...5 1 Product Overview 1 1 Appearance Introduction Front View Rear View ...

Страница 8: ...ort 1 5 Built in Camera 12 Rear connecting port 2 6 Document Camera 13 Built in computer ports ops 7 Touch Border 1 2 Front Control Panel Front Button 1 3 Rear Port Button Function on off If the power is on press it to enter sleep mode Press and hold for 2 seconds to shut down If the power is off press it to turn on the power ...

Страница 9: ...7 ...

Страница 10: ...m resolution for video transmission 3840 x 2160 60Hz USB 3 0 Connect the USB device Such as mobile hard disk U disk USB keyboard mouse When the display screen is on android the device on USB is used by android When switching to OPS channel the USB device is connected to OPS Service only USB 2 0 Embedded for System upgrade WAN Network port connect to RJ45 terminal Network reset button Press the res...

Страница 11: ...the task management sidebar Decrease the volume Increase the volume Opens the bottom toolbar no function on the homepage and the app list page Open the app list page Turn the brightness bar on off drag the slider to adjust the brightness Enter the Settings page HDMI Switch to front HDMI source Reserved TYPE C Switch to Type C source Lock unlock screen touch function HDMI1 Switch to HDMI1 source HD...

Страница 12: ...g area is about 3 meters with 30 angle from vertical point to the left and right And the effective receiving area is about 5 meters from the front of device Note that the remote control signal receiver locates at the position of power indicator 5M ...

Страница 13: ...11 2 Installation 2 1 Safety Precautions Installation Environment Installation Direction 2 2 Installation Step ...

Страница 14: ...the 8 holes Depth of holes not less than 90mm Ref Picture 1 Step2 Expansion bolt installation Press the expansion bolt into 8 holes Ref Picture 2 Step3 Wall mounting bracket A installation Install the wall mounting bracket A with 8pcs screws and gaskets Please ensure that the wall mounting bracket A is installed horizontally Ref Picture3 ...

Страница 15: ...he direction of hang bracket B before installation Ref Picture 4 Step5 Hang IQTouch on the wall mounting bracket A Hanging the left right hang bracket B to the wall mounting bracket A please ensure two hang brackets B total hang on wall mounting bracket A then tighten the screws of hang bracket B to prevent it slide Ref Picture5 ...

Страница 16: ...f the machine is less than the loading capacity of the mobile stand When using the wall mount bracket ensure that the wall can support the weight of the machine We recommend that the wall surface be reinforced and have a loading capacity 4 times of the weight of the machine Consult a professional installer for wall mount installation ...

Страница 17: ...llation When installing try to keep the machine vertical The vertical tilt range allowed for wall mount installation is 3 degrees An excessive tilt angle may cause the screen glass to fall off or the machine to collapse ...

Страница 18: ...e the built in computer when the display is powered off Otherwise the display or built in computer may be damaged Perform the following steps to install the built in computer Step1 Unscrew the screws by hand to remove OPS shielding cover Step2 Push OPS into the port at the rear of the machine from right to left ...

Страница 19: ...17 Step3 Secure OPS to the machine by using the screws ...

Страница 20: ...GA and external PC Connect an earphone cable between the PC and audio at the same time 2 Connect a USB cable between the external PC and USB terminal 3 Plug the POWER cord and switch it on from the rear panel 4 Start up the external computer 5 Press to turn on the panel 6 Select Signal source to VGA source according to the one you connected Note The panel can connect with the external PC via HDMI ...

Страница 21: ... Connect an AV cable with the device with AV OUT Yellow is Video Red is Audio R White is Audio L 2 Plug the POWER cord and switch it on from the rear panel 3 Press to turn on the panel 4 Select Signal source to AV IN source YPbPr ...

Страница 22: ...ss to turn on the panel 4 Select Signal source to YPbPr source Front HDMI HDMI 1 HDMI 2 1 Connect a HDMI cable with the device with HDMI 2 Plug the POWER cord and switch it on from the rear panel 3 Press to turn on the panel 4 Select Signal source to HDMI source according to the one you connected 3 3 Video OUT HDMI out ...

Страница 23: ...om the rear panel 3 Press to turn on the panel 3 4 RS232 1 Connect a serial port cable with the device 2 Plug the POWER cord and switch it on from the rear panel 3 After connecting the central control system and unit you can use some of the function such as power on off or adjust the volume etc ...

Страница 24: ...1 38 CF DP 7F 08 99 A2 B3 C4 02 FF 01 56 CF Page up 7F 08 99 A2 B3 C4 02 FF 01 13 CF Page down 7F 08 99 A2 B3 C4 02 FF 01 14 CF VOL 7F 08 99 A2 B3 C4 02 FF 01 17 CF VOL 7F 08 99 A2 B3 C4 02 FF 01 18 CF Menu 7F 08 99 A2 B3 C4 02 FF 01 1B CF Home page 7F 08 99 A2 B3 C4 02 FF 01 1C CF Return exit 7F 08 99 A2 B3 C4 02 FF 01 1D CF OK 7F 08 99 A2 B3 C4 02 FF 01 2B CF 7F 08 99 A2 B3 C4 02 FF 01 2C CF 7F ...

Страница 25: ...ht 7F 08 99 A2 B3 C4 02 FF 01 15 CF Switch to screen lock 7F 08 99 A2 B3 C4 02 FF 01 57 CF Screenshot 7F 08 99 A2 B3 C4 02 FF 01 1F CF Settings 7F 08 99 A2 B3 C4 02 FF 01 20 CF Freeze ON OFF toggle 7F 08 99 A2 B3 C4 02 FF 01 3B CF Freeze On 7F 09 99 A2 B3 C4 02 FF 0B 00 CF Freeze Off 7F 09 99 A2 B3 C4 02 FF 0B 01 CF Mute On 7F 09 99 A2 B3 C4 02 FF 0F 00 CF Mute Off 7F 09 99 A2 B3 C4 02 FF 0F 01 CF...

Страница 26: ...t the ground wire of the outlet is properly connected Step 2 Turn on the rocker switch on the rear side of the machine next to the power socket after a power source has been connected The power indicator should be red Step 3 Press the button on the front panel or the button on the remote control to start the machine the indicator light turns green ...

Страница 27: ... power on off in a short period of time as it may cause malfunction Step 1 Press the button on the remote control or long press the button on the front panel to turn the machine power off The indicator light turns red Step 2 If you want to completely turn off the machine turn off the rocker switch on the rear of the machine next to the power socket and unplug the power cord Indicator Status Indica...

Страница 28: ...ll automatically enter the home page after starting up In any interface press the Home button on the remote control or floating bar to enter the home page Swipe the homepage to the left and it will show the recent application and screen shot You can ...

Страница 29: ... clear all Swipe the homepage to the right and it will show all the applications the interactive display has 5 1 1 Status Bar Status icons including Wi Fi and hotspot status are displayed in the top right corner of the homepage ...

Страница 30: ...t and right side of the screen to show the sidebar The functions are Home Back Annotation Capture Freeze Recent Control panel and Input Icon Name Function Home Enter the main interface of Android system Back Return or exit the current program Annotation Open the annotation Capture Take a screen shot on current page ...

Страница 31: ...e to unfreeze Recent Show recent application you used Control panel Please check the detail below Input Please check the detail below Control panel Click icon to show the control panel which consists of the task management bar toolbar and notification bar As shown below ...

Страница 32: ...llowing operations using the task management bar 1 Open an app Tap the task management widget to enter the app interface 2 Close an app Swipe left and right to close the corresponding app 3 Close all apps Tap the button at the bottom to close all apps ...

Страница 33: ...tings page The user can set Network Application Notification Display Volume Scheduled Power on off and Personal settings etc Calculator Click icon to open calculator Screenshot Click icon to screenshot After entering the screenshot mode press and hold the bright box interface with your finger to move on the screen and the bright box will follow your finger to the position where you need to take th...

Страница 34: ...eenshot application can also be activated by Screen Capture on the remote control Record Click icon to record the voice Camera Click to open camera function Swipe right to access the menu for the picture or video taking When taking a video audio will automatically be recorded Video recording cannot be used at the same time as Screen Recording If Screen recording is already activated video recordin...

Страница 35: ...S please switch the USB Device System Host in Personal Setting to Android but the Windows Platform will no longer access to the IFP s Microphone Camera and USB port Wireless Screen Sharing Click icon to enter screen sharing software we pre installed for wirelessly transmit the content of mobile phones tablets or computers to the display and truly achieve the wireless screen transmission function o...

Страница 36: ...s when both the machine and the mobile device are connected to the internet User will see the voting topic and options on the mobile device after the QR code is scanned After making the selection tap submit to cast vote ...

Страница 37: ...ber of voters is displayed in real time under the QR code The user can tap the Result button to terminate the current vote process and show the voting results The voting results can be displayed in both the Pie chart or Bar chart form ...

Страница 38: ...for the attendees to sign in the meeting Attendees can use their mobile phones to scan the QR code to sign in After the attendees have signed in the relevant information is synchronized to the sign in form in real time Scan the QR code with your mobile devices Sign In only works when both the machine and the mobile device are connected to the internet ...

Страница 39: ...After the user tap submits from their mobile devices their input will be shown on the Sign in list The meeting host can tap Complete to finish the signing process After the meeting host tap Complete users can use their mobile device to scan the QR code to download the Sign in List onto their mobile devices ...

Страница 40: ...r is closed the toolbar will not be displayed at the bottom but on toolbar from Control Panel Tap the icon to enter the corresponding app interface The default app icons include Whiteboard Source File Commander Windows If OPS PC plugged in App 5 Search Shortcut Enter content into the search box and tap the search icon to enter the search page Notification The user can view the notification content...

Страница 41: ...39 Input Click icon to show the source channel list and the user can switch channel ...

Страница 42: ...ng on the desktop can be moved freely and displayed in any interface Click the IQ icon it will shows the pop up menu the functions are Home Back Annotation and Capture You can expand hide the tool icons by touching it once 5 1 4 Bottom Bar ...

Страница 43: ...u used Apps Show all the applications the interactive display has Browser Enter browser page You can search whatever you want Setting Enter the system settings interface Lock Lock the screen which is unable to operate touch screen Touch three times to unlock the screen and then you can operate normally 5 2 Android Setting Click setting icon on home page to enter Android setting interface ...

Страница 44: ... Network Enter the Network submenu to set settings for Wi Fi LAN Hotspot Setting and Other Settings Wi Fi Turn on the wireless network which automatically connects the display to the available wireless network ...

Страница 45: ...k and DNS information The user can customize settings to automatically obtain an IP address of the Ethernet or set a static IP address as needed Hotspot Setting The user can customize relevant settings like Network Name or Password for portable Wi Fi hotspot ...

Страница 46: ...ize settings for network reset network upgrade timing reset network always on change network mode and network proxy 5 2 2 Application Notification Enter the Application Notifications submenu to choose whether the app receives notifications ...

Страница 47: ...r manually adjust the brightness between 0 100 Blue light filter The user can manually adjust the Blue light filtering value between 0 100 Close the bottom toolbar When this function is turned off you can swipe up from the bottom of any input signal source interface except Android and the bottom toolbar icons will be displayed When turns on the bottom toolbar icons will be displayed on control pan...

Страница 48: ...duled Power On Off submenu allows the user to set the automatic power on off or customize power on off time After setting the power on time and power off time the system will automatically power on or power off when the scheduled time is up ...

Страница 49: ...ime that the machine power on off automatically and confirm it 5 2 6 Personal Settings The Personal Settings menu allows the user to customize USB device system host camera microphone and touch for wakeup etc settings ...

Страница 50: ...function is turned on the user can touch the screen to wake up the device Default video source Customize settings to connect to the signal source after power on The options are Built in Windows HDMI1 HDMI2 VGA Type C and the Last channel Microphone Turns on off the microphone HDMI Output Mode Auto 2K 60HZ 4K 30HZ 4K 60HZ HDMI Version Two version v1 4 v2 0 choose the one you want CEC Auto Power On ...

Страница 51: ...he command Automatically clear meeting data after reboot When this function is turned on the machine will automatically clear meeting data after reboot 5 2 7 System Space The System Space submenu allows the user to view the memory capacity and storage space distribution 5 2 8 System Settings The System Settings submenu allows the user to view device information and set time date language and input...

Страница 52: ...version update System Users can modify the name of the interactive display Date and Time The user can customize for the device to automatically adjust date and time time zone provided by the Internet or customize manually the date and time and choose whether to enable the 24 hour ...

Страница 53: ...ed language and input method The language options include Simplified Chinese Traditional Chinese Thai language Korean language English 5 2 9 Restore To Factory Settings The Restore To Factory Settings submenu allows the user to restore factory settings and it will ...

Страница 54: ...board Click icon to open whiteboard app The pen tool of whiteboard is selected by default and it can be written directly Support single point and multi point up to 20 points Moreover we support pen writing by using matched writing pen with thick and thin dual head ...

Страница 55: ...zer or the recorder user also can set the split mode when more than one external device connected Click to use the pen function and the icon turns into blue Click to set the size or color And the chosen color and the size would be shown by the icon Click to use the highlighter function and the icon turns into blue Click to set the size or color And the chosen color and the size would be shown by t...

Страница 56: ...an write with the thick and thin double tip pen that comes with HC900Pro When the switch is swiped to the right it enters up to 20 point writing mode Insert Picture Click to insert the picture You can import the picture from the local file search name of picture directly or search the picture through the browser by connecting the network Click to show the page thumbnails Exiting the whiteboard ...

Страница 57: ...ult text setting Text Color Black White Red Yellow Green Blue Purple default is White Text Size 30 180 click A A to change the font size Insert custom shape Click to insert the anto shape Click to set the shapes and color Shapes Circular ellipse square equilateral triangle right triangle star arrow line ...

Страница 58: ...ere is more than one external device connected you can choose the split mode to view the screen separately Page Operation Click at the lower right corner in the discussion mode All pages will be displayed you can slide right or left by one finger to see more Click one page to switch to that page for more operations as shown in the following figure ...

Страница 59: ...ect share or delete writing pages according to requirements Click to select all pages Click to delete selected pages Click to exit the Navigation Click the writing pages you choose will export in the different form such as PNG JPEG and PDF ...

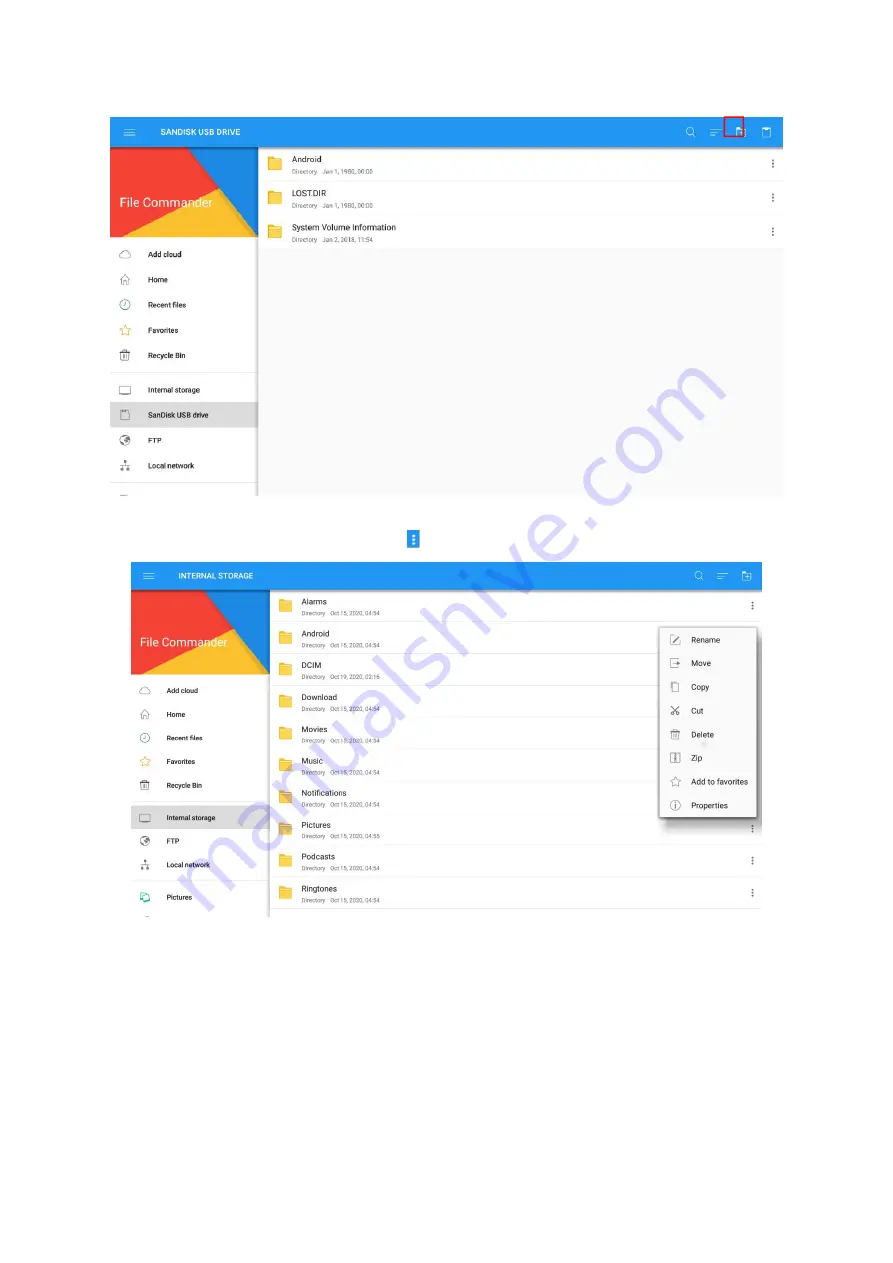
Страница 60: ... devices connected via the USB ports cloud stored files FTP uploaded files and local network files as shown in the following figure Notes Users can click the icon at the top right corner to add categories File Operation Enter the File Viewer application You can create folders according to requirements select files past files and set wallpaper copy paste delete ...

Страница 61: ...display files by type for example document picture music video archive and the downloaded You can also click to filter files by picture music and video The system supports two view modes list and thumbnail You can click and at the top right corner to switch view modes Click the icon to display files based on name type size and modification You can also change the display to filter files by whether...

Страница 62: ...60 3 New Folder Enter the File Viewer application and click to create folder 4 Paste Choose the files picture or video to paste to internal storage external storage ...

Страница 63: ...ht corner for more operations 5 3 3 Eshare Pro Application note The main function of this application is to wirelessly transmit the content of mobile phones tablets or computers to the display and truly achieve the wireless screen transmission function of the ...

Страница 64: ... local area network Operating instructions 1 Click multi screen interaction icon to open the multi screen interaction interface and the application display interface is as shown 2 Function activation Activate it only through connecting network if you have purchased EShare serial number 3 Operating description ...

Страница 65: ...nd the Apple mobile phone can open the Air Play to cast the screen Setting Click icon it shows setting interface User can set up the relevant information In this interface you can modify the device name and set the connection password when an Android phone connects to touch screen it needs to enter the connection password to connect to the screen Multi split screen Set the number of split screens ...

Страница 66: ...d be paired with Touch screen The USB port of IQShare button should be inserted into Touch screen and paired with touch screen The touch screen will display paired successfully after few seconds Note A Touch screen can be paired with up to 8 IQShare buttons in the same network environment Multi screen function supports to connect up to 9 mobile devices and simultaneously display on 9 split screens...

Страница 67: ... of the IQShare button will no longer flash blue Screen sharing Press the button of IQShare button the blue light will be dimmed which means the screen sharing is successful and the screen and sound of the laptop will be mirrored to the touch screen press the button again the screen mirror will exit ...

Страница 68: ... click input Press INPUT button on the remote control In the signal source page select a channel and press OK or click the channel icon directly to enter it 2 Operate the built in PC in the same way as you operate an ordinary computer 3 Shut down PC before you turn off the panel Do not power off a running PC suddenly to avoid data lose Or you could also press Power button to turn off PC and panel ...

Страница 69: ... Quantity Set 1 IQTouch 1 2 Power Cord Type C 1 3 Writing Pen 1 4 Remote Control 1 5 HDMI Cable 1 6 Touch Cable 1 7 Type C Cable 1 8 Wall Mounting Bracket 1 9 User Manual 1 10 Certification 1 11 Warranty Card 1 12 Packing List 1 ...

Страница 70: ...Do not touch the display with your sleeve or wrist Change the nib or use a pen with larger covering area Check if infrared frames are obscured Remove the interference source or change the using environment No display or no sound No sound is played and no image is displayed Check whether the power plug is inserted into the power socket and whether the panel is powered on Check whether the rocker sw...

Страница 71: ...ctly No image is displayed or the image is black and white Modify the color settings Check the color system This is the general user manual for HC900Pro interactive flat panel Some details may be different from the actual product ...

Страница 72: ...70 ...

Отзывы: