


eZ-Analyst
889691
Edit Menu 4-51
Also displayed is information about the samples displayed in the preview window, and input fields where you
can change the scale and offset of the data as it will be played out of the DSA640 Analog Output.
Changing the
Scale
and
Offset
values allow you to fit a signal to the desired output amplitude. This can also
be accomplished by right clicking the mouse in the preview window, then select the “
Fit Waveform to full
scale”
item in the popup menu. To undo changes, you can reset the
Scale
and
Offset
values to 1 and 0, or
from the popup menu select “
Reset plot Scale and Offset
”.
When you Import an eZ-Analyst data file, the
Output Duration Secs
field in the Waveform Modifiers group is
automatically set to a value equal to the number of samples in the file, divided by the sample rate. This is
amount of time the waveform will be played out of the DSA640 Analog Output. In the example shown in the
preceding figure, this will be 1.0000 second. If you want, you can change this value to play out the
waveform over a different length of time. You can also choose to play out the waveform as a repeated burst
by Checking the
Repeat Output
and specifying an
Off Time
value.
ASCII (.TXT) Files
When the opened file has a .TXT file extension, you will be presented with another dialog box. This is where
you tell eZ-Analyst how to interpret the data in the ASCII file. The next figure shows the first step needed
for importing an ASCII file.
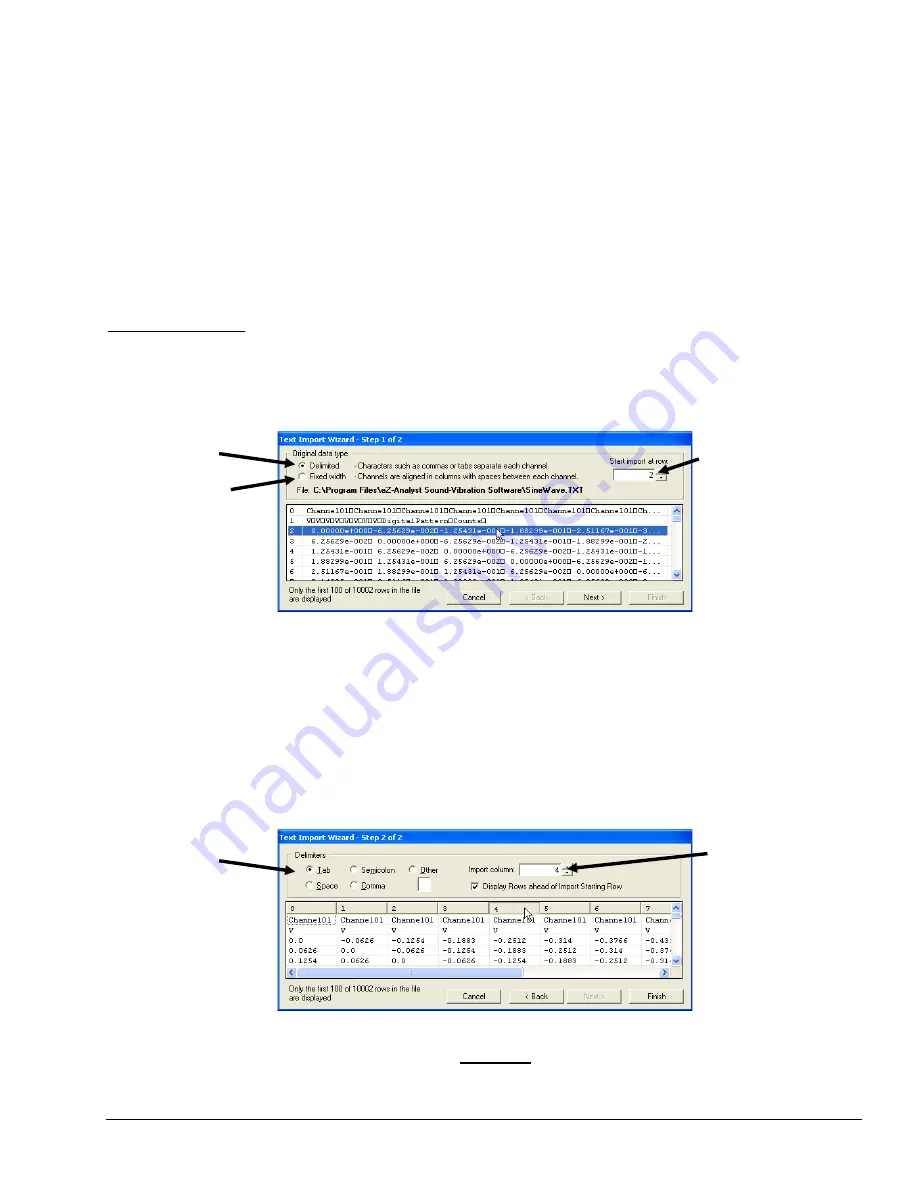
Text Import Wizard – Step 1 of 2
The first step to importing data from an ASCII file is to indicate if the channels are formatted in (a) fixed
width columns padded with spaces, or (b) character delimited columns. This is done via the “Digital data
type” radio button. The above figure shows delimited columns. After clicking the radio button, select the
first row of text that has valid channel data. This allows you to skip over text rows that contain non-data
content [such as channel headers and acquisition information]. You can enter the zero based row number
directly into the entry box, or click on the desired row in the list box. Note that only the first 100 rows of
data [in an ASCII file] are displayed in the list box.
After you have selected
Delimited
or
Fixed width
and the starting row to import, press the
Next
button to
proceed to Step Two.
Text Import Wizard – Step 2 of 2 for “Delimited” Format
The above figure shows Step 2 of 2 for importing a
delimited
column ASCII data file. In this box you select
the type of delimiter used to separate the columns of channel data. Tabs and commas are typical delimiters.
After specifying the delimiter, select the channel (column) that you want to import.
Delimited
Start at
Row
Fixed
Width
Delimiter
Import
Types Column


