background image

2BChapter 3: Getting started 

18 

TruVision DVR 11 and DVR 11c User Manual 


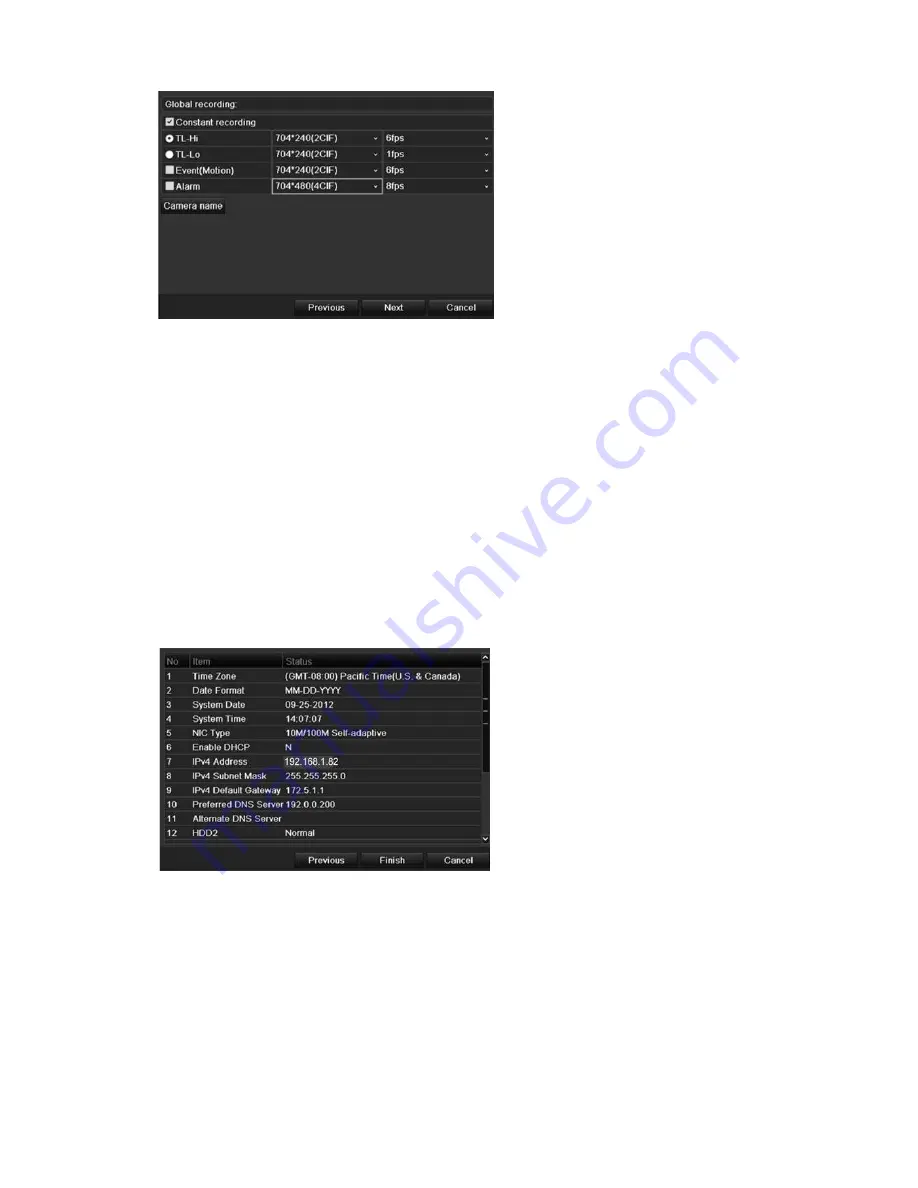
Check the 

Constant Recording

 checkbox for the DVR to record continuously 

all day. If left unchecked, the DVR will not record. 

Check the 

TL-Hi

 check box and select its image resolution and frame rate. 

Check the 

TL-Lo

 check box and select its image resolution and frame rate. 

To record motion detection events, check 

Event (Motion)

 and select the 

image resolution and frame rate. 

To record alarm events, check 

Alarm

 and select the image resolution and 

frame rate. 

Under 

Camera name

 enter the camera name. A soft keyboard will appear to 

enter the characters. 

10. When all the required changes have been entered, a page appears showing 

all the settings.  


Click 

Finish

 to exit the Wizard. The DVR is now ready to use. 


For a description of the DVR main menu, see “Menu overview” on page 55. 


Содержание TruVision TVR-1104-1T/EA

Страница 1: ...TruVision DVR 11 and DVR 11c User Manual P N 1072595B EN REV 1 0 ISS 28JAN13...

Страница 2: ...the equipment off and on the user is encouraged to try to correct the interference by one or more of the following measures Reorient or relocate the receiving antenna Increase the separation between t...

Страница 3: ...6 Chapter 4 Recording 19 Initializing the recording settings 19 Defining a recording schedule 21 Daily schedules 22 Holiday schedules 23 Motion detection schedules 23 External alarm schedules 23 Prote...

Страница 4: ...he front panel 49 Using the mouse 51 Using the IR remote control 52 Menu overview 55 Chapter 9 Live view 59 Description of live view 59 Video output 60 Controlling live view 60 Single and multiview di...

Страница 5: ...firmware 100 Restoring default settings 100 Viewing system information 101 Searching system logs for events 102 Chapter 14 Camera settings 105 Configuring the OSD settings 105 Setting up privacy maski...

Страница 6: ...s 125 Appendix C KTD 405 keypad 127 Supported firmware 127 Wiring the keypad 127 Setting up the keypad to work with the TVR 11 128 Operating the keypad 130 Appendix D Maximum pre recording times 135 A...

Страница 7: ...ch 1 TB Storage TVR 1104 2T EA TruVision DVR 11 H 264 4 ch 2 TB Storage TVR 1108 1T EA TruVision DVR 11 H 264 8 ch 1 TB Storage TVR 1108 2T EA TruVision DVR 11 H 264 8 ch 2 TB Storage TVR 1116 2T EA...

Страница 8: ...al time 25 30 fps while providing integration with the UTC portfolio of security solutions and offering a seamless product experience within the TruVision brand The TVR11c is a four channel version of...

Страница 9: ...installation location Extremes of heat or cold beyond the specified operating temperature limits may reduce the life expectancy of the DVR Do not install the unit on top of other hot equipment Leave 4...

Страница 10: ...Start Guide or TruVision DVR 11c Quick Start Guide TruVision DVR 11 User Manual or TruVision DVR 11c User Manual on CD Back panel The figures on the next page show the back panel connections and desc...

Страница 11: ...ct up to 16 analog cameras to BNC connectors depends on model of DVR 7 Connect to an optional USB device such as a mouse CD DVD burner or HDD The DVR supports both a USB DVD and a USB HD on the front...

Страница 12: ...to a HDTV The HDMI connection supports both digital audio and video 10 Connect to a VGA monitor 11 Connect to speakers for audio output 12 Connect to a network 13 Connect to a RS 485 device such as a...

Страница 13: ...devices to the DVR such as the UTC ProBridge accessory See Configuring the RS 232 port on page 99 for more information PTZ dome camera set up Use the USB mouse provided or the optional keypad for loca...

Страница 14: ...control over the network TVR 11 back panel shown Dome camera DVR back panel TVR 11 shown RS 485 port Configuring the PTZ protocols for Interlogix cameras Before the PTZ dome cameras are assembled in...

Страница 15: ...422 on I O box 100000 RS 485 communication DIP switches 110000 Camera ID DIP switches Select the camera ID DIP switch address as required RS 422 RS 485 data connector TruVision Mini PTZ 12X Outdoor Do...

Страница 16: ...VR 0111 1 Address switches 2 Baud switches 3 Protocol switches RS 422 on I O box 1111 Address switches Select the camera ID DIP switch address as required Baud rate 0000 9600 bps 0011 4800 bps RS 422...

Страница 17: ...5 on DVR 01000 1 Protocol switches 2 Address switches RS 422 on I O box 10000 Address switches Select the address switch address as required RS 422 RS 485 data connector Legend Protocol switches RS 48...

Страница 18: ...th devices are required it is recommended that you use the keypad s RS 422 connection to connect the dome camera and the keypad s RS 485 connection to connect the DVR See Figure 5 as well as Table 4 a...

Страница 19: ...addresses DVR bus address DVR video inputs PTZ address range 1 1 32 00 31 2 1 32 32 63 3 1 32 64 95 4 1 32 96 127 5 1 32 128 159 6 1 32 160 191 7 1 32 192 223 8 1 32 224 255 Brackets The DVR is easil...

Страница 20: ...1BChapter 2 Installation 14 TruVision DVR 11 and DVR 11c User Manual...

Страница 21: ...ower supply UPS is used in conjunction with the device To turn on the DVR Turn on the DVR using the power switch on the back panel Once it is powered up the status LEDs on the front panel will light u...

Страница 22: ...the preferred language for the system from the dropdown list and then click Next 4 Enable or disable the option to start the wizard automatically when the DVR is turned on Click Next 5 Administrator c...

Страница 23: ...type IP address subnet mask and default gateway Enter the preferred DNS server address as well as the alternate one to use Click Next to move to the next page or Previous to return to the previous pag...

Страница 24: ...solution and frame rate To record motion detection events check Event Motion and select the image resolution and frame rate To record alarm events check Alarm and select the image resolution and frame...

Страница 25: ...ee Controlling live view on page 60 for further information See Menu overview on page 55 for a list of the menu icons Initializing the recording settings Before you can set up your DVR to begin record...

Страница 26: ...calculated from the frame rate and time required Pre record This is the time the camera starts recording before the scheduled time or event Select the time in seconds to start pre recording before the...

Страница 27: ...e seven days to select Sunday Sun Monday Mon Tuesday Tue Wednesday Wed Thursday Thu Friday Fri and Saturday Sat 4 Recording type There are five recording types to select which are color coded TL Time...

Страница 28: ...Click All Day to record all day Note Time periods defined cannot overlap 7 Select a recording type This setting instructs the DVR to begin recording when an alarm is triggered The recording type can...

Страница 29: ...ngs The Edit window appears 3 Enter the name of the holiday period and click Enable 4 Select whether the holiday period will be categorized by date week or month and then enter the start and end dates...

Страница 30: ...recorded files Lock files to protect them against being overwritten or deleted To lock or unlock a recorded file 1 In live view enter the video search window by pressing the Search button on the front...

Страница 31: ...read only To set a HDD to read only 1 Click the System Setting icon in the menu toolbar 2 Click Hard Disk to set up the HDD parameters 3 Select the HDD you want to set to read only 4 Check Read only...

Страница 32: ...3BChapter 4 Recording 26 TruVision DVR 11 and DVR 11c User Manual...

Страница 33: ...tion types are Full screen monitoring Triggers the camera image in alarm to appear as full screen view Audible warning Triggers an audible beep when a notification or alarm is detected Notify surveill...

Страница 34: ...for each camera individually or easily copy the settings of one camera to other cameras Motion detection set up To set up motion detection 1 Click the Camera Management icon in the menu toolbar and se...

Страница 35: ...the week and the time periods during the day when motion can be recorded You can schedule up to eight time periods in a day Default is 24 hours Click Apply to save the settings Click Copy to copy the...

Страница 36: ...box to enable the function and click Rule to set up the rules for the cameras to be triggered their alarm schedules method of alarm notification and PTZ function 5 Select the cameras to be triggered...

Страница 37: ...larm Output 2 Select the alarm output 3 Select a timeout option The timeout setting lets you define how long a signal remains active after the alarm has ended If you select Manually Clear the signal r...

Страница 38: ...need to test them Clear All Stop all alarm outputs at once 4 Click Back to return to live view The alarm is silenced Or 1 Press the Alarm button on the front panel or remote control The alarm is sile...

Страница 39: ...evelop a fault or are damaged You can set up the DVR to detect video loss and trigger a system notification To setup video loss detection 1 Click the Camera management icon in the menu toolbar and sel...

Страница 40: ...een where you want camera tampering to be detected Click and drag the mouse across an area to mark that area for video tampering You can only set one tampering area with the full screen being the maxi...

Страница 41: ...your Network Administrator or ISP to see if your DVR requires specific IP addresses or port numbers Configuring general network settings To configure general network settings 1 Click the Network sett...

Страница 42: ...f 64 IPv6 address 2 Enter the IPv6 address for the DVR IPv6 default gateway Enter the IPv6 address of your network gateway so the DVR will be recognized within the network This is typically the IP add...

Страница 43: ...n function to set up a dynamic IP address The server is set up to assign an available host name to your DVR Figure 8 ezDDNS setup window NAT translates the ports on the server Consequently there is no...

Страница 44: ...uld use a NTP server that has a time synchronization function such as the server at the National Time Center IP Address 210 72 145 44 or europe ntp pool org If the device is setup in a more customized...

Страница 45: ...you want to send an email with attached alarm images Interval Select an interval range in the Interval box The interval range represents the time range in between the alarm images being sent For exam...

Страница 46: ...presents the IP of the remote PC where the Network Video Surveillance software installed The alarm host port value must be the same as software s alarm monitor port Default port is 7200 4 Click Apply...

Страница 47: ...port The RTSP Real Time Streaming Protocol is a network control protocol designed for use in entertainment and communications systems to control streaming media servers To configure RTSP service port...

Страница 48: ...st result appears in a pop up window 4 If you need to check the current network parameters click the Network button to get an overview The NIC type and Enable DHCP options can be changed Click Apply t...

Страница 49: ...ash drive SATA eSATA CD RW and other local backup devices To export network packet data 1 Click the System Settings icon in the menu toolbar and then click Net Detect 2 Select the Network Detection ta...

Страница 50: ...5BChapter 6 Network settings 44 TruVision DVR 11 and DVR 11c User Manual...

Страница 51: ...r and then click Hard Disk to display its window 2 Select the HDD to be initialized 3 Click the Initialize button to begin initialization After the HDD has been initialized the status of the HDD chang...

Страница 52: ...Click the Edit icon The Local HDD Settings window appears 5 Click the desired HDD property for the selected HDD 6 Click the group number for this HDD 7 Click Apply to save and exit the window Note Onc...

Страница 53: ...t HDD Error and check the desired notification method 4 Click Apply to save the settings Checking the S M A R T information S M A R T Self Monitoring Analysis and Reporting Technology reports on a var...

Страница 54: ...6BChapter 7 HDD management 48 TruVision DVR 11 and DVR 11c User Manual...

Страница 55: ...ntrol method for any procedure but in most cases we describe procedures using mouse terminology Optional control methods are given only when they differ substantially from mouse control methods Using...

Страница 56: ...r 3 Eject button Ejects CD DVD disc This is only present on models with a CD DVD burner 4 Archive button Press once to enter quick archive mode Press twice to start archiving 5 Display and Seq buttons...

Страница 57: ...ress the arrow buttons left right and up down to position cursor in the menu window Press for Enter See Figure 12 on page 55 Playback mode Press the left right arrow buttons to slow down or speed up p...

Страница 58: ...ol Adjust pan tilt and zoom Tamperproof privacy masking and motion detection functions Select the target area Digital zoom in Drag and select target area Right button Single Click Live view Display me...

Страница 59: ...ew formats 5 Mon A and Mon B Switch between monitors A and B 6 Live Return to live view mode 7 Menu Activate the main menu 8 Seq Start stop sequencing 9 In Menu mode Use left or right arrow buttons to...

Страница 60: ...ick Display Mode Settings Monitor 3 Check the device address value The default value is 255 This device address is valid for all IR controls Note The DVR will respond to any remote control that has an...

Страница 61: ...n of the icons 2 Submenu panel Submenus for the selected menu function are displayed Click an item to select it 3 Setup menu All the details for the selected submenu are displayed Click a field to mak...

Страница 62: ...ngs RS 232 settings firmware upgrade hard drive settings boot log and shutdown See Chapter 7 HDD management on page 45 and Chapter 13 DVR management on page 99 Help information Provides reference info...

Страница 63: ...keys in the virtual keyboard Switch to lowercase uppercase Space Exit the soft keyboard Alphanumeric characters Backspace Symbols Confirm selection Exiting the main menu Press the Menu button on the...

Страница 64: ...7BChapter 8 Operating instructions 58 TruVision DVR 11 and DVR 11c User Manual...

Страница 65: ...d auxiliary monitors The camera status icons are shown for each camera Each icon represents information on a specific item These icons include Table 8 Description of the on screen status icons Icon De...

Страница 66: ...for more information on setting up the monitors Controlling live view Many features of live view can be quickly accessed by placing the cursor on a live image and clicking the right button of the mou...

Страница 67: ...r Table 10 Mouse menu for monitor B event monitor Item Name Description 1 Single camera Switch to a full screen view for the selected camera from the dropdown list 2 Multi camera Switch between the di...

Страница 68: ...ats 4 channel DVR 8 16 channel DVR To select a multiview display format 1 Press the Display button on the front panel to cycle through different display formats You can also right click the mouse and...

Страница 69: ...16 on page 63 Figure 16 Quick access toolbar Table 11 Description of the quick access toolbar icons Icon Description Freeze Freeze the live image of the selected camera Although the image pauses time...

Страница 70: ...ightness contrast saturation and hue values Click Restore to restore image settings to previous values Click Restore to restore image settings to previous values These settings can also be modified fr...

Страница 71: ...udio output settings to configure the main monitor Use Event output and Full screen monitoring dwell time settings to configure the event monitor Figure 18 Layout window General tab Table 12 Descripti...

Страница 72: ...ettings icon in the menu toolbar 2 Select Layout General 3 Specify the desired settings for each of the menu options 4 Click Apply to save the settings 5 Click Back to return to live view Changing the...

Страница 73: ...The selected tile is highlighted green 6 In the selected tile select the new camera sequence order by scrolling the through the list of available camera numbers Note X means that the camera is not di...

Страница 74: ...selected Default format is Disable Enable DST Manually define DST If this option is selected the Auto DST adjustment option is disabled Default format is Disable Click the check box to enable or disab...

Страница 75: ...p down list and click Apply The language displayed changes immediately Device name Define the DVR name The default name is TVR 11 Click the edit box and enter the new name from the soft keyboard Devic...

Страница 76: ...Monitor brightness Modify the video output brightness Adjust the scroll bar point to the desired level and click Apply Event hint Define whether the status icons appear on screen See Status informatio...

Страница 77: ...see the output from the cameras on a remote client monitor in one stream Note It is not recommended to use the V stream feature when a CVBS monitor is used as a main monitor because the CVBS main mon...

Страница 78: ...8BChapter 9 Live view 72 TruVision DVR 11 and DVR 11c User Manual...

Страница 79: ...s Each camera must be set up individually Cameras must be configured before they can be used Ensure that the PTZ dome cameras are correctly connected to the RS 485 port on the back panel Note If a cam...

Страница 80: ...appears Click the PTZ control icon to enter PTZ mode The PTZ control panel appears Remote control Press the OK button The PTZ control panel appears Keypad Press the Enter button on the keypad For furt...

Страница 81: ...l Setting and calling up presets Presets are previously defined locations of a PTZ dome camera It allows you to quickly move the PTZ dome camera to a desired position They are configured and modified...

Страница 82: ...d enter a preset number The preset is enabled and stored in the camera If the desired preset number is larger than the 17 numbers listed click The Preset window appears Select a preset number from the...

Страница 83: ...umber a dwell time and a speed The step number is the order the camera will follow while cycling through the preset tour The dwell time is the length of time for which a camera stays at a step before...

Страница 84: ...tour PTZ control panel 1 In live view left click the mouse and select the PTZ control icon in the quick access toolbar The PTZ control panel appears Select the desired camera from the toolbar Or On th...

Страница 85: ...ra along the desired path 4 Click to save the shadow tour Note The shadow tour can be overwritten 5 Click Back to return to live view To call up a shadow tour PTZ control panel 1 In live view left cli...

Страница 86: ...9BChapter 10 Controlling a PTZ camera 80 TruVision DVR 11 and DVR 11c User Manual...

Страница 87: ...deo on that camera display You must have the access privilege to play back recordings see Customizing a user s access privileges on page 110 for more information Cameras in multiview mode play back si...

Страница 88: ...oolbar It is easy to manually control playback using the playback control toolbar See Figure 26 below Note The control toolbar does not appear for instant playback Figure 26 Playback control toolbar s...

Страница 89: ...ing of recording types that appear in the playback progress bar Green indicates continuous recording Red indicates alarm event recording Yellow indicates motion recording 6 Video search This icon is o...

Страница 90: ...the All day playback button Play back starts To start all day playback using the mouse 1 In live view right click the mouse on the desired camera image In the mouse toolbar that appears click All day...

Страница 91: ...tection locked or unlocked and time period Event Search only event recorded files Files can be searched by alarm inputs motion detection or POS ATM text insertion Note Only motion detection and POS AT...

Страница 92: ...he recording 3 Click Search The list of search results appears 4 Play back the search results If there is only one camera in the search result click its playback button Playback starts If there is mor...

Страница 93: ...puts If you selected Text insertion select the required alarm inputs and enter the desired keywords 4 Click Search The list of search results appears 5 Play back the search results If there is only on...

Страница 94: ...e 6 To see a slideshow of all the snapshots found click the or buttons on the snapshot toolbar to sequence forwards or backwards through the shots 7 To do another search Click the Picture Search icon...

Страница 95: ...rmation All Local HDD information HDD S M A R T Start recording Stop recording Delete expired record Figure 28 View log window To play back video from the system log 1 Click System Settings Log Search...

Страница 96: ...grid 3 Search Search the playback recording for motion detection 4 Exit Quit motion search mode and return to play back To search for motion in playback 1 In playback mode right click the mouse and cl...

Страница 97: ...peed changes until single frame 2 Press Enter to advance the video frame by frame 3 Press the Playback button to continue playback at normal speed Digital zoom in playback You can easily zoom in on an...

Страница 98: ...10BChapter 11 Playing back a recording 92 TruVision DVR 11 and DVR 11c User Manual...

Страница 99: ...on the front panel The DVR then downloads all the recorded files on the unit to fill the available memory space on the media This option is not available via the mouse Advanced Search window Use the...

Страница 100: ...backup device selected Figure 30 Example of an export window Item Function Description 1 Device name Select one of the storage media for archiving If the backup device is not recognized Click the Ref...

Страница 101: ...emote control Or Right click the mouse and select Advanced Search The Advanced Search window appears 3 Select the cameras and search parameters required 4 Click Search The list of results appears 5 Se...

Страница 102: ...dow appears Click No to exit and return to the search results window The clips are not saved 9 In the Export window select from the drop down list the backup device to be used 10 Click Start File down...

Страница 103: ...Create a new folder on the backup device Delete Delete a file or folder from the backup device Play Play the selected video file from the backup device Format Format the backup device Erase Erase file...

Страница 104: ...11BChapter 12 Archiving recorded files 98 TruVision DVR 11 and DVR 11c User Manual...

Страница 105: ...tings menu to configure the RS 232 parameters such as baud rate data bit stop bit parity flow control and usage Figure 31 RS 232 setup window There are three ways the RS 232 port can be used ProBridge...

Страница 106: ...ite at www interlogix com Or www utcfssecurityproductspages eu videoupgrades 2 Connect the USB device to the DVR 3 Click the System Settings icon in the menu toolbar 4 Select Upgrade Local Upgrade The...

Страница 107: ...e are not restored to factory default settings Viewing system information To view system information 1 Click the System Settings icon in the menu toolbar and select System Information 2 To view device...

Страница 108: ...wed and exported at any time Up to 2000 log files can be viewed at once Log files can also be exported onto a USB device The exported file is named according to the time it was exported For example 20...

Страница 109: ...information about a particular log entry select the entry and click or double click the log entry 5 If available you can also view the associated video to the selected log entry by clicking its play b...

Страница 110: ...12BChapter 13 DVR management 104 TruVision DVR 11 and DVR 11c User Manual...

Страница 111: ...mode and include the camera name time and date They also are included in recordings You can also adjust the transparency of the OSD relative to the background so that it is easier to read or is less p...

Страница 112: ...sking You can define an area on screen to remain hidden from view For example you can choose to block the view of a camera when overlooking residential premises This hidden area is referred to as priv...

Страница 113: ...d Outdoor However you can also manually adjust the brightness saturation contrast and hue values using the Customize option Adjustments to the settings affect both live view and recorded images Note T...

Страница 114: ...13BChapter 14 Camera settings 108 TruVision DVR 11 and DVR 11c User Manual...

Страница 115: ...f the system functions There can only be one administrator The user name is admin The name cannot be modified The default password is 1234 Operator The operator account includes reduced menu access to...

Страница 116: ...privileges below for the permission descriptions for each group Click Apply to save the settings and OK to return to the previous window 8 Click Back to return to live view Customizing a user s acces...

Страница 117: ...t Remote Shutdown Reboot Remotely shutdown or reboot the DVR Camera configuration settings By default all analog cameras are enabled for operators for each of these settings and none for guests Remote...

Страница 118: ...n be changed Only a system administrator can modify a user To modify a user 1 Click the User Management icon in the menu toolbar to display its window 2 Click the Edit button for the user whose access...

Страница 119: ...alled When using the DVR web browser interface you can install ActiveX controls to connect and view video using Internet Explorer To have complete functionality of the web browser interface and the DV...

Страница 120: ...r browser User ID admin Password 1234 The default values for DVR network settings are IP address 192 168 1 82 Subnet mask 255 255 255 0 Gateway address 192 168 1 1 Server port 8000 HTTP port 80 RTSP p...

Страница 121: ...video Play back video Search for event logs Configure settings Log out of the interface 3 Viewer View live or playback video 4 Display format Define how you want video to be displayed in the viewer M...

Страница 122: ...and playback video captured images and downloaded files Remote configuration Remote configuration lets you remotely configure the following DVR settings DVR information including device name number a...

Страница 123: ...s window shown Searching and playing back recorded video To search and play back recorded video click Playback on the menu bar to display the Playback page shown in Figure 34 below Figure 34 Browser p...

Страница 124: ...ble disable POS ATM text display in playback Snapshot Capture a snapshot of the video Video clips Start stop video clip during playback Sections of a recording can be saved to an external storage devi...

Страница 125: ...operational events Information Includes general information on the DVR actions such as the start and end of video recording etc To search for logs click Log on the menu bar select a log type specify a...

Страница 126: ...insertion via the UTC ProBridge accessory connected to the RS 232 port on the DVR This feature is currently only available using the browser Playback from the camera set up for text insertion will dis...

Страница 127: ...elect ProBridge 3 Select Text Insertion 4 Check Enable text insertion 5 Select the access device from the drop down list 6 Select the access mode Only ProBridge is listed 7 Under Start String enter th...

Страница 128: ...15BChapter 16 Using the web browser 122 TruVision DVR 11 and DVR 11c User Manual...

Страница 129: ...o audio output HDMI output 1 ch Resolution 1920 1080P 60 Hz 1600 1200 60 Hz 1280 1024 60 Hz 1280 720 60 Hz 1024 768 60 Hz VGA output 1 ch Resolution 1920 1080P 60 Hz 1600 1200 60 Hz 1280 1024 60 Hz 12...

Страница 130: ...work interface 1 RJ45 10M 100M Ethernet interface Serial interface 1 RS 232 interface for ProBridge Challenger Technical Support 1 RS 485 interface for PTZ control or KTD405 keyboard control USB inter...

Страница 131: ...dix B PTZ protocols Interlogix 485 PHILIPS Interlogix 422 PHILIPS 3 Kalatel SAE DSCP Samsung HIKVISION Siemens Honeywell SONY EVI D30 31 INFINOVA SONY EVI D70 KTD 348 SONY EVI D100 P LG MULTIX TECHWIN...

Страница 132: ...17BAppendix B PTZ protocols 126 TruVision DVR 11 and DVR 11c User Manual...

Страница 133: ...i or higher KTD 405U 2DU keypad firmware 1 4 00 Note XXX is represents the DVR storage configuration such as 1T 1 TB etc Wiring the keypad Connect the RS 485 bus of the KTD 405 I O box to the RS 485 p...

Страница 134: ...the cable provided with the equipment F I O box G DVR back panel TVR 11 shown See Connecting a KTD 405 keypad and dome camera to the on page 12 for information on how to connect both a keypad and dome...

Страница 135: ...w window by selecting System in the main menu Under Zone ID enter the zone ID value The default value is 1 Note The zone ID value must be identical for the DVR and keypad The DVR is now connected to t...

Страница 136: ...ard Operating the keypad You can navigate the DVR menus using the keypad buttons and joystick However not all maneuvers are available using the joystick See Table 22 on page 131 for the description of...

Страница 137: ...the menu tab More Settings 4 When in the desired menu window press and hold esc and then press the arrow buttons to navigate the cursor to the option Menu Timeout 5 Press to activate the dropdown men...

Страница 138: ...Sequence through multiview windows Move the joystick to the right next camera or the left previous camera Switch between monitor A and monitor B Press the mon button and button 1 to switch to monitor...

Страница 139: ...uirements see Configuring PTZ settings on page 73 Table 23 Default PTZ camera addresses by zone ID Camera input Zone ID of TVR 11 TVR 11c 1 2 3 4 5 6 7 8 9 10 11 12 13 14 15 16 1 0 32 64 96 128 160 19...

Страница 140: ...48 180 212 244 276 308 340 372 404 436 468 500 22 21 53 85 117 149 181 213 245 277 309 341 373 405 437 469 501 23 22 54 86 118 150 182 214 246 278 310 342 374 406 438 470 502 24 23 55 87 119 151 183 2...

Страница 141: ...tion and image quality do not impact time Note This information only applies when the bit rate is set to Constant see Initializing the recording settings on page 19 for more information Constant bit r...

Страница 142: ...19BAppendix D Maximum pre recording times 136 TruVision DVR 11 and DVR 11c User Manual Constant bit rate Maximum pre recording time seconds 1792 15 2048 15 3072 10 4096 5...

Страница 143: ...Y Y Honeywell Y Y Y Y N N N N N Y Y Y Y INFINOVA Y Y Y Y N N N N N Y Y Y Y KTD 348 Y Y Y Y N N N N N Y Y Y Y LG MULTIX Y Y Y Y N N N N N Y Y Y Y LILIN Y Y Y Y N N N N N Y Y Y Y PANASONIC_ CS850 Y Y Y...

Страница 144: ...N N Y N Y KALATEL Y Y N N N N N Y N Y DSCP Y Y N N N N N Y N Y HIKVISION Y Y N N Y Y Y Y Y Y Honeywell Y Y N N N N N N N N INFINOVA Y Y N N N N N Y N Y KTD 348 Y Y N N N N N Y N Y LG MULTIX Y Y N N N...

Страница 145: ...1920 1080 60HZ 1080P Password required Yes Scale output video Yes Enable wizard Yes More settings Monitor standard NTSC PAL Auto detect at booting Output mode Standard Monitor brightness 5 Event hint...

Страница 146: ...GMT 8 Date Format MM DD YYYY System date Current system date System time Current system time Auto DST Adjustment No Enable DST No From Apr 1st Sun 2 00 To Oct last Sun 2 00 DST bias 60 min Holiday Ho...

Страница 147: ...mera Analog 1 Enable privacy mask No Zone Null Tamper proof Tamper proof settings Camera Analog 1 Enable tamper proof No Rule Alarm schedule all day for whole week Rule Null Sencitivity Low Zone Null...

Страница 148: ...ty Medium V stream encoding Enable V stream No Frame rate 25 fps Max bit rate mode General Max bit rate Kbps 1792 More settings More settings Event priority Text In Motion Overwrite Yes Networking set...

Страница 149: ...Disable DDNS type ezDDNS Server address www tvr ddns net Host Name Null NAT Disable Nat server port 8000 0 Nat HTTP port 80 0 NTP NTP Enable NTP Disable Interval 60min NTP server time nist gov NTP Por...

Страница 150: ...r whole week Rule Null PTZ link Null Alarm Output Alarm Output Alarm output no All Alarm name Null Time out 5 s Rule All day for whole week Manual Alarm Trigger none Notification Notification HDD full...

Страница 151: ...ettings Null User settings User User management Admin 1234 Operator 4321 Guest Null Change password Null System settings RS 232 RS 232 setting Baud rate 115200 Date bit 8 Stop bit 1 Parity None Flow c...

Страница 152: ...21BAppendix F Default menu settings 146 TruVision DVR 11 and DVR 11c User Manual...

Страница 153: ...eo signals from analog cameras compress the signal and store it on its hard drives HDD Acronym for Hard Disk Drive A storage medium which stores digitally encoded data on platters with magnetic surfac...

Страница 154: ...Glossary 148 TruVision DVR 11 and DVR 11c User Manual...

Страница 155: ...2 Date configuring display 67 DDNS settings 37 Default menu settings 139 Default settings restore 100 Digital zoom description 64 Digital zoom in playback 91 DST 67 DVR address change 68 DVR name chan...

Страница 156: ...al set up 35 Network settings for browser 114 Network status 41 Network traffic checking 41 Notifications alarm types 27 external alarms 30 system event types 32 NTP server 38 O OSD settings 105 Overw...

Страница 157: ...yboard 56 Status icons enable disable display 68 System information view 101 System logs major and minor record types 88 playback 88 view 102 System notifications event types 32 T Tampering detecting...

Страница 158: ......

Отзывы: