background image

Intel

®

 Server System R1000WF Product Family System Integration and Service Guide


51 

3.7


Intel® SAS RAID Module Installation / Removal 

3.7.1


Intel® SAS RAID Module Installation 


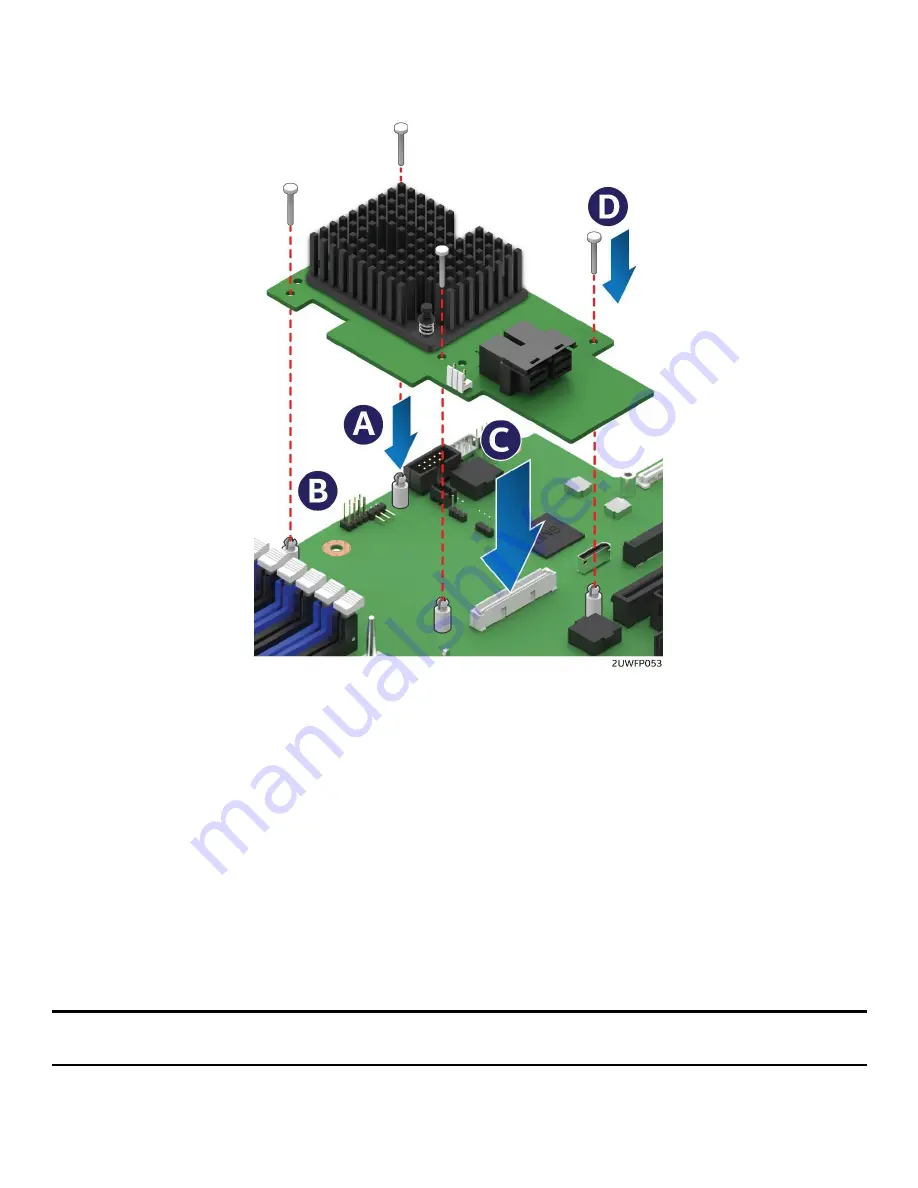
Figure 75. Intel® SAS RAID Module Installation 

1.


Insert the four barrel standoffs into the matching holes in the server board (see Letter ‘A’). 

2.


Align the module mounting holes over the four barrel standoffs (see Letter ‘B’). 

3.


Press down firmly until the module connector is fully engaged with the matching connector on the 
server board and the module is firmly seated over each barrel standoff (see Letter ‘C’). 

4.


Insert a locking pin into each barrel standoff and connect cables (see Letter ‘D’). 


3.7.2


Intel® SAS RAID Module Removal 

1.


Disconnect cables and remove the four locking pins from each barrel standoff. 

2.


Grasp the module near the front two barrel standoffs and pull up firmly until the front side of the 
module is clear of the standoffs. 

3.


Repeat step 2 to release the other side of the module. 


Note

: Remember to remove the four plastic barrel standoffs when replacing the server board. 


Содержание R1000WF Series

Страница 1: ...ct Family System Integration and Service Guide A guide providing instructions for the insertion and extraction of system components and available Intel accessories and spares Revision 1 1 August 2017 Intel Server Products and Solutions ...

Страница 2: ...Intel Server System R1000WF Product Family System Integration and Service Guide Blank Page ...

Страница 3: ...Document Revision History Date Revision Number Modifications July 2017 1 0 Production Release August 2017 1 1 Figure 13 modification ...

Страница 4: ... trade The products and services described may contain defects or errors known as errata which may cause deviations from published specifications Current characterized errata are available on request You may not use or facilitate the use of this document in connection with any infringement or other legal analysis concerning Intel products described herein You agree to grant Intel a non exclusive r...

Страница 5: ...l com support motherboards server sb cs 010770 htm Consignes de sécurité Lisez attention toutes les consignes de sécurité et les mises en garde indiquées dans ce document avant de suivre toute instruction Consultez Intel Server Boards and Server Chassis Safety Information sur le site http www intel com support motherboards server sb cs 010770 htm Instrucciones de seguridad importantes Lea todas la...

Страница 6: ...liers to remove or install a jumper grip the narrow sides of the jumper with the pliers never the wide sides Gripping the wide sides can damage the contacts inside the jumper causing intermittent problems with the function controlled by that jumper Take care to grip with but not squeeze the pliers or other tool you use to remove a jumper or you may bend or break the pins on the board Slide Rail mo...

Страница 7: ...ver board and other major components are pre installed in the system Chapter 2 Essential System Component Integration and Service provides instructions for adding essential system components required to complete the integration of the server system This includes installation of Processors Memory Add in Cards and hot swap storage devices Chapter 3 Options and Accessory Kit Integration and Service p...

Страница 8: ...erver Configurator Tool For system power budget guidance Intel Server Board S2600WF Product Family Power Budget Tool and Thermal Configuration Guide For system firmware updates onboard device drivers and software to manage your Intel Server System http downloadcenter intel com For a complete list of supported processors memory add in cards and peripherals Intel Online Server Configurator Tool The ...

Страница 9: ... 2 6 4 3 5 HDD SSD Drive Assembly Intel Server R1304WFxxx 30 2 6 5 2 5 SSD into a 3 5 Drive Carrier Assembly Intel Server R1304WFxxx 31 2 7 RISER CARD BRACKET ASSEMBLY REMOVAL INTEGRATION INSTALLATION 34 2 7 1 Riser Card Bracket Removal 34 2 7 2 PCIe Add in Card Installation 34 2 7 3 Riser Card Bracket Installation 35 2 8 PCIE NVME SSD SUPPORT R1208WFXXX ONLY 36 2 8 1 Onboard PCIe OCuLink Connecto...

Страница 10: ...RE UPDATES AND CONFIGURATION 60 4 1 UPDATING THE SYSTEM SOFTWARE STACK 60 4 2 USING THE BIOS SETUP UTILITY 60 4 2 1 Entering BIOS Setup 60 4 2 2 No Access to the BIOS Setup Utility 60 4 2 3 Navigating the BIOS Setup Utility 61 5 SYSTEM PACKAGING ASSEMBLY 63 5 1 ACCESSORY KIT 63 6 SYSTEM SERVICE SYSTEM FEATURES OVERVIEW 70 6 1 SYSTEM FEATURE REFERENCE DIAGRAMS 70 6 1 1 Front Drive Bay Options 71 6 ...

Страница 11: ...7 6 1 Server Board Removal 87 7 6 2 Server Board Installation 89 APPENDIX A GETTING HELP 90 APPENDIX B SYSTEM CABLE ROUTING DIAGRAMS 91 APPENDIX C SYSTEM STATUS LED OPERATING STATES AND DEFINITION 93 APPENDIX D POST CODE DIAGNOSTIC LED DECODER TABLE 95 APPENDIX E POST CODE ERRORS 102 ...

Страница 12: ...NT I O INTERNAL CABLE CONNECTIONS 9 FIGURE 16 AIR DUCT SIDE WALL AND SUPPORT BRACKET INSTALLATION 10 FIGURE 17 POWER SUPPLY AND POWER SUPPLY BAY FILLER INSTALLATION 11 FIGURE 18 INTERNAL CABLE ROUTING 13 FIGURE 19 SYSTEM COVER REMOVAL 14 FIGURE 20 SYSTEM COVER INSTALLATION 14 FIGURE 21 AIR DUCT REMOVAL 15 FIGURE 22 AIR DUCT INSTALLATION 15 FIGURE 23 PROCESSOR HEAT SINK MODULE PHM REFERENCE DIAGRAM...

Страница 13: ...OVAL 32 FIGURE 53 3 5 DRIVE CARRIER TO 2 5 SSD BRACKET MOUNT SSD TO BRACKET 32 FIGURE 54 3 5 DRIVE CARRIER TO 2 5 SSD BRACKET MOUNT BRACKET ASSEMBLY TO CARRIER 33 FIGURE 55 3 5 DRIVE CARRIER TO 2 5 SSD BRACKET SECURE SSD TO CARRIER 33 FIGURE 56 PCI RISER ASSEMBLY REMOVAL 34 FIGURE 57 PCI ADD IN CARD INSTALLATION 34 FIGURE 58 RISER CARD BRACKET INSTALLATION 35 FIGURE 59 ONBOARD PCIE OCULINK CONNECT...

Страница 14: ...IVE CONFIGURATION INTEL SERVER SYSTEM R1208WFXXXX 71 FIGURE 89 CONTROL PANEL FEATURES 71 FIGURE 90 FRONT I O PANEL FEATURES 71 FIGURE 91 BACK PANEL FEATURES 72 FIGURE 92 SERVER BOARD FEATURE IDENTIFICATION 72 FIGURE 93 INTEL LIGHT GUIDED DIAGNOSTIC LEDS SERVER BOARD 73 FIGURE 94 DIMM FAULT LEDS 74 FIGURE 95 SYSTEM FAN CONNECTIONS 74 FIGURE 96 SYSTEM CONFIGURATION AND RECOVERY JUMPERS 75 FIGURE 97 ...

Страница 15: ...ITY SOFTWARE VI TABLE 3 BIOS SETUP KEYBOARD COMMAND BAR 61 TABLE 4 SYSTEM STATUS LED STATE DEFINITIONS 93 TABLE 5 POST PROGRESS CODE LED EXAMPLE 95 TABLE 6 MRC PROGRESS CODES 96 TABLE 7 MRC FATAL ERROR CODES 97 TABLE 8 POST PROGRESS CODES 98 TABLE 9 POST ERROR CODES AND MESSAGES 102 TABLE 10 POST ERROR BEEP CODES 108 TABLE 11 INTEGRATED BMC BEEP CODES 109 ...

Страница 16: ......

Страница 17: ...essor s Intel Xeon processor Scalable family Memory DDR4 DIMMs Appropriate Power Cable s Storage Devices HDDs SSDs M 2 PCIe Add in Cards Optional Server System Accessories Reference the Intel Server S2600WF Product Family Configuration Guide for a complete list of available accessories and spares Before You Begin Before working with your server product observe the safety and ESD precautions found ...

Страница 18: ... R1000WF Product Family System Integration and Service Guide 2 1 1 Chassis Identification Figure 1 Intel Server Chassis R1304WFxxx 4 x 3 5 Front Drive Bay 1 1 1 Chassis Component Identification Figure 2 Chassis Components ...

Страница 19: ...cket spacers See Chapter 2 for usage The following components will be found inside the chassis Each should be removed Clear plastic air duct See Chapter 2 for usage A box with two processor heat sinks See Chapter 2 for usage Two riser card brackets See Chapter 2 for usage Two 3 fan system fan assemblies 1 Remove the System Cover Note A non skid surface or a stop behind the server system may be nee...

Страница 20: ...on each side and pulling straight up away from the chassis mounting pins see Letter A 1 3 System Assembly Note on System Integration It is highly recommended that the system integration process defined in the following sections within this chapter be performed in the order specified Following these instructions will result in the proper installation of critical system components and provide recomm...

Страница 21: ...c Holding the server board by its edges carefully lower the server board into the chassis so that the rear I O connectors of the server board align with and are fully seated into the matching holes on the chassis back panel and each server board mounting hole is aligned with a threaded chassis standoff d The server board is accurately placed when the two screw holes nearest the front edge of the s...

Страница 22: ...S SATA Data cable along the base of the backplane and underneath the backplane power connector before bending the cable up along the right chassis sidewall towards the back of the system Figure 7 Backplane Power Cable and SAS SATA Data Cable Attachments d For on board SATA support attach the P2 angled connector end of the SAS SATA data cable to one of the on board Mini SAS HD connectors see follow...

Страница 23: ...ng the right chassis sidewall to the area behind the power supply bay and connect the 2x6 pin cable connector labeled SVRBRD to the matching 2x6 white power connector on the server board silk screened HSBP PWR Note Once the cable is attached on both ends carefully press the cable as low as possible into the cable routing channel 3 Install the system fan modules Figure 10 System Fan Assembly Instal...

Страница 24: ...econd system fan module Figure 11 Connect System Fan Cables d Attach each fan cable to the matching 10 pin fan connector on the front edge of the server board 4 Install the Backplane I2C cable Figure 12 Hot Swap Backplane I2C Cable a Locate the backplane I2 C cable Figure 13 Hot Swap Backplane I2C Internal Cable Connection b Attach the cable connector labeled HSBP to the white connector silk scree...

Страница 25: ...BP I2C on the server board 5 Connect the Front Panel Cables As received the chassis should have three cables pre attached on one end of each cable to the system front panel The other end of each cable must be attached to matching connectors on the server board The cables should be routed to the server board in the following order 1 Front Control Panel 2 Front Panel Video and 3 Front Panel USB Port...

Страница 26: ...e Walls and Chassis Support Bracket The air duct sidewalls and chassis support bracket MUST be installed and fastened down in a specific order Do not deviate from the provided instructions Figure 16 Air Duct Side Wall and Support Bracket Installation a Locate the two black plastic air duct sidewalls b Following the illustration above place the left and right air duct sidewalls onto each side of th...

Страница 27: ...oard labeled FP USB 2 0 3 0 Push the cable down as far as possible into the cable routing channel 1 3 1 Power Supply Module Installation The server system can support 1 or 2 power supply modules 1 Install the Power Supply Module s Figure 17 Power Supply and Power Supply Bay Filler Installation a Insert the 1st power supply into the left most power supply bay until it clicks and locks into place Se...

Страница 28: ...safety and ESD precautions found in the Warnings section at the beginning of this manual Tools and Supplies Needed T 30 Torx screwdriver Flat head screwdriver Phillips cross head screwdriver 1 and 2 bits Adequate ESD protective gear wrist strap ESD mat System Reference All references to left right front top and bottom assume the reader is facing the front of the chassis Instruction Format Each pro...

Страница 29: ... Channels All cables should be routed using the cable channels along each chassis sidewall as shown in the following illustration When routing cables front to back none should be routed through the center of the system or in the area between the system fans and the DIMMs slots Figure 18 Internal Cable Routing ...

Страница 30: ...river may be needed to loosen the system cover thumb screws Figure 19 System Cover Removal 1 Loosen the two captive thumb screws located on the back edge of the system cover See Letter A 2 Slide cover back and lift upward see Letter B 2 2 2 System Cover Installation Figure 20 System Cover Installation 1 Place the system cover onto the chassis and slide forward until the front edge of the system co...

Страница 31: ...n place The air duct is required for proper airflow within the server system 2 3 1 Air Duct Removal Figure 21 Air Duct Removal 2 3 2 Air Duct Installation Figure 22 Air Duct Installation Position the air duct behind the system fans and over the processors and memory and carefully lower it into place If placed correctly the air duct should sit flat and securely in place ...

Страница 32: ... Diagram To properly assemble the PHM and install it to the server board the procedures described in the following sections must be followed in the order specified These instructions assume that all the PHM components are new and the Thermal Interface Material TIM is already applied to the bottom of the heat sink Note Intel Server Systems include two processor carrier clips to support standard Int...

Страница 33: ...ide up on to a flat surface as shown Figure 25 PHM Assembly Heat Sink Orientation 3 If present carefully remove the plastic protective cover from the bottom side of the processor to expose the Thermal Interface Material TIM 4 Locate the processor clip and place it on to a flat non skid surface with corner latch pins facing down 5 Carefully remove the processor from its packaging A processor should...

Страница 34: ... Assembly 7 Install the processor into the processor clip until it snaps into place CAUTION To prevent the processor from falling out of the clip the processor clip assembly should only be grasped by its shorter edges CAUTION Do not touch the sensitive contacts on the bottom side of the processor at any time during PHM assembly or installation In addition the pins inside the processor socket are e...

Страница 35: ...four corners are secure Processor clip sub assembly should sit flat on top of the heat sink 2 4 2 Processor Installation Intel server systems support the installation of 1 or 2 processors For the server to be operational CPU 1 must be installed The installation of CPU 2 is optional however to ensure proper airflow when the server system is operational the CPU 2 heat sink must be installed at all t...

Страница 36: ...r should be saved for future use CAUTION When re installing the socket cover make sure it properly snaps into place Improper installation will cause it to become loose and damage the processor socket The assembled PHM and the processor socket include several alignment features to ensure the PHM can only be installed one way Care should be taken to ensure components are accurately assembled and the...

Страница 37: ...re 3 Lower the PHM onto the processor socket assembly CAUTION Processor socket pins are delicate and bend easily Use extreme care when placing the PHM onto the processor socket do not drop it The PHM assembly is properly installed when seated flat and evenly upon the processor socket assembly Figure 33 Correct PHM Placement NOTE The PHM is NOT installed properly if it does not sit level with the p...

Страница 38: ...e to the processor socket assembly Each heat sink screw should be fully tightened to 12 in lb torque before securing the next screw in the sequence 5 For a second procesor repeat the processor installation instructions above ensuring the proper processor heatsink and processor carrier clip are used for the installation For single processor configurations where a 2nd processor is not configured ins...

Страница 39: ...cause damage Figure 35 Uninstalling the PHM Using a T30 Torx bit screwdriver loosen each heat sink fastener in the sequence shown on the label located on the top of the heat sink see Letter A Lift the PHM straight up from the server board until it is free from the processor socket bolster plate guide pins see Letter B Note to prevent possible damage to the processor socket re install the original ...

Страница 40: ... sink and the processor is broken Unlatch the hooks on each corner of the processor carrier clip to free the processor carrier from the heat sink Figure 38 Releasing the Processor Carrier Clip from the Heat Sink Carefully lift the processor sub assembly from the heat sink Remove the processor from the processor clip by carefully pushing back one of the latches located on the ends of the processor ...

Страница 41: ...as 1 and 2 On the server board each memory module slot is identified by Processor Channel Identifier and DIMM Slot Examples CPU1_DIMM_A1 CPU1_DIMM_A2 CPU2_DIMM_A1 etc BLUE Memory Slots identify DIMM 1 for each memory channel To maintain required air flow within the system certain memory slots MUST be populated with a DIMM or supplied DIMM blank DIMM blanks should only be removed when installing a ...

Страница 42: ...urations DIMMs should be populated to DIMM Slots 1 and 2 of Channels A B D and E o 9 DIMM 10 DIMM and 11 DIMM Configurations NOT Recommended These are an unbalanced configurations which will yield less than optimal performance o 12 DIMM Configurations DIMMs are populated to ALL DIMM Slots Note DIMM populations noted as Not Recommended are fully functional configurations However they will not yield...

Страница 43: ...e that the retaining clips of adjacent slots are closed 2 Open the DIMM slot latches at either end of the selected DIMM socket see Letter A in Figure 43 Memory Removal The DIMM will lift up from the socket connectors 3 Holding the DIMM by its edges lift it away from the socket see Letter B Figure 43 Memory Removal For DIMM installation see section 2 5 1 ...

Страница 44: ...ch drive carrier must have installed a hard disk drive HDD Solid State Device SSD or a supplied drive blank 2 6 1 Drive Carrier Extraction Figure 44 Extracting Drive Carrier from Chassis 1 Remove the drive carrier from the chassis by first pressing the button on the carrier face plate to release the lever see Letter A 2 Using the lever pull the carrier from the drive bay see Letter B 2 6 2 Drive C...

Страница 45: ...me pushing the drive or drive blank up from the bottom as shown above Figure 47 2 5 Drive Carrier Assembly Drive Installation to Carrier 2 With the rear drive connector positioned towards the back of the drive carrier align and position the mounting holes on one side of the drive over the mounting tabs located on the drive carrier side rail See letter A 3 Lower the other side of the drive into the...

Страница 46: ... prior to installation Failure to properly install a drive blank may result with the carrier assembly not fitting properly in to the chassis drive bay 2 6 4 3 5 HDD SSD Drive Assembly Intel Server R1304WFxxx Figure 49 3 5 Drive Carrier Assembly Drive Drive Blank Removal 1 Remove the drive or drive blank from the carrier by holding the carrier assembly top side down in your right hand Using your le...

Страница 47: ... side rail See letter A 3 Lower the other side of the drive into the carrier and press down until all mounting tabs lock in place 2 6 5 2 5 SSD into a 3 5 Drive Carrier Assembly Intel Server R1304WFxxx The 3 5 drive blank can be used as a 2 5 SSD bracket Note Due to degraded performance and reliability concerns the use of the 3 5 drive blank as a 2 5 drive bracket is intended to support SSD type s...

Страница 48: ... pushing the drive blank down away from the carrier see Letter B Figure 52 3 5 Drive Carrier to 2 5 SSD Bracket Tab Removal 2 Break off the small side tab from the side of the drive blank making the drive blank into a 2 5 drive bracket see Letter C Note Once the side tab is removed it cannot be re attached to the drive blank Figure 53 3 5 Drive Carrier to 2 5 SSD Bracket Mount SSD to Bracket 3 Mou...

Страница 49: ...ctor positioned towards the back of the drive carrier align and position the mounting holes on the left side of the drive bracket over the mounting tabs located on the drive carrier side rail See letter E 5 Lower the other side of the drive into the carrier and press down until all mounting tabs lock in place See letter F 6 Turn the drive assembly over Figure 55 3 5 Drive Carrier to 2 5 SSD Bracke...

Страница 50: ...al Figure 56 PCI Riser Assembly Removal Disconnect all cables attached to any add in cards Grasp the riser assembly with and carefully pull straight up to remove it from the system 2 7 2 PCIe Add in Card Installation Figure 57 PCI Add In Card Installation 1 Remove the PCI riser assembly from the system see Section Error Reference source not found 2 Remove the filler panel from the add in card slot...

Страница 51: ... card assembly into the system Figure 58 Riser Card Bracket Installation 1 Position the riser card s edge connector over the riser slot on the server board and align the two hooks on the back edge of the riser assembly with the slots on the back of the chassis 2 Once aligned press the riser assembly straight down into the riser slot Note Do not rock the riser assembly into place doing so may damag...

Страница 52: ...and communicate NVMe drive population rules and mixed drive support limits when an optional Intel VROC accessory key is installed to provide support for NVMe RAID and drive management features 2 8 1 Onboard PCIe OCuLink Connector Cabling 1 Locate the appropriate PCIe Data cables sold separately Note for cleanest cable routing the appropriate cable should be routed between the matching IDed PCIe_SS...

Страница 53: ...rver System R1208WFxxxxx Intel Accessory AXXP3SWX08040 4 port PCIe Switch Add in Card Intel Accessory TBD 4 port PCIe Data Cable 1 Remove the Riser Card 2 assembly from the system 2 Install the PCIe Switch card in to the add in slot on the riser card See section 2 7 2 3 Install the 5 pin connector of the PEM cable to the matching 5 pin connector on the PCIe Switch card 4 Attach all four 4 OCuLink ...

Страница 54: ...hite 4 pin key connector above the CR2032 battery on the back edge of the server board 3 To install the key place it over the connector and confirm the orientation of the key matches that of the connector 4 Press the key down onto the connector 2 8 4 Removing the Intel VROC Upgrade Key 1 Power off the system and disconnect the power cable s 2 Remove the system cover see Section 2 2 1 3 Using the k...

Страница 55: ...ote The use of one or more OCuLink connectors on the server board to the backplane is considered a single source Figure 62 Backplane Cabling from Two PCIe Sources When cabling the backplane from two different PCIe sources no other drive set combinations beyond those defined above are supported Drive population rules will differ depending on the source of the PCIe interface to the backplane In addi...

Страница 56: ...ed in the first drive connector of the given pair drives 0 and 2 Combining an NVMe drive with a SAS SATA drive within a defined drive pair is NOT supported Example With an NVMe drive installed to drive connector 0 drive connector 1 cannot be populated with a SAS SATA drive The same rule applies to ALL other drive pairs on the backplane When an Intel VROC key is installed to the server board the fo...

Страница 57: ...ulated in the first drive connector of the given set drive connector 4 Additional NVMe drives within the drive set must be populated in sequential order with no gaps between drive connectors Combining NVMe drives and SAS SATA drives within the defined drive set is NOT supported When an Intel VROC key is installed to the server board the following illustrations identify supported and unsupported X ...

Страница 58: ...1000WF Product Family System Integration and Service Guide 42 Where 1st Drive drive connectors 4 on the backplane NVMe not in 1st drive and Mixing of NVMe and SAS within a common drive set is not supported SAS Only no NVMe ...

Страница 59: ...nd in the Warnings section at the beginning of this manual Tools and Supplies Needed Anti static wrist strap and conductive foam pad recommended Phillips cross head screwdriver 2 bit System Reference All references to left right front top and bottom assume the reader is facing the front of the chassis Internal Cable Routing See section 2 1 Internal Cable Routing Instruction Format Each procedure d...

Страница 60: ...ce 3 1 2 Power Supply Module Removal CAUTION The power supply is only hot swappable system does not have to be powered off if the system is configured with two power supply modules operating in a 1 1 redundant configuration only Systems with a single power supply installed or a system operating in a 2 0 non redundant power mode must be powered off before removing the power supply module from the s...

Страница 61: ...eptacle on the back of the power supply module see Letter A Figure 66 Power Cord Plugging 3 While pushing up the locking tab on the bottom of the slider adjust the slider to the desired position see Letter B 4 Install the power cord into the power cord receptacle on the back side of the power supply see Letter C 5 Pull the slider strap over the power cord and lock it securely into place see Letter...

Страница 62: ...g 2 Locate the white 4 pin key connector above the CR2032 battery on the back edge of the server board 3 To install the key place it over the connector and confirm the orientation of the key matches that of the connector 4 Press the key down onto the connector 3 2 2 Removing the ESRT2 SATA RAID 5 Upgrade Key 1 Power off the system and disconnect the power cable s 2 Remove the system cover see Sect...

Страница 63: ...ckaging 2 Locate the Intel RMM4 Lite connector on the server board next to the front panel USB 2 0 connector 3 Place the Intel RMM4 Lite key over the connector and match the orientation of the key to that of the connector 4 Press the key down onto the connector 3 3 2 Intel RMM4 Lite Key Removal 1 Power off the system and disconnect the power cable s 2 Remove the system cover see section 2 2 1 3 Ca...

Страница 64: ...the orientation and press the key down onto the connector see Better B 4 Secure the TPM module to the stand off with the fastener screw see Letter C Note TPM module comes with two screws in kit one Philips head version and one tamper proof version 3 5 M 2 Storage SSD Installation Removal The Intel Server Board S2600WF product family includes two M 2 SSD connectors labeled M2_x4PCIE sSATA_1 and M2_...

Страница 65: ...e preintalled screw see Letter B 2 Insert the drive into the M 2 socket see Letter A 3 While holding down the M 2 drive secure it with the previously removed screw see Letter B Note Not holding down the loose end of the M 2 while installing the screw will cause the board to spring up and make installing the screw difficult 3 5 2 M 2 Storage SSD Removal Figure 72 Removing M 2 Device 1 Remove the sc...

Страница 66: ...o damage the I O shield material when placing the OCP module into the back panel cut out see Letter A 3 Carefully press down on the module to engage the connectors 4 Secure the module with four screws as shown see Letter B 3 6 2 OCP Expansion Module Removal Figure 74 Removing an OCP Expansion Module 1 Power off the server and detach the power cable s 2 Detach all cables from the OCPModule 3 Remove...

Страница 67: ... connector is fully engaged with the matching connector on the server board and the module is firmly seated over each barrel standoff see Letter C 4 Insert a locking pin into each barrel standoff and connect cables see Letter D 3 7 2 Intel SAS RAID Module Removal 1 Disconnect cables and remove the four locking pins from each barrel standoff 2 Grasp the module near the front two barrel standoffs an...

Страница 68: ...le Intel RAID Maintenance Free Backup Unit RMFBU Installation 1 The RMFBU mounting plate is located in between the two system fan module assemblies Align the tabs on the bottom side of the RMFBU assembly with the mounting holes in the mounting plate see Letter A 2 Slide the RMFBU assembly left until the tabs engage with the mounting holes in the mounting plate see Letter B 3 Using one of the desig...

Страница 69: ...de AWTAUXBBUBKT The kit can be applied for RMFBU mountings in both 1U and 2U server system For the 1U chassis only the plastic dual RMFBU housing and small mounting plate are needed from the kit 3 9 1 Dual Intel RAID Maintenance Free Backup Unit RMFBU Assembly Installation Figure 78 AWTAUXBBUBKT 1U RMFBU Mounting Plate Installation 1 Place the new RMFBU mounting plate into the chassis making sure ...

Страница 70: ...e housing see Letter C and then push the other end down until it sits securly into place Figure 81 Dual RMFBU Assembly Installation 6 Position the Dual RMFBU assembly onto the RMFBU mounting plate located in between the two system fan module assemblies see Letter D and slide right until the assembly locks into place see Letter E 7 Using the designated cable routing channels see Figure 18 route eac...

Страница 71: ...it disengages from the mounting plate see Letter B 4 Lift the RMFBU up and away from the mounting plate 3 10 Intel Omni Path IFT Carrier Accessory Kit Installation The Intel Server System R1000WF product family has support for 1 or 2 Intel Xeon processor Scalable family SKUs that include an Intel Omni path Host Fabric Interface HFI connector In support of these processor SKUs one of two available ...

Страница 72: ...tions 1 Install Fabric processor s on to the server board See Section 2 9 for fabric processor installation instructions 2 Install the internal Omni path sideband cable to the matching connector on the IFT Carrier mezzanine card See letter A 3 Install the internal HFI cable to Port 1 of the IFT Carrier mezzanine card See letter B 4 Optional For dual Fabric processor configurations Install the seco...

Страница 73: ...lacing the card into the back panel cut out 8 Secure the IFT Carrier card with four screws as shown see Letter B 9 Route the HFI cable attached to Port 1 of the IFT Carrier Card to CPU 1 Figure 83 Fabric Processor Cable Installation 10 Place the HFI cable processor connector within the connector rails on the processor socket and slide processor and cable connectors together See Letter A 11 Pull th...

Страница 74: ...sor installation instructions 2 Install the internal Omni path sideband cable to the matching connector on the IFT Carrier mezzanine card See letter A 3 Install the internal HFI cable to Port 1 of the IFT Carrier mezzanine card See letter B 4 Optional For dual Fabric processor configurations Install the second internal HFI cable to Port 2 of the IFT Carrier mezzanine card See letter C 5 Remove the...

Страница 75: ... cable connectors together See Letter A 8 Pull the bail wire back until the cable is securely locked in place See Letter B 9 Repeat Steps 8 thru 10 for the second internal HFI cable if present 10 Connect the Omni path sideband cable from the IFT Carrier card to the two sideband signal connectors on the server board at the locations shown above Place and Insert Cable Lock Cable A B Omni path Sideba...

Страница 76: ...igate the embedded F2 BIOS Setup utility This utility can be used to view and configure system settings that determine how the server operates 4 2 1 Entering BIOS Setup To enter the BIOS Setup using a keyboard or emulated keyboard press the F2 function key during boot time when the OEM or Intel Logo Screen or the POST Diagnostic Screen is displayed Note At initial system power on a USB Keyboard wi...

Страница 77: ...nu the exit confirmation window is displayed and the user is asked whether changes can be discarded If No is selected and the Enter key is pressed or if the Esc key is pressed the user is returned to where they were before Esc was pressed without affecting any existing settings If Yes is selected and the Enter key is pressed the setup is exited and the BIOS returns to the main System Options Menu ...

Страница 78: ... Enter is pressed or if the Esc key is pressed the user is returned to where they were before F9 was pressed without affecting any existing field values F10 Save and Exit Pressing the F10 key causes the following message to display Save configuration and reset Yes No If Yes is highlighted and Enter is pressed all changes are saved and the Setup is exited If No is highlighted and Enter is pressed o...

Страница 79: ... of the original packaging material must be used including both boxes and each inner packaging component In addition all inner packaging components MUST be reinstalled in the proper location to ensure adequate protection of the system for subsequent shipment Note The design of the inner packaging components does not prevent improper placement within the packaging assembly There is only one correct...

Страница 80: ...bly Instructions Figure 85 Package Assembly Reference Diagram 1 Place four foam inserts into the inner box as shown noting foam insert orientation 2 Place the Accessory Kit box between the end foam insert and the end wall of the inner box as shown System FRONT System BACK System RIGHT Side System LEFT Side ...

Страница 81: ... 65 3 Place the two side wall foam inserts 4 Place three corrugated double wall cardboard pads on top of the two bottom foam inserts as shown 5 Carefully place the system into the shipping bag and tape the bag shut 6 Carefully lower the system into the inner shipping box as shown ...

Страница 82: ... Server System R1000WF Product Family System Integration and Service Guide 66 7 Place the accesory box next to the foam insert located in the back of the box 8 Place foam insert in front of the accessory box ...

Страница 83: ...ily System Integration and Service Guide 67 9 At the front of the system between the front foam insert and system front panel place the foam insert labeled J36266 001 10 Place four corrugated double wall cardboard panels on top of the system ...

Страница 84: ...rvice Guide 68 11 Place the two remaining foam inserts on top of the cardboard panels in the positions shown 12 Fold the top flaps of the inner box closed end flaps first followed by side flaps Note By design the two side flaps will not meet Do not tape side flaps shut ...

Страница 85: ...WF Product Family System Integration and Service Guide 69 13 Fold the top flaps of the outer box end flaps first followed by the side flaps 14 Tape the outer box using an H pattern across the center first followed by both ends ...

Страница 86: ...the following Intel documents which can be downloaded from the following Intel web site http www intel com support Intel Server System R1000WF Technical Product Specification Intel Server Board S2600WF Technical Product Specification 6 1 System Feature Reference Diagrams This section provides a high level overview of the Intel Server System R1000WF product family It provides illustrations and diag...

Страница 87: ...Bay Options Figure 87 3 5 Drive Bay 4 Drive Configuration Intel Server System R1304WFxxxx Figure 88 2 5 Drive Bay 8 Drive Configuration Intel Server System R1208WFxxxx 6 1 2 Control Panel Features Figure 89 Control Panel Features 6 1 3 Front I O Features Figure 90 Front I O Panel Features Video USB 3 0 ...

Страница 88: ...e 72 6 1 4 Back Panel Features Figure 91 Back Panel Features 6 1 5 Server Board Features Figure 92 Server Board Feature Identification Power Supply 1 Power Supply 2 NIC 1 NIC 2 S2600WFT Only Video Serial A RJ45 3 x USB 3 0 Management Port OCP Module Bay PCIe Riser 1 PCIe Riser 2 ...

Страница 89: ...Intel Server System R1000WF Product Family System Integration and Service Guide 73 Figure 93 Intel Light Guided Diagnostic LEDs Server Board ...

Страница 90: ...Intel Server System R1000WF Product Family System Integration and Service Guide 74 Figure 94 DIMM Fault LEDs Figure 95 System Fan Connections ...

Страница 91: ...Power down the server and unplug the power cord s 2 Remove the system top cover and move the BIOS DFLT jumper from pins 1 2 default to pins 2 3 Set BIOS Defaults 3 Wait 5 seconds then move the jumper back to pins 1 2 4 Re install the system top cover 5 Re Install system power cords Note The system will automatically power on after AC is applied to the system 6 During POST access the F2 BIOS Setup ...

Страница 92: ...e the Password Clear jumper back to pins 1 2 default 9 Re install the system top cover and reattach the AC power cords 10 Power up the server 11 Strongly recommended Boot into F2 BIOS Setup immediately go to the Security tab and set the Administrator and User passwords if you intend to use BIOS password protection 6 2 3 Management Engine ME Firmware Force Update Jumper Block When the ME Firmware F...

Страница 93: ... Update the BMC firmware using the following command FWPIAUPD u bin ni b o pia if usb file name BIN 10 When the update has successfully completed power off the system 11 Remove the AC power cords 12 Remove the system top cover 13 Move the BMC FRC UPD jumper back to pins 1 2 default 14 Re attach the AC power cords 15 Power on system 16 Boot to the EFI shell 17 Change directories to the folder conta...

Страница 94: ...e instructions provided with the system update package 8 After the BIOS update has successfully completed power off the system For safety remove the AC power cords from the system 9 Remove the system top cover 10 Move the BIOS Recovery jumper back to pins 1 2 default 11 Re install the system top cover and re attach the AC power cords 12 Power on the system and access the F2 BIOS Setup utility 13 C...

Страница 95: ... disconnected from the server system Before You Begin Before working with your server product observe the safety and ESD precautions found in the Warnings section at the beginning of this manual Tools and Supplies Needed Anti static wrist strap and conductive foam pad recommended Phillips cross head screwdriver 2 bit Flat Head screwdriver T30 Torx bit screwdriver System Reference All references to...

Страница 96: ...Power off the system and remove the system top cover see section 2 2 1 2 Disconnect the cable of the target fan Note disconnecting the cables from the remaining fans in the fan assembly is not required Figure 97 System Fan Assembly Removal 3 Lift the system fan assembly up and away from the chassis 4 From the bottom of the fan assembly push out the target fan see Letter A 5 Locate the replacement ...

Страница 97: ... is located on the side closest to the server board See Letter B 7 Align the fan module assembly mounting holes with pins on the chassis base and push down until firmly seated Ensure that no fan cables are trapped beneath the fan module assembly Figure 98 Connect System Fan Cables 8 Attach the fan cable to the fan connector on the server board 9 Ensure that all fan cables are securely connected ...

Страница 98: ...rikat og type Levér det brugte batteri tilbage til leverandøren Advarsel Lithiumbatteri Eksplosjonsfare Ved utskifting benyttes kun batteri som anbefalt av apparatfabrikanten Brukt batteri returneres apparatleverandøren Varning Explosionsfara vid felaktigt batteribyte Använd samma batterityp eller en ekvivalent typ som rekommenderas av apparattillverkaren Kassera använt batteri enligt fabrikantens...

Страница 99: ...a rack or cabinet Note The system should never be carried solely by the rack handles Intel recommends carrying the system using two people or to use a cart when moving the system from one location to another 7 3 1 Installing the Rack Handles Figure 100 Installing the Rack Handle 1 Locate the rack handles 2 Align the rack handle with the two holes on the side of the server system 3 Attach the rack ...

Страница 100: ... and remove the system top cover see Section 2 2 1 2 Remove all hot swap drive carriers regardless of whether a drive is installed in the carrier 3 Disconnect all cables from the backplane 4 Remove all fastener screws securing the backplane to drive bay see Letter A 5 Slide the backplane up from the bottom of the chassis see Letter B 6 Remove the backplane from the server chassis see Letter C ...

Страница 101: ...1U backplane 2 Hold the backplane only by the edges Do not push or pull on any components on the backplane Position the backplane to the server system guides at the front of the server system see Letter A 3 Slide the backplane down to lock it into place see Letter B 4 Secure the backplane with the fastener screws as shown see Letter C 5 Reinstall the hot swap drive carriers ...

Страница 102: ...ee Section 2 2 1 3 Remove the air duct see Section 2 3 1 4 Remove the right system fan module assembly see Section 7 1 5 From the server board disconnect the 30 pin front panel cable 6 Remove the screw securing the Control Panel assembly to the chassis see Letter A 7 Remove the control panel board from the chassis see Letter B 7 5 2 Standard Front Control Panel Installation Figure 105 Standard Fro...

Страница 103: ...8 Install air duct see Section 2 3 2 7 6 Replacing the Server Board 7 6 1 Server Board Removal 1 Power off system and remove power cords from each power supply module 2 Disconnect all externally attached cables 3 Remove the system cover see Section 2 2 1 4 Remove power supply modules see Section 3 1 2 5 Remove air duct see section 2 3 1 6 Disconnect all the system fan cables 7 Remove both fan modu...

Страница 104: ...ve the Chassis Support Bracket see Letter B 16 Loosen the fastener screws securing the Air Duct Sidewalls to the server board see Letter C 17 Remove the two air duct sidewalls from the chassis Figure 107 Server Board Lifting 18 Remove the eight fastener screws used to secure the server board to the chassis see Letter C 19 Carefully lift server board up and away from the chassis see Letter D and pl...

Страница 105: ...ed instructions 3 Re attach all cables previously removed from the server board 4 Install processor s see Section 2 5 2 5 Install DIMMs see Section 2 5 1 6 Re Install all options previously removed from the server board 7 Re Install riser card assemblies see Section 2 8 3 8 Re attach all internal cables previously detached from add in cards and modules 9 Re install system fan module assemblies see...

Страница 106: ...erver and chassis accessory parts list for ordering upgrades or spare parts A searchable knowledgebase to search for product information throughout the support site If you are still unable to obtain a solution to your issue send an email to Intel s technical support center using the online form available at http www intel com p en_US support contactsupport Lastly you can contact an Intel support r...

Страница 107: ...Intel Server System R1000WF Product Family System Integration and Service Guide 91 Appendix B System Cable Routing Diagrams Figure 108 Intel Server System R1304WFxxxx Cable Routing ...

Страница 108: ...Intel Server System R1000WF Product Family System Integration and Service Guide 92 Figure 109 Intel Server System R1208WFxxxx Cable Routing ...

Страница 109: ...ion with the Chassis ID solid ON the BMC is booting Linux Control has been passed from BMC uBoot to BMC Linux itself It will be in this state for 10 20 seconds Green 1 Hz blink Degraded system is operating in a degraded state although still functional or system is operating in a redundant state but with an impending failure warning System degraded Redundancy loss such as power supply or fan Applie...

Страница 110: ...reshold of correctable errors is crossed within the window Amber Solid on Critical non recoverable System is halted Fatal alarm system has failed or shutdown CPU CATERR signal asserted MSID mismatch detected CATERR also asserts for this case CPU 1 is missing CPU Thermal Trip No power good power fault DIMM failure when there is only 1 DIMM present and hence no good memory present Runtime memory unc...

Страница 111: ...ble cause of the hang condition Each POST code is represented by eight LEDs four green and four amber The POST codes are divided into two nibbles an upper nibble and a lower nibble The upper nibble bits are represented by Amber Diagnostic LEDs and the lower nibble bits are represented by Green Diagnostics LEDs If the bit is set in the upper and lower nibbles the corresponding LED is lit If the bit...

Страница 112: ...k information B5h 1 0 1 1 0 1 0 1 Program registers on the channel level B6h 1 0 1 1 0 1 1 0 Perform the JEDEC defined initialization sequence B7h 1 0 1 1 0 1 1 1 Train DDR4 ranks B8h 1 0 1 1 1 0 0 0 Initialize CLTT OLTT B9h 1 0 1 1 1 0 0 1 Hardware memory test and init BAh 1 0 1 1 1 0 1 0 Execute software memory init BBh 1 0 1 1 1 0 1 1 Program memory map and interleaving BCh 1 0 1 1 1 1 0 0 Prog...

Страница 113: ...re disabled E9h 1 1 1 0 1 0 0 1 Memory is locked by Intel Trusted Execution Technology and is inaccessible EAh 1 1 1 0 1 0 1 0 DDR4 channel training error 01h Error on read DQ DQS Data Data Strobe init 02h Error on Receive Enable 03h Error on Write Leveling 04h Error on write DQ DQS Data Data Strobe EBh 1 1 1 0 1 0 1 1 Memory test failure 01h Software memtest failure 02h Hardware memtest failed ED...

Страница 114: ...0 1 Collect info such as SBSP Boot Mode Reset type etc A3h 1 0 1 0 0 0 1 1 Setup minimum path between SBSP other sockets A7h 1 0 1 0 0 1 1 1 Topology discovery and route calculation A8h 1 0 1 0 1 0 0 0 Program final route A9h 1 0 1 0 1 0 0 1 Program final IO SAD setting AAh 1 0 1 0 1 0 1 0 Protocol layer and other uncore settings ABh 1 0 1 0 1 0 1 1 Transition links to full speed operation ACh 1 0...

Страница 115: ...E CPU AP Init 68h 0 1 1 0 1 0 0 0 DXE PCI Host Bridge Init 69h 0 1 1 0 1 0 0 1 DXE NB Init 6Ah 0 1 1 0 1 0 1 0 DXE NB SMM Init 70h 0 1 1 1 0 0 0 0 DXE SB Init 71h 0 1 1 1 0 0 0 1 DXE SB SMM Init 72h 0 1 1 1 0 0 1 0 DXE SB devices Init 78h 0 1 1 1 1 0 0 0 DXE ACPI Init 79h 0 1 1 1 1 0 0 1 DXE CSM Init 80h 1 0 0 0 0 0 0 0 DXE BDS Started 81h 1 0 0 0 0 0 0 1 DXE BDS connect drivers 82h 1 0 0 0 0 0 1 ...

Страница 116: ... 1 0 0 1 1 1 0 1 DXE Ready to Boot 9Eh 1 0 0 1 1 1 1 0 DXE Legacy Boot 9Fh 1 0 0 1 1 1 1 1 DXE Exit Boot Services C0h 1 1 0 0 0 0 0 0 RT Set Virtual Address Map Begin C2h 1 1 0 0 0 0 1 0 DXE Legacy Option ROM init C3h 1 1 0 0 0 0 1 1 DXE Reset system C4h 1 1 0 0 0 1 0 0 DXE USB Hot plug C5h 1 1 0 0 0 1 0 1 DXE PCI BUS Hot plug C6h 1 1 0 0 0 1 1 0 DXE NVRAM cleanup C7h 1 1 0 0 0 1 1 1 DXE ACPI Enab...

Страница 117: ...rror EFh 1 1 1 0 1 1 1 1 Indicates a CLTT table structure error B0h 1 0 1 1 0 0 0 0 Detect DIMM population B1h 1 0 1 1 0 0 0 1 Set DDR4 frequency B2h 1 0 1 1 0 0 1 0 Gather remaining SPD data B3h 1 0 1 1 0 0 1 1 Program registers on the memory controller level B4h 1 0 1 1 0 1 0 0 Evaluate RAS modes and save rank information B5h 1 0 1 1 0 1 0 1 Program registers on the channel level B6h 1 0 1 1 0 1...

Страница 118: ...Error Pause option setting in the BIOS setup determines whether the system pauses to the Error Manager for this type of error so the user can take immediate corrective action or the system continues booting Note that for 0048 Password check failed the system halts and then after the next reset reboot will displays the error code on the Error Manager screen Fatal The system halts during post at a b...

Страница 119: ...8198 OS boot watchdog timer failure Major 8300 Baseboard management controller failed self test Major 8305 Hot Swap Controller failure Major 83A0 Management Engine ME failed self test Major 83A1 Management Engine ME Failed to respond Major 84F2 Baseboard management controller failed to respond Major 84F3 Baseboard management controller in update mode Major 84F4 Sensor data record empty Please upda...

Страница 120: ...d DIMM Major 8553 CPU1DIMM_G2 disabled Please remove the disabled DIMM Major 8554 CPU1DIMM_G3 disabled Please remove the disabled DIMM Major 8555 CPU1DIMM_H1 disabled Please remove the disabled DIMM Major 8556 CPU1DIMM_H2 disabled Please remove the disabled DIMM Major 8557 CPU1DIMM_H3 disabled Please remove the disabled DIMM Major 8558 CPU2_DIMM_A1 disabled Please remove the disabled DIMM Major 85...

Страница 121: ..._DIMM_F1 encountered a Serial Presence Detection SPD failure Major 8570 CPU1_DIMM_F2 encountered a Serial Presence Detection SPD failure Major 8571 CPU1_DIMM_F3 encountered a Serial Presence Detection SPD failure Major 8572 CPU1_DIMM_G1 encountered a Serial Presence Detection SPD failure Major 8573 CPU1_DIMM_G2 encountered a Serial Presence Detection SPD failure Major 8574 CPU1_DIMM_G3 encountered...

Страница 122: ...ease remove the disabled DIMM Major 85CC CPU2_DIMM_G3 failed test initialization Please remove the disabled DIMM Major 85CD CPU2_DIMM_H1 failed test initialization Please remove the disabled DIMM Major 85CE CPU2_DIMM_H2 failed test initialization Please remove the disabled DIMM Major 85CF CPU2_DIMM_H3 failed test initialization Please remove the disabled DIMM Major 85D0 CPU2_DIMM_C3 disabled Pleas...

Страница 123: ...ection SPD failure Major 85EB CPU2_DIMM_G2 encountered a Serial Presence Detection SPD failure Major 85EC CPU2_DIMM_G3 encountered a Serial Presence Detection SPD failure Major 85ED CPU2_DIMM_H1 encountered a Serial Presence Detection SPD failure Major 85EE CPU2_DIMM_H2 encountered a Serial Presence Detection SPD failure Major 85EF CPU2_DIMM_H3 encountered a Serial Presence Detection SPD failure M...

Страница 124: ...error related to the CPU family core cache mismatch was detected The following Beep Codes are sounded during BIOS Recovery 2 Recovery started N A Recovery boot has been initiated 4 Recovery failed N A Recovery has failed This typically happens so quickly after recovery is initiated that it sounds like a 2 4 beep code The Integrated BMC may generate beep codes upon detection of failure conditions B...

Страница 125: ...h one or more other PSUs in the system PS Status 1 5 2 1 No CPUs installed or first CPU socket is empty CPU Missing Sensor 1 5 2 2 CPU CAT Error IERR assertion CPU ERR2 Timeout Sensor 1 5 2 3 CPU ERR2 timeout assertion CPU ERR2 Timeout Sensor 1 5 2 4 CPU Icc max Mismatch CPU Icc max Mismatch Sensor 1 5 2 5 CPU population error CPU 0 Status Sensor 1 5 4 2 Power fault DC power is unexpectedly lost p...

Отзывы: