background image

Firmware Update

En-65

Firmware Update

About Firmware Update

There are two methods for updating the firmware; via 

network and via USB�

Use the one that best suits your environment�


For the latest information on updates, visit the Onkyo 

website�


Before updating, make sure that the speaker setup 

microphone is not connected�


During an update, do not

–  Disconnect and reconnect any cable, USB storage 

device, speaker setup microphone or headphones, 

or perform any operation on the component such as 

turn off its power

–  Access to this unit from a PC or smartphone using 

Android application


The update may take about 30 minutes to complete for 

either method: via network or via USB�

Furthermore, existing settings are guaranteed 

regardless of the method used for update�

Disclaimer

: The program and accompanying online 

documentation are furnished to you for use at your own 

risk�

Onkyo will not be liable and you will have no remedy for 

damages for any claim of any kind whatsoever concerning 

your use of the program or the accompanying online 

documentation, regardless of legal theory, and whether 

arising in tort or contract�

In no event will Onkyo be liable to you or any third party for 

any special, indirect, incidental, or consequential damages 

of any kind, including, but not limited to, compensation, 

reimbursement or damages on account of the loss of 

present or prospective profits, loss of data, or for any other 

reason whatsoever�

Updating the Firmware via Network

Before Starting 


Check that the unit is turned on, and the connection to 

the Internet is secured�


Turn off the controller component (PC etc�) connected to 

the network�


Stop any playing Internet radio, USB storage device, or 

server content�


If the multi-zone function is active, press Off on the main 

unit to turn it off�


If "HDMI CEC (RIHD)" is set to "On", set it to "Off" 

(default value)�

–  After pressing RCV on the remote controller, press 

Setup� Then, after selecting "6� Hardware" - "HDMI" 

and pressing Enter, select "HDMI CEC (RIHD)" to 

select "Off"�

¼

½

The description may differ from the on-screen display but that will not 
change the way to operate or the function�

¼

Update

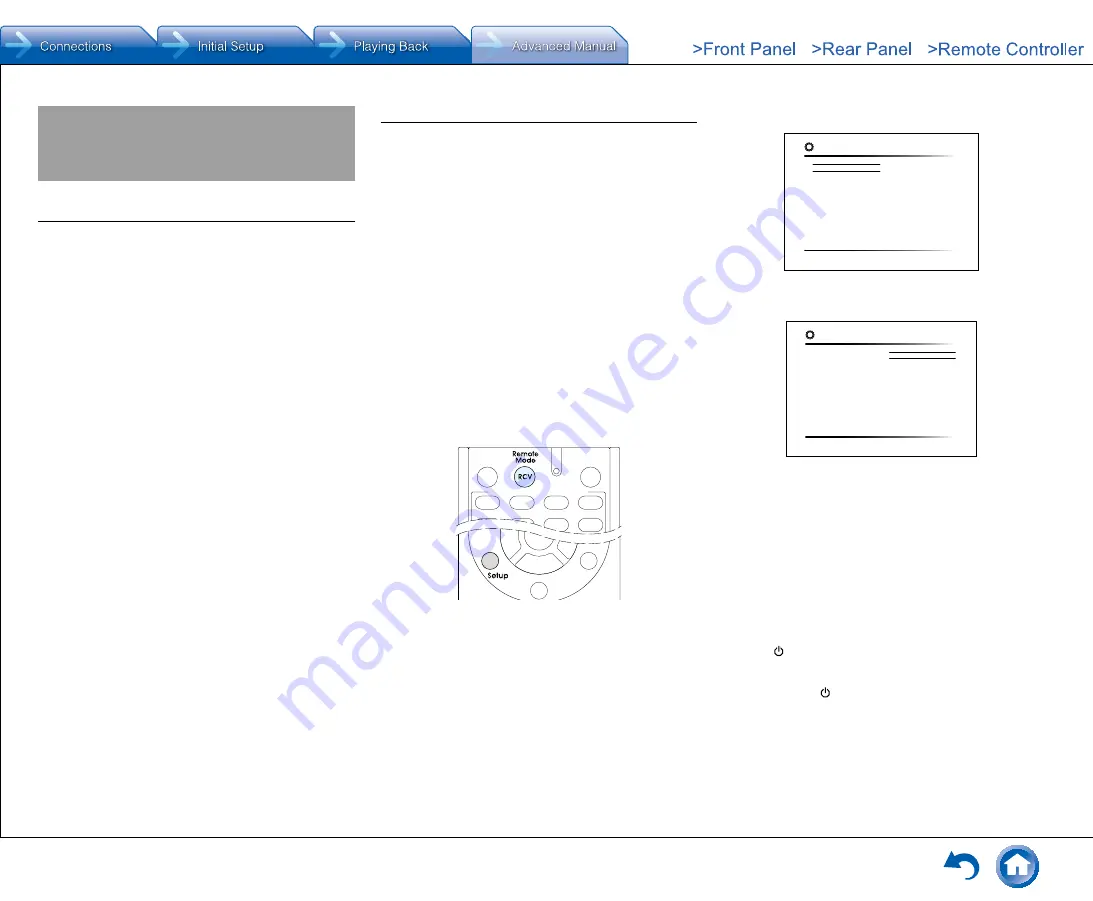
1�  After pressing RCV on the remote controller, press 

Setup�

The Setup menu is displayed on the TV screen�

1. Input/Output Assign
2. Speaker
3. Audio Adjust
4. Source
5. Listening Mode Preset
6. Hardware
7. Remote Controller
8. Miscellaneous

Setup

1. TV Out
2.HDMI Input
3. Video Input
4. Digital Audio Input

2�  With the cursors, select "8� Miscellaneous" - "Firmware 

Update" - "Update via NET", and then press Enter�

1. Input/Output Assign
2. Speaker
3. Audio Adjust
4. Source
5. Listening Mode Preset
6. Hardware
7. Remote Controller
8. Miscellaneous

Setup

1. Firmware Update
2. Initial Setup
3. Lock


If "Firmware Update" is grayed out and cannot be 

selected, wait for a while until it starts up�


You will not be able to select "Update via NET" if 

there is nothing to update�

3�  Press Enter with "Update" selected to start update�


During the update, the TV screen may go black 

depending on the updated program� In that case, 

check the progress on the display of the unit� The TV 

screen will remain black until the update is complete 

and the power is turned on again�


"Completed!" is displayed when the update is 

complete�

4�  Press  On/Standby on the main unit to turn the unit 

into standby mode� The process is completed and your 

firmware is updated to the latest version�


Do not use  Receiver on the remote controller�

Содержание DTR-40.7

Страница 1: ...work Connection 14 Step 3 Playing Back 15 1 Basic Operations 15 Part names and functions of the remote controller 15 2 Network Functions 16 3 AirPlay 16 4 AM FM Radio 17 5 Multi zone 18 Making Multi z...

Страница 2: ...content HDMI IN1 to IN3 HDMI OUT MAIN SUB Supports ARC Audio Return Channel Supports USB storage playback Supports variety of network functions such as Internet Radio DLNA AirPlay etc Equipped with a...

Страница 3: ...he display H Setup button Used when making settings I Cursor buttons Tuningjl button Presetd c button and Enter button Move the cursor and confirms the selection When listening to AM FM broadcasting t...

Страница 4: ...cessary to use the control functions 7 to 9 Contact the specialized stores for more information F HDMI IN OUT jacks Digital video signals and audio signals are transmitted between the unit and the con...

Страница 5: ...are connected 3 Lights when playing NET or USB 4 Lights according to the type of input digital audio signals and the listening mode 5 Stays lit when Music Optimizer is enabled 6 Lights in the followin...

Страница 6: ...ht speakers produce surround effects on a height plane This unit can perform optimal sound field processing for the type of height speakers actually installed and registered in Initial Setup Height sp...

Страница 7: ...t speakers The following shows combinations of speakers for reproducing Dolby Atmos 1 Back 2 Front High 3 Rear High 4 Top Front 5 Top Middle 6 Top Rear 7 Dolby Enabled Speaker Front 8 Dolby Enabled Sp...

Страница 8: ...but has a cut off frequency adjusting dial turn it to the maximum frequency If your subwoofer does not have built in power amplifier you can connect a power amplifier between the unit and the subwoofe...

Страница 9: ...he input jacks and input selector buttons For how to make settings see the Advanced Manual To connect the TV and the unit connect the HDMI OUT MAIN jack of the unit and the HDMI IN jack of the TV usin...

Страница 10: ...ct to the audio input jacks corresponding to the jacks connected at 2 and 3 For example when video input connection is to the 2 BD DVD jack the audio input connection should also be to the 4 BD DVD ja...

Страница 11: ...of the router Internet radio Router NAS Headphones connection Connect stereo headphones with a standard plug 1 4 inch or 6 3 mm to the Phones jack on the front panel Sound from the speakers will be of...

Страница 12: ...displayed Select Yes in this screen and press Enter on the remote controller Welcome to initial setup Have you connected all the speakers and devices Before starting please connect speakers and sourc...

Страница 13: ...e settings Press Enter with Save selected To have the settings reflected for all the speakers select On All Channels in the next screen and press Enter on the remote controller Select On Except Front...

Страница 14: ...cursors and press Enter on the remote controller If you select Yes in the next screen you can view the Ethernet cable connection status When connection is successful Successfully Connected is display...

Страница 15: ...ch the input to be played Furthermore by registering a particular remote control code to a button you can switch the remote control mode to operate other equipment by pressing that button Game2 button...

Страница 16: ...od touch iPad and PCs with iTunes Important This unit needs to be connected to the network through the same router as the iOS terminal or PC Playing music files from an iPhone iPod touch or iPad Updat...

Страница 17: ...veral times to select a number between 1 and 40 while the preset number is flashing about 8 seconds 4 Press Memory again on the main unit to register the station When registered the preset number stop...

Страница 18: ...rce in a separate room while 7 1 ch source is being played in the main room Connect the PRE LINE OUT ZONE2 jacks of the unit and the line in jacks of the pre main amplifier in a separate room with an...

Страница 19: ...tion interlink between Onkyo components is disabled Pressing Input Selector on the remote controller while you are using the remote controller for Zone 2 will switch the controlled target to the main...

Страница 20: ...oise This setting is unavailable for content other than DTS X This setting may not be available for selection with some content HDMI Select the HDMI OUT jack to be used for output Information Audio Di...

Страница 21: ...rfered In that case keep distance between TV antenna cable and cables of the unit If you connect a player supporting HDCP2 2 be sure to connect it to one of the HDMI IN1 to IN3 jacks of the unit Video...

Страница 22: ...ers Power Consumption 6 9 A North American 710 W Others 0 1 W Stand by North American 0 15 W Stand by Others 2 6 W Network Standby 80 W No sound Dimensions W H D 435 mm 174 mm 376 mm 17 1 8 6 7 8 14 1...

Страница 23: ...30 50 60 Hz 2560 1080p 24 25 30 Hz 50 60 Hz 4K 3840 2160p 24 25 30 Hz RGB YCbCr4 4 4 YCbCr4 2 2 8 10 12 16 bit 1 50 60 Hz RGB YCbCr4 4 4 8 bit 2 YCbCr4 2 2 12 bit YCbCr4 2 0 8 10 12 16 bit 4K SMPTE 40...

Страница 24: ...chna p slu n ustanoveni Sm rnice 1999 5 ES Undertegnede Onkyo Corporation erkl rer herved at f lgende udstyr DTR 40 7 overholder de v sentlige krav og vrige relevante krav i direktiv 1999 5 EF Hiermit...

Страница 25: ...p of companies QR Code is a registered trademark of DENSO WAVE INCORPORATED x v Color and x v Color logo are trademarks of Sony Corporation DSD and the Direct Stream Digital logo are trademarks of Son...

Страница 26: ...above provided that you accompany it with the complete corresponding machine readable source code which must be distributed under the terms of Sections 1 and 2 above on a medium customarily used for...

Страница 27: ...ctions are prohibited by law if you do not accept this License Therefore by modifying or distributing the Program or any work based on the Program you indicate your acceptance of this License to do so...

Страница 28: ...list of Contributing Authors Tom Lane Glenn Randers Pehrson Willem van Schaik libpng versions 0 89 June 1996 through 0 96 May 1997 are Copyright c 1996 1997 Andreas Dilger Distributed according to the...

Страница 29: ...d to anyone to use this software for any purpose including commercial applications and to alter it and redistribute it freely subject to the following restrictions The origin of this software must not...

Страница 30: ...PLICABLE LAW IN NO EVENT WILL THE AUTHOR OR THE PUBLISHER BE LIABLE TO YOU ON ANY LEGAL THEORY FOR ANY SPECIAL INCIDENTAL CONSEQUENTIAL PUNITIVE OR EXEMPLARY DAMAGES ARISING OUT OF THIS LICENSE OR THE...

Страница 31: ...En 31...

Страница 32: ...86 21 52130396 http www integra com cn Integra Division of Kitahama Chuo Bldg 2 2 22 Kitahama Chuo ku OSAKA 541 0041 JAPAN Tel 072 831 8023 Fax 072 831 8163 http www integraworldwide com Supplied Acce...

Страница 33: ...33 How to Set 33 1 Input Output Assign 34 2 Speaker 36 3 Audio Adjust 41 4 Source 43 5 Listening Mode Preset 44 6 Hardware 45 7 Remote Controller 55 8 Miscellaneous 55 Operating Other Components with...

Страница 34: ...anges by 1 step each time you press the button The frequency changes continuously if the button is held down and stops when the button is released Tune by looking at the display To return to automatic...

Страница 35: ...be displayed continuously or not at all PS Program Service Tuning into a radio station distributing Program Service information displays the radio station name Pressing Display displays the frequency...

Страница 36: ...firm your selection To return to the previous screen press Return If the OSD language is set to Chinese the operations in this section are not displayed on the TV Operate by looking at the display on...

Страница 37: ...usic sports and news from all over the world Operation You can set up by viewing the guidance displayed on the TV screen OSD Select the item with the cursor buttons of the remote controller and press...

Страница 38: ...ve Operation You can set up by viewing the guidance displayed on the TV screen OSD Select the item with the cursor buttons of the remote controller and press Enter to confirm your selection To return...

Страница 39: ...lecting this unit you can automatically turn this unit on auto power on function switch input to the NET position and start playback of high quality streaming from Spotify To enable the auto power on...

Страница 40: ...Adds the currently playing station to presets list Delete from Presets Deletes the currently playing station from presets list SiriusXM Internet Radio subscriptions are sold separately and are govern...

Страница 41: ...either store a new user account or delete an existing one Some of the services do not allow the use of multiple user accounts You can store up to 10 user accounts To switch between accounts you must...

Страница 42: ...e File menu to enter the IP address Information of the unit is displayed on the browser WEB Setup 5 Click tab then enter the name and URL of the Internet radio station 6 Click Save to register the ent...

Страница 43: ...ed to select may differ from the explanation here Windows MediaR Player 12 1 Turn on your PC and start Windows MediaR Player 12 2 In the Stream menu select Turn on media streaming to display a dialog...

Страница 44: ...s in the Stream menu to list players in the network and then go to step 4 3 Click Turn on media streaming to list players in the network 4 Select this unit in Media streaming options and check that it...

Страница 45: ...ess can read and write files in the Public folders Turn off password protected sharing 4 Select Save Changes and click OK on the dialog box Creating a Shared Folder 1 Select and right click the folder...

Страница 46: ...check the server name of your PC from the PC properties 4 With the cursors select the target shared folder and then press Enter 5 If a username and password is required enter the necessary login info...

Страница 47: ...My Favorites 6 Menu This button displays the menu of each Internet radio service 7 Return This button returns to the previous screen 8 This button fast forwards the current track This button is not op...

Страница 48: ...ds or objects that can be accurately positioned and move dynamically throughout the 3 dimensional listening space during playback A key ingredient of Dolby Atmos is the introduction of a height plane...

Страница 49: ...dless of where you are within the listening room Game Action In this mode sound localization is distinct with emphasis on bass Game Rock In this mode sound pressure is emphasized to heighten live feel...

Страница 50: ...rall output level at THX calibrated loudness just turn down the volume control by 4dB However unlike a movie theater where the playback loudness is preset you can choose your preferred volume setting...

Страница 51: ...Mono Dolby Surround Neo 6 Cinema 1 DTS Neural X THX Cinema 2 TV Logic 3 All Ch Stereo 4 Full Mono 4 T D 1 Center speaker or surround speakers need to be installed 2 Surround speakers need to be instal...

Страница 52: ...ono 7 T D 1 Cannot be selected when the input format is monaural or 2 ch 2 Center speaker or surround speakers need to be installed 3 Can only be selected when the input format is 2 ch and a center sp...

Страница 53: ...format is monaural or 2 ch 2 Center speaker or surround speakers need to be installed 3 Can only be selected when the input format is 2 ch and a center speaker or surround speakers are installed 4 Sur...

Страница 54: ...ut format is monaural or 2 ch 2 Center speaker or surround speakers need to be installed 3 Can only be selected when the input format is 2 ch and a center speaker or surround speakers are installed 4...

Страница 55: ...rs or height speakers need to be installed Music button You can select a mode suitable for music Input Format Listening Mode Analog Direct Stereo Dolby Surround Neo 6 Music 1 DTS Neural X THX Music 2...

Страница 56: ...elected when the input format is 5 1 ch 4 Surround speakers or height speakers need to be installed 5 Center speaker surround speakers or height speakers need to be installed Input Format Listening Mo...

Страница 57: ...en the input format is monaural or 2 ch 2 Center speaker or surround speakers need to be installed 3 Can only be selected when the input format is 2 ch and a center speaker or surround speakers are in...

Страница 58: ...e input format is monaural or 2 ch 2 Center speaker or surround speakers need to be installed 3 Can only be selected when the input format is 2 ch and a center speaker or surround speakers are install...

Страница 59: ...installed 7 Center speaker surround speakers or height speakers need to be installed Input Format Listening Mode DTS ES Direct Stereo DTS 1 ES Matrix 2 ES Discrete 2 Dolby Surround 3 DTS Neural X THX...

Страница 60: ...2 Game Sports 2 All Ch Stereo 3 Full Mono 3 T D 1 Surround speakers need to be installed 2 Surround speakers or height speakers need to be installed 3 Center speaker surround speakers or height speak...

Страница 61: ...me RPG 5 Game Action 5 Game Rock 5 Game Sports 5 All Ch Stereo 6 Full Mono 6 T D 1 Cannot be selected when the input format is monaural or 2 ch 2 Center speaker or surround speakers need to be install...

Страница 62: ...o 6 Full Mono 6 T D 1 Cannot be selected when the input format is monaural or 2 ch 2 Center speaker or surround speakers need to be installed 3 Surround speakers need to be installed 4 Back speakers n...

Страница 63: ...ereo 6 Full Mono 6 T D 1 Cannot be selected when the input format is monaural or 2 ch 2 Center speaker or surround speakers need to be installed 3 Surround speakers need to be installed 4 Back speaker...

Страница 64: ...All Ch Stereo 2 Full Mono 2 T D 1 Surround speakers or height speakers need to be installed 2 Center speaker surround speakers or height speakers need to be installed THX button You can select a THX l...

Страница 65: ...3 Video Input 4 Digital Audio Input 4 Press to select the item and then press Enter 5 With the cursors select the item to configure the settings HDMI Out HDBaseT TM OSD Language Impose OSD Screen Save...

Страница 66: ...DMI IN jacks Setting Item Default Value Setting Details BD DVD HDMI 1 HDCP 2 2 HDMI 1 HDCP 2 2 to HDMI 7 Assign a desired HDMI IN jack to the BD DVD button If you do not assign a jack select To select...

Страница 67: ...VIDEO 3 Assign a desired VIDEO IN jack to the STRM Box button PC VIDEO 3 COMPONENT 1 COMPONENT 2 Assign the COMPONENT VIDEO IN jacks to the PC button VIDEO 1 to VIDEO 3 Assign a desired VIDEO IN jack...

Страница 68: ...er frequency and so on Settings are automatically configured if you use the Automatic Speaker Setup This setting cannot be selected if headphones are connected or audio is output from the speakers of...

Страница 69: ...will be output If Configuration Subwoofer is set to No Front will be fixed to Full Band and the low pitched range of the other channels will be output from the front speakers Refer to the instruction...

Страница 70: ...it feet meters Specify the unit of distance for configuring settings feet When setting in feet 0 1 ft to 30 0 ft in increments of 0 1 ft meters When setting in meters 0 03 m to 9 00 m in increments of...

Страница 71: ...nge the value Select the desired level This setting cannot be changed if Configuration Powered Zone 2 is set to Yes and Zone2 is set to on Setting Item Default Value Setting Details Surround Left 0 dB...

Страница 72: ...llowing values When Distance Unit is set to feet Select a value from 1 0 ft 1 0 4 0 ft and 4 0 ft When Distance Unit is set to meters Select a value from 0 3 m 0 3 1 2 m and 1 2 m This cannot be selec...

Страница 73: ...y the proper THX Loudness Plus settings for each type of content 3 Audio Adjust Configure various settings related to sound such as settings for listening to multiplex audio or multilingual TV broadca...

Страница 74: ...equency effect sound is too strong select 20dB or dB This setting works on LFE channel volume of DTS DTS ES DTS HD High Resolution and DTS HD Master Audio sources Other Multich Source 0dB Select the l...

Страница 75: ...B Set a negative value if the volume of the target device is larger than the others and a positive value if smaller When you select a desired input to check the audio start playback of the connected d...

Страница 76: ...playing PCM sources Select Off normally Changing Audio Select changes the setting to Off The setting cannot be changed when TUNER or NET input is selected Video Select Setting Item Default Value Setti...

Страница 77: ...ut signals are played as they are input if you select Straight Decode Available listening modes vary depending on speaker configuration and the input signal Setting Last Valid will always select the l...

Страница 78: ...ure whether it is compatible set the setting to Off Setting Item Default Value Setting Details HDMI Standby Through Off When this is set to anything other than Off you can play the video and audio of...

Страница 79: ...of the HDMI connected TV while this unit is on On Use this function Off Do not use this function Listening mode cannot be changed while Audio TV Out SUB is set to On and audio is being output through...

Страница 80: ...etting will be enabled Off The setting will be disabled This setting cannot be set to On if Auto Standby is set to Off USB Power Out at Standby Off When this function is On you can still have equipmen...

Страница 81: ...on the equipment connected by network 1 Press Enter to display the Edit screen 2 Select a character or symbol with the cursors and press Enter Repeat it to input 31 or less characters A a Switches bet...

Страница 82: ...can be set for each input selector You can enable power link operation when you connect the unit and the external devices equipped with 12V trigger input jack Setting Item Default Value Setting Detail...

Страница 83: ...CD is selected as input for main room or ZONE2 Setting Item Default Value Setting Details PHONO Main Set the 12V trigger output setting to each input Off No output Main Output when PHONO is selected...

Страница 84: ...Main Zone2 Output when CBL SAT is selected as input for main room or ZONE2 STRM BOX Zone2 Set the 12V trigger output setting to each input Off No output Main Output when STRM BOX is selected as input...

Страница 85: ...nal maximum 12 V 25 mA through the 12V TRIGGER OUT C jack Different settings can be set for each input selector You can enable power link operation when you connect the unit and the external devices e...

Страница 86: ...is selected as input for main room or ZONE2 Setting Item Default Value Setting Details PHONO Main Zone2 Set the 12V trigger output setting to each input Off No output Main Output when PHONO is select...

Страница 87: ...date Notice Enable Availability of a firmware update will be notified via network Enable Notify updates Disable Do not notify updates Version The current firmware version will be displayed Update via...

Страница 88: ...ry and then press Enter to display the brand name input screen 5 Select a character with the cursors and press Enter Repeat it to enter the first three characters of the brand name 6 Select Search wit...

Страница 89: ...of the component whose remote control code you programmed to Remote Mode However you will not be able to remap the colored buttons if Zone 2 is selected 1 Hold down the Remote Mode button to map and A...

Страница 90: ...CH 9 Return F G H I F G A Red B Green C Yellow D Blue H Number 1 to 9 0 10 I CLR Display Not CEC compatible Blu ray Disc player DVD player DVD recorder operation Press the Remote Mode button programm...

Страница 91: ...4 CH 5 8 9 6 7 5 Guide 6 Enter 7 Home 8 PREV CH 9 Return F G H F G Number 1 to 9 0 10 H CLR Display Satellite receiver Cable receiver operation Press the Remote Mode button programmed with the remote...

Страница 92: ...erate by using the corresponding buttons Available buttons vary depending on the product category of the component Operation may be incorrect or impossible depending on the product 1 2 3 1 Remote Mode...

Страница 93: ...the same sound in two directions for example forward and backward a a b b TV Connections An arrow for matching the phases is marked on a dipole speaker Place the surround speakers a so that their arro...

Страница 94: ...work in the same way and are interchangeable To connect the RI Dock or cassette tape deck via RI the following settings are required Rename the input selector To make the RI functions work you must re...

Страница 95: ...our iPod iPhone is updated to the latest version Certain buttons may not work for some iPod iPhone models and generations or RI Dock For details on the operation refer to the RI Dock s instruction man...

Страница 96: ...om remote control kit with this jack you can operate the unit with the remote controller even when you are in a separate room or operate the unit with the remote controller even if its remote control...

Страница 97: ...nt PC etc connected to the network Stop any playing Internet radio USB storage device or server content If the multi zone function is active press Off on the main unit to turn it off If HDMI CEC RIHD...

Страница 98: ...If the multi zone function is active press Off on the main unit to turn it off If HDMI CEC RIHD is set to On set it to Off default value After pressing RCV on the remote controller press Setup Then a...

Страница 99: ...remain black until the update is complete and the power is turned on again During the update do not turn off or disconnect and reconnect the USB storage device Completed is displayed when the update...

Страница 100: ...om the wall outlet wait 5 seconds or more then plug it in again The unit turns off unexpectedly The AV receiver will automatically enter standby mode when Auto Standby or Sleep Timer is set and launch...

Страница 101: ...layback With some CD and LD players you will not be able to playback DTS material properly even though your player is connected to a digital input on the unit This is usually because the DTS bitstream...

Страница 102: ...Network Setup becomes selectable after the network starts up even if it cannot be selected first It may take about a minute to start up When NET is blinking the AV receiver is not properly connected t...

Страница 103: ...set the same ID on both the unit and remote controller Input a correct remote control code again If there are several codes try each code Display and OSD The display does not light Make sure that Dim...

Страница 104: ...How do I change the language of a multiplex source Select Main or Sub for 3 Audio Adjust Multiplex Mono Multiplex Input Channel Cannot connect to the AV receiver from a Web browser Make sure that the...

Страница 105: ...ly power on in conjunction when it determines it to be necessary Even if the AV receiver is connected to an RIHD compatible TV or player recorder it will not power on if it is not necessary It may not...

Страница 106: ...e a shielded CAT5 Ethernet cable straight type to connect the unit to your home network Consult your cable store for details of Ethernet cable Network server When PC etc network server is used Compone...

Страница 107: ...kHz 16 kHz 22 05 kHz 24 kHz 32 kHz 44 1 kHz 48 kHz Supported bitrates Between 8 kbps and 320 kbps Incompatible files cannot be played WMA wma WMA WMA stands for Windows Media Audio and is an audio co...

Страница 108: ...ld 10698 Auria 12087 12014 Autovox 12676 Aventura 10171 Axxon 10714 Azuki 12239 B O 10620 Baier 12239 Baird 10208 Bang Olufsen 10620 Barco 10556 Base 10698 Basic Line 10037 10668 11037 10556 Bauer 121...

Страница 109: ...0556 DX Antenna 13817 Dynatron 10037 Dynex 12049 E S C 10037 Easy Living 12104 ECE 10037 ECG 12197 12125 Eiki 10735 Elbe 10037 10556 Electroband 10000 Electrograph 11755 Electrohome 11670 Electrolux 1...

Страница 110: ...Hikona 11983 Hinari 10037 10208 HiPlus 11826 Hisawa 10714 Hisense 12846 12098 13519 12183 10556 13123 10508 14029 10208 13382 Hitachi 11643 12676 11576 11585 11037 11691 13317 11667 10634 13639 10037...

Страница 111: ...sters 10037 Mastro 10698 Masuda 10037 Matsui 10037 10195 10208 12486 11037 10714 11667 12676 10556 12561 Matsushita 10650 Maxent 11755 Maxess 12493 Meck 10698 Mediator 10037 10556 Medion 12676 10714 1...

Страница 112: ...8 13067 10037 Panama 10037 Panasonic 11636 11480 11291 10650 11650 13825 12170 10037 10093 10150 10178 10208 10508 Panavideo 13825 Panavision 10037 Panavox 13835 Panda 10698 10208 10508 PARK 12104 Pen...

Страница 113: ...4 12881 12769 13488 11498 11365 10508 11037 11150 11667 13861 Sanyuan 10093 Save 10037 SBR 10037 10556 Sceptre 13899 12528 12337 Schaub Lorenz 10714 12676 12125 12197 11667 12289 Schneider 10037 10714...

Страница 114: ...11667 11037 Tecnimagen 10556 Teco 10093 10178 10653 11523 11687 Tedelex 10208 Teknika 10150 TELE System 11585 12125 Telecor 10037 Telefunken 10625 12676 12414 10698 12239 11585 11667 10037 10714 Tele...

Страница 115: ...12461 10698 Xoro 13067 Xpeer 12051 XRYPTON 10037 Yamaha 11576 10650 Yamishi 10037 Yokan 10037 Yoko 10037 YU MA TU 10037 Zenith 10017 10178 11423 10000 12731 11365 12358 12362 Zepto 11585 Ziggo 11818...

Страница 116: ...33851 Denver 31643 Dewo 31634 Dick Smith Electronics 32095 30675 Digihome 32966 30713 DigiLogic 30713 DiK 30831 Dikom 32494 Disney 30675 30831 DK Digital 30831 32095 31643 Donghai 31233 Dragon 30831 D...

Страница 117: ...30627 32147 30503 31769 31612 30571 31634 Oppo 32545 30575 Optimus 30571 Orava 30713 Orbit 31643 30872 Orion 30713 31233 Ormond 30713 Pacific 30831 30713 Packard Bell 30831 Palladium 30713 Panasonic...

Страница 118: ...831 Waitec 30730 31233 Walker 32966 Waltham 30713 WB Electronics 32555 Welkin 30831 Wellington 30713 Weltstar 30713 Wharfedale 30713 Wilson 31233 30831 Windsor 30713 Windy Sam 30573 Woxter 32139 Xbox...

Страница 119: ...twork 03936 Anhui Network 03936 Arcadyan 02952 Arion 03336 Armstrong 01376 00476 Arris 02187 01982 01998 02378 Arvig Communication Systems 01376 01982 01998 02345 Astound Broadband 01376 01877 00476 0...

Страница 120: ...ertain 02132 Entone 02302 03048 ER Telecom 02493 eTb 04281 Evolution 02479 02746 04079 Extra TV 02132 Cable Set Top Box F to J Fastway 03382 FCTV 01782 02703 Fidelity Communications 01376 Finnet 02030...

Страница 121: ...e 00476 01376 Matanuska Telephone Association 01481 02254 02482 02586 Mediacom 01376 00476 01982 01877 Mediastream 01376 00476 Mega 02683 Mega TV 02683 Megacable 01376 00476 Meo 02401 MetroCast Cablev...

Страница 122: ...62 Smartlabs 03611 Smile Content 02437 SMT 03527 SMtronics 03319 Sogetel 01998 02482 Sonaecom 02437 Sonera 00660 Source Cable 01376 00476 Starcat 02703 01782 StarHub 01927 00276 Stipte 01898 Stofa 020...

Страница 123: ...ell 01986 02418 Astro 00173 01838 02627 00658 03838 01099 01100 02026 Atevio 02928 Atlanta 02418 03320 Atom 02289 Audiola 03012 02418 Audioline 01672 Aurora 00879 Austar 00879 Austriasat 01195 01197 0...

Страница 124: ...SE 02418 02813 D Smart 02231 DSTV 00879 02059 02060 DTI Electronics 02938 DTK Deutsche Telekabel 01195 01197 DTV 03572 Dual 02034 Durabrand 01284 02034 Dyon 02738 02813 Easy One 03240 Echostar 00775 0...

Страница 125: ...ic 01413 IP Vision 02455 IPM 03567 IQ 02813 IQ Prism 02813 ISkyB 00887 ITT 02418 Jaeger 02797 01334 Jameson 02813 Jerrold 00869 Jiuzhou 03140 JVC 00775 01284 Kabel Deutschland 01195 01197 01672 01882...

Страница 126: ...0879 Orbis 01334 Orbitech 01195 01100 01197 01099 01351 Orchid 02289 Orion Express 01986 Orton 02957 P T Luxembourg 01322 02455 Pace 00847 00887 01356 02754 01682 01175 01693 02475 00853 02231 02467 0...

Страница 127: ...d 02211 00887 00856 01356 SKY PerfecTV 03099 02616 03049 Sky UK 01175 01662 00847 SkyCable 01631 01957 SkyLife 03321 01255 Skylink 02957 01545 02443 02928 01195 01197 01986 Skymaster 01409 02205 01611...

Страница 128: ...97 UPC Direct 02443 Vantage 02797 Variosat 00173 VEA 02418 Vectra 01195 01197 Vestel 01626 01284 02231 02034 03517 VH Sat 00299 Via Embratel 03787 02796 Viasat 01682 01197 01195 02235 00253 Videocon 0...

Страница 129: ...BAT 70157 Cairn 70157 California Audio Labs 70029 70303 Cambridge 70157 Cambridge Audio 70157 Carver 70157 CCE 70157 Curtis Mathes 70029 Cyrus 70157 Denon 70766 DKK 70000 DMX Electronics 70157 Dynaco...

Страница 130: ...Bell Fibe TV 01998 BesTV 04196 Bluewin 02271 Bouygues Telecom 03007 British Telecom 02294 BT 02294 BT Vision 02294 Cabovisao 02436 CalTel Connections 02586 Canal Digital 02030 Canby Telcom 01481 02302...

Страница 131: ...02271 TalkTalk 02994 TCC 04409 TDC 02271 Technicolor 02994 Telefonica 01585 03028 03288 Telekom Deutschland 02132 Telia 02030 TELUS 03028 TeNeT 01898 T Home 02132 Thomson 03007 02407 TVB 01615 U tvG...

Страница 132: ...sVu 00775 Bell Fibe TV 00775 Bell Satellite TV 00775 BENsat 02957 Boca 02797 02308 02813 Botech 02738 03749 Boxer 01957 BSkyB 01175 01662 Bush 02034 Canal Digitaal 02631 02466 02957 Canal Digital 0255...

Страница 133: ...784 03838 01693 Sansui 01545 Sat Control 01300 Schwaiger 02308 00740 02957 SEG 02034 Set One 03240 Sharp 02034 01935 Shaw Direct 00869 Siemens 01657 SilverCrest 02308 02932 Sky Austria 02754 02443 Sky...

Страница 134: ...26 Gran Prix 12197 Grundig 12239 12125 12676 Haier 11753 12309 13429 11749 11983 Hantarex 12197 Hikona 11983 Hisense 13519 Hitachi 12676 11037 11667 Hyundai 12676 Ingo Devices 12239 Insignia 12049 iSy...

Страница 135: ...echnika 12426 12197 12106 11983 13005 Techwood 12676 Telefunken 12239 10698 12676 Teletech 11037 Tesco 12426 Tevion 12426 Thomson 12675 10625 13047 Toshiba 13323 12676 11524 11656 TVE 12239 UMC 12426...

Страница 136: ...Fax 201 785 2650 http www integrahometheater com Integra Division of Liegnitzerstrasse 6 82194 Groebenzell GERMANY Tel 49 8142 4401 0 Fax 49 8142 4208 213 http www integra eu Integra Division of 302 B...

Отзывы: