background image

© Intatec Ltd 2017

15

Installation

   3.  The supply to which the thermostatic shower valve is to be installed must be thoroughly 
        flushed and cleaned to remove any debris, which may have accumulated during the 
        installation. Failure to remove any debris will affect the performance and the manufacturer’s 
        warranty of the product. In areas that are subject to aggressive water, provision must be 
        made to treat the supplies prior to the supplies entering the shower valve.

   4.  The thermostatic shower valve has been designed for horizontal installation and surface 
        mounting. 

   5.  The thermostatic shower valve will be installed in such a position that maintenance of it’s 
        components, associated valves and the commissioning and testing of the shower valve can 
        be undertaken.

   6.  The hot and cold water supplies must be connected to the valve strictly in accordance with 
        the indications on the body of the valve i.e. hot water supply to the hot port of the valve.

   7.  In a situation where one or both of the water supplies are excessive, it is recommended to fit
        a Pressure Reducing Valve to reduce the pressure(s) to within the limits as quoted previously.

   8.  Any thermostatic shower valve must be fitted with a back flow prevention device, such as 
        check valves to prevent the cross contamination of supplies.  The thermostatic shower valve 
        is supplied complete with integral insert check valves and strainers.

   9.  Isolation valves in an accessible position are required as close as is practicable to the water
        supply inlets of the thermostatic shower valve.

  10. The fitting of strainers is recommended as close as is practicable to the water supply inlets of
        the thermostatic shower valve.

  11. It is essential that the fail safe thermostatic shower valve should not be installed in situations 
        where there is a possibility of the valve being deprived of water or where demands for 
        water are greater than the actual stored supplies.

  12. To ensure that the performance levels of the thermostatic shower valve are maintained (in 
        the event of cold water failure), the temperature of the hot water supply at the point of entry 
        to the thermostatic shower valve must be a minimum of 10˚C above the commissioned 
        mixed water discharge temperature.

  13. The fail-safe thermostatic shower valve must not be subject to any extreme temperature 
        variations either during the installation or under normal operating conditions.

Содержание Nulo CB10031CP

Страница 1: ...tion as accurate as possible We cannot accept any responsibility should it be found that in any respect the information is inaccurate or incomplete or becomes so as a result of further developments or...

Страница 2: ...pplied at a safe temperature to suit the users The shower is pre set using ideal conditions to 38 C at the stop with a manual push button override to 46 C can be re set to suit site conditions or user...

Страница 3: ...et Temperature 85 C Max Inlet Pressure Dynamic 5 bar Pre Set Factory Temp Setting 38 C Min Operating Pressure Dynamic 0 2 bar Temperature Stability 2 C Max Unbalanced Pressure Ratio 5 1 Min Temp Diffe...

Страница 4: ...her than the hot supply we recommend that a separate pressure reducing valve is fitted to the cold supply as close as possible to the shower valve and with no draw off points between it and the shower...

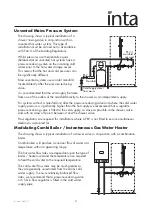
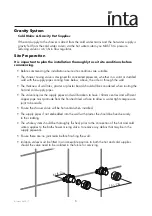
Страница 5: ...lt the pump manufacturer s installation requirements Gravity System The drawing shows a typical installation of a shower valve on a gravity supplied system Please note the minimum head pressure requir...

Страница 6: ...ter or plaster board should all be considered when routing the hot and cold supply pipes The valve requires the supply pipes and wall brackets to have 150mm centres and sufficient copper pipe must pro...

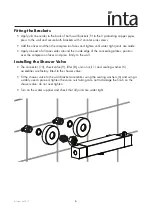
Страница 7: ...inside edge of the concealing plates position over the compression faces and press firmly to the wall Installing the Shower Valve The connector 10 check valve 9 filter 8 union nut 11 and sealing wash...

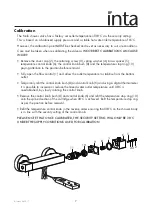
Страница 8: ...ow control 1 and allow the outlet temperature to stabilise from the bottom outlet Temporarily refit the control knob bush 8 and control knob 6 and using a digital thermometer it is possible to increas...

Страница 9: ...have a high quality finish and should be treated with care An occasional wipe with a mild washing up liquid on a soft damp cloth followed by a thorough rinsing is all that is required The nozzles in t...

Страница 10: ...t at cold the showering temperature is too hot The hot and cold supply connections have been made in reverse Thermostatic cartridge movement limited due to lime scale build up The maximum showering te...

Страница 11: ...ble Riser Rail Dimensions 42 5 652 Ctr 684 1 2 3 4 6 7 8 5 Wall Bracket End Cap Details 15 Item Qty Component 1 2 Wall Bracket 2 2 End Cap 3 1 Riser Rail 4 1 Handset Holder 5 2 Retaining Screw Plug 6...

Страница 12: ...ail Dimensions 42 5 652 Ctr 684 1 2 3 4 7 8 5 6 Wall Bracket End Cap Details 30 15 Item Qty Component 1 2 Wall Bracket 2 2 End Cap 3 1 Riser Rail 4 1 Handset Holder 5 2 Retaining Screw Plug 6 1 Push B...

Страница 13: ...all the way behind the ceramic tile Using the screw provided secure the wall bracket 1 to the wall ensuring the correct orientation for the bracket Assemble the handset holder onto the riser rail as...

Страница 14: ...ure the conditions of use are appropriate for the valve Introduction The thermostatic shower valve has been specifically designed and manufactured to meet the requirements of BS EN1111 1999 and TMV2 T...

Страница 15: ...99 and also be aware of their responsibility and duty of care to ensure that all aspects of the installation comply with the regulations It has been brought to our attention that flushing water system...

Страница 16: ...e s to within the limits as quoted previously 8 Any thermostatic shower valve must be fitted with a back flow prevention device such as check valves to prevent the cross contamination of supplies The...

Страница 17: ...eratures are established before any attempt to commission 4 Once the supply temperatures are stable and the normal operating conditions are established the shower valve can be commissioned The followi...

Страница 18: ...g performance checks shall be carried out 1 Measure the mixed water temperature at the outlet 2 Carry out the cold water supply isolation test by isolating the cold water supply wait for five seconds...

Страница 19: ...Intatec Ltd 2017 18 Notes...

Страница 20: ...n Staffordshire ST18 0PF Tel 01889 272 180 Fax 01889 272 181 email sales intatec co uk web www intatec co uk E O E 10 08 17 To activate your product warranty please visit www intatec co uk and click o...

Отзывы: