25
NOTICE
• If gear clearance is not within specification (0.005 to 0.032
inch [0.1 to 0.8 mm]) as determined in Step 4a., correct
location/quantity of washers (84), (85) and (86) must be
determined at assembly.
f.
Unless the roller bearings (50) or spacer (53) must be
replaced it is not recommended that these parts be
separated or removed from the output planet gear
assembly. Care must be taken to maintain the roller
bearing position. The input planet pin (49) can be
carefully reinserted into the gear to maintain bearing
position until reassembly.
6.
Remove the oil seal (58) and discard. Remove the caged
needle bearing (57) only if replacing. To remove press
bearing out of housing.
Cleaning, Inspection and Repair
Clean all winch component parts in solvent (except the drum
brake bands and disc brake friction plates). The use of a stiff
bristle brush will facilitate the removal of accumulated dirt and
sediments on the housings, frame and drum. If bushings have
been removed it may be necessary to carefully remove old
Loctite
®
from the bushing bores. Dry each part using low
pressure, filtered compressed air. Clean the drum brake band
using a wire brush or emery cloth. Do not wash the drum brake
band in solvent. If the drum brake band lining is oil soaked, it
must be replaced.
Inspection
All disassembled parts should be inspected to determine their
fitness for continued use. Pay particular attention to the
following:
1.
Inspect all gears for worn, cracked, or broken teeth.
2.
Inspect all bushings for wear, scoring, or galling.
3.
Inspect shafts for ridges caused by wear. If ridges caused by
wear are apparent on shafts, replace the shaft.
4.
Inspect all threaded items and replace those having
damaged threads.
5.
Inspect the drum band brake lining for oil, grease and
glazing. If the drum band brake lining is oil-soaked,
excessively greasy or overly glazed replace the brake band.
Remove small glazed areas of band brake lining by sanding
lightly with a fine grit emery cloth.
6.
Measure the thickness of the drum band brake lining. If the
drum brake band lining is less than 0.062 in. (2 mm) thick
anywhere along the edges replace the brake band assembly
(104).
Repair
Actual repairs are limited to the removal of small burrs and other
minor surface imperfections from gears, shafts, housings and
machined surfaces. Use a fine stone or emery cloth for this
work.
1.
Worn or damaged parts must be replaced. Refer to the
applicable parts listing for specific replacement parts
information.
2.
Inspect all remaining parts for evidence of damage.
Replace or repair any part which is in questionable
condition. The cost of the part is often minor in comparison
with the cost of redoing the job.
3.
Smooth out all nicks, burrs, or galled spots on shafts,
bores, pins, or bushings.
4.
Examine all gear teeth carefully, and remove nicks or
burrs.
5.
Polish the edges of all shaft shoulders to remove small
nicks which may have been caused during handling.
6.
Remove all nicks and burrs caused by lockwashers.
Assembly
General instructions
•
use all new gaskets and seals.
•
replace worn parts.
•
assemble parts using match marks applied during
disassembly. Compare replacement parts with originals
to identify installation alignments.
•
lubricate all internal parts with rust and oxidation
inhibiting lubricant, ISO VG 100 (30W).
Thermoplastic Coated Parts Assembly
CAUTION
• During application of thermoplastic coating to assemblies
use a flame to localize the heat. Do not heat entire assembly.
Assemblies contain gaskets, ‘O’ rings and other components
that may be damaged by exposure to excessive heat.
1.
When assembling parts already coated, the mating areas can
be heated to soften the coating enough to flow together and
seal the parts.
2.
When installing a new component in an assembly, remove
coating from existing parts as necessary to ensure parts
mate correctly.
3.
Install fasteners and torque as required. Apply coating to
bare areas as described in ‘Thermoplastic Coating’
repairing surfaces instructions in the “MAINTENANCE”
section for areas larger than 1/16 inch (1.6 mm).
4.
Allow the repaired area to cool. Quenching with water is
acceptable. Rough spots, minor scorching and excess
coating deposits can be wet sanded to remove the
imperfections. To return the gloss finish, reheat the surface
carefully.
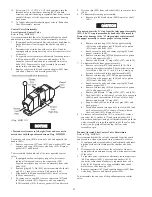
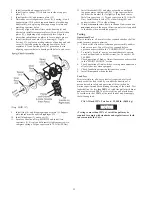
Motor Assembly
Refer to Dwg. MHP0690.
1.
Install two seal rings (251) on each end of rotary valve
(250). Place bearing (252) onto the rear of rotary valve
(250) and press into position. Press only on the bearing
inner race. With the rotary valve housing (247) exhaust
flange side down, install rotary valve into housing.
2.
Install ‘O’ ring (244) into motor housing (217).
3.
Install the rotary valve housing gasket (243) onto rotary
valve housing (247). With the exhaust flange down on the
bench, install motor housing (217) onto rotary valve
housing (247). Check for any evidence of damage to ‘O’
ring (244) when the rotary valve housing is fully engaged.
Install exhaust flange (254) and tighten capscrews (255) to
50 ft lbs (68 Nm).
4.
If removed, press crank bearing (228) on crank assembly
(231). Press only on the inner race of the bearing.
5.
Place crank assembly (231) on a work bench with the oil
slinger (230) down and slide the sleeve (232), with tang up,
on the crankpin.
6.
Slide connecting rod bushing (233) over the sleeve (232)
and first connecting rod ring (234) with the chamfer up.
7.
Install the connecting rods (206) in the same order as
removed, with all feet pointing in the same direction, using
the first connecting rod ring (234) to hold one side of the
connecting rod feet.
8.
Slide the second connecting rod ring (234) over the other
side of the connecting rod feet with the chamfer on the ring
facing down (toward the stem of the connecting rod).
9.
Slide the crank shaft valve end over the crank pin while
simultaneously aligning the tang on the sleeve (232) with
the slot in the crank shaft.
10. Rotate and position the crank shaft valve end relative to the
crank pin to allow installation of the lock pin (235).
11. Tap the lock pin (235) into place and install the pin nut
(237). Torque nut to 60 ft lbs (81 Nm).
Содержание force5 FA5A-LAK1
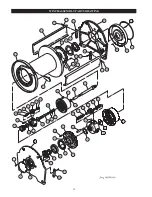
Страница 34: ...34 WINCH ASSEMBLY PARTS DRAWING ...
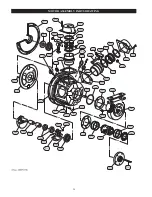
Страница 36: ...36 MOTOR ASSEMBLY PARTS DRAWING ...
Страница 38: ...38 DISC BRAKE ASSEMBLY PARTS DRAWING ...
Страница 40: ...40 DRUM BAND BRAKE ASSEMBLY PARTS DRAWING ...
Страница 42: ...42 LEVER OPERATED CONTROL VALVE ASSEMBLY PARTS DRAWING ...
Страница 44: ...44 PENDANT OPERATED PILOT CONTROL VALVE ASSEMBLY PARTS DRAWING ...
Страница 48: ...48 SHUTTLE VALVE ASSEMBLY PARTS DRAWING ...
Страница 50: ...50 EMERGENCY STOP AND OVERLOAD ASSEMBLY PARTS DRAWING ...
Страница 52: ...52 OPEN FRAME FACE WINCH ASSEMBLY PARTS DRAWING ...
Страница 57: ...57 WINCH LABEL TAG LOCATION AND PART NUMBER REFERENCE DRAWING ...

