Perform Setup
89
➢
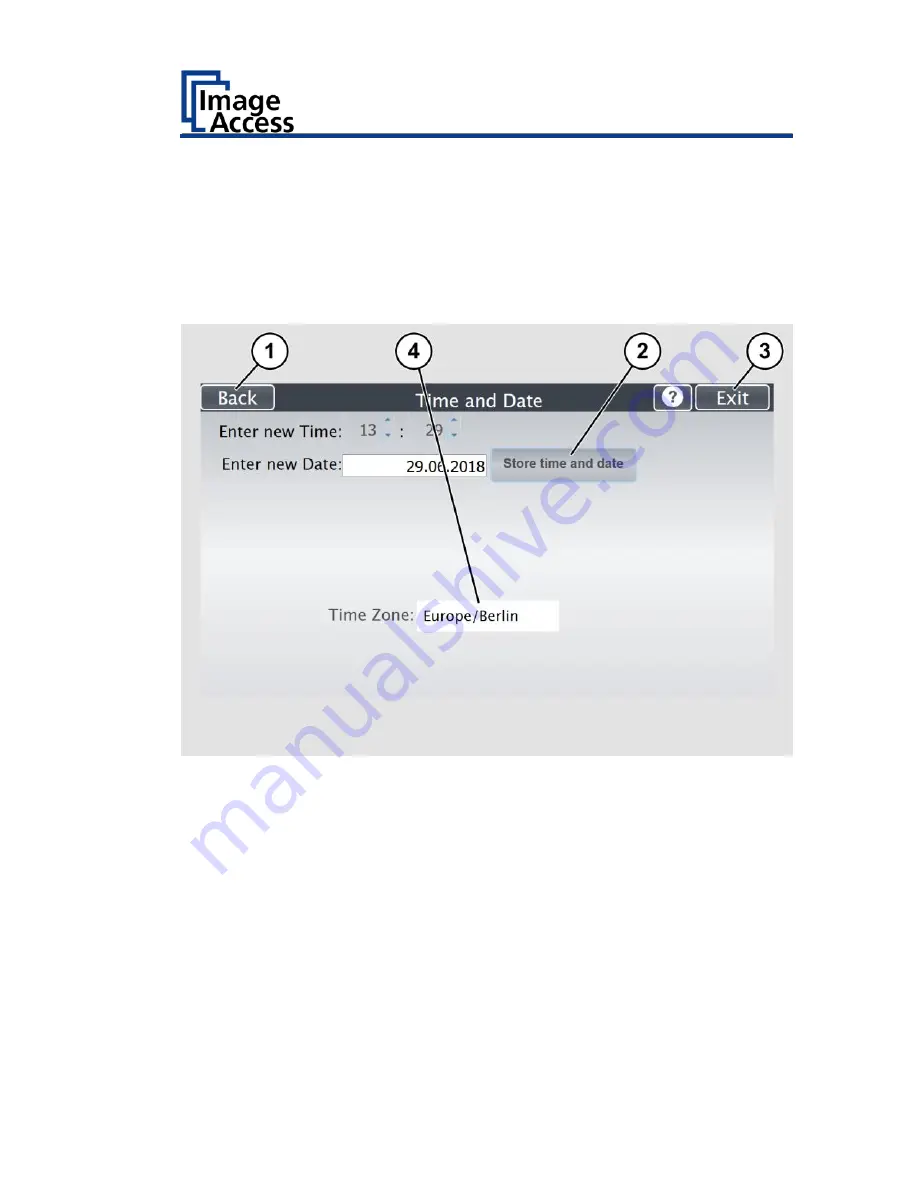
To select the time zone, tap the selection arrow (4).
A selection list with available time zones is displayed.
➢
Select the appropriate time zone.
➢
To save the time zone, click STORE TIME AND DATE (2).
➢
To return to the previous submenu, tap BACK (1).
➢
To return to the "Start screen", tap EXIT (3).
Содержание Bookeye 4 V1A Professional
Страница 1: ...Bookeye 4 V1A V2 V3 Setup Instructions English 02 2019 ...
Страница 23: ...Description 23 The following figure shows the Bookeye 4 V1A rating plate ...
Страница 29: ...Prepare for Setup 29 After a short wait the Start screen is displayed in English ...
Страница 36: ...Perform Setup 36 To complete the log in press OK 1 ...
Страница 38: ...Perform Setup 38 Perform White Balance On the Setup Menu screen tap on WHITE BALANCE 1 ...
Страница 41: ...Perform Setup 41 To perform the white balance proceed as follows Tap on CALIBRATE 1 ...
Страница 46: ...Perform Setup 46 Perform White Balance Glass Plate Tap on GLASS PLATE 1 ...
Страница 49: ...Perform Setup 49 Calibrate Focus and Scan Area On the S2N Setup Menu screen tap on FOCUS and SCAN AREA 1 ...
Страница 50: ...Perform Setup 50 The Focus and Scan Area screen page appears ...
Страница 71: ...Perform Setup 71 Tap the IP Address 1 field ...
Страница 72: ...Perform Setup 72 The IP Address window is displayed Enter the IP address 1 ...
Страница 73: ...Perform Setup 73 To delete a digit move the cursor to the right behind the digit to be deleted and tap DEL 1 ...
Страница 78: ...Perform Setup 78 Modify User Settings On the Setup Menu screen tap on USER SETTINGS 1 ...
Страница 82: ...Perform Setup 82 Configuring the GUI Selection Tap the User Settings screen on CONFIGURE GUI SELECTION 1 ...
Страница 85: ...Perform Setup 85 Set the Time and Date On the Setup Menu screen tap on TIME and DATE 1 ...
Страница 90: ...Perform Setup 90 Perform Test Suite On the Setup Menu screen tap on TESTSUITE 1 ...
Страница 120: ......


