background image

®

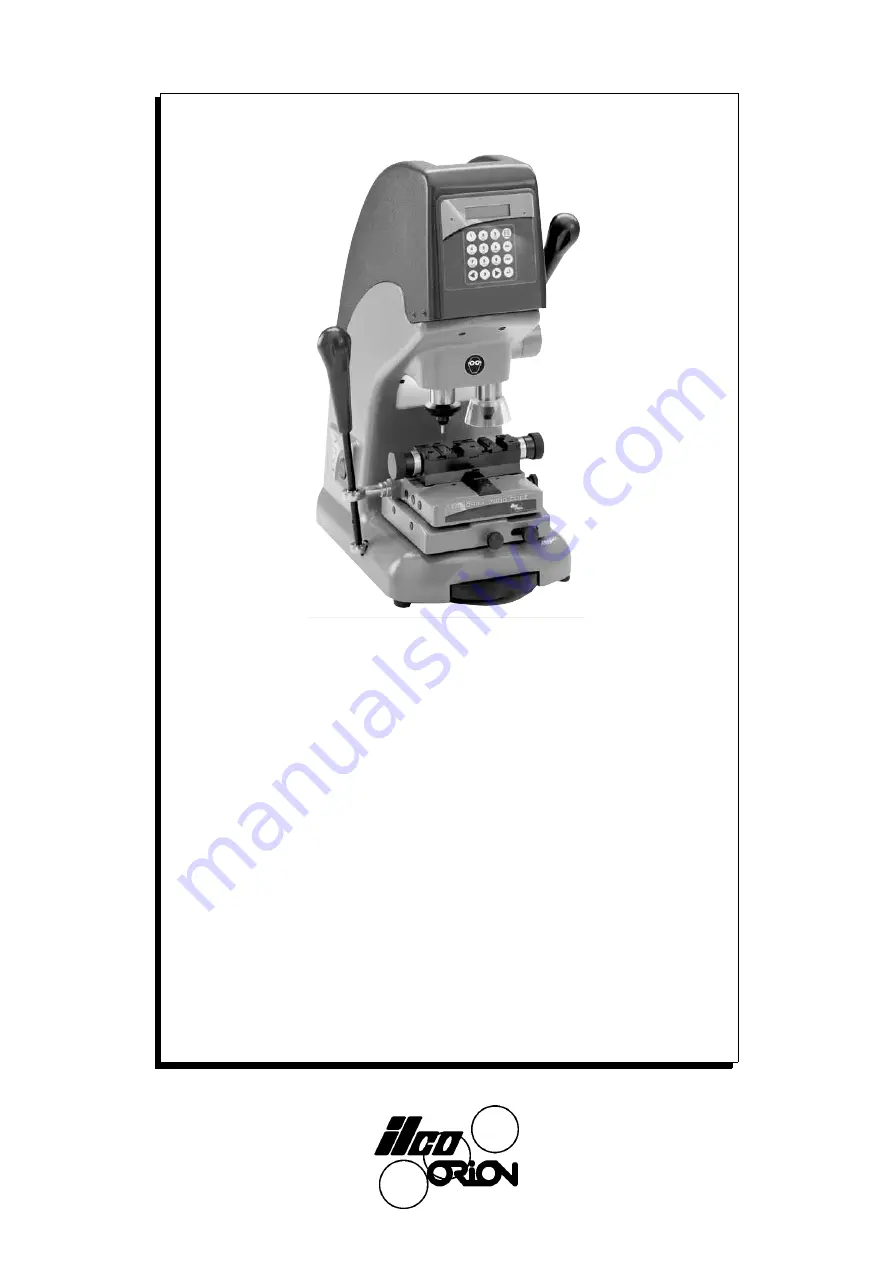
Operating manual


D425374XA

vers. 

2.0

ECODRILL 2000 CODE


Содержание Ecodrill 2000 Code

Страница 1: ... Operating manual D425374XA vers 2 0 ECODRILL 2000 CODE ...

Страница 2: ... rights reserved No part of this publication may be reproduced or used in any form or by any means photocopying microfilm or other without the permission of ILCO ORION Published June 2003 Printed in Vittorio Veneto by ILCo ORION via Podgora 20 Z I 31029 VITTORIO VENETO TV Italy ...

Страница 3: ...er springing 18 7 5 Spring system for LASER Sidewinder keys 19 7 6 Clamps 21 8 CUTTING OPERATIONS 22 8 1 Fitting the keys 22 8 2 Cutting dimple keys 22 8 3 Cutting the back 22 8 4 Cutting by code 23 8 5 Choose key 23 8 6 PC key 23 8 7 Code cutting new keys 24 8 8 Cutting Laser sidewinder type keys 24 8 9 Cutting narrow stemmed Laser sidewinder type keys 25 8 10 Cutting keys for FICHET 26 9 MAINTEN...

Страница 4: ... right hand jaw 34 9 7 3 Replacing the left hand mobile jaw 35 9 7 4 Replacing the right hand mobile jaw 36 9 7 5 Replacing the central jaw 37 10 WASTE DISPOSAL 38 11 AFTER SALES SERVICE 39 11 1 How to request service 39 ...

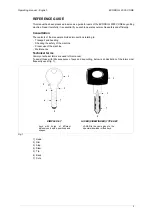
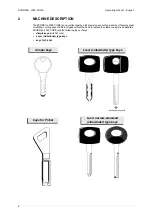
Страница 5: ...ng to Transport and handling Checking the safety of the machine Proper use of the machine Maintenance Technical terms Common technical terms are used in this manual To assist those with little experience of keys and key cutting below is an illustration of the terms most frequently used fig 1 Fig 1 1 Head 2 Rim 3 Stop 4 Stem 5 Tip 6 Back 7 Cuts 2 1 5 7 3 4 6 1 5 7 3 DIMPLE KEY LASER SIDEWINDER TYPE...

Страница 6: ... responsibility in such cases It is therefore indispensable to read the operating manual carefully in order to make the best use of the ECODRILL 2000 CODE sand benefit from its potential Further risks No further risks will arise when properly using the ECODRILL 2000 CODE Protection and safety precautions for the operator The ECODRILL 2000 CODE key cutting machine is entirely built in compliance to...

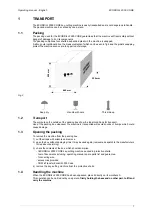
Страница 7: ...r the machine is transported will avoid knocks or bumps which could cause damage 1 3 Opening the packing To remove the machine from the packing box 1 cut the straps with scissors and remove 2 open the box without damaging it as it may be used again removals despatch to the manufacturers for repairs or servicing 3 check the contents of the box which should comprise 1ECODRILL 2000 CODE key cutting m...

Страница 8: ...res great versatility in cutting keys of different types without the need to replace the clamp or apply fixed adapters ECODRILL 2000 CODE cuts the following types of keys dimple keys with flat cuts Laser sidewinder type keys keys for Fichet dimple keys keys for Fichet with adapter supplied Laser sidewinder type keys Laser narrow stemmed sidewinder type keys ...

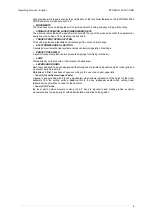
Страница 9: ...ation of settings PROTECTIVE SHIELD A special transparent plastic shield prevents chippings from flying into the air LAMP Placed directly on the machine it illuminates the work area LEVERS AND KNOBS Each lever and knob has been designed with dimensions materials and positions which render grip and movement extremely simple Materials and finish have been chosen according to the use of each part esp...

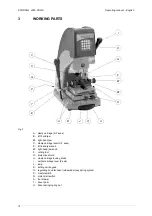
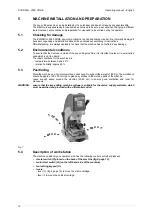
Страница 10: ... E left hand jaw knob E1 right hand jaw knob F cutting tool G protective shield H clamp carriage locking knobs I vertical carriage lever Z axis J lamp K setting unit keypad O regulating knob for Laser sidewinder key spring system P master switch Q motor start switch S tool drawer T tracer point U tracer springing ring nut I K G E1 P B1 O S H B E C J T F Q A U ...

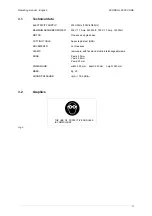
Страница 11: ...3 Amp 140 Watt MOTOR One speed single phase CUTTING TOOLS Super rapid steel HSS MOVEMENTS on three axes CLAMP removable with fixed and mobile interchangeable jaws RUNS X axis 30 mm Y axis 50 mm Z axis 30 mm DIMENSIONS width 350 mm depth 420 mm height 540 mm MASS Kg 25 SOUND PRESSURE Lp A 78 2 dB A 3 2 Graphics Fig 5 THE USE OF PROTECTIVE GOGGLES IS COMPULSORY ...

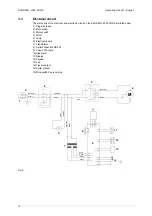
Страница 12: ...h 3 Motor switch 4 Motor 5 Lamp 6 Electronic board 7 Transformer 8 Serial connection RS 232 9 Fuse 3 15A rapid 10 Step motor 11 Display 12 Keypad 13 Fan 14 Tracer contact 15 Cutter contact 16 Microswitch Z axis zeroing Fig 6 M 1 2 3 4 16 light blue 1 2 3 4 1 2 3 1 9 2 3 4 6 7 5 8 10 11 12 13 14 15 brown brown light blue light blue brown blue brown light blue light blue brown white white black blac...

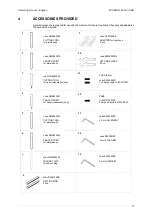
Страница 13: ...ode D300223ZZ 3 mm ALLEN KEY code DMS200080J SETTING PLATES 2 pcs code DMK260340 TRACER POINT for code cutting FUSE 2 pcs code D309226ZZ 3 15 Amps rapid for 230V 100V code DMK260048 CUTTING TOOL for Laser sidewinder keys code DMK260047 TRACER POINT for Laser sidewinder keys 1 2 3 4 5 9 10 11 code DMK260079 TRACER POINT for dimple keys 12 6 14 7 15 13 code DMK260043 CUTTING TOOL for dimple keys cod...

Страница 14: ...ace it in a well aired area which is not too damp The ideal conditions for the machine are temperature between 0 and 40 C relative humidity approx 60 5 3 Positioning Place the machine on a horizontal surface solid enough to support the weight of 30 Kg The workbench should be approx 100 120 cm high to give easy access to the working parts of the machine Leave enough space around the machine 20 30 c...

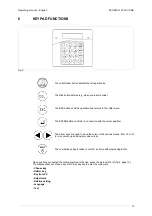
Страница 15: ...ion The Arrow keys are used to move the cursor in the various menus from r h to l h or vice versa up and down or vice versa The number keys insert codes or confirm a choice without pressing Enter Once you have connected the cutting machine to the line press the main switch P fig 4 page 10 The display will show Press a key will Press any key to enter the main menu Choose key Definit key Key from PC...

Страница 16: ...pad Display Tracer point Cutter Serial State of microswitch Turn the ring nut U fig 4 page 10 and check the passage from ON to OFF on the display Note if the OFF ON transition is not made contact Technical Assistance Dept Step motor Use the Arrow keys to check that the tracer point unit turns in both directions Note if this is not so contact Technical Assistance Dept Keypad Press the various keys ...

Страница 17: ... and M1 fig 9 to remove the tracer point and cutting tool from the sleeves Fig 9 7 2 Adjustment Note please note that before adjusting the machine you need to eliminate the tracer springing chap 7 4 page 18 For carrying out adjustment insert the cutter and tracer into their relative mandrils block the bars or 2 identical keyblanks in the clamps and proceed as follows 1 turn the machine on using th...

Страница 18: ...of millimetres which express the depth difference either positive or negative By pressing the left arrow key you will obtain a shallower cut Confirm the desired value by pressing Enter The setting you have thus obtained will remain until you perform a new one The setting you have thus obtained will remain until you perform a new one 7 4 Tracer springing You can obtain the tracer springing simply b...

Страница 19: ...e spring system for Laser sidewinder keys is activated by means of the knob O fig 12 It determines lateral pressure on the part of the tools throughout the cutting operation this makes it possible for the operator to follow the outline of the cuts manually without having to exert cross pressure on lever C Fig 12 fig 13 fig 14 and fig 15 show three examples of the use of the spring system central c...

Страница 20: ...ems of the two keys fig 12 page 19 Right hand cutting take the cutter and tracer over the keys positioning them to the left of the stems fig 14 Left hand cutting take the cutter and tracer over the keys positioning them to the right of the stems fig 15 Tighten knob O and carry out cutting operations Fig 14 Fig 15 right hand cutting adapter adapter left hand cutting ...

Страница 21: ...manual English ECODRILL 2000 CODE 21 7 6 Clamps The clamps are provided with special key locking jaws fig 16 which can be easily changed if damage without replacing the whole clamp unit see ch 9 7 page 33 Fig 16 ...

Страница 22: ...tting tool in motion 8 1 Fitting the keys 1 Switch on the machine with the master switch 2 take the clamp carriage towards the operator 3 place the original key into the left hand jaw and the keyblank into the right hand jaw paying attention to the type of stop on the key 8 2 Cutting dimple keys 1 turn on switch P fig 4 page 10 2 install the cutter and tracer point and gauge 3 release the tracer p...

Страница 23: ...this operation too press the ESC button 14 Wait positioning will first be displayed followed by the initial menu 15 repeat the cutting procedure to cut other rows if applicable 8 4 2 PC key Insert the suitable tracer and cutter in their respective spindles Eliminate the tracer point spring ch 7 4 and gauge Note the key cutter only works with direct codes 1 place the cutting pattern of the key to b...

Страница 24: ...select Definition key press Enter select Cut key press Enter Use a template with suitable pitches according to the type of key to be cut and follow the order of position and depth as when cutting by code 8 6 Cutting Laser sidewinder type keys Before activating the start switch Q lower lever I close to the keys and regulate the spring system for laser sidewinder keys ch 7 5 with knob O 1 start the ...

Страница 25: ... secure the key by tightening knob E 5 remove the bar and repeat the same operations on the right hand jaw Cutting 1 before activating the start switch Q lower lever I close to the keys and regulate the spring system for laser sidewinder keys ch 7 5 2 start the cutting operation by activating switch Q 3 lower the spindle cut the key and stop at the beginning of the cut secure the spindle at this h...

Страница 26: ...with the stop up against the clamp 3 secure the keys by tightening knobs E and E1 Fig 21 Cutting 1 After gauging use the knob O to activate the spring for laser keys cap 7 5 central cutting 2 turn on switch Q lower the collet assembly and position on the beginning of the cut secure the spindle at this height by turning the lever I clockwise carry out the cuts using only lever C Note the letters in...

Страница 27: ... oil Before starting any type of maintenance checks or replacements read the instructions below never carry out maintenance or servicing with the machine switched on always remove the mains plug follow all the instructions in the manual to the letter use original spare parts 9 1 Replacing the belt and adjusting tension If the upper part of the machine vibrates check the tension on the belt as desc...

Страница 28: ... same type rapid or delayed and with the same Amps as shown in the manual The ECODRILL 2000 CODE key cutting machine has two fuses 3 15 Amps rapid placed in the inlet socket next to the master switch fig 24 to protect the key cutting machine from sudden changes in voltage or short circuits It is advisable to check the fuses if the machine is not activated by turning on the master switch Proceed as...

Страница 29: ...ws D1 on the cover D and remove 3 detach the connectors C1 C2 C3 C4 C5 4 loosen the 2 screws T1 and remove the keypad unit 5 loosen the 4 screws V on the fan support and remove fig 26 6 loosen the 4 screws S1 on the circuit board and remove by lifting the tab L2 fig 26 7 fit the new circuit board and secure with the 4 screws S1 Fasten down the tab L2 and secure the keypad wire L3 8 replace the fan...

Страница 30: ... keypad unit fig 26 page 29 5 loosen the 4 screws V on the fan support and remove 6 loosen the 4 screws S1 on the circuit board and remove by lifting the tab L2 fig 26 7 remove the keypad unit T2 fig 27 8 fit the new keypad unit 9 fit the circuit board and secure with the 4 screws S1 Fasten down the tab L2 and secure the keypad wire L3 10 fit the fan support to the new keypad unit and secure with ...

Страница 31: ...he microswitch connectors C6 observing their position carefully 4 loosen the 2 screws M3 taking care not to drop the washers and remove the microswitch 5 tighten the ring nut G1 completely then unscrew by one full turn 6 loosen the screw M4 7 fit the new microswitch and secure with the 2 screws M3 8 regulate plate P1 height manually until the microswitch clicks then tighten the screw M4 9 replace ...

Страница 32: ...osen the 4 screws F1 securing the motor and remove the belt F2 4 unscrew the 4 screws F1 completely and remove the motor 5 unscrew the motor pulley left hand thread and remove the pulley 6 fit the pulley to the new motor 7 secure the new motor with the 4 screws F1 without tightening them 8 tension the belt pull the motor by hand so that it is neither too tight or too loose and tighten the 4 screws...

Страница 33: ...he central jaw fig 33 5 if the distance between the two jaws is not correct no contact with one of the sides adjust the position of the left hand jaw a loosen the 2 screws R1 and the 2 grub screws R2 then register the 2 grub screws R3 until they are properly gauged b lock the 2 screws R1 and the 2 grub screws R2 6 check the front alignment lower the lever I and take the pins into contact with the ...

Страница 34: ... fig 36 5 if the distance between the two jaws is not correct no contact with one of the sides adjust the position of the right hand jaw a loosen the 2 screws Z1 and the 2 grub screws Z2 then register the 2 grub screws Z3 until they are properly gauged b lock the 2 screws Z1 and the 2 grub screws Z2 6 check the front alignment lower the lever I and take the pins into contact with the front side of...

Страница 35: ...lamp and remove it with its washer 4 loosen the 2 screws P2 and remove the central jaw chap 9 7 5 page 37 5 remove the mobile jaw B3 6 fit the new mobile jaw B3 fit the washer and tighten the clamp closing screw 7 fit the central jaw chap 9 7 5 page 37 8 secure the flange F1 with the 2 screws X2 9 fit the knob onto the pin of the clamp screw securing with the grub screw X1 on the machined flat par...

Страница 36: ...and remove it with its washer 4 loosen the 2 screws P2 and remove the central jaw chap 9 7 5 page 37 5 remove the mobile jaw B4 6 fit the new mobile jaw B4 fit the washer and tighten the clamp closing screw 7 fit the central jaw chap 9 7 5 page 37 8 secure the flange W1 with the 2 screws Y2 9 fit the knob onto the pin of the clamp screw securing with the grub screw Y1 on the machined flat part of ...

Страница 37: ... Z2 and register the 2 grub screws Z3 until the distance is correct chap 9 7 2 page 34 b tighten the 2 grub screws Z2 and the 2 screws Z1 For the left hand jaw a loosen the 2 screws R1 the 2 grub screws R2 and register the 2 grub screws R3 until the distance is correct chap 9 7 1 page 33 b tighten the 2 grub screws R2 and the 2 screws R1 6 check the front alignment lower the lever I and take the p...

Страница 38: ...esidue from solid urban waste into contaminated or toxic noxious waste are listed in the appendices to the current European Union regulations regarding disposal of such waste INFORMATION FOR USERS as per art 10 of Directive 2002 96 CE of 27 01 2003 regarding waste from electric and electronic appliances RAEE The symbol illustrated above also found on the machine indicates that it has been placed o...

Страница 39: ...t by the manufacturer or in the special Service Centres recommended by Ilco Orion On the back cover of this manual is a list of the manufacturer s addresses listed below are the addresses of specialized service centres 11 1 How to request service The guarantee attached to ECODRILL 2000 CODE key cutting machine ensures free repairs or replacements of faulty parts within 12 months of purchase All ot...

Страница 40: ...ECODRILL 2000 CODE Operating manual English 40 ...

Страница 41: ... FAX 0438 913800 Declares under its own responsibility that the Key cutting machine model ECODRILL 2000 CODE complies with the requirements of the following European Directives European Union DIRECTIVE 98 37 CEE Machines and with the EN 292 1 EN 292 2 Standards European Union DIRECTIVE 89 336 CEE Electromagnetic Compatibility and with the EN 55014 1 2000 A1 2001 EN 55014 2 1997 A2 2001 EN 61000 3 ...

Страница 42: ...ILCO ORION via Podgora 20 Z I 31029 VITTORIO VENETO TV 0438 913636 Telefax 0438 913650 Internet www ilco orion it E mail ilco orion ilco orion it ...

Отзывы: