115
The window display mode and the channel number are by default. For example, for the 16-
channel, the max window split mode is 16.
3) Multiple-channel monitor, system adopts extra stream to monitor by default. Double click one
channel, system switches to single channel and system uses main stream to monitor. You can
view there are two icons at the left top corner of the channel number for you reference. M stands
for main stream. S stands for sub stream (extra stream).
4) If you login via the WAN mode, system does not support alarm activation to open the video
function in the Alarm setup interface.
Important
z
For multiple-channel monitor mode, system adopts extra stream to monitor by default. You
can not modify manually. All channels are trying to synchronize. Please note the
synchronization effect still depends on your network environments.
z
For bandwidth consideration, system can not support monitor and playback at the same time.
System auto closes monitor or playback interface when you are searching setup in the
configuration interface. It is to enhance search speed.
7.8
Setup
7.8.1 Channel
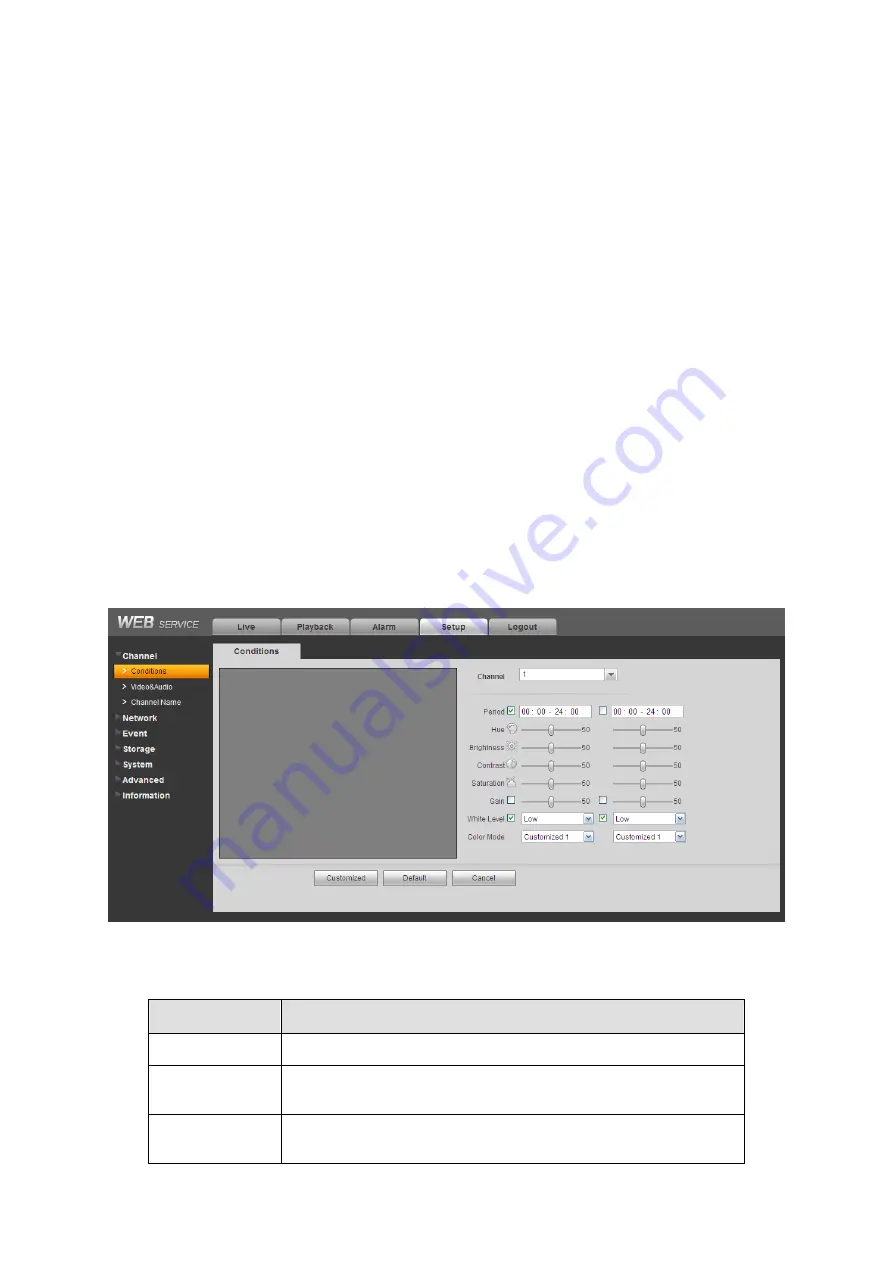
7.8.1.1 Conditions
Here you can view device property information. The setups become valid immediately after you
set. See Figure 7-18.
Figure 7-18
Please refer to the following sheet for detailed information.
Parameter
Function
Channel
Please select a channel from the dropdown list.
Period
It divides one day (24 hours) to two periods. You can set
different hue, brightness, and contrast for different periods.
Hue
It is to adjust monitor video brightness and darkness level. The
default value is 50.
Содержание N6 Series
Страница 1: ...ICRealtime N6 Series Standalone DVR User s Manual Version 6 2 0 ...
Страница 51: ...41 Figure 4 25 Figure 4 26 Figure 4 27 ...
Страница 52: ...42 Figure 4 28 Figure 4 29 Figure 4 30 ...
Страница 68: ...58 Figure 5 3 Figure 5 4 Figure 5 5 Figure 5 6 ...
Страница 70: ...60 Please highlight icon to select the corresponding function Figure 5 8 Figure 5 9 Figure 5 10 ...
Страница 76: ...66 Figure 5 16 Figure 5 17 Figure 5 18 5 3 5 3 NTP Setup ...
Страница 116: ...106 Figure 6 11 ...
Страница 145: ...135 Figure 7 43 Figure 7 44 Figure 7 45 Please refer to the following sheet for detailed information ...
Страница 148: ...138 Figure 7 49 Figure 7 50 Figure 7 51 Figure 7 52 ...
Страница 150: ...140 Figure 7 54 Figure 7 55 Figure 7 56 ...
Страница 185: ...175 Maxtor DiamondMax 20 STM3250820AS 250G SATA ...


