background image


I-2533 User Manual (ver. 1.1, 2013/05/31) ------22


3.4  Baud Rate Register Configuration 

The  I-2533  supports  the  baud  register  configuration.  Users  can  directly 

configure  the  baud  by  write  the  proper  value  of  the  baud  register.  This  is 

useful  if  users  want  to  adjust  the  position  of  the  sampling  point  of  a  CAN 

message. The baud rate register is active when the value baud is set to zero 

and the rotary switch is set to 

‘A’. The following steps is helpful for configure 

the baud register. 


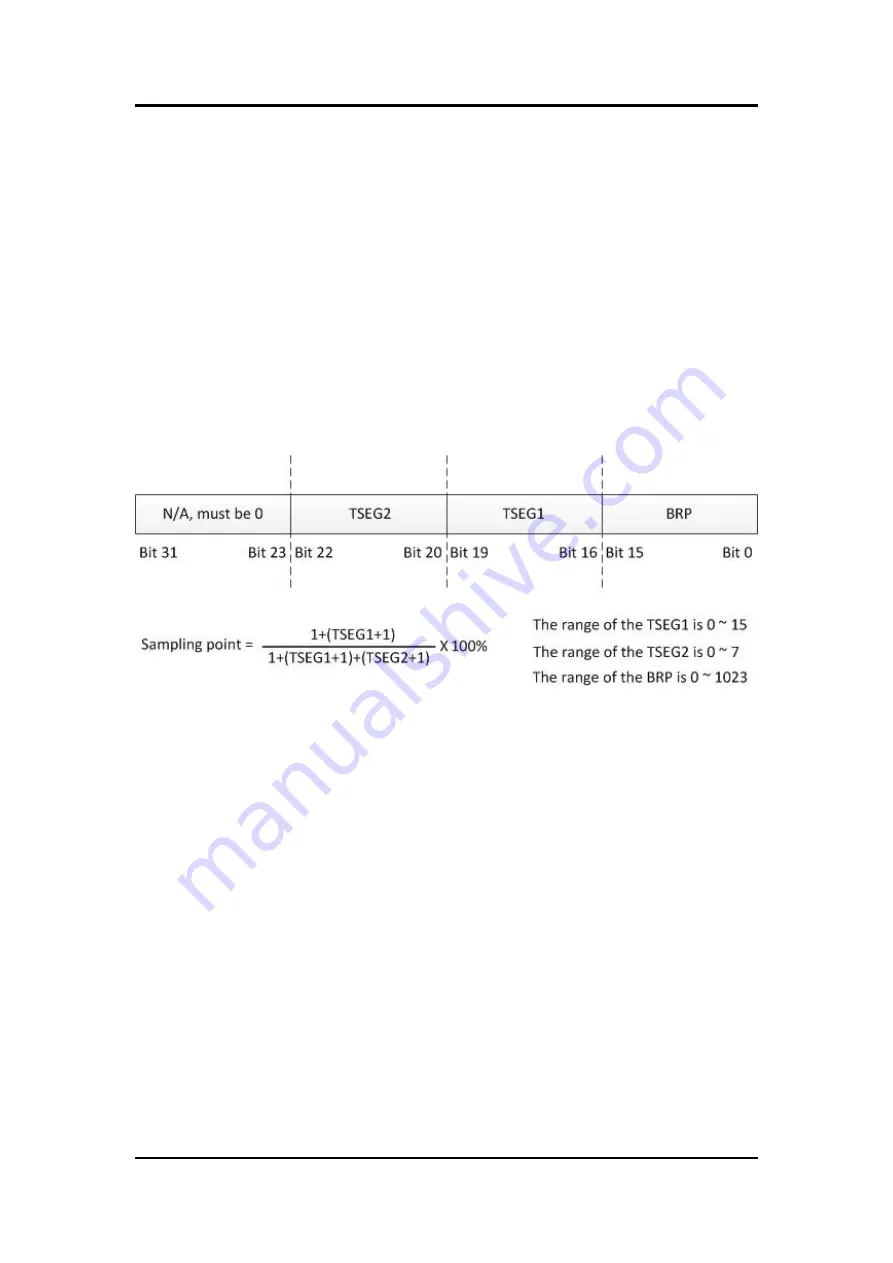
Step 1:  Calculate the proper  value of  the baud  register.  The baud register  is 

divided into 4 parts as below. 


(1) Calculate the time quantum which is the value of 36000000 divided 

by  the  value  of  the  CAN  buad  which  you  would  like  to  use.  For 

example, if you want to use 250kbps, then 36000000/250000=72. 

Because  the  time  quantum  must  be  integer,  if  the  time  quantum 

can

’t be integer, it indicates that the baud rate can’t be supported 

by the I-2533. 

(2) The  time  quantum  must  be  the  product  of  the  (BRP+1)  and 

1+(TSEG1+1)+(TSEG2+1).  Because  the  limitation  of  the  value  of 

TSEG1 and TSEG2, the time quantum divided by (BRP+1) must be 

in  the range of  3 ~ 25.  Therefore select a  proper integer  value of 

the BRP to fit the condition. For example, if the time quantum are 

72. The BRP may be 2, 3, 5, 7, 8, 11, 17, 23, and 35. If the BRP is 

selected  to  5,  the  1+(TSEG1+1)+(TSEG2+1)  is  72/(5+1)=12. 

Select the TSEG1 and TSEG2 are 9 and 0 respectively. In this case, 

the  sampling  point  is  (1+9+1)/(1+9+1+0+1)=91.6%.  The  register 

value is 0x00090005. 

Содержание I-2533

Страница 1: ...uct ICP DAS reserves the right to change this manual at any time without notice The information furnished by ICP DAS is believed to be accurate and reliable However no responsibility is assumed by ICP...

Страница 2: ...Diagram 6 2 2 Appearance 7 2 3 Pin Assignment 8 2 4 Rotary Switch 9 2 5 LED Indicator 10 2 6 Terminator Resistor Setup 12 2 7 Wire Connection 14 3 Network Deployment 15 3 1 Driving Capability 15 3 2 F...

Страница 3: ...CAN bus system will not reduced because of CAN baud rate It means that the total network distance can be extended Second the bus error on one CAN network will not affect the operation of another CAN...

Страница 4: ...0 m 62 5 125 m is recommended Transmission Distance m 2 km max in 62 5 125 m fiber cable UART Interface COM 1 RS 232 configuration only COM 1 Connector Screwed terminal block RxD TxD GND Baud Rate bps...

Страница 5: ...on on the CAN side Support both CAN 2 0A and CAN 2 0B Fully compatible with the ISO 11898 2 standard Rotary switch for CAN baud rate configuration Build in switch for 120 terminator resistor Up to 100...

Страница 6: ...I 2533 User Manual ver 1 1 2013 05 31 6 2 Technical data 2 1 Block Diagram The following figure is the block diagram illustrating the functions of the I 2533 module Figure 2 1 Block Diagram of I 2533...

Страница 7: ...Type Multi Mode 50 125 m 62 5 125 m 100 140 m LED Indicators COM Port Only for utility tool COM Port ISO 11898 2 standard Rotary Switch Power Connector port DIP Switch Enable or disable 120 terminator...

Страница 8: ...Sometimes the CAN_GND voltage level of different CAN devices on a CAN bus system are not equal In this case it could cause some problems and derogate the system stability There is one way to relieve...

Страница 9: ...re 16 sections on the rotary switch They are descripted on the following table Table 2 2 Description of Rotary Switch Switch Value Description 0 Set baud rate to 10 kbps 1 Set baud rate to 20 kbps 2 S...

Страница 10: ...if bus loading is heavy the LED will be always on CAN Err Red 1 If the I 2533 detects the bus off status on the CAN bus this LED is always on At this moment the I 2533 clear all CAN messages stored i...

Страница 11: ...uffer in to the CAN network the LED is turned off if there is no error happened Fiber Err Red 1 If the I 2533 detects the RXD line of the fiber is off this LED is always on 2 If the fiber data buffer...

Страница 12: ...ositions of these terminator resistors are shown as following figure 120 120 CAN_H CAN_L Device N Device 2 Device 1 Figure 2 5 CAN bus network topology Each I 2533 includes one build in 120 termintor...

Страница 13: ...you to enable the terminator resistor 120 120 CAN_H CAN_L Device N Device 2 Device 1 Device N 1 I 2533 I 2533 Fiber Figure 2 8 Application 1 If your application is like the structure as follows the t...

Страница 14: ...G pin of power connector are interconnected inside the I 2533 When users mount the I 2533 onto a metal DIN Rail users can connect the DIN Rail to Earth Ground to replace connecting the F G pin of pow...

Страница 15: ...tion mm2 Resistance km 0 25 AWG23 90 0 5 AWG20 50 0 8 AWG18 33 1 3 AWG16 20 Under the conditions described above users can refer to the following table to know the maximum node numbers in each segment...

Страница 16: ...the some attributions of fiber still influence it Higher attenuation of fiber will reduce the transmission distance Users can use following table to know the relationship between those two Table 3 4...

Страница 17: ...3 Set the rotary switch to F and connect the PC available COM port with the COM port of the I 2533 Users can find the communication cable in the product box When connecting to the COM port of I 2533 t...

Страница 18: ...rate on the User defined Baud Rate field Here fill 250000 for 250 kbps Then set the filter by using the from field to field and Add button For example If users want to pass the CAN message with ID 0x...

Страница 19: ...led is empty it means all pass If users want to pass the message with ID 0x0 in the CAN 2 0A specification fill the value 0 in both of from and to field and click Add button Step5 The method of config...

Страница 20: ...p7 Then Users can save the configurations in to an ini file Click Save to File to archieve this purpose Step8 Of course users can load the configurations from ini file and store them into the I 2533 S...

Страница 21: ...he ID 0x018 in the Pass List and click Delete one button The ID 0x018 will be removed from the Pass List Clear all button will remove all settings from the Pass List Step11 After finishing the configu...

Страница 22: ...36000000 divided by the value of the CAN buad which you would like to use For example if you want to use 250kbps then 36000000 250000 72 Because the time quantum must be integer if the time quantum ca...

Страница 23: ...value into the fields and set the baud rate to be zero Step 3 When finishing the configuration click Save All Configuration button Step4 When the procedure is successful the following message will be...

Страница 24: ...emote_IO can_bus i 2533 htm Step 1 Power off the I 2533 set the rotary switch to E and power on the I 2533 If the I 2533 is in the firmware update mode the CAN_Tx CAN_Rx CAN_Err FB_Err will flash once...

Страница 25: ...I 2533 User Manual ver 1 1 2013 05 31 25 4 Dimension Figure 4 1 Dimension of I 2533...

Отзывы: