


4-16 Using the Tools Page
Rev AA
To capture the Encoder profiling on the CLARiTY screen, proceed as
follows:
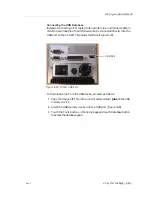
1
Touch the Encoder Profiles button on the Printhead Diagnostics page
access to the Encoder Profiles parameters (Figure 4-16).
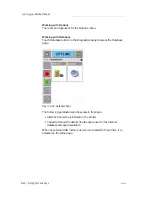
2
To set up the options for the profile you are want to capture, touch the
following buttons:
• Profiling starts: Has three options
- Automatically allows you to capture the profile after you touch the
Capture Encoder Profile button
- On Print Underspeed allows you to only capture a profile if the film
speed drops below the minimum limit of the printers specification
- On Print Signal allows you to only capture a profile after a print
signal has been received
• Profile Type: Has three options which present the information in
slightly different graphical forms. Choose the one which best suits
your needs
• Profile X Axis: Allows you to set the X Axis of the chart to be either
time or distance
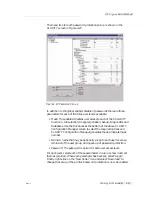
3
Once the options have been setup, start the capture process by
touching the Capture Encoder Profile button.
Note: Encoder profiles are not captured during the ribbon calibration
sequence.
Figure 4-16: Encoder Profiles Page
ICE
P
egasus
Service Manual