7.
If
you
have
other
options
to
install
or
remove,
do
so
now;
otherwise,
go
to
“Completing
the
installation”
on
page
35.
Installing
a
hot-swap
hard
disk
drive
The
following
notes
describe
the
types
of
hard
disk
drives
that
your
server
supports
and
other
information
that
you
must
consider
when
installing
a
hard
disk
drive:
v
The
server
supports
up
to
six
26
mm
(1-inch),
3.5-inch,
hot-swap
hard
disk
drives
in
the
hot-swap
bays.
v
Each
hot-swap
drive
is
in
a
tray,
which
has
a
green
activity
LED
and
an
amber
status
LED
in
the
upper-right
corner.
The
activity
LED
flashes
when
the
drive
is
active;
the
status
LED
is
lit
if
the
drive
has
an
error.
Each
hot-swap
drive
has
a
single-connector-attached
(SCA)
connector,
which
connects
directly
into
the
hot-swap
SCSI
hard
disk
drive
backplane.
The
backplane
controls
the
SCSI
IDs
for
the
hot-swap
drives.
v
Before
you
install
a
hot-swap
hard
disk
drive,
take
the
following
actions:
–
Inspect
the
drive
tray
for
any
signs
of
damage.
–
Make
sure
that
the
drive
is
installed
in
the
tray
correctly.
–
If
your
server
has
an
optional
RAID
adapter
installed,
see
the
documentation
that
comes
with
the
adapter
for
information
about
installing
a
hard
disk
drive.
Complete
the
following
steps
to
install
a
hard
disk
drive:
1.
Review
the
safety
information
beginning
on
page
v
and
“Installation
guidelines”
on
page
11.
2.
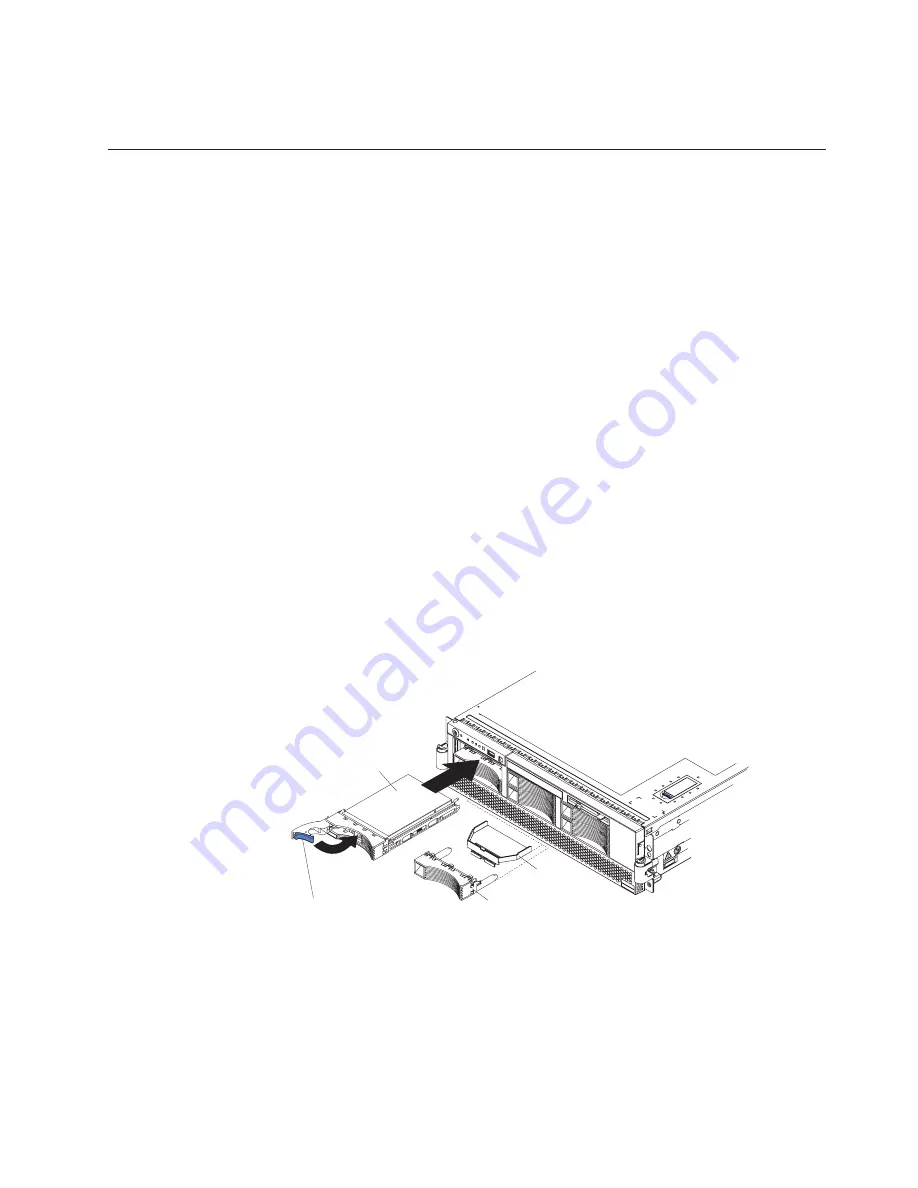
Remove
the
filler
panel
and
air
baffle
from
one
of
the
empty
hot-swap
bays,
if
present.
Attention:
To
maintain
proper
system
cooling,
do
not
operate
the
server
for
more
than
10
minutes
without
either
a
drive
or
filler
panel
and
air
baffle
installed
in
each
bay.
Filler panel
Drive-tray assembly
Drive handle
(in open position)
Air baffle
3.
Install
the
hard
disk
drive
in
the
hot-swap
bay:
a.
Make
sure
that
the
tray
handle
is
open
(that
is,
perpendicular
to
the
front
of
the
drive).
b.
Align
the
drive
assembly
with
the
guide
rails
in
the
bay.
c.
Gently
push
the
drive
assembly
into
the
bay
until
the
drive
stops.
d.
Push
the
tray
handle
to
the
closed
(locked)
position.
e.
Check
the
hard
disk
drive
status
LED
to
make
sure
that
the
hard
disk
drive
is
operating
correctly.
If
the
amber
hard
disk
drive
status
LED
for
a
drive
is
Chapter
2.
Installing
options
17
Содержание xSeries 365
Страница 1: ...IBM xSeries 365 Type 8861 and 8862 Option Installation Guide ERserver...
Страница 2: ......
Страница 3: ...IBM xSeries 365 Type 8861 and 8862 Option Installation Guide ERserver...
Страница 37: ...b Remove all fans See Replacing a hot swap fan on page 33 for instructions Chapter 2 Installing options 25...
Страница 52: ...40 IBM xSeries 365 Type 8861 and 8862 Option Installation Guide...
Страница 64: ...52 IBM xSeries 365 Type 8861 and 8862 Option Installation Guide...
Страница 67: ......
Страница 68: ...Part Number 13N0344 Printed in USA 1P P N 13N0344...


