background image

Installing


the


system


fan


To


install


the


system


fan,


complete


the


following


steps.


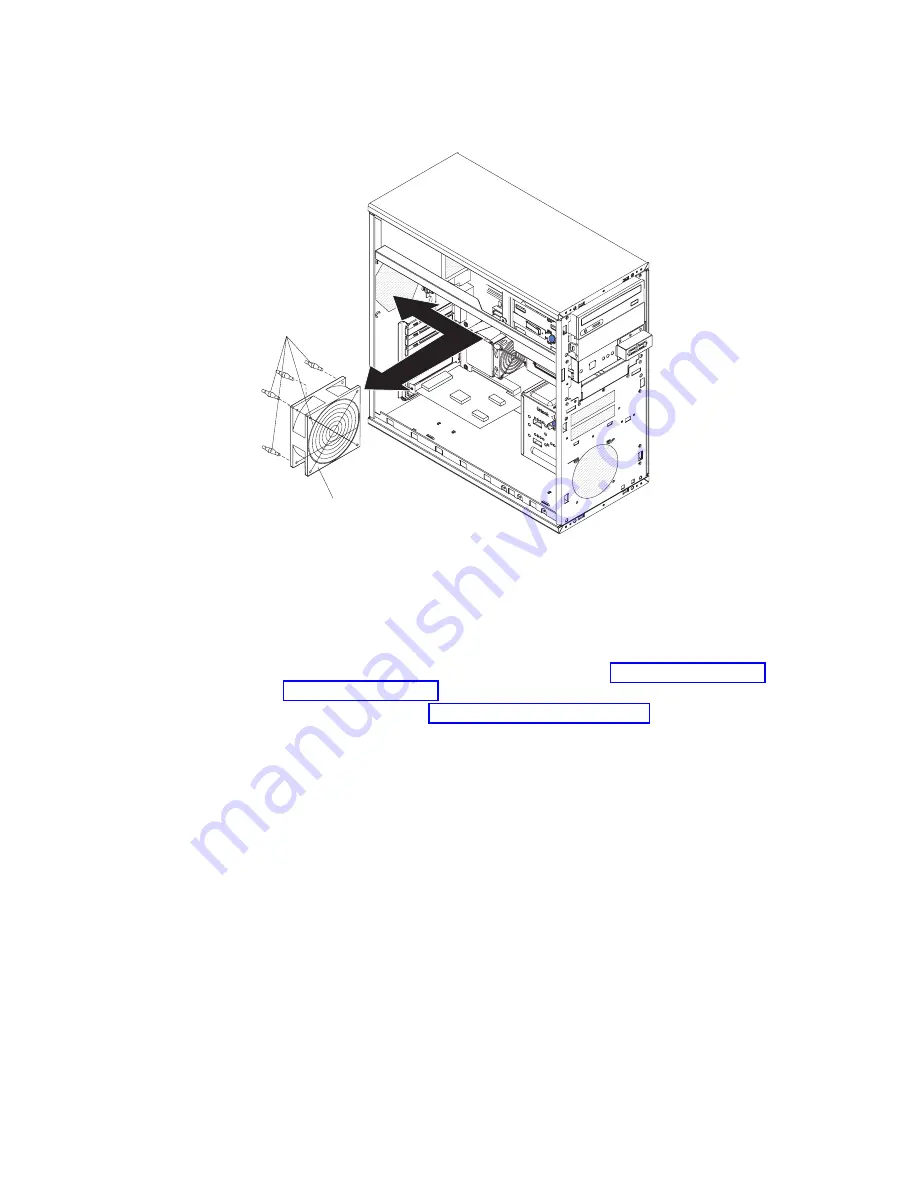
Rubber
grommets

System fan


1.


Locate


the


rubber


grommets


that


you


removed


from


the


defective


fan.


Use


needle-nosed


pliers


to


pull


the


grommets


through


the


holes


in


the


replacement


fan.


2.


Position


the


fan


so


that


the


grommets


protrude


through


the


holes


in


the


chassis;


then,


use


needle-nosed


pliers


to


pull


the


grommets


through


the


holes


from


outside


the


chassis.


3.


Connect


the


fan


cable


to


the


system


board


(see


“System-board


internal


connectors”


on


page


8


for


the


location


of


the


system


fan


connector).


4.


Install


the


cover


(see


“Installing


the


cover”


on


page


58).


5.


Reconnect


the


external


cables


and


power


cords


to


the


server;


then,


connect


the


power


cords


to


electrical


outlets.


6.


Turn


on


the


attached


devices;


then,


turn


on


the


server.


Chapter


4.


Removing


and


replacing


server


components


75

Содержание xSeries 100

Страница 1: ...IBM xSeries 100 Type 8486 Problem Determination and Service Guide...

Страница 2: ......

Страница 3: ...IBM xSeries 100 Type 8486 Problem Determination and Service Guide...

Страница 4: ...al information in Appendix B Notices on page 97 Second Edition January 2006 Copyright International Business Machines Corporation 2005 All rights reserved US Government Users Restricted Rights Use dup...

Страница 5: ...r codes 16 Checkout procedure 22 About the checkout procedure 22 Performing the checkout procedure 23 Checkpoint codes trained service technicians only 23 ServerGuide problems 24 Troubleshooting table...

Страница 6: ...75 Removing the front USB connector assembly 76 Installing the front USB connector assembly 77 Removing the power switch LED bracket 78 Installing the power switch LED bracket 79 Removing and replacin...

Страница 7: ...ogram 101 Electronic emission notices 102 Federal Communications Commission FCC statement 102 Industry Canada Class B emission compliance statement 102 Avis de conformit la r glementation d Industrie...

Страница 8: ...vi IBM xSeries 100 Type 8486 Problem Determination and Service Guide...

Страница 9: ...tuotteen lue turvaohjeet kohdasta Safety Information Avant d installer ce produit lisez les consignes de s curit Vor der Installation dieses Produkts die Sicherheitshinweise lesen Prima di installare...

Страница 10: ...such as a damaged CRT face or a bulging capacitor v Mechanical hazards such as loose or missing hardware To inspect the product for potential unsafe conditions complete the following steps 1 Make sur...

Страница 11: ...chanical inspection work near power supplies or remove or install main units v Before you work on the equipment disconnect the power cord If you cannot disconnect the power cord have the customer powe...

Страница 12: ...formation document For example if a caution statement begins with a number 1 translations for that caution statement appear in the Safety Information document under statement 1 Be sure to read all cau...

Страница 13: ...quipment when there is evidence of fire water or structural damage v Disconnect the attached power cords telecommunications systems networks and modems before you open the device covers unless instruc...

Страница 14: ...CAUTION When laser products such as CD ROMs DVD drives fiber optic devices or transmitters are installed note the following v Do not remove the covers Removing the covers of the laser product could r...

Страница 15: ...ower control button on the device and the power switch on the power supply do not turn off the electrical current supplied to the device The device also might have more than one power cord To remove a...

Страница 16: ...ide any component that has this label attached There are no serviceable parts inside these components If you suspect a problem with one of these parts contact a service technician Statement 10 CAUTION...

Страница 17: ...s Guide This document is in Portable Document Format PDF on the IBM xSeries Documentation CD It provides general information about the server including information about features and how to configure...

Страница 18: ...statements are used in this document v Note These notices provide important tips guidance or advice v Important These notices provide information or advice that might help you avoid inconvenient or pr...

Страница 19: ...adcom 5721 10 100 1000 Ethernet controller on the system board with RJ 45 Ethernet port v Two serial ports v One parallel port v Two port Serial ATA controller v Four Universal Serial Bus USB v2 0 por...

Страница 20: ...LED is lit it indicates that the CD or DVD drive is in use USB connectors Connect a USB device to these connectors System error LED When this amber LED is lit it indicates that a system error has occu...

Страница 21: ...he electrical outlet Rear view The following illustration shows the connectors on the rear of the server Power cord connector Connect the power cord to this connector Power supply error LED When this...

Страница 22: ...server to a network Serial 2 connector Connect a 9 pin serial device to this connector Ethernet link status LED This LED is on the Ethernet connector When this LED is lit it indicates that there is a...

Страница 23: ...boards The illustrations might differ slightly from your hardware System board option connectors The following illustration shows the option connectors on the system board DIMM 4 DIMM 3 DIMM 2 DIMM 1...

Страница 24: ...the system board System fan 3 rear fan Wake on LAN SATA 2 SATA 0 Primary IDE System fan 1 fan sink Microprocessor power Main power Diskette drive optional Power switch LED bracket Battery Microprocess...

Страница 25: ...onnectors The following illustration shows the external input output I O connectors on the system board Nonmaskable interrupt NMI Parallel Serial 2 Keyboard Ethernet RJ 45 Serial 1 USB 2 Video Mouse C...

Страница 26: ...LEDs on the system board System fan 3 error LED2 System fan 1 error LED3 System fan 2 error LED13 Standby power LED1 DIMM 1 error LED17 DIMM 2 error LED16 DIMM 3 error LED15 DIMM 4 error LED14 VRD goo...

Страница 27: ...efault v Pins 2 and 3 Clear the CMOS data which clears the power on password Note Changing the position of this jumper does not affect the administrator password check if an administrator password is...

Страница 28: ...12 IBM xSeries 100 Type 8486 Problem Determination and Service Guide...

Страница 29: ...tion v Diagnostic programs messages and error messages The diagnostic programs are the primary method of testing the major components of the server The diagnostic programs are on the IBM Enhanced Diag...

Страница 30: ...n 1 1 3 CMOS write read test failed 1 Reseat the battery 2 Replace the following components one at a time in the order shown restarting the server each time a Battery b Trained service technician only...

Страница 31: ...e battery 2 Replace the following components one at a time in the order shown restarting the server each time a Battery b Trained service technician only System board 3 1 4 Time of day clock failed 1...

Страница 32: ...onfiguration Setup Utility program see the User s Guide To view the error logs complete the following steps 1 Turn on the computer 2 When the prompt Press F1 for Configuration Setup appears press F1 3...

Страница 33: ...rting the server each time a Battery b Trained service technician only System board 162 Device configuration error 1 Run the Configuration Setup Utility program select Load Default Settings and save t...

Страница 34: ...rator password then run the Configuration Setup Utility program and change the power on password 289 A DIMM has been disabled by the user or by the system 1 If the DIMM was disabled by the user run th...

Страница 35: ...dapter one at a time restarting the server each time until the problem is isolated 1801 A PCI adapter has requested memory resources that are not available 1 Change the order of the adapters in the PC...

Страница 36: ...vice error 1 Reseat the pointing device cable 2 Replace the following components one at a time in the order shown restarting the server each time a Pointing device b Trained service technician only Sy...

Страница 37: ...d disk drive boot sector error 1 Reseat the hard disk drive cable 2 Replace the following components one at a time in the order shown restarting the server each time a Hard disk drive cable b Hard dis...

Страница 38: ...ne whether the failing server is part of a shared hard disk drive cluster two or more servers sharing external storage devices If it is part of a cluster you can run all diagnostic programs except the...

Страница 39: ...OST error codes on page 16 if necessary see Solving undetermined problems on page 47 v No Find the failure symptom in Troubleshooting tables on page 25 if necessary run the diagnostic programs see Run...

Страница 40: ...make sure that only one drive is set as the primary drive Start the CD from the primary drive The ServeRAID program cannot view all installed drives or the operating system cannot be installed v Make...

Страница 41: ...laceable units FRU v If an action step is preceded by Trained service technician only that step must be performed only by a trained service technician Symptom Action The CD or DVD drive is not recogni...

Страница 42: ...mponents are customer replaceable units CRU and which components are field replaceable units FRU v If an action step is preceded by Trained service technician only that step must be performed only by...

Страница 43: ...at step must be performed only by a trained service technician Symptom Action Not all drives are recognized by the hard disk drive diagnostic test the Fixed Disk test Remove the drive that is indicate...

Страница 44: ...d in the Action column until the problem is solved v See Chapter 3 Parts listing xSeries 100 Type 8486 on page 49 to determine which components are customer replaceable units CRU and which components...

Страница 45: ...Make sure that v The mouse or pointing device cable is securely connected to the server v For PS 2 devices the keyboard and mouse or pointing device cables are not reversed v The mouse or pointing de...

Страница 46: ...rrupt SMI replace the DIMM v If a DIMM was disabled by the user or by POST run the Configuration Setup Utility program and enable the DIMM 3 Make sure that there is no memory mismatch when the server...

Страница 47: ...ned on and the brightness and contrast controls are adjusted correctly v No beep codes sound when the server is turned on Important In some memory configurations the 3 3 3 beep code might sound during...

Страница 48: ...s If this happens turn off the monitor Attention Moving a color monitor while it is turned on might cause screen discoloration Move the device and the monitor at least 305 mm 12 in apart and turn on t...

Страница 49: ...y v You have not loosened any other installed devices or cables v You updated the configuration information in the Configuration Setup Utility program Whenever memory or any other device is changed yo...

Страница 50: ...eat the power switch LED bracket cable If the problem remains replace the power switch LED bracket 2 Make sure that v The power cords are correctly connected to the server and to a working electrical...

Страница 51: ...following components one at a time in the order shown restarting the server each time a Failing serial device b Serial cable c Trained service technician only System board Software problems v Follow t...

Страница 52: ...ymptom Action A USB device does not work 1 Run USB diagnostics see Running the diagnostic programs on page 37 2 Make sure that v The correct USB device driver is installed v The operating system suppo...

Страница 53: ...om the diagnostic programs screen select the test that you want to run and follow the instructions on the screen When you are diagnosing hard disk drives select SCSI Fixed Disk Test for the most thoro...

Страница 54: ...test could not be run There was no failure of the hardware that was being tested but there might be a hardware failure elsewhere or another problem prevented the test from running for example there mi...

Страница 55: ...rmine which components are customer replaceable units CRU and which components are field replaceable units FRU v If an action step is preceded by Trained service technician only that step must be perf...

Страница 56: ...ents a RAID adapter in slot s b Cable for the RAID adapter in slot s 2 Replace the following components one at a time in the order shown restarting the server each time a RAID adapter in slot s b Cabl...

Страница 57: ...91 3 Look in the test log see Viewing the test log on page 38 and correct any other errors 215 xxx 000 Failed CD or DVD test 1 Run the test again with a different CD or DVD 2 Reseat the following com...

Страница 58: ...nd prevent the POST error message 301 from being displayed during startup 1 Reseat the keyboard cable 2 Replace the following components one at a time in the order shown restarting the server each tim...

Страница 59: ...CI slot n v For single port computers n 0 adapter in PCI slot n v For dual port computers n 1 adapter in PCI slot n 1 Complete the following steps to identify the slot on the riser card a Run the Conf...

Страница 60: ...ce any adapters that were removed see Installing an adapter on page 62 then install the cover see Installing the cover on page 58 7 Reconnect all external cables and power cords 8 Insert the update CD...

Страница 61: ...power problems Power problems can be difficult to solve For example a short circuit can exist anywhere on any of the power distribution buses Usually a short circuit will cause the power subsystem to...

Страница 62: ...mode of the hub v Check the Ethernet controller LEDs on the rear panel of the server These LEDs indicate whether there is a problem with the connector cable or hub The Ethernet link status LED is lit...

Страница 63: ...til you find the failure Turn on the server and reconfigure it each time v Any external devices v Surge suppressor device on the server v Modem printer mouse and non IBM devices v Each adapter v Hard...

Страница 64: ...gnostic program type and version level v Hardware configuration print screen of the system summary v BIOS code level v Operating system type and version level You can solve some problems by comparing...

Страница 65: ...s 100 Type 8486 server To check for an updated parts listing on the Web complete the following steps 1 Go to http www ibm com support 2 Under Search technical support type 8486 and click Search 3 Unde...

Страница 66: ...imary models 11X 91X 92X A2x 39M3511 4 CD ROM drive 48X alternate models 11X 91X 92X A2x 39M3509 4 CD RW DVD ROM combo drive primary models 21X 31X 41X 71x B2x C2x G2x H2x 39M3539 4 CD RW DVD ROM comb...

Страница 67: ...6 Battery 3 0 volt all models 33F8354 Bezel diskette drive optional 25R7474 Bezel diskette drive blank all models 25R7472 Bracket microprocessor all models 39M4401 Cable diskette drive optional 39Y838...

Страница 68: ...n 155 39M7013 Polish 214 39M7014 Portuguese 163 39M7015 Romanian 96 39M7016 Russian 443 39M7017 Russian Cyrillic 441 39M7018 Serbian Cyrillic 118 39M7019 Slovenian 234 39M7029 Slovic 245 39M7020 Spani...

Страница 69: ...public Chad Comoros Congo Democratic Republic of Congo Republic of Cote D Ivoire Ivory Coast Croatia Republic of Czech Republic Dahomey Djibouti Egypt Equatorial Guinea Eritrea Estonia Ethiopia Finlan...

Страница 70: ...a Panama Peru Philippines Taiwan United States of America Venezuela 24P6858 Korea Democratic People s Republic of Korea Republic of 34G0232 Japan 36L8880 Argentina Paraguay Uruguay 49P2078 India 49P21...

Страница 71: ...sure that no one is near the server and that no other objects have been left inside the server v Do not attempt to lift an object that you think is too heavy for you If you have to lift a heavy objec...

Страница 72: ...until you are ready to install them To reduce the possibility of damage from electrostatic discharge observe the following precautions v Limit your movement Movement can cause static electricity to bu...

Страница 73: ...mbscrews 1 Read the safety information that begins on page vii and Installation guidelines on page 55 2 Turn off the server and all peripheral devices then disconnect the power cords and all external...

Страница 74: ...l internal cables are correctly routed 2 Place the front edge of the cover into position on the front edge of the server and lower the cover onto the chassis 3 Install the two thumbscrews at the rear...

Страница 75: ...ices then disconnect the power cords and all external cables 3 Remove the cover see Removing the cover on page 57 4 From inside the chassis press up and out on the bezel release tabs to disengage them...

Страница 76: ...er tabs of the bezel with the corresponding openings in the chassis and gently press on the bezel until it clicks into place 3 Install the cover see Installing the cover on page 58 4 Reconnect the ext...

Страница 77: ...screw for the adapter to be removed 6 Carefully grasp the adapter by its top edge or upper corners and pull the adapter from the server 7 If the server will be used before a replacement adapter is ins...

Страница 78: ...the top edge or upper corners and align it with the expansion slot guides then press the adapter firmly into the expansion slot Move the adapter directly from the static protective package to the expa...

Страница 79: ...cables that impede access to the DIMMs 5 Locate the DIMM connector that contains the DIMM to be replaced see System board option connectors on page 7 for DIMM slot locations Attention To avoid breaki...

Страница 80: ...urn the DIMM so that the contacts align correctly with the connector Attention To avoid breaking the DIMM retaining clips or damaging the DIMM connectors open and close the clips gently 4 Insert the D...

Страница 81: ...Remove the battery a Use one finger to press the top of the battery clip away from the battery b Lift and remove the battery from the socket 7 Dispose of the battery as required by local ordinances o...

Страница 82: ...that come with the replacement battery 2 Insert the new battery a Tilt the battery so that you can insert it into the socket on the side opposite the battery clip b Press the battery down into the soc...

Страница 83: ...e computer supports The following illustration shows the location of the internal drive bays Bay 1 Bay 2 Bay 3 Bay 4 Bay 5 Notes 1 A second IDE device that is intended to be cabled to the CD or DVD dr...

Страница 84: ...ette drive from bay 3 remove the bezel see Removing the bezel on page 59 5 Disconnect the cables from the drive to be removed 6 Press the blue latch to release the drive then grasp the drive and pull...

Страница 85: ...ed in the documentation that comes with the new drive v You check the instructions that come with the new drive to determine whether you must set any switches or jumpers on the drive If you are instal...

Страница 86: ...optical instruments and avoid direct exposure to the beam Class 1 Laser Product Laser Klasse 1 Laser Klass 1 Luokan 1 Laserlaite Appareil A Laser de Classe 1 2 Touch the static protective package tha...

Страница 87: ...s or over the microprocessor 8 Install the bezel if it was removed see Installing the bezel on page 60 9 Install the cover see Installing the cover on page 58 10 Reconnect the external cables and powe...

Страница 88: ...talled Attention Make sure that you do not hit the microprocessor fan sink when removing the drive cage 5 Remove the drive cage a Move the locking lever on the drive cage to the Unlock position b Firm...

Страница 89: ...ve cage 4 Install the drive cage a Position the drive cage on the tray in the chassis and slide it forward until the upper and lower clips engage Note Make sure that the locking lever on the drive cag...

Страница 90: ...cover on page 57 4 Disconnect the fan cable from the system board making a note of where the cable was connected for later installation 5 Grasp the fan with both hands and pull firmly extending the ru...

Страница 91: ...les in the chassis then use needle nosed pliers to pull the grommets through the holes from outside the chassis 3 Connect the fan cable to the system board see System board internal connectors on page...

Страница 92: ...or assembly cable then disconnect it from the system board see System board internal connectors on page 8 for the location of the front USB connector 6 Press in on the retaining tab and rotate the pow...

Страница 93: ...connector is keyed to a notch in the top of the opening 3 Place the right side of the power switch LED bracket into the opening in the chassis and rotate the bracket to the left until the retaining t...

Страница 94: ...ctors on page 8 for the location of the power switch LED bracket connector 6 Press in on the retaining tab and rotate the power switch LED bracket toward the right then pull the bracket away from the...

Страница 95: ...otch in the top of the opening 3 Place the right side of the power switch LED bracket into the opening in the chassis and rotate the bracket to the left until the retaining tab clicks into place 4 Rou...

Страница 96: ...observe the following precautions Statement 8 CAUTION Never remove the cover on a power supply or any part that has the following label attached Hazardous voltage current and energy levels are presen...

Страница 97: ...re installed forward slightly see Removing a drive in bay 1 2 or 3 on page 68 for more information It is not necessary to remove these drives v Remove the microprocessor fan sink see Removing the micr...

Страница 98: ...ay 1 2 or 3 on page 69 for more information v Install the microprocessor fan sink see Installing the microprocessor and fan sink on page 85 v Reinstall any DIMMs that were removed from DIMM slots 3 an...

Страница 99: ...system board see System board internal connectors on page 8 for the location of the fan sink connector b Release the fan sink retention lever by pressing down on the end moving it to the side and slo...

Страница 100: ...y using the vacuum tool and completing the following steps Vacuum tool Microprocessor Socket a Squeeze and hold the bladder of the tool then place the suction cup on the microprocessor and release the...

Страница 101: ...the microprocessor Dropping the microprocessor during installation can damage the contacts Also contaminants on the microprocessor contacts such as oil from your skin can cause connection failures be...

Страница 102: ...er is in the fully open position Important Be careful when handling the microprocessor and fan sink Do not contaminate the thermal material between them b Slide the bottom edge of the fan sink under t...

Страница 103: ...Move the locking lever on the drive cage to the Unlock position b Firmly grasp the drive cage and slide it toward the rear of the server until it disengages from the chassis c Lift the drive cage out...

Страница 104: ...til it fully engages the tabs in the chassis Note The tabs are fully engaged when the screw holes in the system board are aligned with the corresponding holes in the chassis 2 Install the seven screws...

Страница 105: ...ve cage that were disconnected during removal 7 Install the cover see Installing the cover on page 58 8 Reconnect the external cables and power cords to the server then connect the power cords to elec...

Страница 106: ...90 IBM xSeries 100 Type 8486 Problem Determination and Service Guide...

Страница 107: ...ically designed for your IBM server Use this CD during the initial installation of your server to configure basic hardware features and to simplify your operating system installation See Using the Ser...

Страница 108: ...e and time v Set passwords and security settings To start the Configuration Setup Utility program complete the following steps 1 Turn on the server and watch the monitor screen 2 When the message Pres...

Страница 109: ...ct Save Settings and press Enter Configuring the Broadcom NetXtreme Gigabit Ethernet controller The Ethernet controller is integrated on the system board It provides an interface for connecting to a 1...

Страница 110: ...94 IBM xSeries 100 Type 8486 Problem Determination and Service Guide...

Страница 111: ...many problems without outside assistance by following the troubleshooting procedures that IBM provides in the online help or in the publications that are provided with your system and software The inf...

Страница 112: ...liances For information about which products are supported by Support Line in your country or region see http www ibm com services sl products For more information about Support Line and other IBM ser...

Страница 113: ...TY OF ANY KIND EITHER EXPRESS OR IMPLIED INCLUDING BUT NOT LIMITED TO THE IMPLIED WARRANTIES OF NON INFRINGEMENT MERCHANTABILITY OR FITNESS FOR A PARTICULAR PURPOSE Some states do not allow disclaimer...

Страница 114: ...soft Windows and Windows NT are trademarks of Microsoft Corporation in the United States other countries or both UNIX is a registered trademark of The Open Group in the United States and other countri...

Страница 115: ...Maximum internal hard disk drive capacities assume the replacement of any standard hard disk drives and population of all hard disk drive bays with the largest currently supported drives available fro...

Страница 116: ...ning waste electrical and electronic equipment WEEE The Directive determines the framework for the return and recycling of used appliances as applicable throughout the European Union This label is app...

Страница 117: ...tates go to http www ibm com ibm environment products batteryrecycle shtml or contact your local waste disposal facility In the United States IBM has established a return process for reuse recycling o...

Страница 118: ...d v Consult an IBM authorized dealer or service representative for help Properly shielded and grounded cables and connectors must be used in order to meet FCC emission limits Proper cables and connect...

Страница 119: ...ts resulting from a nonrecommended modification of the product including the fitting of non IBM option cards This product has been tested and found to comply with the limits for Class B Information Te...

Страница 120: ...104 IBM xSeries 100 Type 8486 Problem Determination and Service Guide...

Страница 121: ...rver 91 controls and indicators 4 cooling 3 cover installing 58 removing 57 customer replaceable units CRUs 50 D danger statements 2 diagnostic error codes 39 on board programs starting 37 programs ov...

Страница 122: ...kette drive 69 drive bay 1 69 drive bay 2 69 drive bay 3 69 drive bay 4 or 5 73 fan sink 85 fan system 75 installing continued front USB connector assembly 77 internal drives 67 memory module 64 micro...

Страница 123: ...ttery 65 removing continued bezel 59 cover 57 DIMM 63 diskette drive 68 drive bay 1 68 drive bay 2 68 drive bay 3 68 drive bay 4 72 drive bay 5 72 fan sink 83 fan system 74 front USB connector assembl...

Страница 124: ...mission Class B notice 102 United States FCC Class B notice 102 updating firmware 91 USB problems 36 using Boot Menu program 92 utility Configuration Setup 92 V video controller 3 video problems 31 W...

Страница 125: ......

Страница 126: ...Part Number 31R2070 Printed in USA 1P P N 31R2070...

Отзывы: