www.i2systems.com
Integrated Illumination Systems, Inc.
355 Bantam Lake Road
Morris, CT 06763 USA
tel +1.860.567.0708
fax +1.860.567.2501
[email protected]
Product information is subject to change without notice.
All brand names and product names are trademarks of i2Systems.
© 2012 i2Systems. All Rights Reserved.
Gen3
Installation Guide
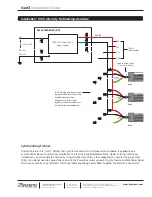
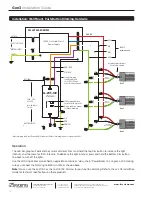
HOT (BLK)
NEUTRAL (WHT)
VIO
BRN
WHT
Gen3
Gen3
Gen3
24V DC
HOT (BLK)
NEUTRAL (WHT)
GRN/YEL
Hardwire Fixture includes
6-foot Cable installed
120-277V AC FEED
RED
BLK
WHT
GRN
16 AWG
recommended
PS24V75W-E05P / PW
LL-205-10V
3rd Party
0 to 10V Dimmer
10V, SINK / SOURCE
100W, UL-Listed Class 2
Power Supply
120V-277V
AC FEED
Non-Switched
Circuit
VIO / BLK*
*Indoor Dimming Cable uses Red and Black Conductors. Outdoor Dimming Cable uses Orange and Violet.
ORN / RED*
Dim Up and Down buttons
for Manual Dimming
LED bar graph indicator
shows selected dim levels
Connect Dimming
Cable Drain Wire to
the LL-205-10V and
Power Box Earth Ground
GRN/YEL
LL-205-10V
Operation
The LED bar graph will indicate the current dim level, based on 0 to 10V levels. The LL-205-10V reads these levels and
translates them to i2Systems LightLink protocol, adjusting the light intensity of the connected Gen3 Fixtures from 1%
to 100% (less than 1V is equal to 0% and greater than 9V is equal to 100%).
Use the Dimming Cables as specified on page 8 to combine or “daisy-chain” Power Boxes to a single LL-205-10V,
making sure you connect the Dimming Cable Drain Wire as shown above.
Note:
Refer to the LL-205 Installation Guide for technical specifications on all available models of this Dimmer.
Installation: 0 to 10V Dimming, Sink or Source, Hardwire
16
Содержание Gen3 V3285
Страница 1: ...Gen3 V3285 Installation Guide ...
Страница 20: ......

