


Chapter 3 – Starting up
34
•
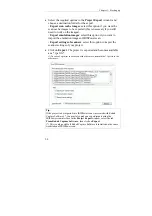
Select the required options in the
Project Export
window and
choose a destination folder for the export.
-
Export scan cache images
: select this option if you want the
scan cache images to be exported (this is necessary if you still
need to work on the images).
-
Export emulation images
: select this option if you want to
import the emulation images of IRISPowerscan.
-
Export settings of scanners
: select this option to import the
scanner settings of your project.
•
Click on
Export
. The project is exported and becomes available
as a *.ips file*.
(*) In case of a project to be shared with other users, transmit the *.ips file to the
other users.
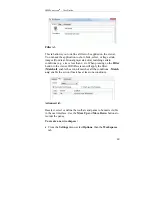
Tip
:
If the project to be imported into IRISPowerscan was created with Kodak
Capture Software 6*, you must also make an export/import using the
IRISPowerscan interface. In the
Project Export
window, select the tab
From Kodak Capture Software
., then click on
Export
.
(*) This is only possible if Kodak Capture Software is installed on the same
workstation as IRISPowerscan.
Содержание IRISPowerscan 9.5
Страница 1: ...Version 9 5 User Guide ...
Страница 2: ......
Страница 10: ......
Страница 12: ......
Страница 20: ......
Страница 28: ...Chapter 2 Installation 20 ...
Страница 50: ......
Страница 134: ......
Страница 154: ...Chapter 6 Scanning 146 ...
Страница 162: ...Chapter 8 Post scanning operations 154 Image editing Image re organization ...
Страница 182: ...IRISPowerscanTM User Guide 174 ...


