


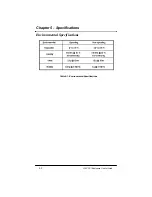

Chapter 2 - Hardware
6.
Remove the backplane by unscrewing the thirty-six screws that secure
it to the rear of the chassis.
7.
Secure the new backplane to the rear of the chassis, using the thirty-
six screws removed in step 3.
8.
Secure the rear plate to the chassis.
9.
Install the CPU board, power supply module, drive module, all add-in
boards, and all rear I/O modules (if applicable).
10. Turn on the main system power.
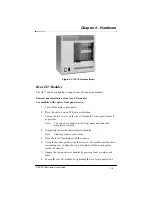
Fan Plenum and Chassis Fan
2-5
G8 CPCI Enclosure User’s Guide
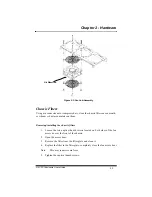
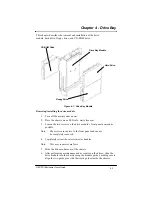
Figure 2-2: Fan Access Door and Fan Tray
Captive Thumb Screw
Fan Tray
Содержание G8
Страница 1: ...G8 CPCI Enclosure User s Guide G8 8 Slot CompactPCI Enclosure User s Guide 095 30004 00 Rev A ...
Страница 8: ...iv Table of Contents This page was intentionally left blank G8 CPCI Enclosure User s Guide ...
Страница 12: ...1 4 Chapter 1 Introduction G8 CPCI Enclosure User s Guide This page was intentionally left blank ...
Страница 20: ...2 8 G8 CPCI Enclosure User s Guide Chapter 2 Hardware This page was intentionally left blank ...
Страница 26: ...4 4 This page was intentionally left blank Chapter 4 Drive Bays G8 CPCI Enclosure User s Guide ...


