


Note: Replace the seat, needle valve and lever arm
at the same time. The seat of the needle valve must
be pressed in level with the carburetor housing. Use
a vise with soft jaw guards to prevent damage to the
seat of the needle valve.
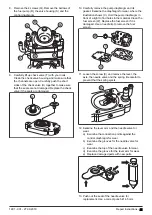
7.7.5 To assemble the carburetor
Refer to
Overview of the carburetor on page 19 for an
overview of how the parts of the carburetor connects.
1. Assemble the carburetor in the opposite sequence
to how it was disassembled.
a) Make sure that the seal ring (A) is attached
correctly on the carburetor before the carburetor
is attached on the engine. The wide edge on the
ring must be nearest to the carburetor housing.
A
b) Examine the distance piece for cracks and
damage that can result in leakage. Replace the
distance piece if it is damaged.
c) Make sure that the lever arm is flush with the
diaphragm housing. If the lever arm is set too
high, too much fuel goes into the carburetor. If
the lever arm is set too low, a too small quantity
of fuel goes into the carburetor.
d) Replace the nozzle of the carburetor if it is
damaged. Use a small screwdriver to remove
the nozzle (B) and the small O-ring (C) from the
carburetor housing.
B
C
2. Do a pressure test of the carburetor. Refer to
a pressure test of the carburetor on page 22.
7.7.6 To do a pressure test of the carburetor
1. Remove the carburetor. Refer to
carburetor on page 20.
2. Make sure that the carburetor is correctly
page 22.
22 - Repair instructions
1291 - 001 - 27.09.2019
Содержание 333RB Mark II
Страница 1: ...Workshop manual 333RB Mark II English 1291 001 27 09 2019 ...
Страница 47: ...1291 001 27 09 2019 Technical data 47 ...
Страница 48: ...1141571 26 2019 09 30 ...