background image

eAN3810A 
Deployment Guide 

1 eAN3810A Deployment Guide 


Issue 01 (2017-04-30) 

Huawei Proprietary and Confidential                                     

Copyright © Huawei Technologies Co., Ltd. 

23 


Table 1-5


Indicator status of a functional eAN3810A   

Indicator 

Status 

RUN 

Steady white 

ETH 

Slow blinking white (on for 1s and off for 
1s) 

LINK 

Steady white     


If the indicator status of an eAN3810A differs from that in the preceding table, contact 
Huawei technical support engineers.     

Viewing Deployment Results on the U2000 

This section describes how to view deployment results after an eAN3810A is powered on.     

Context 

After site deployment is completed, you need to log in to the Web LMT or connect the 
eAN3810A to the U2000 within 30 minutes. Otherwise, the eAN3810A will be rolled back to 
the source version upon timer expiry.   

Procedure 

1.


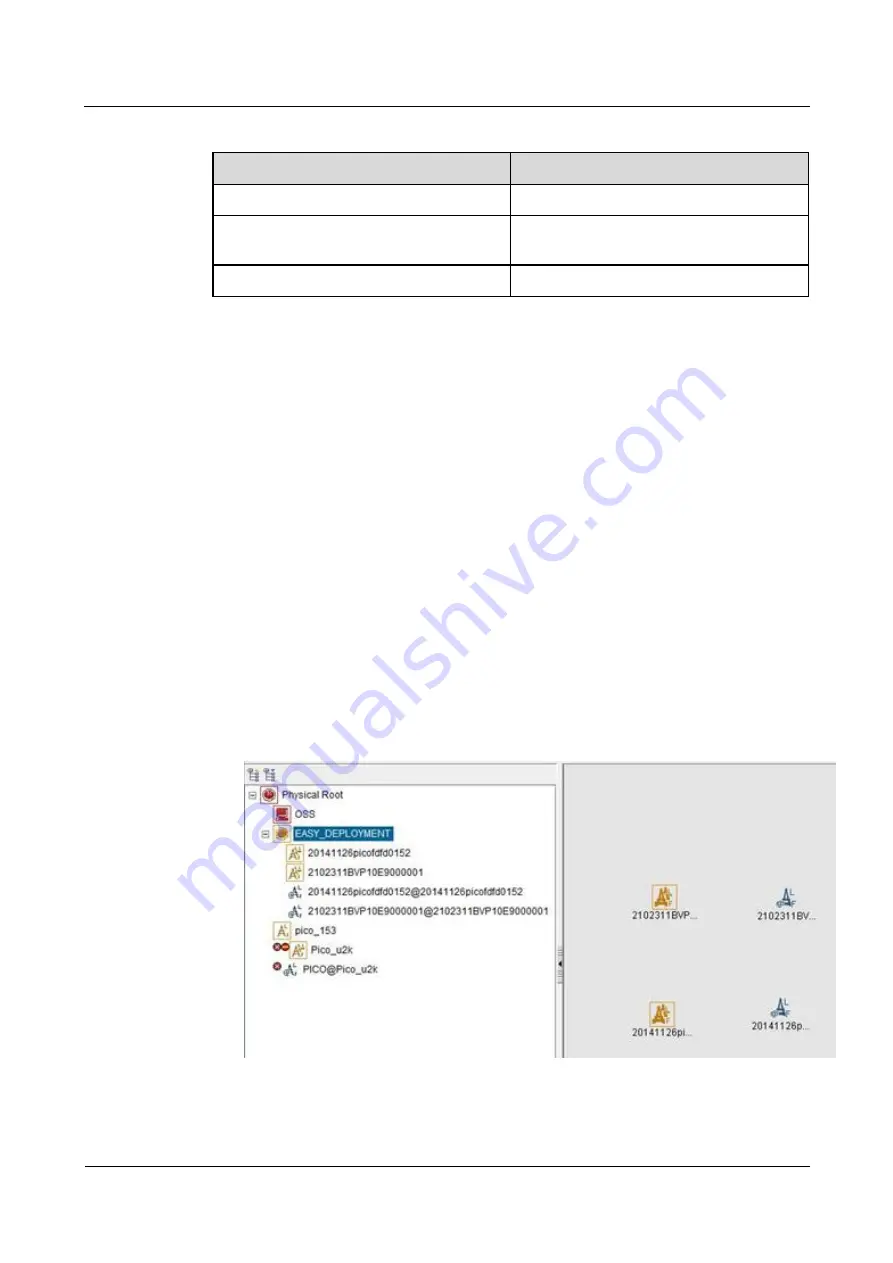
Wait 3 to 4 minutes after an eAN3810A is powered on. Then, on the U2000, choose 
Topology > Main Topology (traditional style), or double-click Topo View in Application 
Center and then choose Topology > Main Topology (application style). On the displayed 
Main Topology window, check whether the eAN3810A topology is created. See the 
following 

Figure 1-9

. 

Figure 1-9


Main topology view 


Содержание eAN3810A

Страница 1: ...eAN3810A V100R001C00 Deployment Guide Issue 01 Date 2017 04 30 HUAWEI TECHNOLOGIES CO LTD ...

Страница 2: ...e customer All or part of the products services and features described in this document may not be within the purchase scope or the usage scope Unless otherwise specified in the contract all statements information and recommendations in this document are provided AS IS without warranties guarantees or representations of any kind either express or implied The information in this document is subject...

Страница 3: ...duct Version Unless otherwise stated eNodeB Pico eAN and AirNode in this document refer to the 3810 series AirNode The 3810 series AirNode is a base station that provides communications services in Huawei OneAir solution The following table lists the product name and product version related to the 3810 series AirNode Product Name Product Version eAN3810A V100R001C00 Intended Audience This document...

Страница 4: ...yment Overview With site deployment data is planned delivered and activated on a per eAN3810A MicroSD card commissioning and MML can be used Application Scenarios and Deployment Principles Site deployment applies to outdoor coverage scenarios where operator provided private transport networks are used Scope Figure 1 1 shows the procedures for site deployment in this document Figure 1 1 Site deploy...

Страница 5: ...red and the transport network is working properly 3 Engineering preparation Use the U2000 to prepare configuration data software packages and commissioning licenses based on the network plan At the site get ready service dialing tools 4 Hardware installation and power on At the site install and power on the Pico and perform checks 5 Engineering verification Create query deployment results and veri...

Страница 6: ...iles to be prepared for eAN3810A deployment Preparing Common Base Station Deployment Data Files on the CME This section describes how to prepare verify and export common base station deployment data files on the CME Data Configuration Process This section describes the data configuration process Before configuring data you are advised to learn the initial base station configuration process on the ...

Страница 7: ...se station creation No base station has been deployed on the live network or only a small number of base stations need to be deployed You can create base stations using the base station creation wizard on the CME Batch base station creation using the tool for customizing a summary data file A large number of base stations need to be deployed and their planned data differs greatly from data of exis...

Страница 8: ...ecific data preparation tables Scenario Data Preparation Table on the eAN3810A Side Non secure transmission networking Click Data Preparation in Non secure Transmission Networking to download the table Data to be prepared on the eAN3810A side for enabling cellular services includes device data common transport data LTE radio data Creating a Work Area The CME provides one current data area and allo...

Страница 9: ...de the CME functions can be started using either of the following methods Start CME functions on the U2000 client in application mode Start the CME client directly U2000 client mode This mode applies when both the CME and U2000 functions are used In this mode both the CME functions and U2000 functions such as fault management topology management and performance management are started For detailed ...

Страница 10: ...and Confidential Copyright Huawei Technologies Co Ltd 8 Start the CME client directly On the Windows desktop choose Start All Programs iManager U2000 MBB Client Start CME functions on the U2000 client in traditional mode On the Windows desktop choose Start All Programs iManager U2000 MBB Client ...

Страница 11: ...e created add the controller associated to the base station to the planned area when you create a planned area For details about how to create a planned data area press F1 to obtain the online help Configuring Data on GUIs This section describes how to initially configure a single base station on GUIs using a default or user defined template 1 Creating Base Stations This section describes how to c...

Страница 12: ... on the U2000 4 After the configuration is complete click Next The CME starts to create a base station 5 Click Finish to exit the wizard 2 Configuring eAN3810A Data This section describes how to configure device data transport data and radio data for the eAN3810A by using the CME Procedure 1 Click the required tab Controller Base Station Cell in the left pane of the planned data area On the displa...

Страница 13: ... menu The CME starts to verify the data validity and integrity of the base station 2 View the verification results and modify incorrect data until the validity and integrity of the data are successfully verified Exporting the Deployment Lists and Configuration Files of Base Stations This section describes how to export the deployment lists and configuration files of base stations After base statio...

Страница 14: ...dow The CME automatically switches to the auto deployment window and creates a commissioning task Select Open the Auto Deployment window and start Auto Deployment task The CME automatically switches to the auto deployment window and starts a commissioning task 7 Click Finish The save paths for the exported data configuration scripts and deployment lists are as follows Data configuration scripts ex...

Страница 15: ...es Co Ltd 13 Procedure 1 Choose Start Programs iManager U2000 MBB Client USB Making and Protection Tool to start the tool Figure 1 5 USB making and protection tool 2 Choose Make USB M Enterprise Private Network Product for AirNode Only The Enterprise Private Network Product for AirNode Only dialog box is displayed as shown in Figure 1 6 ...

Страница 16: ...pecify the directory where the software package is stored Click Add to add the software package path d Deselect the Do not copy csp file option according to the site deployment scenario 3 Set the local save paths for the software package and data files based on the type of SD card directory Then click OK And then according to the number of open station number One USB for One Site or One USB for Mu...

Страница 17: ...ment list exported from the CME The exported deployment list is saved in export path ADList by default Engineers must select the only xml file in this directory Do not copy csp file It is good practice to deselect this option In this case all files and integrity protection information except the csp files are saved in the directories and you can send them through emails Then copy the SD card direc...

Страница 18: ...MAC_SHA1 is recommended 6 In the Output Path area specify a save path Option Description USB Flash Drive Path Save all the information to an SD card All the directories of one SD card are prepared at a time One USB for One Site In this mode select only one NE and save this NE s information to the SD card One USB for Multiple Sites In this mode save the information about all NEs to an SD card The s...

Страница 19: ...ies the configuration files to the SD card directories of corresponding NEs according to the save path of configuration files in the deployment list Copies all files under the directory specified by Software path to the SD card directories of corresponding NEs according to the directory structure of the SD card 8 Click OK in the dialog box displayed after the SD card is prepared 9 Optional If Outp...

Страница 20: ...y the file again To remove an SD card from the computer after the files are copied to the SD card eject or safely remove the SD card from the Windows OS If the SD card is forcibly ejected the files in the SD card may be damaged As a result software and data configuration files cannot be loaded by using the SD card When transferring files for an SD card do not copy the xml files from a remote deskt...

Страница 21: ...n requirements of the corresponding scenario Check Methods O M engineers can check whether the transport network meets the configuration requirements of the Automatic OMCH Establishment feature by using either of the following methods Method 1 Confirm with the department in charge of the transport network whether the transport network meets the requirements Method 2 Check the network connectivity ...

Страница 22: ...e MicroSD card to the eAN3810A to load software and the configuration file Prerequisites The SD card has been prepared The eAN3810A is working correctly Context The port for housing a MicroSD card is enabled by default on the eAN3810A Insert a MicroSD card into the powered on eAN3810A and then restart the eAN3810A to read data from the MicroSD card Alternatively insert the MicroSD card into the po...

Страница 23: ...or details about how to perform the power on check see section Power On Check on the eAN3810A in eAN3810A Installation Guide SD card U2000 based commissioning a Ensure that the eAN3810A hardware has been installed and has passed the installation check For details about how to perform the hardware installation check see section Checking Hardware Installation in eAN3810A Installation Guide b Determi...

Страница 24: ...0 125s and off for 0 125s In MicroSD card deployment scenarios the eAN3810A automatically activates the downloaded software and configuration file and then restarts for them to take effect The activation and restart take about 30 minutes during which the indicator status is negligible During loading do not remove the MicroSD card e Remove the MicroSD card only after you have confirmed that the loa...

Страница 25: ...ection describes how to view deployment results after an eAN3810A is powered on Context After site deployment is completed you need to log in to the Web LMT or connect the eAN3810A to the U2000 within 30 minutes Otherwise the eAN3810A will be rolled back to the source version upon timer expiry Procedure 1 Wait 3 to 4 minutes after an eAN3810A is powered on Then on the U2000 choose Topology Main To...

Страница 26: ... eAN3810A the deployment task fails Proceed to the next step Handling Alarms This section describes how to handle alarms generated by a newly deployed eAN3810A All active alarms must be cleared during the commissioning Procedure 1 On the U2000 choose Monitor Browse Current Alarms traditional style or double click Fault Management in Application Center and then choose Browse Alarms Browse Current A...

Страница 27: ... 2017 04 30 Huawei Proprietary and Confidential Copyright Huawei Technologies Co Ltd 25 Figure 1 10 Filter dialog box 2 Click the Alarm Source tab and click the Custom option button Then click Add and choose NE from the shortcut menu The NE dialog box is displayed ...

Страница 28: ...nologies Co Ltd 26 Figure 1 11 NE dialog box 3 In the Available Objects area on the left select NEs in the navigation tree Click to add the selected NEs to the Selected Objects area on the right Then click OK 4 In the Filter dialog box click OK All alarms reported by the selected NEs are displayed on the Browse Current Alarm window ...

Страница 29: ...ow to verify that UEs can attach to the eAN3810A and perform ping services Prerequisites Cells are activated UEs have been defined on the core network Procedure 1 Check whether UEs can successfully attach to the eAN3810A and perform ping services 1 2 5 FAQ This section describes the graphical user interfaces GUIs involved in deployment and troubleshooting methods for common problems How Do I Set t...

Страница 30: ...t is launched only with the applications required by a user Menu items cannot be searched for You can search for menu items The Favorites feature is not supported You can add functions and menu items that are frequently used to the Favorites tab Traditional welcome page features are supported The welcome page features are not supported Procedure 1 On the U2000 choose System Preferences traditional...

Страница 31: ...ckage and can be used only after the target RAT is added Procedure 1 Open the Precfg ini file using the Notepad in the Windows OS 2 Add the target RAT at the end of the ALL record in the Precfg ini file Add L if the target RAT is LTE Retain the other settings in the file 3 Save the file and retain the name Precfg ini Directory Structure on a MicroSD Card his section provides the save paths and nam...

Страница 32: ...erprise MBTS Software MBTS Software software version NOTE When a MicroSD card stores software of different versions the save paths are named by software version Cold patch package It is used to apply a cold patch Obtain the software package from http suppo rt huawei co m enterprise MBTS ColdPatc h MBTS ColdPatc h cold patch version NOTE When a MicroSD card stores cold patches of different versions...

Страница 33: ...d MBTS ES N SlotNo CFG DATA XML Integrity and Encryption Protection on Files in MicroSD Cards This section describes how to use the USB making and protection tool to apply integrity and encryption protection to files in MicroSD cards This prevents malicious modification unauthorized possession and information disclosure Applying Integrity and Encryption Protection to Files in a Single MicroSD Card...

Страница 34: ...pply encryption to the CFGDATA XML file for eAN3810A After you use the USB making and protection tool to apply integrity and encryption protection to files the USBConf xml file is generated and the file name cannot be changed When loading files in the MicroSD card the Pico checks file integrity and decrypts the files based on the data in the USBConf xml file Procedure 1 Prepare the directory for f...

Страница 35: ...uide Issue 01 2017 04 30 Huawei Proprietary and Confidential Copyright Huawei Technologies Co Ltd 33 Figure 1 13 USB Protection Settings 4 Choose One USB Settings Set Security Policies The Set Security Policies dialog box is displayed See Figure 1 14 ...

Страница 36: ...thm drop down lists Encryption Algorithm can be set to DES3_CBC AES192_CBC AES256_CBC Integrity Algorithm can be set to HMAC_SHA1 HMAC_SHA256 You can choose any encryption and integrity algorithms but the defaults are recommended c Click OK 5 Choose One USB Settings Set USB Pathto specify the root path on the local computer for the folder storing files to be protected and click OK The path informa...

Страница 37: ...en Path and select the path specified in 5 The tool automatically adds all the files in the indicated directory NOTE The tool automatically adds the csp file in the folder but will not apply integrity protection to it describes the files for which integrity and encryption protection must be applied You must follow these rules otherwise deployments or upgrades using a MicroSD card will fail Integri...

Страница 38: ...le is consistent with the save path in the MicroSD card 9 Delete existing files on the MicroSD card Copy the folder containing the files that have been protected by using the tool from the computer to the MicroSD card All the files in the folder must be copied SeeFigure 1 16 Figure 1 16 Copying the USBConf xml file Do not change the directory structure in the folder when files are being copied Oth...

Страница 39: ...tool to apply integrity protection to them Otherwise deployments or upgrades using an SD card will fail You must apply integrity protection to all files except for the version and patch software packages Encryption protection Do not apply encryption to the version and patch software packages and the Precfg ini file Otherwise deployments or upgrades using an SD card will fail You must apply encrypt...

Страница 40: ... Huawei Proprietary and Confidential Copyright Huawei Technologies Co Ltd 38 Figure 1 17 USB Protection Settings dialog box 4 Choose Multi USB Settings Set USB Path and Security Policies The Multi USB Protection Settings dialog box is displayed See the following Figure 1 18 ...

Страница 41: ...area select algorithms as required from the Encryption Algorithm and Integrity Algorithm drop down lists Encryption Algorithm can be set to DES3_CBC AES192_CBC or AES256_CBC Integrity Algorithm can be set to HMAC_SHA1 or HMAC_SHA256 You can choose any encryption and integrity algorithms but the default ones are recommended 7 Select the IsEncrypted Index check box In the file list area if IsEncrypt...

Страница 42: ...ified encryption algorithm and applies integrity protection to all files in the current file list area based on the specified integrity algorithm Sizes of files remain the same before and after encryption because the system uses a symmetrical encryption algorithm 9 Click OK when a dialog box is displayed indicating that the integrity and encryption protection is completed Do not delete or move the...

Страница 43: ...arms Events This section describes how to save alarms and events to acquire system operating status in real time Prerequisites You have logged in to the local maintenance terminal LMT by using an account with the required operation rights Procedure Step 1 On the menu bar of the LMT click the Browse Alarm Event or Query Alarm Event Log tab on the Alarm Event tab page Step 2 Right click an alarm eve...

Страница 44: ...C who must master the deployment process shown in Figure 1 in advance of the deployment Figure 1 21 Site deployment process 1 3 2 Hardware Installation and Power on Check This section describes how to perform hardware installation and power on checks at the site after eAN3810A hardware is installed If a MicroSD card is used for local deployment engineers at the site need to insert the MicroSD card...

Страница 45: ...e the following points about loading If the MicroSD card only stores software the eAN3810A loads only the software If the MicroSD card only stores configuration files the eAN3810A loads only the target configuration file The eAN3810A does not load the software or configuration file on the MicroSD card and its RUN indicator indicates a loading failure steady on in any of the following conditions Th...

Страница 46: ...d if the RUN indicator status does not change d In configuration free deployment scenarios wait until the eAN3810A automatically downloads the preconfiguration file and reads the preconfigured information In site deployment scenarios wait until the eAN3810A completes the following procedure automatically loads and activates the software and data configuration files and restarts itself to make them...

Страница 47: ...10A cabling cavity 4 Waterproof blocks are securely installed in vacant cable troughs of the eAN3810A cabling cavity and the cover plate of the cabling cavity is securely installed In addition vacant RF ports are covered with dustproof caps and the caps are tightened 5 Labels are correct legible and complete at both ends of each cable feeder and jumper Table 1 11 lists the check items of the signa...

Страница 48: ...quirements of the engineering design 4 There are no connectors or joints on each PGND cable None of PGND cables can be short circuited or reversely connected In addition these cables are not damaged or broken 5 PGND cables are separately bound from other cables 6 The protection grounding of the eAN3810A and the surge protection grounding of the building share one group of ground conductors Power O...

Страница 49: ...tus If then RUN Steady white The eAN3810A is running correctly ETH Blinking white WIFI Off LINK Off During the eAN3810A startup there is no need to observe the indicator status During a start the eAN3810A reads and writes the flash and therefore the indicators blinking quickly may blink irregularly for 1 2 seconds which does not affect services 1 3 3 Deployment Preparation This section describes t...

Страница 50: ...g to each node to check whether the transmission channel at each node is ready Check whether the network equipment at each node is configured as required to ensure that an eAN3810A can automatically establish the OMCH Preparing Dialing Test Tools Dialing tests are performed by using test terminals to check whether deployed eAN3810A can provide services properly Prepare test terminals and ensure th...

Страница 51: ...E R Peer IPv4 Address 200 100 109 10 9 Indicates the user plane IPv4 address of the peer end U2000 IP MOD IPOAM Peer IPv4 Address 10 145 35 15 Indicates the first SCTP peer IPv4 address for signaling channel setup This IP address serves as the first peer IPv4 address for automatic SCTP link setup PLMN ADD CNOPERATOR Mobile country code 460 Indicates the mobile country code MCC of the operator Mobi...

Страница 52: ... for connection to the S1 interface 2 Run the ADD IPINTERFACE command to add a device IP address used for connection to the U2000 Set the Interface Reference Type parameter to ETHERNET Ethernet Set the IPAddress parameter to the eNodeB IP address used for connection to the U2000 3 Run the ADD ROUTE command to add a static IP route Step 3 Add local and peer information of the data plane and control...

Страница 53: ...1 Run the ADD S1 command to add an S1 object Step 7 Add sectors and cell antennas 1 Run the ADD SECTOREQM command to add a set of sector equipment 2 Run the ADD TXSECTORANTENNA command to add a transmit sector antenna 3 Run the ADD RXSECTORANTENNA command to add a receive sector antenna Adding an antenna depends on the type of the added cell Note that the Sector Equipment No must be consistent wit...

Страница 54: ...HOPIP 1 93 168 100 100 ADD ROUTE ROUTENO 1 DESTIPADDR 10 145 35 0 DESTIPMASK 255 255 255 0 NEXTHOPIP 172 253 254 254 Adding local and peer information of the data plane and control plane of the S1 interface ADD LOGICALPORT LOGICALPORTNO 0 INTERFACENO 0 ADD TRANSPORTDEVICE TRANSPORTDEVICENO 0 ADD SCTPHOST SCTPHOSTNO 0 IPINTERFACEREF 1 LOCALPORT 1024 ADD USERPLANEHOST USERPLANEHOSTNO 0 IPINTERFACERE...

Страница 55: ...nt SA0 SpecialSubframePatterns SSP7 ADD EUCELLSECTOREQM LOCALCELLID 0 SECTOREQMID 0 ADD CELLOP LOCALCELLID 0 TRACKINGAREAID 0 MMECFGNUM CELL_MME_CFG_NUM_0 Changing the ENODEBID according to the plan and restarting the eNodeB MOD ENODEBFUNCTION ENODEBID 586189 RST BTSNODE Activating cells ACT CELL LOCALCELLID 0 Connecting to the U2000 MOD IPOAM IPOAMNO 0 IPINTERFACEREF 2 PEERIPV4ADDR 10 145 35 15 P...

Страница 56: ...version upon timer expiry Procedure 1 Wait 3 to 4 minutes after an eAN3810A is powered on Then on the U2000 choose Topology Main Topology traditional style or double click Topo View in Application Center and then choose Topology Main Topology application style On the displayed Main Topology window check whether the eAN3810A topology is created See the following Figure 1 23 Figure 1 23 Main topolog...

Страница 57: ... traditional style or double click Fault Management in Application Center and then choose Browse Alarms Browse Current Alarms application style On the displayed Browse Current Alarm window click Filter The Filter dialog box is displayed Figure 1 24 Filter dialog box 2 Click the Alarm Source tab and click the Custom option button Then click Add and choose NE from the shortcut menu The NE dialog box...

Страница 58: ...nologies Co Ltd 56 Figure 1 25 NE dialog box 3 In the Available Objects area on the left select NEs in the navigation tree Click to add the selected NEs to the Selected Objects area on the right Then click OK 4 In the Filter dialog box click OK All alarms reported by the selected NEs are displayed on the Browse Current Alarm window ...

Страница 59: ...d to the new eAN3810A deployment If related handle the alarms For details about how to handle the alarms see the alarm reference Verifying Services This section describes how to verify that UEs can attach to the eAN3810A and perform ping services Prerequisites Cells are activated UEs have been defined on the core network Procedure 1 Check whether UEs can successfully attach to the eAN3810A and per...

Отзывы: