background image

Whole-House Audio Control Addendum

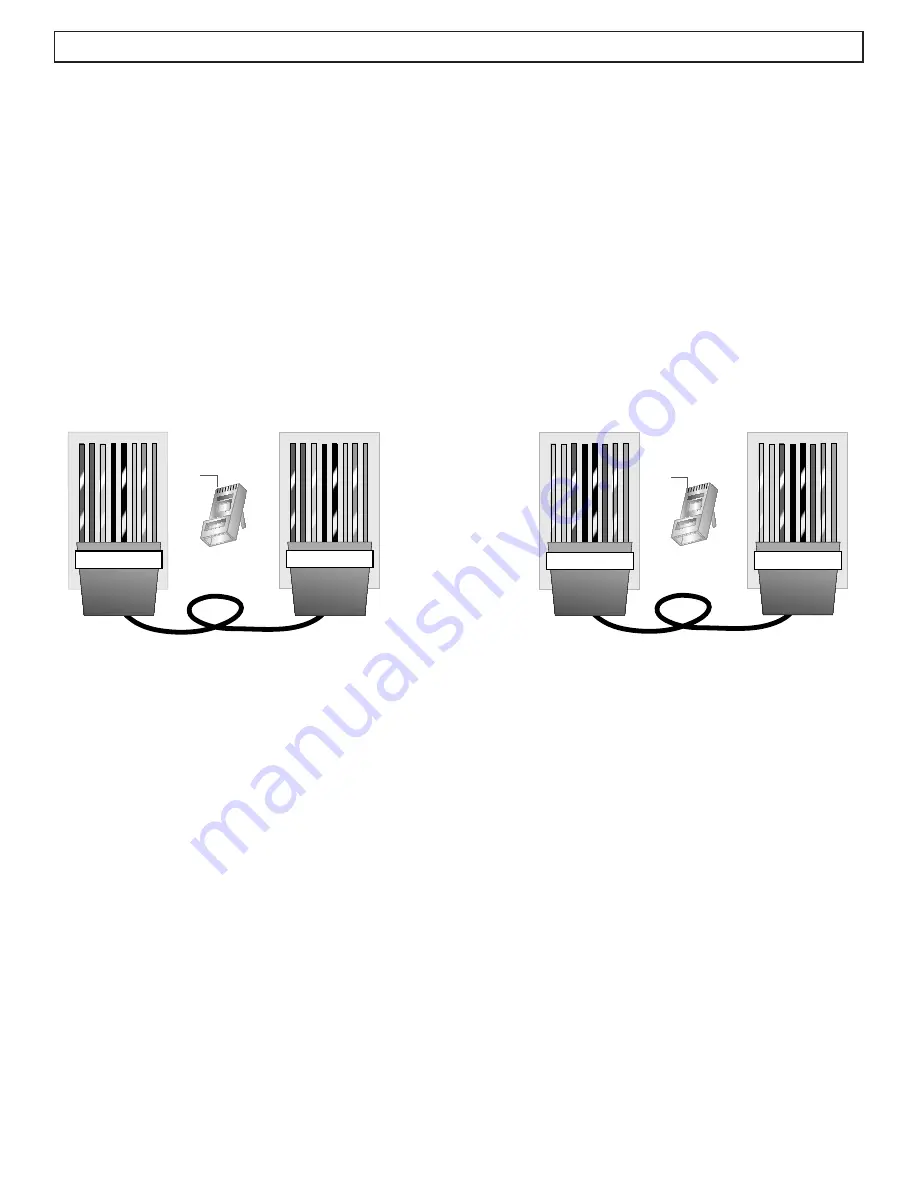
Please use a standard (T-568A or T-568B) “Straight-Through” RJ-45 connection with Cat5e cable (Cat5, or Cat6 are acceptable) 

to connect the LyncPad to the Lync or a LyncPad to another LyncPad.  A “Straight-Through” connection means that the Cat5e 

wires are attached in exactly the same order inside the RJ-45 plug at both ends of the cable.  

Never use a cable with a “Cross-

over” connection in which the two ends of the cable are wired differently.

When running your Cat5e cable, you have two options: 1) use cable of predetermined lengths that have the RJ-45 plugs attached 

by the manufacturer, or 2) use a crimping tool to attach the RJ-45 plugs yourself after you have run the Cat5e cable.  With option 

1) you don’t have to worry about the connections being solid and correct, but you’ll likely have to cut larger holes through the 

framework of your house to get the cables into position.  This option will cost a little more because you are likely to have excess 

cable since you can only buy in predetermined lengths.  Option 2) allows you to buy your Cat5e cable in bulk and run exactly the 

length you need for each connection.  But you’ll have to terminate each end with an RJ-45 plug yourself.

If you decide to add the RJ-45 connections yourself, make sure you wire the plugs using a “Straight-Through” standard.  The T-

568A standard is supposed to be used in new network installations. However, most off-the-shelf Ethernet cables (Cat5e cables 

with RJ-45 plugs) are still of the T-568B standard; either standard is suitable for use with the Lync whole-house system.

Instructions for most standard RJ-45 Crimpers:

Start on one end and strip the cable jacket off (about 1”) using a stripper or a knife. Be extra careful not to nick the wires, otherwise 

you will need to start over.

Spread, untwist the pairs, and arrange the wires in the order of the desired cable end. Flatten the end between your thumb and 

forefinger. Trim the ends of the wires so they are even with one another, leaving only 1/2” in wire length. If it is longer than 1/2” it 

will be out-of-spec and susceptible to crosstalk. Flatten and insure there are no spaces between wires. 

Hold the RJ-45 plug with the clip facing down or away from you. Push the wires firmly into the plug. Inspect that each wire is flat 

and even at the front of the plug. Check the order of the wires. Double check again. Check that the jacket is fitted right against the 

stop of the plug. Carefully hold the wire and firmly crimp the RJ-45 with a special RJ-45 crimping tool.

Check the color orientation, check that the crimped connection is not about to come apart, and check to see if the wires are flat 

against the front of the plug. If even one of these are incorrect, you will have to start over.

Tips for Running Cat5e and Connecting to RJ-45:

•   

If you are pulling cables through holes, it is easier to attach the RJ-45 plugs after the cable is pulled.

•  

Odd numbered pins are always striped, even numbered pins are always solid colored. 

•  

Looking at the RJ-45 with the clip facing away from you, Brown is always on the right, and pin 1 is on the left. 

•  

No more than 1/2” of the Ethernet cable should be untwisted otherwise it will be susceptible to crosstalk. 

•  

Do not deform, do not bend, do not stretch, do not staple, do not run parallel with power cables, and do not run Cat5e cables 

near noise inducing components.

Connecting RJ-45 Plugs to Cat5e Cable

RJ-45 Plug

Clip is pointed

away from you

T-568B

o


O


g   B   b


G   br  BR

1 2 3 4 5 6 7 8

T-568B

o


O


g   B   b


G   br  BR

1 2 3 4 5 6 7 8

RJ-45 Plug

Clip is pointed

away from you

T-568A

1 2 3 4 5 6 7 8

  g   G   o


B   b   O   br BR

T-568A

1 2 3 4 5 6 7 8

  g   G   o


B   b   O   br BR

O

o

G

g

B

b

BR

br

Orange

Orange striped

Green

Green striped

Blue

Blue striped

Brown

Brown striped

Wire Key

T-568A Straight-Through Cat5e Cable

T-568B Straight-Through Cat5e Cable

Pin 1

Pin 1

22

Содержание Lync

Страница 1: ...Lync Owner s Manual Home Theater Direct Toll free 866 HTD AUDIO 483 2834 www htd com info htd com Copyright Home Theater Direct Inc V 04 13 2016 ...

Страница 2: ... this device during lightning storms Power Cord Protection Route the power cord so that it is not likely to be walked on or pinched by items placed upon or against them paying particular attention to the plugs receptacles and the point where the cord exits from the appliance Cleaning Unplug the appliance from the wall outlet before cleaning Do not use liquid cleaners or aerosol cleaners Use a clot...

Страница 3: ...balance of this owner s manual for further explanation as well as additional connection options that help you customize the system to your par ticular situation 1 Make sure the multi channel amplifier and Lync controller are powered off 2 Connect all LyncPads to the Lync controller via Cat5 or Cat6 cable that is properly terminated with RJ 45 connectors 3 Connect all speakers to the multi channel ...

Страница 4: ...Source inputs USB Flash Drive MP3 Input IR Input connect to IR receiving eye sold separately Global IR Output Passes IR signals via a single or dual IR emitter regardless of Source selected by a zone Routed IR Outputs Pass IR signals via a single IR emitter only to the Source selected bya a zone RJ 45 input for Cat 5 cable to LyncPad Zone Output Fixed Variable Zone Output Mono Stereo Switch Trigge...

Страница 5: ...ONE 6 PREOUT MONO STEREO MONO STEREO MONO STEREO MONO STEREO MONO STEREO MONO STEREO R L R L R L R L R L R L R L R L R L R L R L R R L 2 1 4 3 6 5 8 7 10 9 12 11 IR IN RS232 INTERFACE GLOBAL IR OUT 12V DC TRIGGER 100mA IN OUT System TRIGGER AC DC 3 20V Mute Made in T aiwan CAUTION T o Prevent Electric Shock Do Not Remove Cover No User Serviceable Parts Inside Refer Servicing T o Qualified Service ...

Страница 6: ...e same zone For large zones it is possible to daisy chain up to four LyncPads into the same zone When doing this you MUST insert the terminator in the last LyncPad in order for the 3 5 mm inputs to work properly Please note that a maximum of 12 LyncPads can be connected to a single Lync 6 controller a maximum of 24 LyncPads to the Lync 12 When connecting more than one LyncPad into the SAME zone ea...

Страница 7: ...o output to a stereo input on the home theater receiver In this arrangement you use the amps in the home theater receiver to power the zone or subzone instead of using two channels on the multi channel amplifier It is also possible for sources connected to the home theater receiver to be shared with the whole house system For these two reasons it is often a good idea to establish your central loca...

Страница 8: ... 1 Vol 2 Vol 3 Vol 4 Vol 5 Vol 6 Vol 7 Vol 8 Vol 9 Vol 10 Vol 11 Vol 12 Power 1 2 3 4 5 6 7 8 9 10 11 12 13 14 15 16 17 18 1 2 3 4 5 6 7 8 9 10 11 12 Connection Overview For Lync6 System Connection Overview For Lync12 System Zone 3 How to Connect Think of the Lync as the brain of the system Based on information received from the LyncPads or PC interface it determines what source to play into each ...

Страница 9: ...t anywhere in the zone Amplifier Connections see pages 9 10 Both variable and fixed stereo line level outputs are provided on the Lync controller for every zone In most cases you will use the variable outputs to connect the Lync controller to a multi channel amplifier in order to control the volume level within a zone from the LyncPad Use the fixed outputs when you want the volume to be controlled...

Страница 10: ...ne 1 2 Line 1 2 Line 1 2 Line 1 2 Line Line In Line In Line In Line In Bridged Bridged Bridged Bridged Bridged Power Vol 1 Vol 2 Vol 3 Vol 4 Vol 5 Vol 6 Vol 7 Vol 8 Vol 9 Vol 10 Vol 11 Vol 12 Amplifier Settings Two side by side amplifier channels are used for each zone One side is set to amplify the Right channel of a stereo signal and the other side is set to amplify the Left side of a stereo sig...

Страница 11: ...NO STEREO MONO STEREO MONO STEREO R L R L R L R L R L R L R L R L R L R L R L R FIXED VARIABLE OUTPUT TO AMP IR IN 2 5mm to 3 5mm trigger cable 3 Shielded Stereo Patch Cables Speaker Connections Right Right Right Right Right Right Left Left Left Left Left Left Left Right Out 2 Out 1 In 2 In 1 1 2 3 Line In 4 5 6 7 8 9 10 11 12 Line In 1 2 Line Bridged L L R R L L R R L L R R L L R R L L R R L L R ...

Страница 12: ...er is best when using the Lync with an HTD multi channel amplifier A mono 3 5mm patch cable should be connected from the Trigger Out on the Lync to the Trigger In on the multi chan nel amplifier The trigger is only active when a LyncPad is powered on which means the multi channel amplifier is only active when a LyncPad is on When all LyncPads are off the multi channel amplifier will automatically ...

Страница 13: ...el A Control up to six centrally located devices In addition to Lync s built in MP3 player you can connect an additional 5 sources directly into the Lync controller These 5 sources can be controlled via IR pass through by aiming the source s remote control or a common universal remote at any LyncPad This is because an IR eye is built into every LyncPad IR information is routed only to the source s...

Страница 14: ...e to all zones Stereo audio is digitally transferred to the Lync controller at CD level quality Wifi Audio Source ROUTED IR OUT SOURCE INPUT 7 8 9 10 11 12 MP3 R L SOURCE 7 HTD Whole House Audio Controller HTD 12 Channel Amplifier CD DVD Player F r o m C D D V D P l a y e r F r o m A n y O t h e r S o u r c e F r o m S a t R c v r F r o m T u n e r F r o m W i f i A u d i o S o u r c e Back of HTD...

Страница 15: ... a more convenient source input location This is usually the best solution for connecting a source more permanently within a zone While a zone source can only be controlled from within its own zone it is available for listening in all zones Audio Device 3 5mm out OR Audio Device RCA out with RCA to 3 5mm cable Vol Vol VOL 42 Kitchen MP3 Player Ex 1 Ex 2 Ex 3 C Cat5 or Cat6 Cat5 or Cat6 Cat5 or Cat...

Страница 16: ...rds you can control a centrally located device simply by pointing the IR remote control for that device at any LyncPad Making use of Infrared IR Capability Power 1 2 3 4 5 6 1 2 3 4 5 6 7 8 9 10 11 12 Zone Status Source Signal Strength AC 120V 60Hz FUSE T2AL 250V Power Consumption 160W ROUTED IR OUT SOURCE INPUT KEYPAD PORTS 7 8 9 10 11 12 MP3 L ZONE 1 PREOUT ZONE 2 PREOUT ZONE 3 PREOUT ZONE 4 PRE...

Страница 17: ...V 60Hz FUSE T2AL 250V Power Consumption 160W ROUTED IR OUT SOURCE INPUT KEYPAD PORTS 7 8 9 10 11 12 MP3 L ZONE 1 PREOUT ZONE 2 PREOUT ZONE 3 PREOUT ZONE 4 PREOUT ZONE 5 PREOUT ZONE 6 PREOUT MONO STEREO MONO STEREO MONO STEREO MONO STEREO MONO STEREO MONO STEREO R L R L R L R L R L R L R L R L R L R L R L R R L 4 3 2 1 5 6 IR IN RS232 INTERFACE GLOBAL IR OUT 12V DC TRIGGER 100mA IN OUT System Mute ...

Страница 18: ...n All ON Party Mode It is possible to turn all of the zones to the same source from any LyncPad This is called Party Mode Select a source on the LyncPad Then press and hold either source button for approximately 3 seconds until the word Party is displayed in the upper left section of the screen All LyncPads not in DND mode will be powered On if not already on and switched to this source The volume...

Страница 19: ... However in some cases you will need to reduce this output level in order to prevent distortion especially if operating on battery power Docking stations for these devices usually provide a fixed output level with slightly better sound quality Accessing and Using the LyncPad Settings Menu The LyncPad has the ability for the user to adjust bass treble balance font color back ground color brightness...

Страница 20: ...ure Within the Panel set ting menu see image at right use the source buttons to navigate up and down to the appropriate feature use the volume buttons to adjust the settings for each feature and use the DND button to save and return to the previous menu NOTE it is impossible for the Font and Background Colors to be set to the same color Adjusting Operation and Standby Brightness Once the Settings ...

Страница 21: ...atically set to communicate with the zone that initiated the call Simply press and hold the Talk button to respond DND and the LyncPad power Status If a zone is in DND Do Not Disturb mode it will not be interupted by the intercom feature The zone initating the call will see DND displayed below the zone name and will be unable to contact that zone Similarly if the LyncPad within a zone is currently...

Страница 22: ...ource Signal Strength AC 120V 60Hz FUSE T2AL 250V Power Consumption 1 L ZONE 1 PREOUT ZONE 2 PREOUT ZONE 3 PREOUT ZONE 4 PREOUT ZONE 5 PREOUT ZONE 6 PREOUT MONO STEREO MONO STEREO MONO STEREO MONO STEREO MONO STEREO MONO STEREO R L R L R L R L R L R L R L R L R L R L R L R 4 2 6 IR IN RS232 INTERFACE GLOBAL IR OUT 12V DC TRIGGER DOOR INTERFACE 100mA IN OUT System TRIGGER AC DC 3 20V Mute Made in T...

Страница 23: ... and arrange the wires in the order of the desired cable end Flatten the end between your thumb and forefinger Trim the ends of the wires so they are even with one another leaving only 1 2 in wire length If it is longer than 1 2 it will be out of spec and susceptible to crosstalk Flatten and insure there are no spaces between wires Hold the RJ 45 plug with the clip facing down or away from you Pus...

Страница 24: ...ten only used for pre install or new work electrical boxes that are recessed behind the drywall If you have an old work box then you will likely not need the double sided tape as the LyncPad s frame will be slightly off the surface of the drywall due to the old work box having a lip that sits on the front of the drywall already iPod is a registered trademark of Apple Computer Inc Whole House Audio...

Страница 25: ... a Skype account you will want a separate dedicated account to use with Phone to Zone This new account will be set to auto answer and accept inbound calls only from a very limited Contacts list 2 Connect a dedicated third party device to your home s network and download the Skype app This device will typically be an old PC Android phone or Android tablet At the time of this printing the auto answe...

Страница 26: ... to have their own Skype account name running on his or her own device Before connecting the hardware check to make sure this dedicated Skype account has been set up correctly by placing a call to it from one of the Skype accounts included in your Contacts list Connecting the Hardware Make sure the two position switch on the back of the DI 21 is set to P2Z and follow this diagram to connect ...

Страница 27: ...one 3 04 Ring Zone 4 04 Talk Zone 4 05 Ring Zone 5 05 Talk Zone 5 06 Ring Zone 6 06 Talk Zone 6 07 Ring Zone 7 Lync 12 07 Talk Zone 7 Lync 12 08 Ring Zone 8 Lync 12 08 Talk Zone 8 Lync 12 09 Ring Zone 9 Lync 12 09 Talk Zone 9 Lync 12 10 Ring Zone 10 Lync 12 10 Talk Zone 10 Lync 12 11 Ring Zone 11 Lync 12 11 Talk Zone 11 Lync 12 12 Ring Zone 12 Lync 12 12 Talk Zone 12 Lync 12 00 Ring ALL Zones 99 E...

Страница 28: ... connected to the audio OUT on the DI 21 and that the headphone jack on your third party device is connected to the audio IN on the DI 21 I can successfully place a call to a particular zone but when I hang up and call back I am already connected with that same zone It is important to press 99 on your phone to end your call with a particular zone or have the person in that zone press one of the Zo...

Отзывы: