background image


Page 8 

When the cursor is at the Input Method Select option, the user may use 

and 

  to select between the 

following four input methods. 


Digital Input 


Lowercase Input 


Uppercase Input 


Chinese Character Location Input 

When a Chinese character is inputted, the cursor should be moved to the front of ‘:’ on the next line 
under the input method. 
Digital Input: In this input method, press the relevant numeric keys directly to input the wanted figure or 
use 

  to delete any wrongly inputted figures. 

Lowercase Input: In this input method, the numeric key 2 stands for abc, 3 for def, 4 for ghi, 5 for jkl, 6 for 
mno, 7 for pqrs, 8 for tuv, 9 for wxyz; when a numeric key is pressed, the corresponding letters will be 
listed from left to right in a sequence of 1, 2, 3 and 4. For example, to input letters akz, just press the 
numeric key 2 to display abc and 1 to input the letter a, then press the numeric key 5 to display jkl and 2 
to input the letter k, and finally press the numeric key 9 to display wxyz and 4 to input the letter z. If the 
user moves the cursor to the figure in front of “:” and presses other numeric keys, the current figure will 
be covered, the newly inputted figure will be displayed and other letters may be inputted at this time. The 
User may also move the cursor to a letter to be selected and then press 

  to input the letter. Press 


to delete the wrongly inputted content. 
Uppercase Input: The operation method is the same as that of the Lowercase Input. 
Chinese  Character  Location  Input:  In  this  input  method,  the  user  can  input  a  Chinese  character  by 
pressing four numerical keys only. The User can move the cursor to the input digit and press another 
numerical  key  to  replace  it.  Under  the  text  input  mode,  the  user  can  press  the 

  key  to  delete  the 

wrongly inputted words. (It is the same as that in the following module setup) Finally press # key to save 
the settings. 

Note: After an address is set, press the # key to save the settings, otherwise the changed data 
will be ignored. 

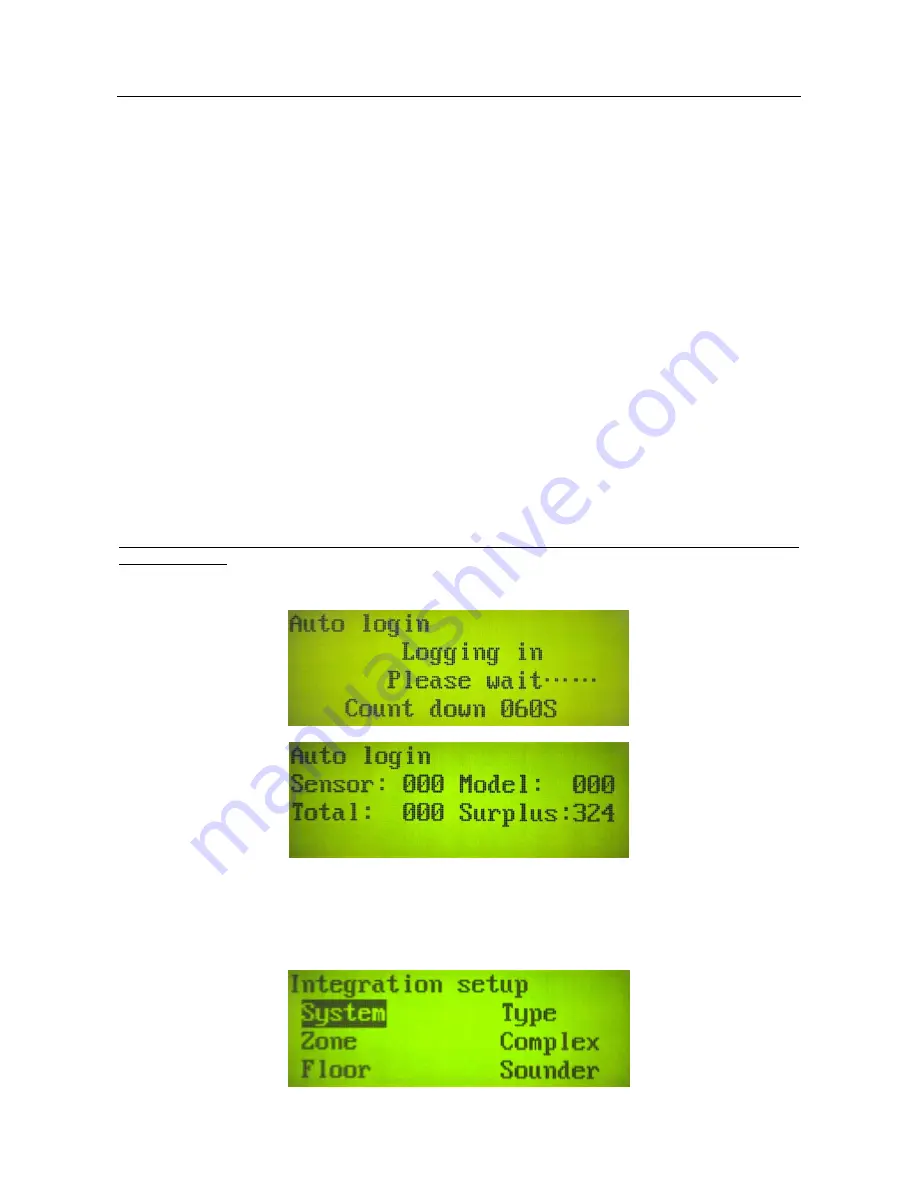
§2-3-2 Auto login 

Move the cursor to 

Auto login

 and then press the # key for login. 


After login, the interface will display the following content. 


After login, there are 99 sensors, 29 modules and 196 surplus addresses. Press the # key to save the 
data. If the # key is not pressed at this time, a Login Completed interface will pop up periodically to 
remind user to save the data. 

§2-3-3 Linkage setup 

Move  the  cursor  to 

Linkage  setup

  and  then  press  the  #  key.  After  that,  the  interface  will  display  the 

following content. 


Содержание Addressable fire alarm MN-300

Страница 1: ...Fire Alarm Control Panel Linkage Type ...

Страница 2: ...Alarm Control Panel Linkage Type Contents I General description 1 II Operation instructions 2 III External dimensions and installation dimensions 20 IV Wiring diagram 22 V Main technical parameters 23 VI Precautions 24 ...

Страница 3: ...intelligent detectors and the intelligent modules can be directly connected to them which greatly simplifies the system wiring engineering installation and circuit maintenance The system uses an AC DC master standby power supply system which will automatically change between the master and standby power supplies in the event of a power failure of either of the two power supplies to ensure uninterr...

Страница 4: ...L MUTE NORMAL Note When the BUS MANUAL CONTROL ENABLE indicator is lit the bus manual control panel is not under password protection and can be operated When the system is running and the KEYBOARD key is pressed Input password will display on the LCD After the correct password is inputted and the key is pressed the system will return to the main interface and the KEY ON OFF indicator will be lit w...

Страница 5: ... to input non numeric data or use the numeric keys from 0 to 9 on the keyboard to type in numbers when describing the position of a detector or module the user can select four types of input methods including Digital Input Lowercase Input Uppercase Input or Chinese Character Location Input 1 5 Unlocking the keyboard and entering the main menu To set the system and other equipment the first thing t...

Страница 6: ...ct Repeater panel setup in the menu and the interface will display the following content Select No Register Zone Floor Type or Indicate by pressing Type and Indicate are two constant options At present only CFT 982 Chinese display panels are equipped with the system for use by the user When the cursor is at the Display option the user can change the display mode by pressing or By Zone Display all ...

Страница 7: ... user may press the key to set the detectors and the modules The User may press or to move the cursor to select the option and then press the key to set the selected option or the key to back Note The system linkage setup and other setups will be set by zone floor or room so all the data must be carefully recorded 2 3 1 Loop setup Select Loop setup in the menu and the interface will display the fo...

Страница 8: ...h 98 floors ranging from 9 to 89 Press the numeric key 9 to input in front of floor numbers 1 to 9 Room The system may be set with 255 room numbers ranging from 001 to 255 through the numeric keys Type This refers to the types of equipment They may be identified through auto login The types of equipment that may be identified through auto login include Ion detector and photoelectric detector Heat ...

Страница 9: ...The types of production is shortening in display please see attached list 2 for their corresponding relationship Output mode This refers to the output mode of the control module during a linkage output It may be selected through and The following output models are available for selection by the user Constant output This means a module keeps outputting after it starts to operate until the control p...

Страница 10: ... newly inputted figure will be displayed and other letters may be inputted at this time The User may also move the cursor to a letter to be selected and then press to input the letter Press to delete the wrongly inputted content Uppercase Input The operation method is the same as that of the Lowercase Input Chinese Character Location Input In this input method the user can input a Chinese characte...

Страница 11: ...e integration is a kind of linkage in which a piece of monitoring equipment in a zone including Ion Photoelectric Heat Infrared Complex Interface Manual Alarm temperature sensing cable Pressure Hydrant flow detector and so on may trigger module actions Group No This refers to the linkage number There are 30 groups ranging from 01 to 30 Through this option the user can view set or modify the linkag...

Страница 12: ...ress the key to go back to the previous menu 4 The User may move the cursor to the Type option and press the key for setting The following content will be displayed Type alarm integration refers to a kind of linkage in which a detector or module in the entire system triggers the actions of another module when giving an alarm or making feedback Group No This refers to the linkage number There are 3...

Страница 13: ...Page 11 Air out fan Air out Valve Valve ...

Страница 14: ...ter 0 invalid Addr 1 This refers to the address of a alarm detector or alarm feedback module triggering the module actions Addr 2 This refers to the address of a alarm detector or alarm feedback module triggering the module actions Delay This refers to the time delay after the control panel receives an alarm signal and before it makes the module with the corresponding address act The user can sele...

Страница 15: ...t test This can be done to test a specific piece of equipment Move the cursor to the Single point test option and press the key to start a single point test The following content will be displayed 2 4 Cancel setup Move the cursor to the Cancel option and press the key After that the following content will be displayed The cursor points out the setting item to be cleared Press or to move the cursor...

Страница 16: ...ess the key to save or the key to go back to the previous menu 2 6 History Record Move the cursor to the Record option and press the key After that the following content will be displayed When the cursor is now at the Fire alarm option the user may query the history of fire alarms by pressing the key The user may move the cursor through or and press the key to query or delete the option where the ...

Страница 17: ...endant password 000000 2 7 1 Supervisor password setup Move the cursor to the Highest level option and press the key After that the following content will be displayed Input the old password and then input the new password twice and finally press the key to save the new setting 2 7 2 Administrator password setup Move the cursor to the manager level option and press the key After that the following...

Страница 18: ...face The word Fault is on the top left corner of the interface 001 003 means that there are 3 faults in all and the cursor is now at the first fault 01 50 is the fault occurrence time 326 is the address No K stands for open circuit fault and Battery Open means that the battery disconnection The user can use the and keys to move the cursor to read every record The first record will always display o...

Страница 19: ...8 6 2 2 6 6 5 9 允 许 禁 止 联 动 启 动 联 动 反 馈 备 电 故 障 备 电 欠 压 主 电 故 障 主 电 欠 压 总 故 障 系 统 故 障 电 源 总 火 警 允 许 禁 止 允 许 禁 止 消 音 正 常 启 动 停 止 消 音 面 板 键 盘 本 机 消 音 受 控 设 备 反 馈 启 动 控 制 反 馈 启 动 控 制 受 控 设 备 6 9 1 45 0 23 8 7 自 检 复 位 声 光 故 障 自 检 指 示 总 线 手 控 远 音 控 制 一 般 联 动 远 音 联 动 正 常 J B Q B L M N 3 0 0 火 灾 报 警 控 制 器 联 动 型 允 许 禁 止 自 动 手 动 Diagram of case panel JB QBL MN 300 FIRE ALARM CONTROL PANEL ...

Страница 20: ...rol unit can work GENERAL LINKAGE Only after this indicator is lit and the main machine receives a fire alarm the set linkage can work SOUNDER LINKAGE Only when this indicator is on corresponding bell and the horn strobe will act if there is a fire alarm SOUNDER CONTROL If it is lit it shows that the bell and the horn strobe corresponding to the current fire alarm have been muted stopped PANEL MUT...

Страница 21: ...ed it will stop outputting 2 The 24VK terminal is a resetting the power and power up the equipment needing another power supply to recover from a power failure When the system is recovering the 24VK terminal will output 0V in a short time and the said equipment will be powered up again 3 Terminals ON COM and OFF are the three contacts of the relays When the system is in normal operation terminals ...

Страница 22: ...h two fully sealed maintenance free DC12V 5 0Ah storage batteries connected in series The 24V DC power has a long term constant output current of 6A The 5V DC power has a long term constant output current of 4A Circuit bus two wire system total length 1500m Voltage UL of the circuit bus 20V UL 26V when the DC power is operating 24V UL 26V when the AC power is operating System working conditions 1 ...

Страница 23: ... to the addresses composed of address numbers 8 The zone floor room numbers are repeatable The zone floor room numbers are basic data for the system and all the system configurations are based on the zone floor room numbers Hence the zone floor room numbers must be carefully planned to avoid by all means midway changes 9 Register 1 stands for connection and 0 for disconnection 10 It can be connect...

Страница 24: ...ll make the control panel shut down Precautions 1 If an external power supply is used there will be no power switch and the control panel will be started after it is powered up and when the batteries have insufficient electric quantity the system will remind the user of it by making the buzzer sound once every 30s 2 If no operations are done within one minute when batteries are used the LED screen...

Страница 25: ...F1 Fireproof door FM Sprinkler valve LF Generator FD Sprinkler electromotor LB Fire water electromotor XB City power exchange QS Elevator DT Roll door JL Air condition KT Broadcast GB Sounder YY Back FH Horn strobe SG Equipment type Shortening Ion smoke detector LZ Photoelectric smoke detector GD Heat detector WG Infrared smoke detector HW Combined detector FH Manual call point SB Hydrant call poi...

Страница 26: ......

Отзывы: