

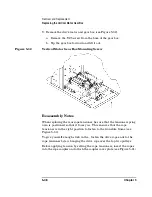

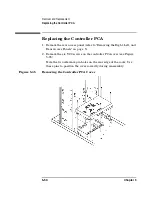

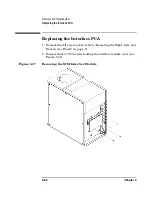

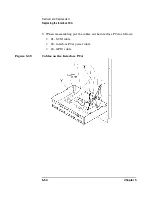


Removal and Replacement
Upgrading Firmware to the Current Revision Level
Chapter 5
5-60
customer’s default configurations should be recorded so that the jukebox
can be correctly restored. Go to the CONF * menu on the control panel to
access and display the current jukebox configurations.
1. Turn the jukebox off.
2. Ensure that your PC tool is off.
3. Remove any cable connections to the single-ended ports on the
interface module.
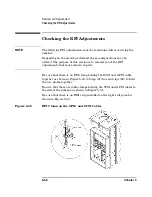
NOTE
A service SCSI cable is stowed to the left of the drives. This cable is
provided in case you need it in the next step.
4. Connect a SCSI cable between your PC tool and one of the
single-ended ports on the interface module. (Connectors on the
module are high-density.)
Place the interface select switch to the “single-ended” position, if
necessary.
5. Turn the jukebox on.
Wait until the jukebox shows
READY
in the display.
6. Turn your PC tool on.
7. Follow your download utilities instructions to download the firmware
needed (jukebox and/or drives).
8. Verify the operation of the drives by running a “random write” for
approximately two minutes using your PC tool.
9. Veify the operation of the jukebox by running the “Wellness Test”
from the control panel.
10. Turn off the PC tool and the jukebox.
11. Remove PC tool SCSI cable from the jukebox interface module.
12. Reconnect the customer’s cable to the single-ended port (if that was
the configuration).
Reset the interface select switch to differential, if necessary.
13. If you downloaded jukebox controller firmware, go to the CONF *
Содержание Surestore 160ex - Optical Jukebox
Страница 10: ...TOC x Contents ...
Страница 14: ...Tables TOC xiv ...
Страница 15: ...Chapter 1 1 1 Product Information 1 Product Information ...
Страница 26: ...Product Information Environmental Specifications Chapter 1 1 12 ...
Страница 27: ...Chapter 2 2 1 Installation 2 Installation ...
Страница 30: ...Installation Identifying Controls and Features Chapter 2 2 4 Figure 2 2 Left Side ...
Страница 47: ...Chapter 3 3 1 Operation and Configuration 3 Operation and Configuration ...
Страница 50: ...Operation and Configuration Operating the Control Panel Chapter 3 3 4 Figure 3 1 The Jukebox Control Panel ...
Страница 52: ...Operation and Configuration Operating the Control Panel Chapter 3 3 6 Figure 3 2 Jukebox Display Menu Tree ...
Страница 60: ...Operation and Configuration Changing the Administration Menu Password Chapter 3 3 14 flash ROM ...
Страница 75: ...Chapter 4 4 1 Troubleshooting and Diagnostics 4 Troubleshooting and Diagnostics ...
Страница 122: ...Troubleshooting and Diagnostics Running an Internal Test Chapter 4 4 48 ...
Страница 123: ...Chapter 5 5 1 Removal and Replacement 5 Removal and Replacement ...
Страница 129: ...Removal and Replacement Service Access Chapter 5 5 7 Removal and Replacement Front Panel ...
Страница 136: ...Removal and Replacement Replacing the Control Panel Assembly Chapter 5 5 14 oriented incorrectly ...
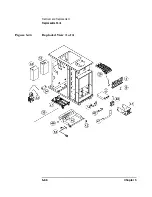
Страница 188: ...Removal and Replacement Replaceable Parts Chapter 5 5 66 Figure 5 43 Exploded View 1 of 3 ...
Страница 189: ...Removal and Replacement Replaceable Parts Chapter 5 5 67 Removal and Replacement Figure 5 44 Exploded View 2 of 3 ...
Страница 190: ...Removal and Replacement Replaceable Parts Chapter 5 5 68 Figure 5 45 Exploded View 3 of 3 ...
Страница 191: ...Removal and Replacement Replaceable Parts Chapter 5 5 69 Removal and Replacement Figure 5 46 Power Cabling ...
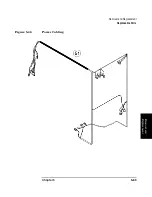
Страница 192: ...Removal and Replacement Replaceable Parts Chapter 5 5 70 Figure 5 47 Rope and Pulley System ...
Страница 193: ...Chapter 6 6 1 Theory of Operation 6 Theory of Operation ...
Страница 218: ...Theory of Operation Optical Drive Mechanism Chapter 6 6 26 ...
Страница 219: ...Appendix A A 1 Safety and Regulatory A Safety and Regulatory Information ...