background image

IMPORTANT:

Replace the SAS switches one at a time. When you remove a switch, I/O continues

on the remaining switch. Before resetting a switch, verify that all storage is accessible by the
remaining data path. Replacing both SAS switches at one time disconnects the storage and could
compromise data integrity.

If a SAS switch fails, storage access continues through the remaining SAS switch. This causes
storage access to set a preference to all LUNs in the remaining data path. This preference remains
in place until the controllers in the blade enclosure are power cycled, or the remaining path becomes
unavailable.

CAUTION:

Power down the disk enclosure before disconnecting a SAS cable. Failing to do so

may damage the I/O module.

To replace the SAS switch:

1.

Remove the power cable.

2.

Disconnect the SAS cables, noting which cable goes to which port.

3.

Remove the switch.

4.

Install the replacement switch.

5.

Attach the power cable.

6.

Update the switch firmware.

a.

Open the HP Virtual SAS Manager.

b.

Select

Force VSM Active

.

This selection copies the zone and firmware information from the active switch to the passive,
replacement switch. The replacement switch then becomes the active switch.

7.

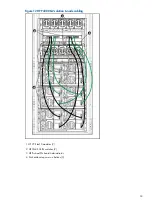
Reconnect the SAS cables to their original locations, see

“HP P4800 G2 solution cabling”

(page 31)

.

NOTE:

Do not attach the SAS cables to the replacement switch until the firmware update is

complete.

Wait at least 60 seconds before removing another SAS switch.

The SAS switch should now provide a redundant access path to storage. Storage controllers will
distribute I/O evenly over the switches upon restart.

Replacing a SAS cable

CAUTION:

Failing to follow these steps in this order may damage the I/O module.

1.

Before disconnecting a SAS cable, power down the server blades using the procedures to
shut down the management group in the CMC Online Help or HP P4000 SAN Solution User
Guide
.

2.

Manually power off the disk enclosure.

3.

Replace the SAS cable.

See

“HP P4800 G2 solution cabling” (page 31)

for an illustration of HP P4800 G2 solution

connectivity.

Replacing a SAS cable

25

Содержание P4800 G2

Страница 1: ...HP P4800 G2 SAN Solution for BladeSystem Quick Start Guide For day to day operations see the HP P4000 SAN Solution User Guide For late breaking information HP recommends that you read the release notes for the installed software version Obtain the latest version of this and other HP P4000 user documents by navigating to the Manuals page of the HP Business Support Center website www hp com support ...

Страница 2: ...Corporation Warranty To obtain a copy of the warranty for this product see the warranty information website http www hp com go storagewarranty Revision History July 2010 Revision 1 First edition November 2010 Revision 2 Second edition Updated with changes for the SAN iQ software 9 0 release March 201 1 Revision 3 Third edition Applied branding changes to product and server blade names The product ...

Страница 3: ... Identifying hot pluggable and non hot pluggable components 20 Replacing the server blade and server blade components 20 Replacing the controller and controller components 22 Replacing the VC Flex 10 module 24 Replacing the SAS switch 24 Replacing a SAS cable 25 Replacing the disk enclosure I O module 26 Replacing the disk enclosure power supply 26 Replacing the disk enclosure fan 26 Replacing the...

Страница 4: ...Battery replacement notices 46 Glossary 50 Index 51 4 Contents ...

Страница 5: ...P P4800 G2 solution Hardware components The HP P4800 G2 solution comprises the following components HP BladeSystem c7000 Enclosure 1 Server blades 2 to 8 HP 3G SAS BL Switches 2 pass through modules between the blade enclosure and the disk enclosures HP disk enclosures 1 per pair of server blades HP Smart Array P700m controller cards one on each server blade HP VC Flex 10 modules 2 these modules c...

Страница 6: ...Figure 1 Front view HP P4800 G2 solution 2 node 1 Blade enclosure 1 2 Server blades 2 3 HP BladeSystem Insight Display 1 4 Disk enclosure 1 6 Overview ...

Страница 7: ...Figure 2 Front view HP P4800 G2 solution 4 node 1 Blade enclosure 1 2 Sever blades 4 3 HP BladeSystem Insight Display 1 4 Disk enclosures 2 Hardware configuration 7 ...

Страница 8: ...Figure 3 Front view HP P4800 G2 solution 6 node 1 Blade enclosure 1 2 Server blades 6 3 HP BladeSystem Insight Display 1 4 Disk enclosures 3 8 Overview ...

Страница 9: ...quick installation and setup see the HP P4800 G2 SAN Solution for BladeSystem Quick Start Guide For links to the latest manuals for HP BladeSystem and other components see the HP P4800 G2 SAN Solution for BladeSystem Documentation CD For detailed instructions about using the HP P4800 G2 SAN Solution for BladeSystem see the following resources Documentation available 9 ...

Страница 10: ...mation about configuring and using asynchronous replication of storage volumes and snapshots across geographic distances HP P4000 Multi Site HA DR Solution Pack User Guide Find detailed instructions for designing and implementing the Multi Site SAN features to synchronously and automatically mirror data between geographic sites HP P4000 Software Release Notes Review the Release Notes for the lates...

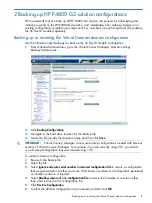
Страница 11: ...le usually the domain name and then click Save IMPORTANT Virtual Connect Manager cannot use backup configurations created with previous versions of Virtual Connect Manager For example if you are currently using 2 01 you cannot use a backup configuration that was created using 1 20 To restore a domain configuration 1 Browse to the backup file 2 Select the file 3 Select Ignore enclosure serial numbe...

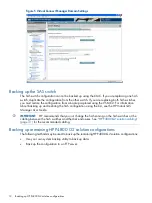
Страница 12: ... the SAS configuration using the CLI see the HP Virtual SAS Manager User Guide IMPORTANT HP recommends that you not change the SAS zoning on the SAS switches or the cabling between the SAS switches and the disk enclosures See HP P4800 G2 solution cabling page 31 for the recommended cabling Backing up remaining HP P4800 G2 solution configurations The following methods may be used to back up the rem...

Страница 13: ...list the storage drives or OS boot drives Cause The BIOS was reset to factory defaults Resolution Reset the BIOS by selecting Onboard P410i as the boot controller 1 Restart the server blade upon power on press F9 to enter BIOS setup menu 2 Select Boot Controller Order 3 Select Ctrl 2 PCI Embedded HP Smart Array P410i controller 4 Select Controller Order 1 5 To exit the submenu press Esc 6 To exit ...

Страница 14: ...system recovery procedures for the HP P4800 G2 solution includes the following tasks Obtaining the feature registration license key for the HP P4800 G2 solution Running server diagnostics Re imaging the HP P4460sb G2 server blade or the HP P4000sb server blade with the SAN iQ software and re installing the license key Before you start Have the following items ready BIOS version I27 09 30 2010 inst...

Страница 15: ...mple featurekey_0030482A189B 4 Save this file to the USB flash drive 5 If you have more than one server blade to image repeat steps in both sections Obtain the MAC address page 15 and Obtaining a license key page 15 6 Re image the SAN iQ software Re imaging the server blade with the SAN iQ software If you do not have the license key start with the instructions Obtaining a license key page 15 for o...

Страница 16: ...0 MB BIOS boot device order 1 Array Controller in Slot 2 HP Smart Array P700m controller Model HP P700m Firmware 7 22 or later Installed Memory 512 MB Battery1 OK BIOS boot device order 2 Run server diagnostics 1 On the HP Insight Diagnostics Test tab select Quick Test and specify the number of loops 2 Click Begin Testing The Survey Tab displays the data from the tests Wait for the tests to finish...

Страница 17: ...nnect the Virtual Media using iLO 2 Remove the USB flash drive from the Dongle 3 Reboot the server blades 4 Enter start to log into the server blade 5 Navigate to Network TCP IP Settings 6 Assign an IP address to the server blade The server blade is now ready for use Next steps Install the CMC from the HP P4000 Management Software DVD Open the CMC and use the wizards on the Getting Started Launch ...

Страница 18: ... to the existing SAN as follows Manually power on the server blades for the existing SAN and wait for the management group to come up in the CMC Discover the new server blades in the CMC using the Find feature Add the newly discovered systems to the existing management group and cluster or create a new cluster if desired If adding the new storage to the existing cluster the volume and snapshot dat...

Страница 19: ...itch firmware Upgrading the VC Flex 10 firmware Upgrading the server blade firmware If a volume is not replicated upgrades to the server blade firmware and OA firmware BIOS will take the volume offline Upgrading firmware 19 ...

Страница 20: ...Maintenance and Service Guide HP c Class blade enclosure HP Smart Array Controllers for HP ProLiant Servers User Guide HP Smart Array P410i controller BIOS boot controller Identifying hot pluggable and non hot pluggable components IMPORTANT Hot add and hot removal of the disk enclosures are not supported by HP P4800 G2 SAS BladeSystem SAN Solution The following HP P4800 G2 solution components are ...

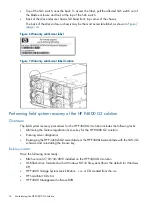
Страница 21: ... failure for an extended period of time without loss of data or lost access to the data The cluster however will remain in a degraded state until the replacement blade is functioning To prepare the server blade for replacement 1 Confirm the RAID and customer data Ensure that RAID is configured on the old blade and that the customer data exists on the disk enclosures 2 Confirm the IP address Ensure...

Страница 22: ...emoved drive with a drive of the same size or larger To replace a disk drive in the server blade 1 Check the state of the internal logical disk drive For more information see Table 1 page 13 for the applicable server blade user guide 2 If the state is failed follow the procedure in Replacing both server blade disk drives page 22 3 Remove the failed drive If you remove the wrong drive the mirror se...

Страница 23: ...lushes all data from the cache To power down the server blade from the CMC see the Powering off the storage system instructions in the HP P4000 SAN Solution User Guide CAUTION Since the HP P4800 G2 solution uses external data storage make sure that the server blade is the first unit to be powered down and the last to be powered up This precaution ensures that the system does not mark the drives as...

Страница 24: ...the VC Flex 10 module CAUTION Be sure to update the firmware on the new VC Flex 10 module This operation will take the volumes offline IMPORTANT Clients will lose connectivity during this procedure unless using a bonded network If not using a bonded network clients should be disconnected before starting the procedure In addition both externally facing uplinks must be connected to your external net...

Страница 25: ...Update the switch firmware a Open the HP Virtual SAS Manager b Select Force VSM Active This selection copies the zone and firmware information from the active switch to the passive replacement switch The replacement switch then becomes the active switch 7 Reconnect the SAS cables to their original locations see HP P4800 G2 solution cabling page 31 NOTE Do not attach the SAS cables to the replaceme...

Страница 26: ...l of the I O module CAUTION For best cooling practices do not operate the enclosure for extended periods with more than one component or blank removed When removing an active component replace it with a blank To replace the I O module reverse the removal procedure Replacing the disk enclosure power supply There are four power supplies in each disk enclosure chassis two on the left and two on the r...

Страница 27: ... a drive out of the disk enclosure HP recommends that you use the CMC to turn on the drive LED so that you can physically identify the correct drive to replace For detailed instructions on how to physically remove and replace a hard drive see the Removal and replacement procedures chapter in the HP 600 Modular Disk System Maintenance and Service Guide For general instructions on replacing disk dri...

Страница 28: ...s and automatic secure submission of hardware event notifications to HP which will initiate a fast and accurate resolution based on your product s service level Notifications may be sent to your authorized HP Channel Partner for on site service if configured and available in your country The software is available in two variants HP Insight Remote Support Standard This software supports server and ...

Страница 29: ... Blade User Guide HP 3Gb SAS BL Switch replacement instructions HP 3Gb SAS BL Switch installation instructions HP 3Gb SAS BL Switch user guide HP Smart Array Controllers for HP ProLiant Servers User Guide HP Virtual SAS Manager User Guide HP Direct Connect External SAS storage for HP BladeSystem Solutions Deployment Guide HP ProLiant Servers Troubleshooting Guide HP 600 Modular Disk System User Gu...

Страница 30: ...ble parts To identify the replaceable parts see the individual component guides listed in Component removal and replacement instructions page 20 Parts that are available for customer self repair CSR are indicated as follows Mandatory CSR You order the part directly from HP and repair the product yourself On site or return to depot repair is not provided under warranty Optional CSR You can order th...

Страница 31: ... solution SAS cabling is shown in Figure 10 page 31 through Figure 13 page 34 Figure 10 HP P4800 G2 solution 2 node cabling 1 HP VC Flex 10 modules 2 2 HP 3Gb SAS BL switches 2 3 HP ProLiant Onboard Administrator 4 Disk enclosure power on button 31 ...

Страница 32: ...igure 1 1 HP P4800 G2 solution 4 node cabling 1 HP VC Flex 10 modules 2 2 HP 3Gb SAS BL switches 2 3 HP ProLiant Onboard Administrator 4 Disk enclosure power on buttons 2 32 HP P4800 G2 solution cabling ...

Страница 33: ...Figure 12 HP P4800 G2 solution 6 node cabling 1 HP VC Flex 10 modules 2 2 HP 3Gb SAS BL switches 2 3 HP ProLiant Onboard Administrator 4 Disk enclosure power on buttons 3 33 ...

Страница 34: ...Figure 13 HP P4800 G2 solution 8 node cabling 1 HP VC Flex 10 modules 2 2 HP 3Gb SAS BL switches 2 3 HP ProLiant Onboard Administrator 4 Disk enclosure power on buttons 4 34 HP P4800 G2 solution cabling ...

Страница 35: ... requires devices in both classes to bear a label indicating the interference potential of the device as well as additional operating instructions for the user FCC rating label The FCC rating label on the device shows the classification A or B of the equipment Class B devices have an FCC logo or ID on the label Class A devices do not have an FCC logo or ID on the label After you determine the clas...

Страница 36: ... this device that are not expressly approved by Hewlett Packard Company may void the user s authority to operate the equipment Cables When provided connections to this device must be made with shielded cables with metallic RFI EMI connector hoods in order to maintain compliance with FCC Rules and Regulations Canadian notice Avis Canadien Class A equipment This Class A digital apparatus meets all r...

Страница 37: ...nized Telecom products e g Bluetooth Certificates can be obtained from http www hp com go certificates Hewlett Packard GmbH HQ TRE Herrenberger Strasse 140 71034 Boeblingen Germany Japanese notices Japanese VCCI A notice Japanese VCCI B notice Japanese VCCI marking Japanese power cord statement Korean notices Class A equipment Japanese notices 37 ...

Страница 38: ...Class B equipment Taiwanese notices BSMI Class A notice Taiwan battery recycle statement Turkish recycling notice Türkiye Cumhuriyeti EEE Yönetmeliğine Uygundur 38 Regulatory compliance notices ...

Страница 39: ...re to hazardous radiation Do not try to open the module enclosure There are no user serviceable components inside Do not operate controls make adjustments or perform procedures to the laser device other than those specified herein Allow only HP Authorized Service technicians to repair the unit The Center for Devices and Radiological Health CDRH of the U S Food and Drug Administration implemented r...

Страница 40: ...German laser notice Italian laser notice Japanese laser notice 40 Regulatory compliance notices ...

Страница 41: ... means do not dispose of your product with your other household waste Instead you should protect human health and the environment by handing over your waste equipment to a designated collection point for the recycling of waste electrical and electronic equipment For more information please contact your household waste disposal service Recycling notices 41 ...

Страница 42: ...cí elektrického a elektronického vybavení Pro více informací kontaktujte společnost zabývající se sběrem a svozem domovního odpadu Danish recycling notice Bortskaffelse af brugt udstyr hos brugere i private hjem i EU Dette symbol betyder at produktet ikke må bortskaffes sammen med andet husholdningsaffald Du skal i stedet den menneskelige sundhed og miljøet ved at afl evere dit brugte udstyr på et...

Страница 43: ... au rebut d équipement par les utilisateurs privés dans l Union Européenne Ce symbole indique que vous ne devez pas jeter votre produit avec les ordures ménagères Il est de votre responsabilité de protéger la santé et l environnement et de vous débarrasser de votre équipement en le remettant à une déchetterie effectuant le recyclage des équipements électriques et électroniques Pour de plus amples ...

Страница 44: ...beszolgáltatásával megóvja az emberi egészséget és a környezetet További információt a helyi köztisztasági vállalattól kaphat Italian recycling notice Smaltimento di apparecchiature usate da parte di utenti privati nell Unione Europea Questo simbolo avvisa di non smaltire il prodotto con i normali rifi uti domestici Rispettare la salute umana e l ambiente conferendo l apparecchiatura dismessa a un...

Страница 45: ...tu elektrycznego i elektronicznego Więcej informacji można uzyskać od lokalnej firmy zajmującej wywozem nieczystości Portuguese recycling notice Descarte de equipamentos usados por utilizadores domésticos na União Europeia Este símbolo indica que não deve descartar o seu produto juntamente com os outros lixos domiciliares Ao invés disso deve proteger a saúde humana e o meio ambiente levando o seu ...

Страница 46: ...minarse con los residuos domésticos En lugar de ello debe evitar causar daños a la salud de las personas y al medio ambiente llevando los equipos que no utilice a un punto de recogida designado para el reciclaje de equipos eléctricos y electrónicos que ya no se utilizan Para obtener más información póngase en contacto con el servicio de recogida de residuos domésticos Swedish recycling notice Hant...

Страница 47: ...French battery notice German battery notice Battery replacement notices 47 ...

Страница 48: ...Italian battery notice Japanese battery notice 48 Regulatory compliance notices ...

Страница 49: ...Spanish battery notice Battery replacement notices 49 ...

Страница 50: ...e FCC Federal Communications Commission FOM Failover Manager iLO 2 HP Integrated Lights Out 2 iSCSI Internet SCSI KVM Keyboard video mouse switch LUN Logical unit number NIC Network interface card OA Onboard Administrator POST Power on self test RBSU ROM based setup utility RF Radio frequency SAN Storage Area Network SAS Serial Attached SCSI SFF Small Form Factor SSH Secure Shell UPS Uninterruptib...

Страница 51: ...sure hard drive replacing 27 disk enclosure I O module replacing 26 disk enclosure power supply replacing 26 Disposal of waste equipment European Union 41 document related information 29 documentation HP website 29 documentation available 9 E European Union notice 36 F Federal Communications Commission notice 35 firmware upgrades 18 firmware upgrade 20 Flex 10 module replacing 24 Flex 10 module re...

Страница 52: ...25 replacing the SAS switch 24 replacing the VC Flex 10 module 24 S SAS cable 25 SAS switch 12 24 server blade replacement 21 server blade disk drive replacement 22 replacing both 22 solution configuration 5 storage system repair 17 Subscriber s Choice HP 28 support software remote 28 T Taiwanese notices 38 technical support HP 28 service locator website 29 troubleshooting BIOS reset 13 components...

Отзывы: